

SSH is a secure client-server network protocol which helps a client computer to connect and communicate to a remote server. SSH connection ensures that the commands that are typed in the terminal are sent to the remote server through an encrypted channel.
There are two types of authentication mechanisms used to connect to the remote server, password-based authentication (prone to Brute-force attacks) and SSH Keys based authentication (which is very secure).
In the SSH key-based authentication, a key pair is generated on the client computer, called as the public key and private key. A copy of this public key is made available on the remote server. When a client sends a connection request to the server then the server generates a random string and encrypts it using the public key. This string can only be decrypted using the private key available on the client computer. This method ensures that the server can only be accessed by clients containing the private key.
In this guide, we will see how to set up SSH Keys on Ubuntu 20.04 LTS server.
See if you have any existing SSH Key on your computer
To check whether an SSH Keypair already exists on your computer type this command in your terminal.
ls -l ~/.ssh/id_*.pubIf the above command returns no such file or directory or no matches found, then it means SSH Key pair does not exist.
If you have an existing SSH key pair, then you can either use the same key pair to access two remote servers, or you can also create a different key pair having a different name. Let’s move on to the next step and see how to generate SSH keys for both the cases.
Creating SSH Keys on a Client Computer
To generate a new SSH key pair on your computer type the command as shown below.
ssh-keygenBy default, the SSH keys are of 2048 bit. For better security, if you want to generate SSH keys with higher bits, then use the following command.
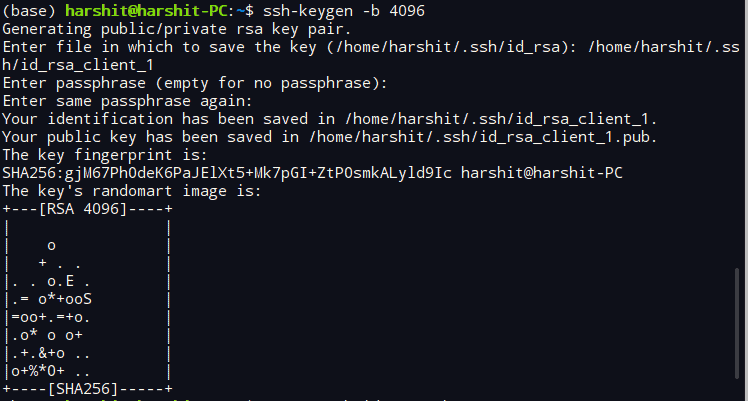
ssh-keygen -b 4096If the command runs successfully, then the following message will prompt on your screen.
generating public/private rsa key pair.
Enter file in which to save the key (/home/harshit/.ssh/id_rsa):
Now if you do not have any existing SSH key pair on your computer then simply press Enter, but if you have an existing SSH key then save the key with a different file name as shown below.
Enter file in which to save the key (/home/your_name/.ssh/id_rsa): /home/your_name/.ssh/id_rsa_xxx
Replace the xxx at the end of the file name with an appropriate name, as shown below and press Enter.
Enter file in which to save the key (/home/your_name/.ssh/id_rsa): /home/your_name/.ssh/id_rsa_client_1
The next prompt will ask you to enter a passphrase of an arbitrary length, it will ensure two-level security on your device.
Enter passphrase (empty for no passphrase):
Enter same passphrase again:
Entering this passphrase will ensure that even if a person gets access to your private key, then he won’t be able to access your remote server without this passphrase.
Once the whole process is complete, the following message appears on your screen.
The SSH Keys have been generated on your system. Now it’s time to copy the public key on the remote server.
Copying the Public key to Remote Ubuntu Server
The easiest and quickest method to copy the Public key to the remote server is by using the ssh-copy-id utility. But if this utility is not available on your machine due to some reason then you can also use other methods provided in this section.
Using ssh-copy-id utility
The ssh-copy-id utility is by default available on your Ubuntu machine which copies the public key from your device to the appropriate directory of your remote Ubuntu machine.
To copy the public ssh key simply type the command in your terminal, as shown below.
ssh-copy-id username@hostnameReplace the username and hostname in the above command with the username and host-name of your server.
The following message will appear on your terminal if you are connecting to your host for the first time, type yes and press Enter.
The authenticity of host' 172.105.XX.XX (172.105.XX.XX)' can't be established.
ECDSA key fingerprint is xx:xx:xx:xx:77:fe:73:xx:xx:55:00:ad:d6:xx:xx:xx.
Are you sure you want to continue connecting (yes/no)? yes
Now the ssh-copy-id utility will scan for the file with the name id_rsa.pub which contains the public SSH key. Once the scanning process is complete, it will prompt you to enter the password of your remote server, as shown below. Type the password and hit Enter.
/usr/bin/ssh-copy-id: INFO: attempting to log in with the new key(s), to filter out any that are already installed
/usr/bin/ssh-copy-id: INFO: 1 key(s) remain to be installed -- if you are prompted now it is to install the new keys
root@172.105.XX.XX's password:
Once the key is added, the following message will appear on your terminal as output.
Number of key(s) added: 1
Now try logging into the machine, with: "ssh 'root@172.105.XX.XX'" and check to make sure that only the key(s) you wanted were added.
In case you have multiple SSH keys on your client computer then to copy the appropriate public key to your remote computer type the command in the pattern shown below.
ssh-copy-id -i id_rsa_xxx.pub username@host💡 Tip
Don’t forget to put .pub at the end of the file name while typing in the terminal.
Copying the Public Key by the piping method
Type the following command in the terminal if ssh-copy-id utility is not available. This command may seem a little bit longer but it works appropriately.
cat ~/.ssh/id_rsa.pub | ssh remote_username@server_ip_address "mkdir -p ~/.ssh && touch ~/.ssh/authorized_keys && chmod -R go= ~/.ssh && cat >> ~/.ssh/authorized_keys"Replace remote_username and server_ip_address with your username and IP address.
If you have multiple SSH keys available on your computer then replace the id_rsa.pub with the public SSH key file of your choice. For example, id_rsa_client_1.pub.
Type the remote user password when prompted and hit Enter.
root@172.105.XX.XX's password:Once you type the password, the id_rsa.pub file will be copied to the authorized_keys file of the remote server.
Manually copying the Public Key
Use this method when you do not have access to your remote system through password authentication.
Open the id_rsa.pub file using the cat command in the terminal. You can also open it from a text editor, the purpose is just to copy the content of the file.
cat ~/.ssh/id_rsa.pubThe content of the file will look like, as shown below.
ssh-rsa AAAAB3NzaC1yc2EAAAADAQABAAABAQComjFtuHvHQ67uf3RXg2wgK4EtxBvBvLCtlc4chG+nJ1cbuJjJ6G8az4xsRN1Q7hrV4dYR81Tk3gRApiMdGcMvInU3Vb7Wq3nh9GS4xnLRH1wvb149wogum2MycIES69Xh0cib+VvJyZ+dGO8zRNT64+SvfiecRV0llnBGWDRqrIGtMHJkKz7VDKuSyzDit/Ck1NFXxC6Plw3cEMOhWHycm8bnSHSoVpr95ySxxnokX4/9iAlvOovxTpMpmDaDvuHKgHxcsOv9Q4sz//6Hy/65+qqmiuLyuIQXjDiiYTjHTx+VNi6S0iMLoN6XgDLp0MfG6kLvZ0Z+csqdvIDQfMuH your_name@your_PC
Now, login to your remote server and paste the copied content using the command shown below. Replace the above_string with the copied content.
echo above_string >> ~/.ssh/authorized_keysConfiguring multiple SSH Keys (Optional)
This step is for people who have multiple SSH Keys setup on their client computer. Skip this section if you have only one SSH Key setup.
To manage multiple SSH Keys, we will now create a config file inside the .ssh directory using the command shown below.
cd ~/.ssh
vim config
Type i to enter into command mode and type the details of multiple hosts, as shown in the following example:
Host remote-ubuntu-server
HostName 172.105.XX.XX
User root
IdentityFile ~/.ssh/id_rsa_client_1

Host remote-ubuntu-server
HostName 172.106.XX.XX
User root
IdentityFile ~/.ssh/id_rsa_client_2
Similarly, type the details of other remote servers and their keys. Once the process is complete press Esc and :wq to save and exit.
Now the subsequent processes are same for both having single or multiple SSH Keys on client computer.
Login to your remote server using SSH keys
Once the process of copying your Public key is complete, log in to your remote server by typing the command as shown below.
ssh remote_username@server_ip_addressIf you supplied the passphrase while generating the key pair then you will be prompted to enter it. A new session will open after the authentication process is complete.
You have now successfully configured the SSH keys based authentication on your remote server. But the password based authentication is still active on your server, this means that your remoter server is still prone to brute-force attacks.
So now we will disable the password-based login mechanism completely from our remote server.
Disable password-based Login Mechanism
Before you make any changes, make sure that the root user or any sudo enabled user for your remote account has access to your server using the SSH key-based authentication system. This step will lock or disable the password-based login completely so it is crucial that at least one user root privileges have access to the server through SSH key.
Login to your remote Ubuntu server and type the command shown below.
sudo vim /etc/ssh/sshd_config- Press
Esc,/and type ‘PasswordAuthentication’ and hitenter. - Now press
iand change the value of ‘PasswordAuthentication yes’ to ‘PasswordAuthentication no’. - Press
Escand repeat the above process to find ‘ChallengeResponseAuthentication’, ‘UsePAM’, and change their values tonoas well.
PasswordAuthentication no
ChallengeResponseAuthentication no
UsePAM no
Once all the values are set to no, press Esc, type :wq and hit enter.
To activate all the changes restart the ssh service using the command below.
sudo systemctl restart sshNow open a new terminal window on your computer and verify that your SSH Key authentication is working properly before closing the current session.
Once the verification process is complete, close all the running sessions.
We have now successfully configured the SSH Key-based authentication on our Ubuntu 20.04 server. Now nobody can log in to your server using a password-based login mechanism.


Member discussion