

Disk management is a built-in utility in Windows that enables you to manage hard drives, both internal and external. It was available on earlier versions of Windows as well, but the one in Windows 10 is more efficient with the tasks.
Many users earlier preferred using third-party tools for managing the storage space on their device, but with Disk Management in the picture, there isn’t much you cannot do. Apart from the wide variety of tasks it can perform, it also has a simple interface and quick processing time. Moreover, being a built-in utility, you need not worry about it harming your computer.
It offers several features to users, namely creating partition or volume, extend or shrink partition, format or delete partition, add mirror, change drive path and drive letters among others. Also, it is customizable, so you can easily modify the layout as per your liking.
How to Open Disk Management
There are multiple ways to open Disk Management in Windows 10.
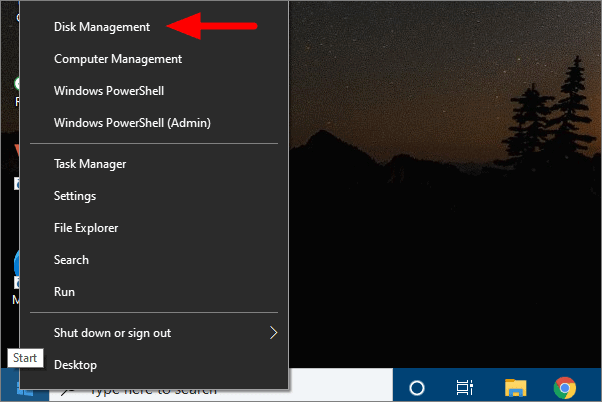
Using Quick Access Menu
Right-click on the ‘Start Menu’ at the left corner of the Taskbar and then select ‘Disk Management.
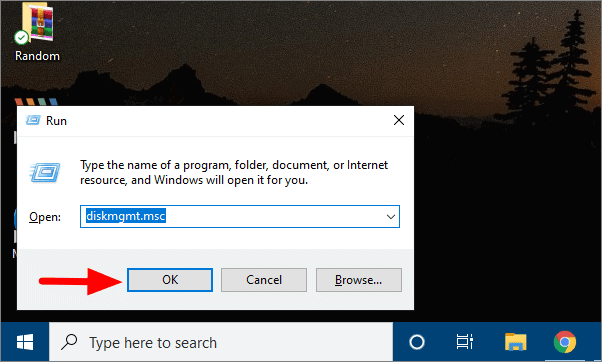
Using Run
Search for Run in the search menu or press Windows + R to open it. Type ‘diskmgmt.msc’ in the text box and then press the Enter key or click on ‘OK’ at the bottom.
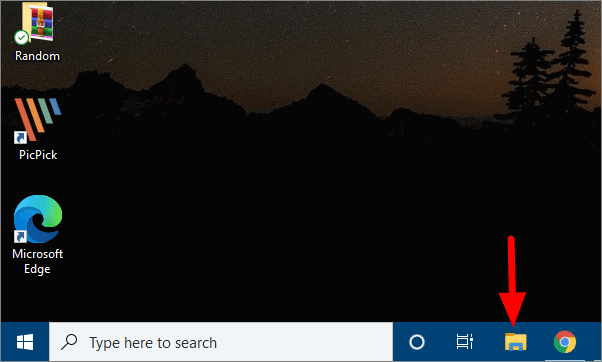
Using File Explorer
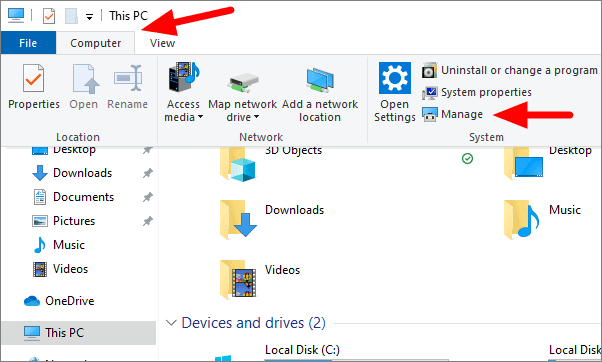
To access disk management via the File Explorer, click on the file explorer icon on the Taskbar.
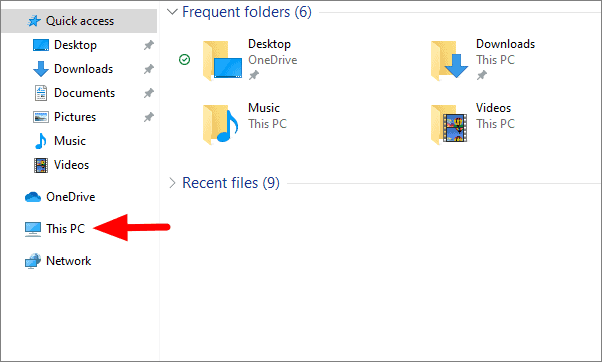
In the File Explorer, click on ‘This PC’ at the left.
Click on ‘Computer’ at the top and then select ‘Manage’ to open Computer Management.
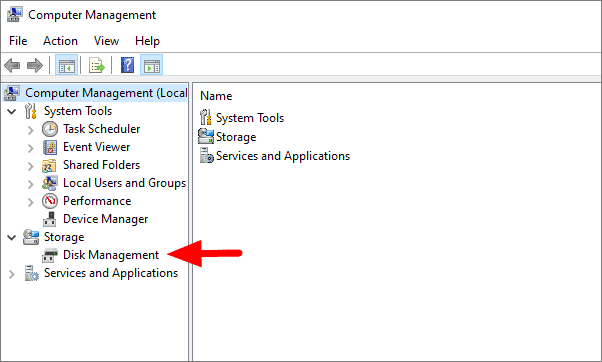
In the Computer Management window, click on ‘Disk Management’ under Storage at the left, and the Disk Management window will open.
You can use any of the three methods to open Disk Management as per your preference and comfort.
How to Use Disk Management
Disk Management in Windows 10 can be used to accomplish a lot of tasks. Make sure you open Disk Management with administrator settings to make any changes to the hard disk.
Initialize a Disk
Before you can start storing data on a disk in your computer, you need to initialize it. If the disk is not initialized, it will be unusable. Even when going for a disk that has been used before, you need to initialize it to eliminate the system errors.
To initialize a disk, open disk management using the process discussed above. Make sure the disk is online, if not, right-click on it and then select ‘Online’. Now, right-click on the new disk and select ‘Initialize new disk’. On the next window, select whether you want an MBR or GPT style and then press ENTER. Now let the disk management initialize the disk for you.
Add/Change Drive Letter
Disk Management can also be used to add or change the drive letter. All the drives on your system have a drive letter assigned to them. Sometimes users want to change the drive letter assigned to a particular drive.
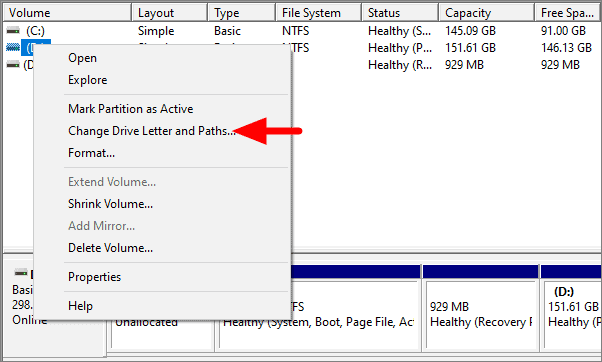
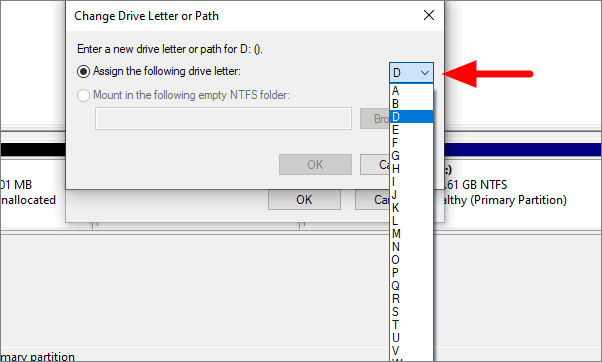
To change the drive letter of a volume, right-click on it, and then select ‘Change Drive Letter and Paths’.
Click on ‘Add’ if the volume has not yet been assigned a drive letter or click on ‘Change’ if you want to change the drive letter.
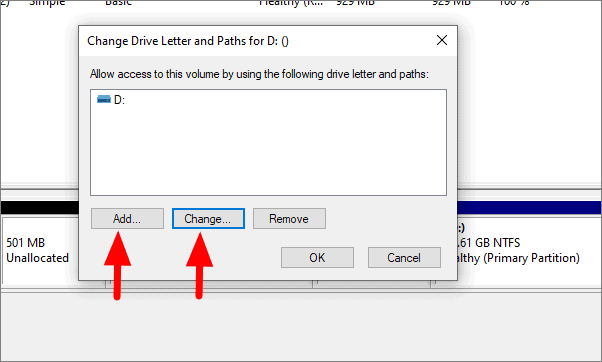
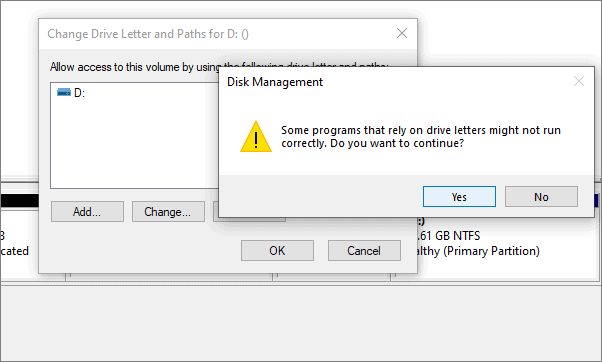
Now, click on the drive letter, select one of the options from the drop-down menu, and then click on ‘OK’.
You will receive a warning which says programs that rely on drive letter might not function properly. Click on ‘Yes’ to proceed. It is recommended to not change the drive letter of the volume where the Windows and other programs are stored.
Extend/Shrink a Volume
Resizing of partitions is done to reallocate space and to make use of the unallocated space. Say, you have multiple partitions on your hard disk and the C drive is out of storage. This is when you need to shrink the volume of another partition to make space for the C drive.
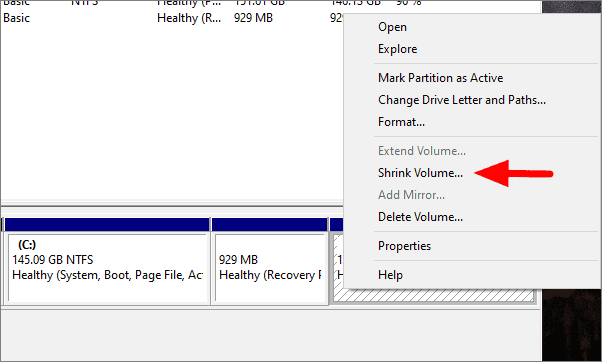
To do so, right-click the partition you want to shrink and then select ‘Shrink Volume’.
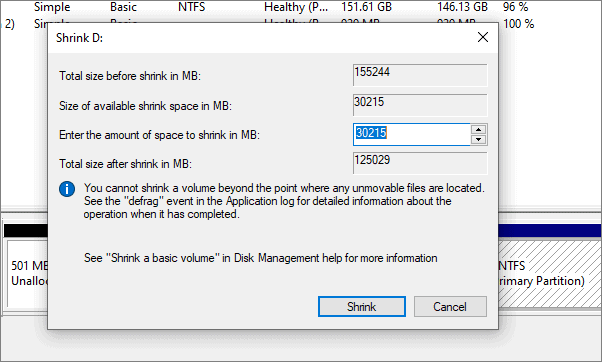
Now, input the space you want to shrink, or you can select the available shrink space and proceed. After you have decided the amount of space to shrink and input the same, click on ‘Shrink’ at the bottom.
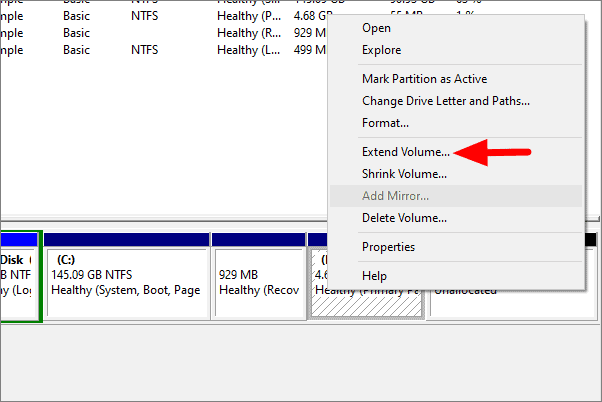
You similarly extend the partition if there is unallocated space right next to it. In this case, right-click on the partition you want to extend and select ‘Extend Volume’.
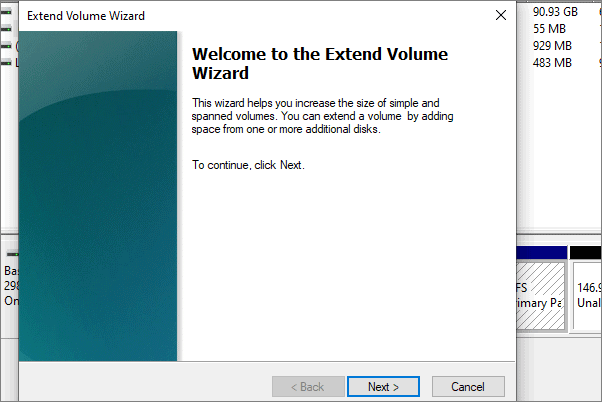
The Extend Volume Wizard will now open, click on ‘Next’ at the bottom.
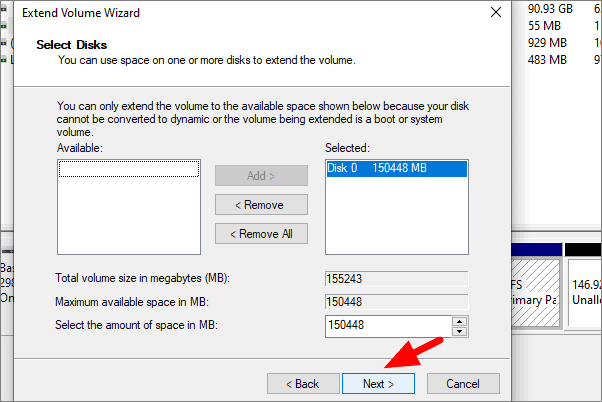
You can now change the volume size you want to extend or go with the default maximum setting and then click on ‘Next’.
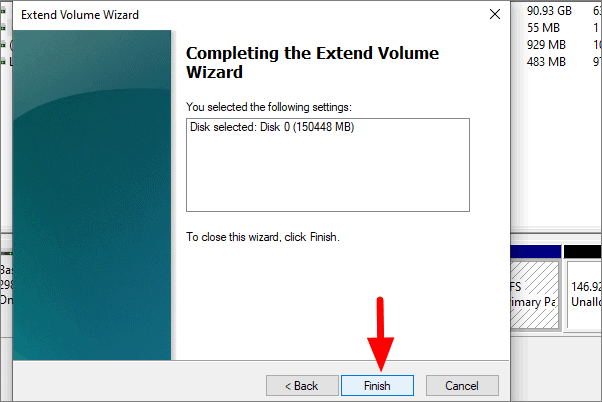
Check the settings you have selected for extending volume and then click on ‘Finish’.
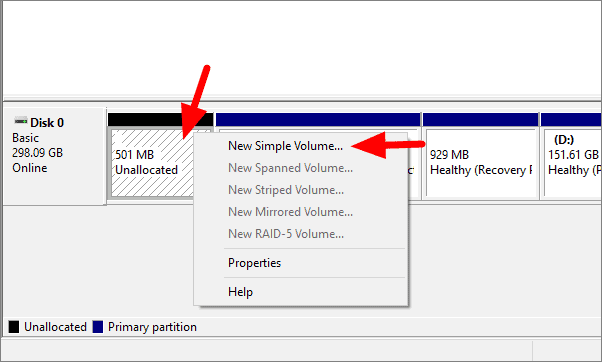
Create New Partition/Volume
You can create a new partition on your drive if there is unallocated space available, or you could shrink a volume to create space. To create a new partition, check if you have unallocated space.
Right-click on the unallocated space and then select ‘New Simple Volume’. Unallocated space has a black bar on the top to denote it. It is, however customizable in settings.
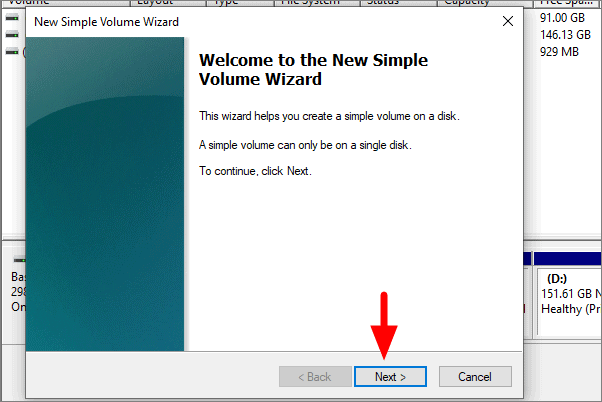
New Simple Volume Wizard will open, click on ‘Next’.
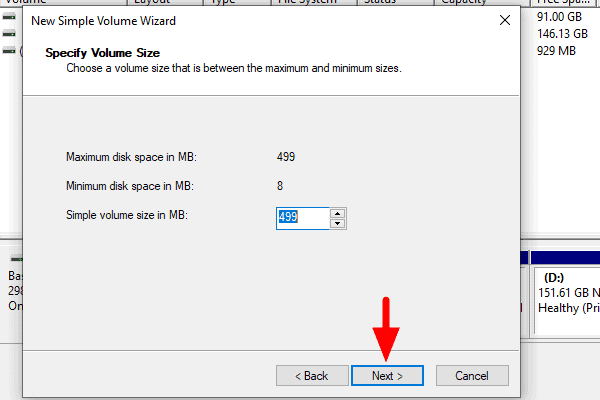
You can now specify the volume size or go with the maximum volume size set by default. After specifying the volume size, click on ‘Next’.
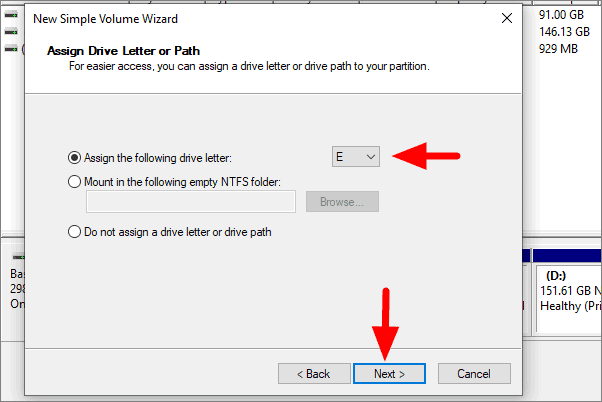
Now, you can assign a drive letter. It is by default set to the next available drive letter. However, you can change it by clicking on the drive letter and selecting another one from the drop-down menu.
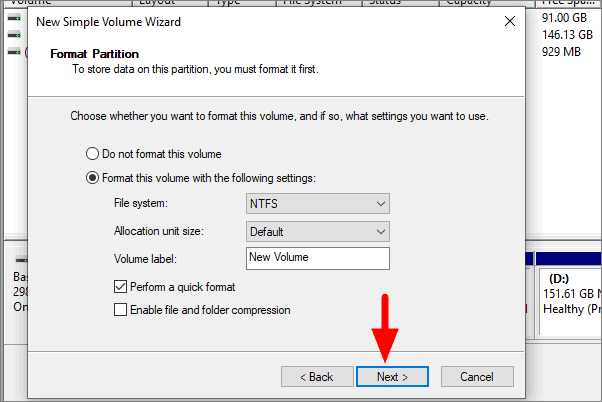
You can now select to either format the partition now or leave it for later. It is recommended to format when creating a partition. Go with the default format settings, and if required, change the name of the partition in Volume Label. Now, click on next.
The selected setting for the new partition will now be displayed. If you don’t want to make any changes to the settings, click ‘Finish’.
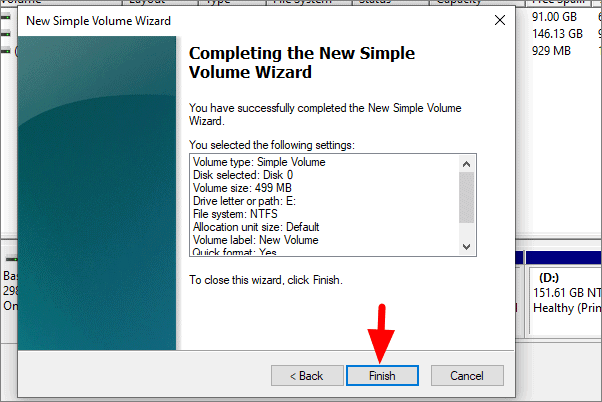
A new volume will now be created on the disk.
In the article, we have understood the importance of Disk Management, how to access it and how to perform various tasks. You can now start working on your hard disk and resolve any storage issue or create new partitions.


Member discussion