
Overload is a 6v6, respawn-based objective mode debuting in Black Ops 7 where both teams fight over a single neutral device and carry it into enemy territory to score. Possession constantly flips, the objective location is public to all players, and coordination matters more than raw slaying — expect a fast, momentum-driven tug‑of‑war.
Overload rules and match flow
- One Overload Device spawns on the map. Its location is always visible on the HUD and Tac‑Map.
- Either team can pick up the device. The carrier must deliver it to one of two scoring zones positioned near the opposing team’s starting spawn.
- Entering and disrupting a valid enemy zone with the device scores a point and causes a new device to spawn on the field.
- The carrier gains a personal radar that pings nearby threats, helping with short‑range awareness during a run.
- Standard respawns are active throughout the match.
- At halftime, teams switch sides (zone locations flip accordingly).
Because the device’s location is public, Overload is about controlling routes, staging escorts, and timing intercepts more than hiding the carrier.
Scoring, possession, and timing implications
- Two target zones, one at a time: The offense chooses which of the two enemy‑side zones to attack. Use that choice to create misdirection and force defenders to split.
- Immediate reset on score: A fresh device appears after each point, so teams should quickly transition from celebration to map control for the next fight.
- Information parity: With device location shared to both teams, opening lanes and blocking flanks is often more effective than trying to “sneak” across mid.
What the HUD tells you (and how to use it)
- Tac‑Map marker: Use it to read enemy pathing. If the icon drifts toward a tight lane, pinch from cut‑offs instead of chasing directly.
- Carrier radar: The personal radar benefits the holder; leverage it to pre‑aim close corners and avoid avoidable trades. Escorts should trust the carrier’s callouts and clear the next choke, not the one the radar already exposed.
Recommended roles and a simple 6‑player structure
- Carrier (1): Prioritizes survivability, burst mobility, and close‑range intel. Makes the zone selection call once space is created.
- Lead Escort (1): Clears the next choke, deploys protective utility (e.g., Trophy System), and trades immediately.
- Blockers/Flank Control (2): Cut off common interception routes and delay rotate‑throughs.
- Anchor/Flex (1): Holds mid control or fast‑rotates to the alternate zone to punish over‑rotations.
- Interceptor (1): Stays detached to collapse on enemy carries, prioritizing stuns/EMPs and fast engagements.
Rotate these roles dynamically after a score or wipe — Overload rewards teams that re‑form shape quickly between device phases.
Loadout priorities for the carrier and escorts (Beta content)
Perks (movement and resilience):
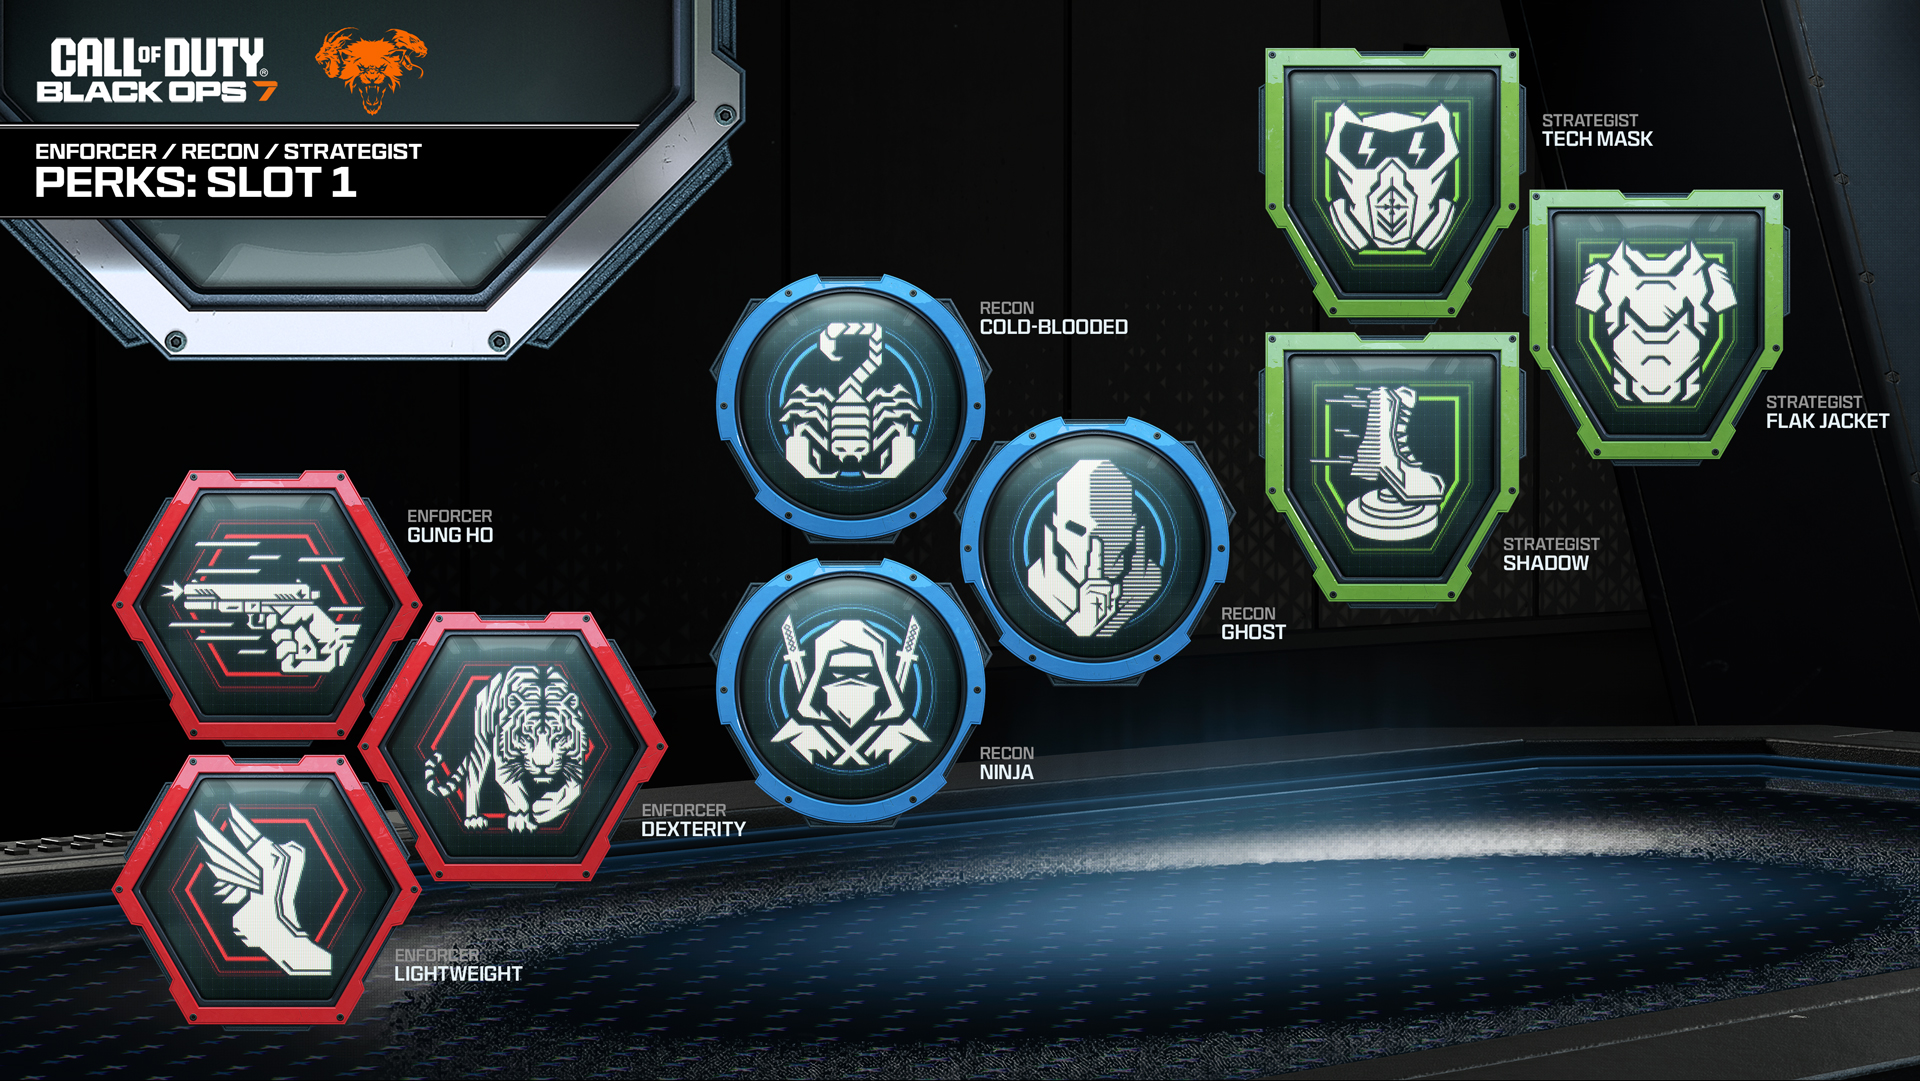
- Lightweight (Perk 1, Enforcer): Increased movement speed with longer slides/dives — valuable for beating rotations.
- Gung Ho (Perk 1, Enforcer): Fire while sprinting; smoother weapon handling during movement heavy runs.
- Dexterity (Perk 1, Enforcer): Full ADS on slides/dives and reduced weapon motion; useful in tight lanes.
- Ghost (Perk 1, Recon): Stays off Scout Pulse/UAV while moving, planting, or on streaks — helps during approach.
- Tech Mask (Perk 1, Strategist) / Flak Jacket (Perk 1, Strategist): Resist disables and explosives when entering zones.
- Fast Hands (Perk 2, Strategist): Faster reloads/swaps; crucial for escorts who must chain fights.
- Engineer (Perk 2, Recon): Spot enemy equipment/turrets through walls; pre‑clear device lanes.
- Tac Sprinter (Perk 3, Enforcer): Enables Tactical Sprint (with reduced base sprint speed) to cross long gaps — plan routes to exploit its burst.
- Charge Link (Perk 3, Strategist): Faster Field Upgrade charge, shared to allies — keeps Trophies/Camo cycling during repeated pushes.
Tacticals (entry, denial, intel):
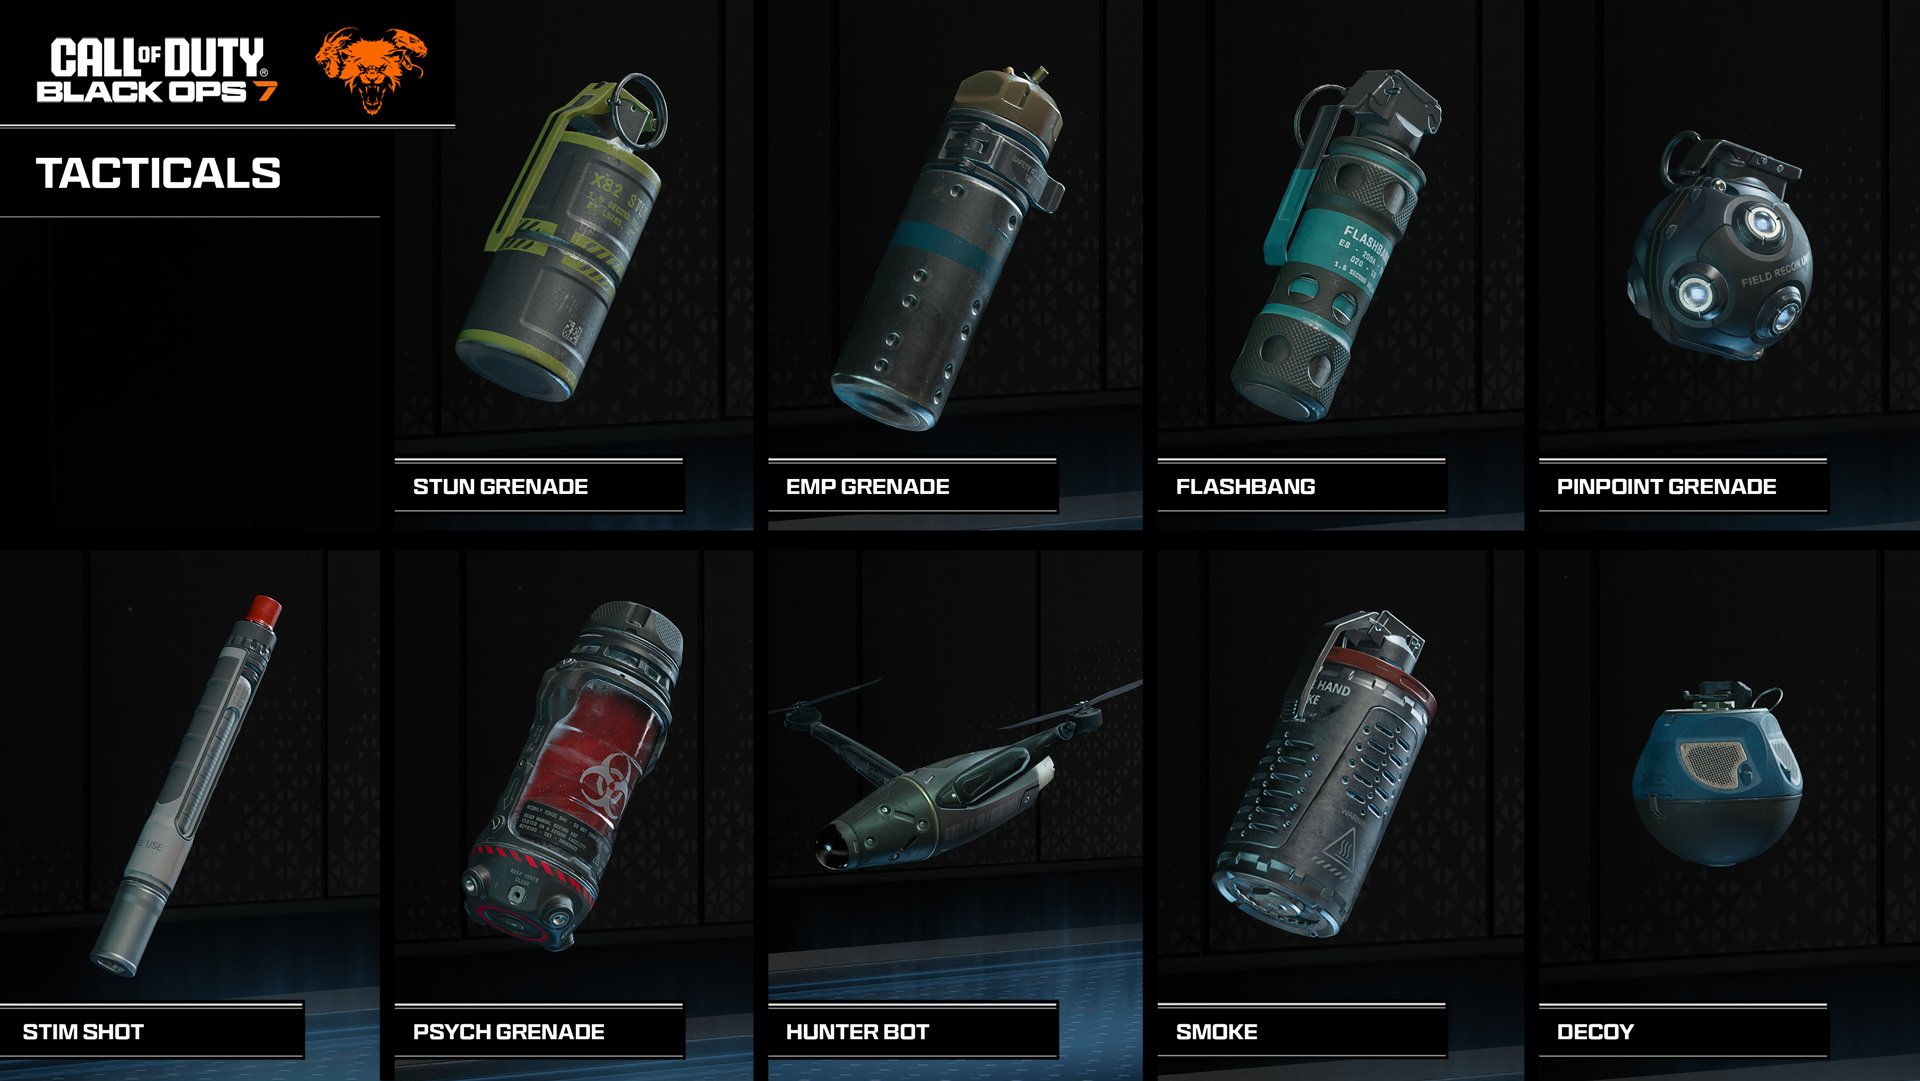
- Stun Grenade: Slows enemy movement/aim — best tool to stop an incoming carrier at the last choke.
- EMP Grenade: Disables equipment and Scorestreaks — strip enemy Trophy Systems from the zone.
- Flashbang: Quick entry on close‑quarters zones after escorts shoulder‑peek sightlines.
- Stim Shot: Rapid heal; with its Overclock, it can also clear debuffs and grant a brief speed boost.
- Pinpoint Grenade: Temporarily tags nearby enemies — throw ahead of the carrier to reveal stacked corners.
- Psych Grenade: Hallucinogenic gas cloud to stall retake attempts through narrow entries.
Field Upgrades (protection, deception, tempo):
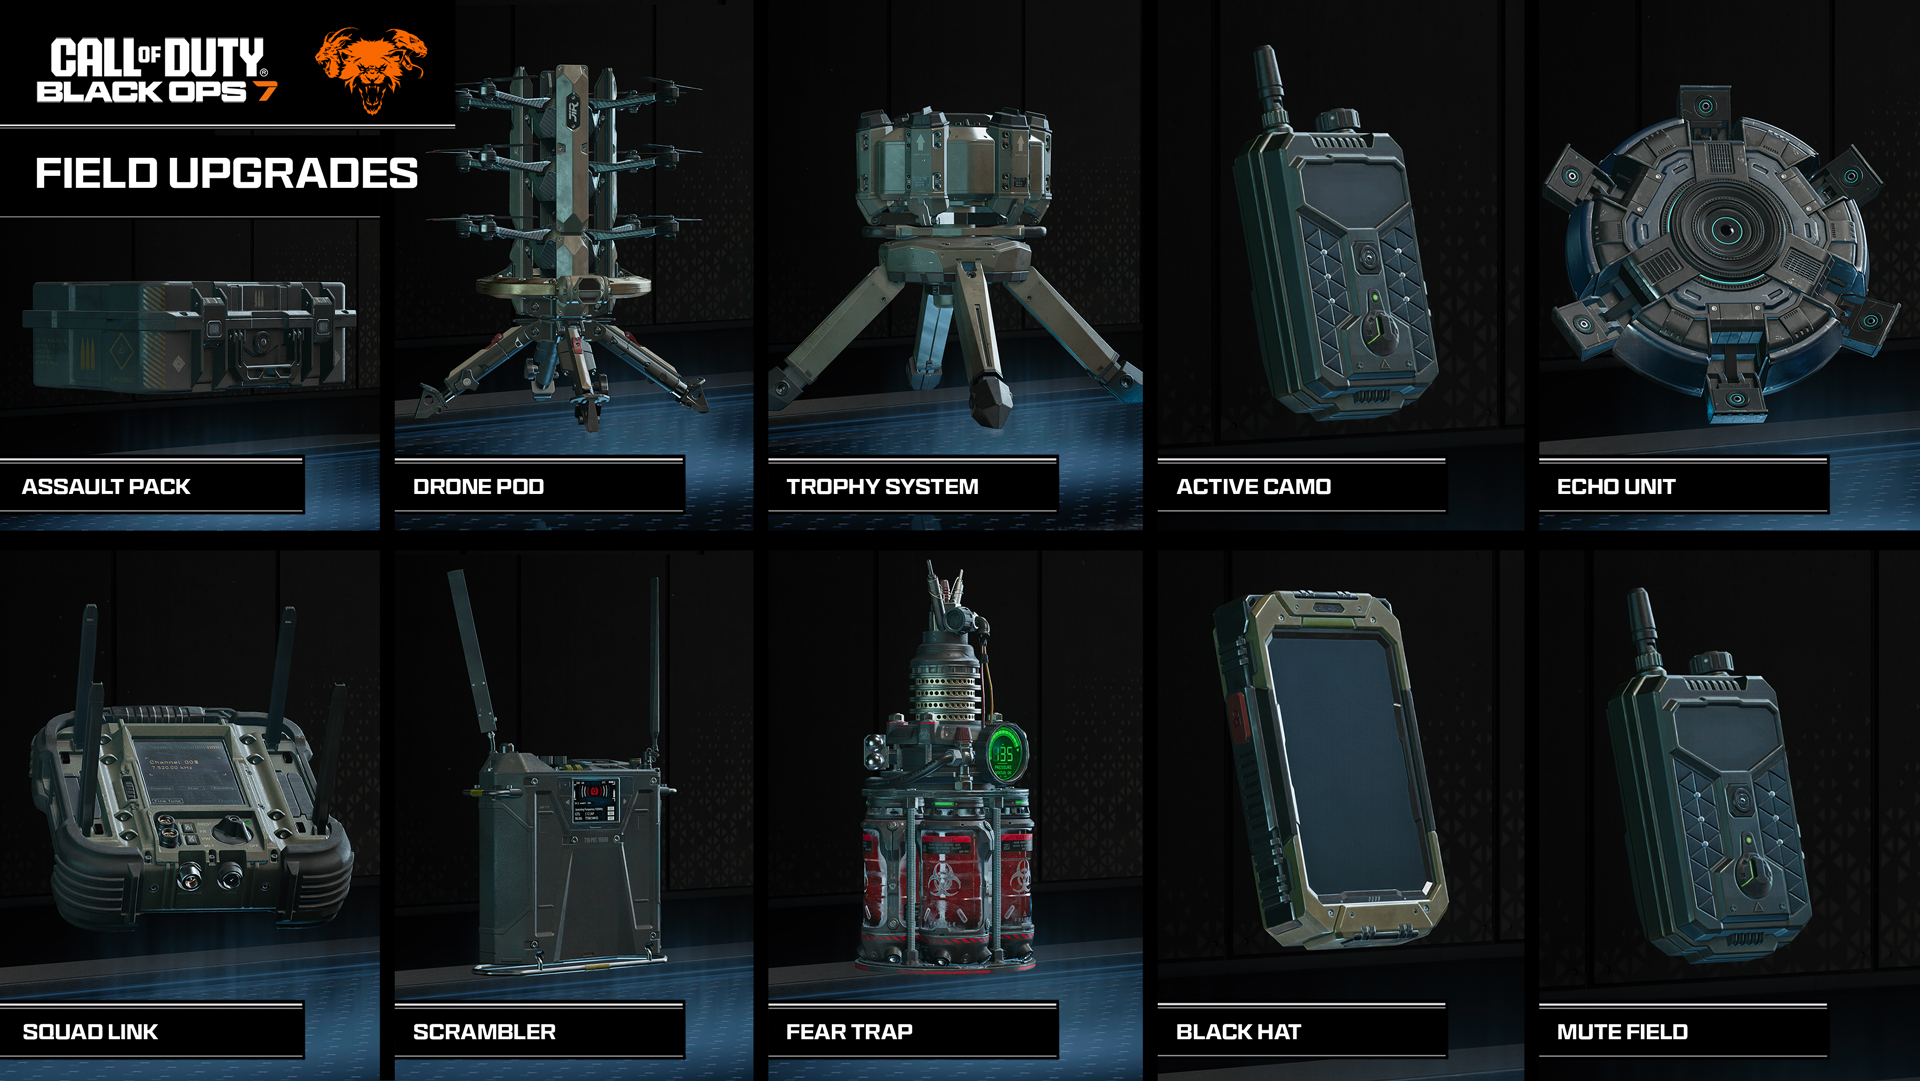
- Trophy System: Neutralizes projectiles over the device or zone. Its Overclock adds charge speed and extra ammo.
- Active Camo: Short‑duration cloak for slip‑ins; Overclocks extend duration and make gunfire briefly reveal instead of cancel.
- Echo Unit: Holographic decoy that can even contest; Overclocked, it stuns enemies who approach — great for baiting zone holds.
- Squad Link: Buffs allied Operators and gadgets in range; Overclock expands coverage and accelerates team Field Upgrade recharge.
- Assault Pack: Ammo and equipment resupply to sustain repeated pushes.
- Drone Pod: Launches explosive drones to flush common hold angles before the carrier commits.
Note: Availability reflects the Beta lineup listed by the developer; some items may arrive at launch rather than in Beta.
Tools for interceptions and zone retakes
- EMP + Stun sequencing: EMP the zone to break Trophies, then Stun to secure the final trade against the carrier/escort pair.
- Point Turret (Lethal): Deploy to watch a flank while the team collapses on the device path; Overclocks increase rate of fire and allow ceiling/wall deployments.
- Needle Drone (Lethal): Use manual control to dive‑bomb entrenched anchors at the zone platform before a retake.
- Engineer (Perk 2): Identify and prioritize clearing automated threats (turrets, drones) on the approach.
Scorestreak picks that support Overload (Beta)
- UAV / Counter UAV: Cheap, repeatable information and minimap disruption during device fights. Overclocks reduce cost and add missile flare counters.
- Scout Pulse: Local radar ping to time a push across midfield; Overclocks upgrade pings to directional arrows.
- RC‑XD: Quick, precise zone clear in tight interiors; Overclocks improve durability and target indication.
- D.A.W.G.: Deploy to anchor a scoring zone during setup or hold; Overclock adds a Sentry Mode with supply and Trophy support.
- Gravemaker: One‑hit sniper assembly to remove power‑positions that consistently stop your runs.
- Watchdog Helo / HKDs / Rhino / VTOL Warship: Use sparingly on small maps; they are better for locking down rotations and punishing over‑pushes than escorting in tight lanes.
Tip: Favor low‑to‑mid cost streaks that you can cycle through multiple device phases rather than one high‑cost swing that arrives too late.
Route planning and zone control
- Open with control, not the pickup: Use the first 5–10 seconds to win mid and block enemy fast routes. Grabbing the device into a lost mid usually feeds a turnover.
- Show one zone, hit the other: Start pressure toward Zone A to draw defenders, then rotate through a mid connector to Zone B with the carrier and one escort.
- Choke layering: Place a Trophy at the last bend, hold a crossfire one lane back, and let the carrier break the plane only once utility has traded out.
- Post‑score habits: After a point, immediately re‑establish lane control for the next spawn rather than chasing exits. Overload snowballs through the reset.
Halftime adjustments
- Rebuild routes: Your best first‑half path may be a poor second‑half option because defender spawn and zone geometry flip.
- Reassign roles: If your interceptor kept winning from one side of the map, swap flanks at half so they can contest the new strong lane.
- Re‑tune perks: Consider swapping between Tech Mask and Flak Jacket depending on whether the enemy leans into stuns/gas or explosives at chokes.
Combat Specialties: when to go all‑in vs hybrid
- Enforcer (all red): After each elimination, you gain a brief movement and regen buff — ideal for carriers and lead escorts who must chain close fights.
- Recon (all blue): Valuable for interceptors reading rotations off respawn.
- Strategist (all green): Objective‑leaning teams get faster equipment deploys and bonus objective score; great for support players.
- Hybrid options:
- Scout (red+blue): Stay hidden on minimaps briefly after a bullet elimination — helps a flanker escort stay undetected between picks.
- Operative (blue+green): Earn Field Upgrade charge from stealthy eliminations — useful for Active Camo/Trophy cycling.
- Tactician (red+green): Assists briefly boost score from bullet kills — accelerates mid‑cost streaks during escort chains.
Common mistakes to avoid
- Solo rushing the device: Without lane control or utility, the carrier’s radar can’t save you from crossfires.
- Over‑stacking the carrier: One escort is usually enough; dedicate others to blocking flanks and cutting rotations.
- Ignoring Trophies: Most zone defenses revolve around explosives — a single Trophy often decides whether a run survives the last two meters.
- Chasing after a score: The next device spawns quickly; reset and re‑take space instead of hunting exits.
Quick checklist for first matches
- Agree on roles before the first spawn (carrier, escort, interceptor). Rotate only on wipes/scores.
- Open by winning mid lanes, then take the device.
- Pair EMP → Stun to break entrenched zone holds.
- Drop a Trophy System at the final bend every run.
- Use Stim Shot to survive chip damage and keep momentum.
- Cycle UAV/Counter UAV across device phases; don’t bank streaks too long.
Overload rewards teams that make fast, disciplined decisions between device phases. Establish lane control first, pair the right utility with each commit, and convert your halftime flip into fresh route advantages.