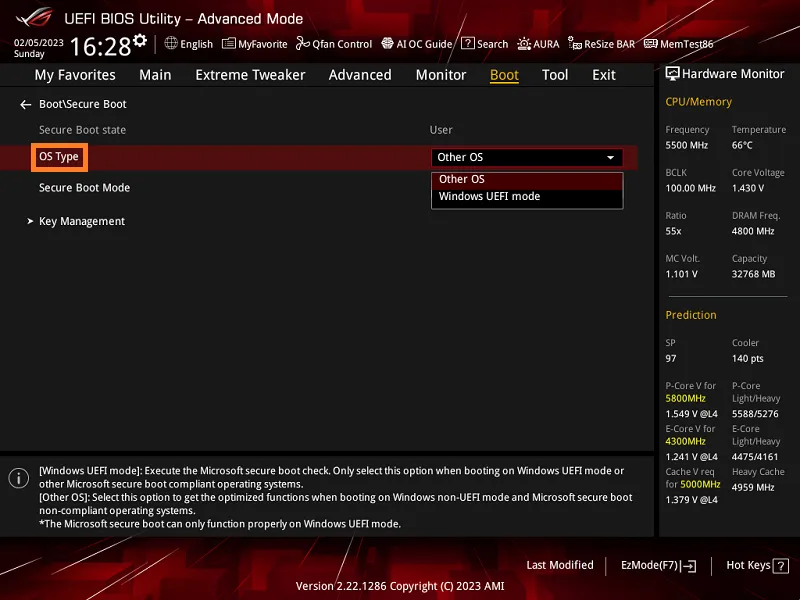
Secure Boot blocks untrusted boot code by allowing only signed components to load during startup. On ASUS systems, the setting is controlled either by OS Type (desktop motherboards) or Secure Boot Control (notebooks). Once enabled, Windows will report Secure Boot as On and certain games and security features will work as intended.
Quick reference: ASUS Secure Boot controls
The labels you see in BIOS directly determine the Secure Boot state.
| BIOS option | Effect at next boot |
|---|---|
| OS Type = Windows UEFI mode. | Secure Boot turns On when keys are present (state shows “User”). |
| OS Type = Other OS. | Secure Boot is Off. |
| Secure Boot State = User. | Keys are installed; Secure Boot can be active. |
| Secure Boot State = Setup. | No keys installed; Secure Boot is not active. |
On desktop boards, OS Type controls Secure Boot; see the official overview for this behavior on ASUS motherboards (FAQ 1049829).
Enable Secure Boot — ASUS desktop motherboards (UEFI)
On ASUS motherboards, Secure Boot is enabled by setting OS Type to Windows UEFI mode.
Step 1: Open BIOS. Power on and repeatedly press Delete until the BIOS screen appears.
Step 2: Switch to Advanced Mode. If you see EZ Mode, press F7 to enter Advanced Mode.
Step 3: Go to the Boot menu. Select the Boot tab to access startup settings.
Step 4: Open Secure Boot. Select Secure Boot to view its controls.
Step 5: Set OS Type. Change OS Type to Windows UEFI mode to enable Secure Boot. Leave Secure Boot Mode on Standard unless you need custom key management.
Step 6: Save and restart. Press F10, confirm, and allow the system to reboot.
Enable Secure Boot — ASUS notebooks, AIO, and handhelds
Laptops use a “Secure Boot Control” toggle in the Security page.
Step 1: Enter BIOS. With the device fully off, hold F2 and press the power button. Release F2 when BIOS opens.
Step 2: Enter Advanced settings. If needed, press F7 for Advanced Mode.
Step 3: Open Security. Go to the Security page and select Secure Boot.
Step 4: Enable Secure Boot Control. Set Secure Boot Control to Enabled.
Step 5: Save and restart. Press F10, confirm, and reboot to apply.
Verify Secure Boot state in Windows
Step 1: Open System Information. Press [WIN]+[R], type msinfo32, and press Enter.
Step 2: Check the result. In System Summary, find Secure Boot State. “On” means enabled; “Off” means disabled.
Fix greyed‑out options or changes that won’t stick (restore keys)
If the Secure Boot state won’t change, refresh the Secure Boot key database, then try again.
Desktop motherboards — restore default keys
Step 1: Open Secure Boot Mode. In BIOS, go to Boot > Secure Boot and set Secure Boot Mode to Custom.
Step 2: Open Key Management. Select Key Management to manage the key database.
Step 3: Clear keys. Choose Clear Secure Boot Keys and confirm. The state will switch to “Setup.”
Step 4: Install default keys. Choose Install Default Secure Boot Keys and confirm. The state should switch to “User.”
Step 5: Save and restart. Press F10 to save. After reboot, set OS Type to Windows UEFI mode again if needed.
Notebooks/AIO/handhelds — restore factory keys
Step 1: Enable control. In Security > Secure Boot, set Secure Boot Control to Enabled.
Step 2: Reset to Setup Mode. Open Key Management and select Reset to Setup Mode, then confirm.
Step 3: Restore keys. Select Restore Factory Keys and confirm to reinstall the default key database.
Step 4: Save and restart. Press F10. After reboot, ensure Secure Boot Control remains Enabled.
Common blockers and how to resolve
- UEFI boot required. Secure Boot only works in UEFI mode, not Legacy/CSM. Set the firmware to UEFI‑only and disable CSM.
- GPT system disk required. If your system drive is MBR, convert it to GPT; otherwise Secure Boot will not activate.
- Keys determine state. “User” indicates keys are installed; “Setup” indicates none are present. Use the restore‑keys steps above if needed.
- BitLocker prompts. Changing boot security may trigger a recovery key prompt. Have your recovery key ready or suspend BitLocker before making BIOS changes. See ASUS guidance for finding the recovery key: Troubleshooting – BitLocker Recovery Key.
Once BIOS is set to UEFI with valid keys and the correct toggle, Secure Boot will report On in System Information and persist across reboots.

