
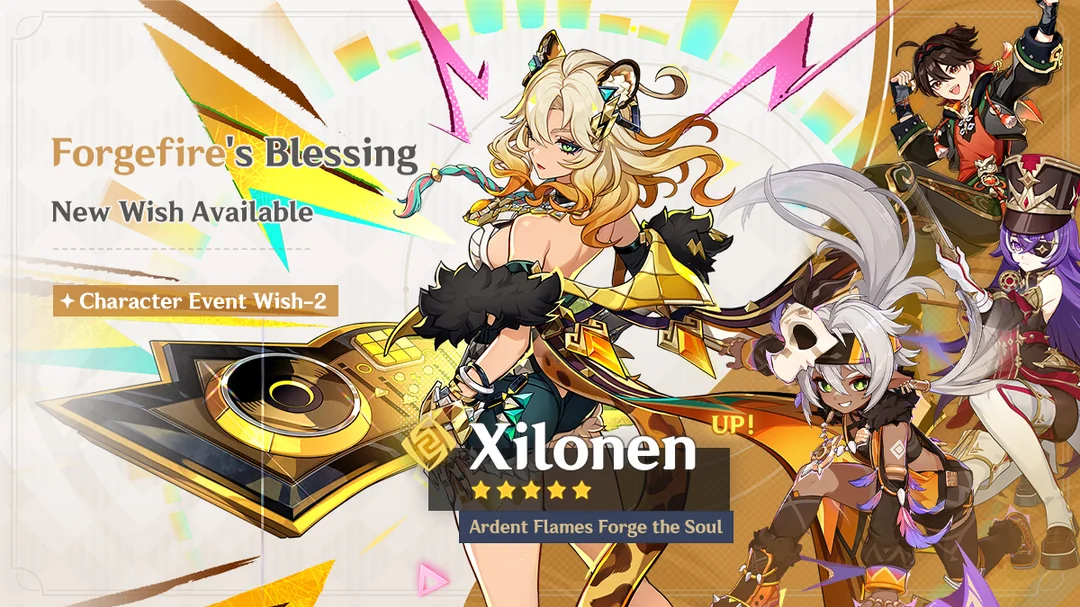
The second half of Genshin Impact’s Version 6.2 “Luna 3” patch revolves around two rerun headliners: Varesa and Xilonen. Their character event wishes and matching weapon banner go live near the end of December and run into mid‑January, giving a limited window to grab some of the game’s most in‑demand supports and DPS tools.
Luna 3 Phase 2 schedule
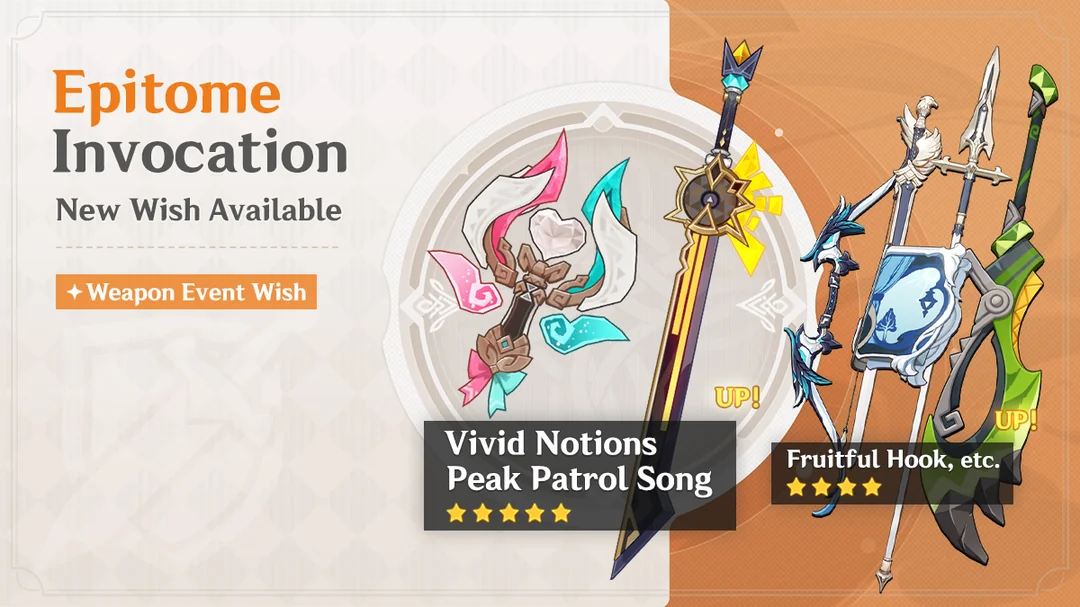
The Phase 2 event wishes for Version 6.2 start on December 23, 2025 at 6:00 p.m. (server time) and end on January 13, 2026 at 2:59 p.m. (server time). During that period, both character event wishes run alongside a shared Epitome Invocation weapon banner.
Within the overall Version 6.2 window, Phase I covers Durin and Venti from December 3 to December 23, and Phase 2 covers Varesa and Xilonen from December 23 to January 13.
Phase 2 character banners: featured 5‑stars and 4‑stars
Phase 2 repeats the same lineup that made Varesa’s first run in Version 5.5 so notorious. Both character event wishes share a unified 4‑star pool:
| Rarity | Character | Element / Weapon | Role summary |
|---|---|---|---|
| 5★ | Varesa | Electro / Catalyst | Plunging Electro main DPS |
| 5★ | Xilonen | Geo / Sword | Universal buffer, healer, RES shredder |
| 4★ | Iansan | Electro / Polearm | Electro and Natlan DPS support |
| 4★ | Chevreuse | Pyro / Polearm | Overloaded reaction support |
| 4★ | Gaming | Pyro / Claymore | Plunge‑centric Pyro DPS |
Pulling on either Varesa’s or Xilonen’s event wish gives the same chance at these 4‑stars, so the choice between banners is primarily about which 5‑star you want to target.
Varesa: Electro plunge carry with dedicated support options

Varesa is a 5‑star Electro catalyst who functions as a plunge‑focused on‑field DPS. Her kit is built around frequent plunging attacks with strong Electro application, and she scales heavily with Crit and Attack while leaning on Electro reactions for extra damage.
On this banner, she slots naturally into an Overloaded team alongside Iansan and Chevreuse. Iansan provides Electro support and damage, while Chevreuse boosts Overloaded reaction damage and brings Pyro coverage. Gaming gives another Pyro option if you want to field a second Pyro DPS or build a separate team.
Players who already own Durin or other modern buffers can also run Varesa in more flexible Electro or quickswap compositions, but Overloaded remains the obvious showcase here.
Xilonen: broad‑coverage support with high ceiling
Xilonen is a 5‑star Geo sword support who covers three jobs at once: teamwide buffs, Elemental RES shred, and comfortable healing. At base, she works with nearly any non‑Anemo, non‑Physical DPS, which makes her a strong pick for accounts that lack several “purpose‑built” supports for each carry.
She is especially valuable in a few places:
- Geo DPS teams where she can partner with units like Itto or Navia and another Geo support.
- Mualani and Mavuika lineups, where her RES shred and buffing smooth out rotations and reduce energy pressure.
- Stygian Onslaught and multi‑team endgame, where a single flexible support that fits many teams eases roster constraints.
Her constellations are also a point of discussion. Many players consider C2 Xilonen a turning point, adding a cluster of extra effects and stronger energy support, especially for Electro teams and triple‑Geo setups. However, those power spikes come at the cost of multiple 5‑star pulls, so they tend to make more sense for long‑term planners rather than anyone scraping for their first copy.
The 4‑star lineup: why Iansan, Chevreuse, and Gaming matter
The three 4‑stars on Phase 2 are unusually impactful for modern combat content, which is why the banner is often described as “stacked.” Each one fills a specific niche that can be hard to replace.
Iansan is a 4‑star Electro polearm who acts as a core support for Natlan’s Pyro and Electro carries. She boosts damage for those elements and slots into reaction‑heavy teams. Her synergy with Varesa is obvious, but she is also valuable across Natlan‑themed squads, which keeps demand for her constellations high.
Chevreuse is a 4‑star Pyro polearm that turbocharges Overloaded. She increases team damage around that reaction and allows Pyro/Electro carries like Arlecchino, Varesa, or certain Natlan units to hit much harder in those comps. Because Overloaded’s best payoff lives on specific supports, missing Chevreuse can bottleneck an entire playstyle.
Gaming is a 4‑star Pyro claymore DPS with a plunge‑centric kit. He is strong enough to clear high‑end content as a main carry when properly built, and he synergizes with weapons like Fruitful Hook on the weapon banner. For players still building out their Pyro roster, he provides real damage rather than filler.
One recurring frustration for many players is that 4‑star constellations arrive very unevenly. Some accounts reach C6 on older units they never use, while newer supports like Iansan and Chevreuse remain at C0–C1 even after multiple banners. There is no selector or bad‑luck protection for specific 4‑stars, so targeting a single unit or constellation on this banner can still be expensive.
Phase 2 weapon banner: Vivid Notions, Peak Patrol Song, and key 4‑stars
The Epitome Invocation that runs alongside Phase 2 focuses on the signature weapons for the two headliners, backed by a set of practical 4‑star options.
| Rarity | Weapon | Type | Notable users |
|---|---|---|---|
| 5★ | Vivid Notions | Catalyst | Varesa |
| 5★ | Peak Patrol Song | Sword | Xilonen and other supports |
| 4★ | Alley Hunter | Bow | Off‑field bow DPS |
| 4★ | Favonius Sword | Sword | Energy batteries and supports |
| 4★ | Favonius Lance | Polearm | Energy batteries and supports |
| 4★ | The Widsith | Catalyst | Burst‑DPS catalysts |
| 4★ | Fruitful Hook | Claymore | Gaming and plunge claymore DPS |
Vivid Notions is Varesa’s signature catalyst. It offers high base ATK, Crit DMG, and a passive that significantly boosts Attack and Crit DMG for plunging attacks. Because very few 5‑star catalysts specifically buff plunges, it stands out as her best‑in‑slot choice by a wide margin.
Peak Patrol Song is Xilonen’s signature sword. It improves her performance but is not mandatory, since she can function well on a wide range of existing 4‑star and 5‑star swords. For many players, it is a luxury pick, especially if other supports or carries can share high‑value swords like Favonius or existing 5‑stars.
Among the 4‑stars, Favonius Sword and Favonius Lance are evergreen. They solve energy problems on supports across almost every element. The Widsith continues to be a top damage option for many burst‑oriented catalysts, and Fruitful Hook is tailored to Gaming’s playstyle, making it attractive if you plan to invest in him.
Weapon banners always involve higher risk than character banners because you must care about two 5‑stars at once. Here, the banner looks favorable if you actively use both Varesa and Xilonen and are missing strong weapons in their slots. If you only care about one of them, character constellations often deliver more direct value per pull.
How the Phase 2 banners fit into the wider 6.2 landscape
Version 6.2 is crowded. Phase I already introduced Durin and Jahoda while rerunning Venti, and the community is already looking ahead to future headline characters like Columbina, Zibai, and Illuga in Version 6.3.
That context explains why Phase 2 is often described as “bait.” On paper, it combines:
- Two flexible 5‑stars that still see use in current top‑end content.
- Three 4‑stars that directly unlock or supercharge popular team archetypes, especially Overloaded and plunge‑centric setups.
- A weapon banner with Favonius staples, a high‑impact catalyst, and a tailored claymore for Gaming.
For anyone sitting on a guaranteed 5‑star with high pity and saving for Columbina or other upcoming units, this can be a difficult patch to navigate. Many players are choosing to “soft pull” a small number of wishes to fish for Iansan or Chevreuse constellations and then walking away if an early 5‑star appears, using that as setup for the next banner instead.
On the other side, accounts that skipped Varesa’s original run or missed Xilonen altogether get a chance to pick up both of them in one phase while also rounding out critical 4‑star supports. With Spiral Abyss, Stygian Onslaught, and Imaginarium Theater all expecting three competent teams, that kind of roster compression can be worth prioritizing over another new limited DPS later.
Practical pull advice: who should consider these banners
A few broad rules of thumb emerge from how these units are used today.
Pulling for Varesa makes sense if you enjoy plunge‑centric gameplay and want a premier Electro carry, especially for Overloaded teams. She benefits the most from having at least basic support infrastructure in place: one of Chevreuse or Iansan, some Crit gear, and ideally her signature weapon or another high‑Crit catalyst.
Pulling for Xilonen pays off most on accounts that lack strong universal supports or are trying to field three high‑end teams in Stygian Onslaught and later Spiral Abyss floors. She can bridge gaps for Pyro, Hydro, Cryo, and Geo carries while also providing healing, which simplifies both gearing and team building.
Sniping 4‑stars only is much harder to justify mathematically but understandable if you are one constellation shy of a key breakpoint, such as C6 Chevreuse for a favorite Overloaded DPS or C2 Iansan for Natlan teams. In those cases, it is safer to set a strict wish budget and accept the outcome rather than chasing a specific 4‑star at all costs.
Ultimately, the Luna 3 Phase 2 banners are strong from a pure power and flexibility perspective. Whether they are worth your primogems depends less on their quality and more on how close you are to other priorities like Columbina, Neuvillette, or future Geo and Natlan units.