
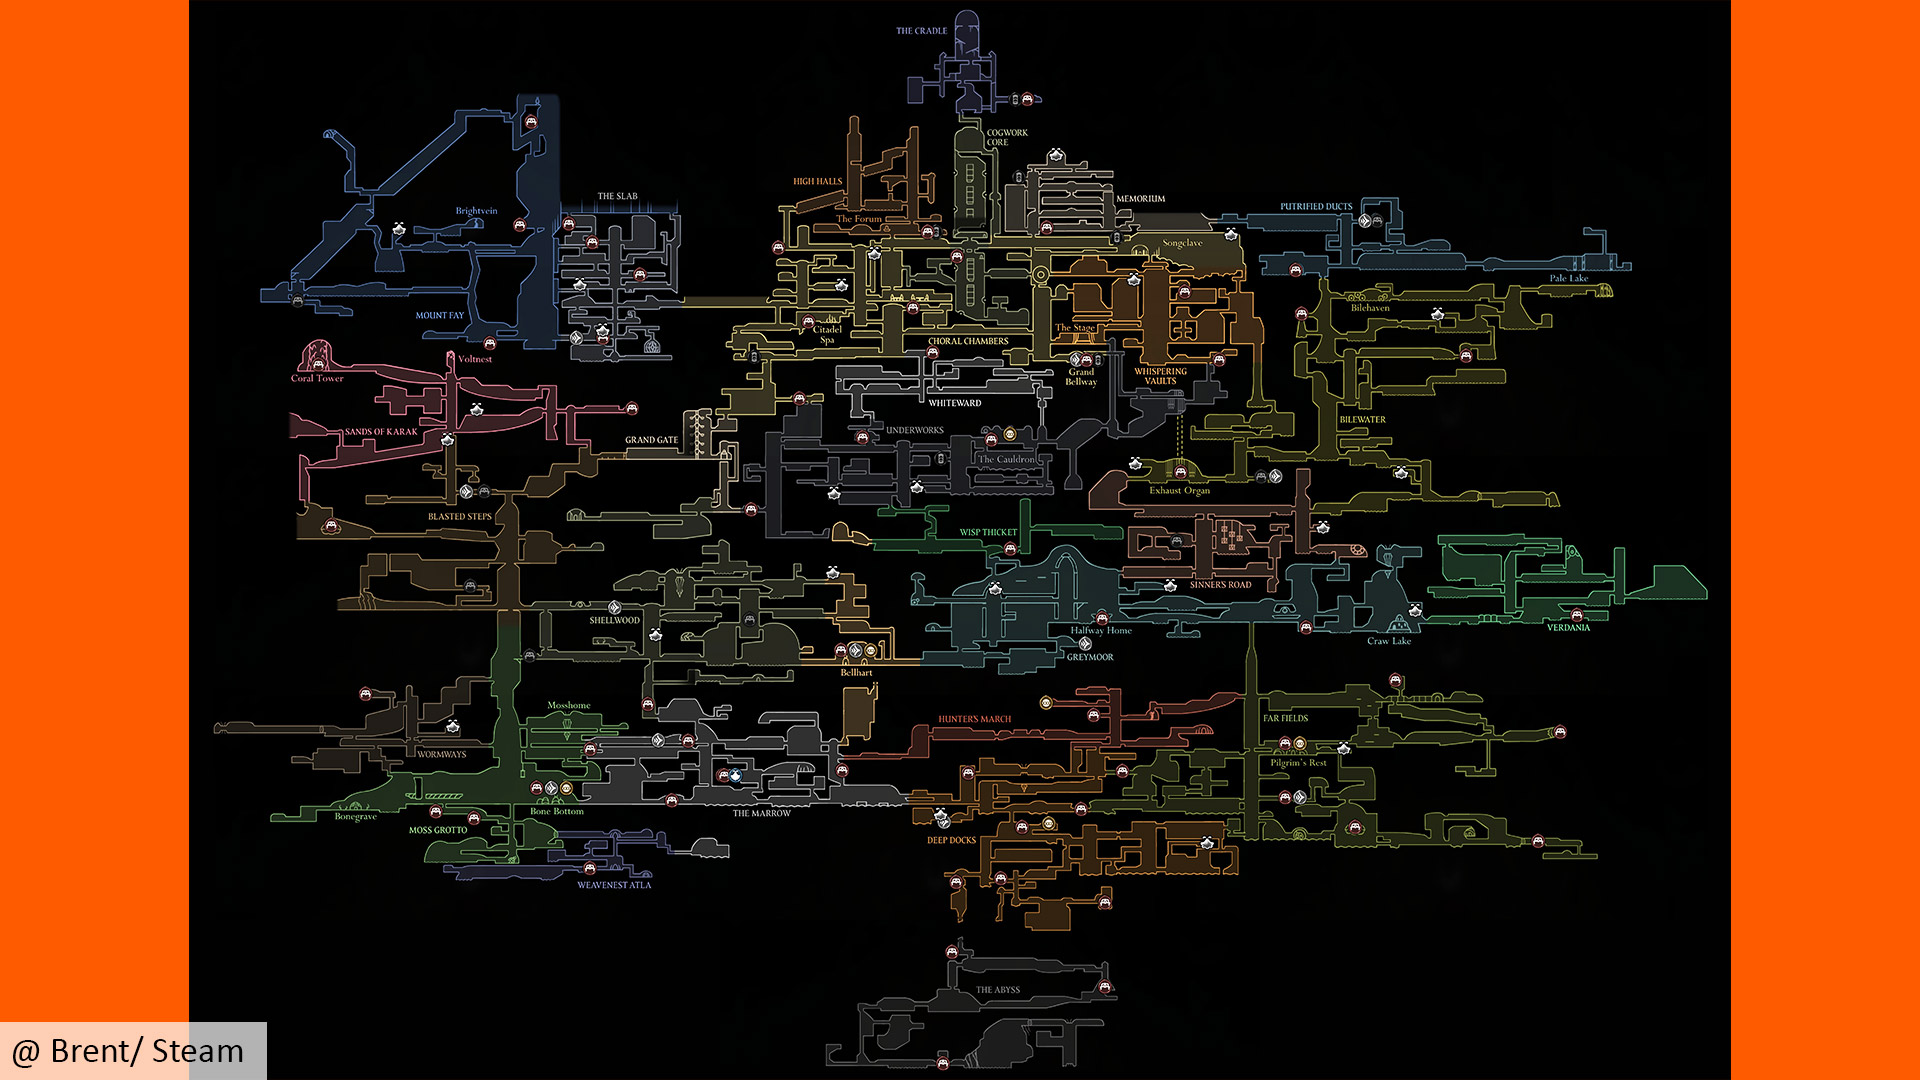
Pharloom is big. Not just “a little larger than Hallownest” big — structurally taller, broader, and packed with sub-areas that branch off core biomes. That scale changes how you navigate: Silksong breaks the world map into region-specific sheets that you must find or purchase, and it leans on pins and fast travel to keep the climb manageable.
How mapping works in Silksong
Silksong uses separate maps for each biome. Early on, you’ll usually buy a region’s map from an NPC cartographer (Shakra). Later zones often use in-world mechanisms — models, plates, or hidden alcoves — that grant the map when you reach them.
- Benches restore health, set your respawn, and are where you equip tools and crests.
- The Quill lets Hornet annotate newly explored rooms on her current area map.
- A Compass tool shows your position on the map.
- Pins mark important features: benches, fast-travel nodes, and more. Buy what you can early.
- Bellways are the fast-travel network; add their pins to reduce backtracking as the world opens.
Tip: Save a cushion of Rosary Beads in new biomes. Shakra’s maps and essential pins (Quill, Compass, benches, Bellways) pay for themselves in reduced wandering and fewer lost runs.
Early-game map pickups (spoiler-light)
- Bone Bottom & The Marrow — Your first proper cartography stop. Climb into the upper Marrow; you’ll hear Shakra humming nearby. Buy both area maps and prioritize the Quill and Compass while you’re here.
- Deep Docks — Along the main rightward path from Marrow, Shakra is just off-route near a bench sign. Pick up the area map and Bellway pins.
- Far Fields — Shakra may not hum in this biome. Push far right from the entrance; a small cave off an open room hides the cartographer. Look for ring markers that hint you’re on the right track.
- Greymoor — From the entrance, head right a screen, drop down, and you’ll find Shakra. Greymoor spans multiple layers; having pins before you commit to a direction helps.
Midgame route markers that matter
- Bellhart & Shellwood — You’ll pass through Bellhart but do most legwork in Shellwood. Work left to a locked gate, then climb and loop to an elevator hub; there’s a left exit just above that often leads to Shakra. Buy both area maps here.
- Blasted Steps — A vertical gauntlet with wind and punishing falls. Activate a mid-climb lever that drops a platform for future attempts, then keep ascending and drift right. After an aerial enemy encounter, follow ring signage to reach Shakra.
Note: Some rooms in these biomes soft-gate progress with movement tools. If a route looks “almost reachable,” it usually is — just not yet. Mark it mentally and move on.
Citadel-adjacent and late-game map unlocks
- Underworks — After a major story beat drops you below the city, climb a short way and peel into a signed side room for a free crude map.
- Coral Chambers — The area map comes from a city model you can purchase. It’s available early for a lower price if you check the model before heading deeper; otherwise, you’ll see it again on a higher loop through the chambers at a standard price.
- Cogwork Core — Enter from the lower side, then climb a side room with an inactive warrior. Step on a pressure plate to receive the map (free). There’s a nearby bench you can activate by interacting with a mechanism above it.
- Whispering Vaults — One of the trickier unlocks. As you move right from the entrance, clear a heavy guard, then strike a small dangling piece above that arena to drop a ladder. Climb to a left-hand model that sells the area map.
Expect more of these model/plate interactions in the upper reaches of Pharloom. They’re a quiet way the game checks whether you can reach a space before it gives you visibility into it.
On size, structure, and gating
Silksong’s map comprises dozens of distinct regions and sub-areas, interleaved vertically in a sustained climb. Several zones branch into tucked-away pockets that only open after story milestones or once you’ve picked up new movement abilities. That means the “complete map” you see circulating is accurate as a whole, but your personal version will fill in piecemeal and out of order, and some connections don’t make sense until much later.
Practical implications:
- Don’t grind a single locked route. Spiral outward, add Bellway connections, and come back with new mobility.
- Use benches as anchors. When a risky detour looks promising, set a nearby bench first to shrink the runback.
- Pin your priorities. If you’re chasing progress, bench/Bellway pins usually return more value than individual collectible pins until late game.
Fast, spoiler-light checklist
- Buy the Quill and Compass at your first Shakra stop.
- Grab bench and Bellway pins as soon as you can afford them.
- In biomes where Shakra doesn’t hum, push to the rightmost obvious path and scan for ring markers and small side caves.
- In Citadel-adjacent areas, look for city models, pressure plates, or hidden ladders rather than a humming vendor.
- If you can see a room on the map but can’t reach it, flag it mentally as a tool-gated route and keep moving.
The takeaway: Silksong’s cartography is a progression system. Secure each biome’s map early, establish fast-travel links, and let the world’s vertical design guide you forward. The climb is longer than it looks — and it’s built to be mapped in layers.