
Unlock the Drifter’s Cloak from the Seamstress in Far Fields, then pass back through the lava pit—Fourth Chorus will awaken and block your return path in Hollow Knight: Silksong.
This guide shows where the fight triggers, how the boss behaves, and two consistent ways to finish the encounter—either by forcing the ceiling kill or by standard damage to the head.
Prerequisites and where to trigger the fight
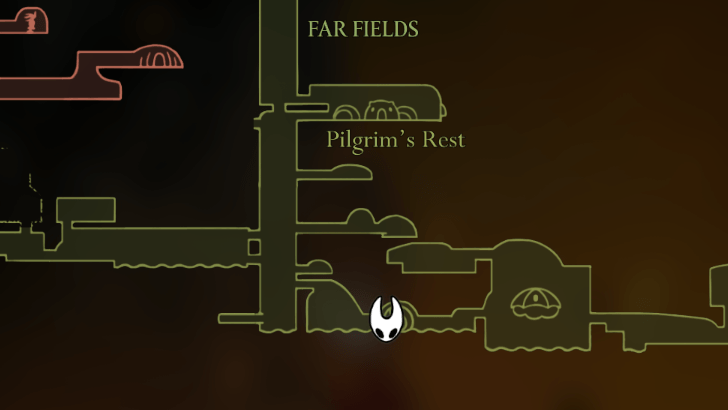
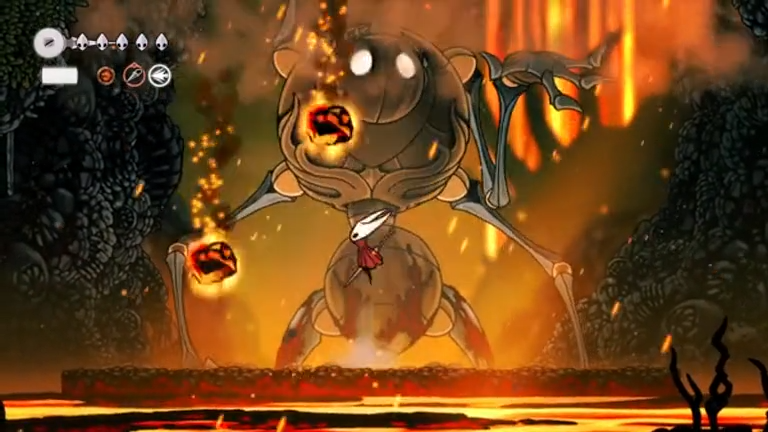
Fourth Chorus sits in the lava pit in Far Fields, near the route back from the Seamstress. It remains dormant until you obtain the glide (Drifter’s Cloak) and attempt to leave the area. Expect a large arena with segmented platforms over lava and strong upward drafts later in the fight.
- Prerequisite: Complete the Seamstress’s glide quest to receive the Drifter’s Cloak (used to ride updrafts).
- Trigger: Re-enter the lava pit on your way back from the Seamstress; the boss animates and starts the battle.
- Weak point: Only the head takes damage; hands cannot be harmed.
Method 1 — Quick finish via ceiling “detonators” (fastest)
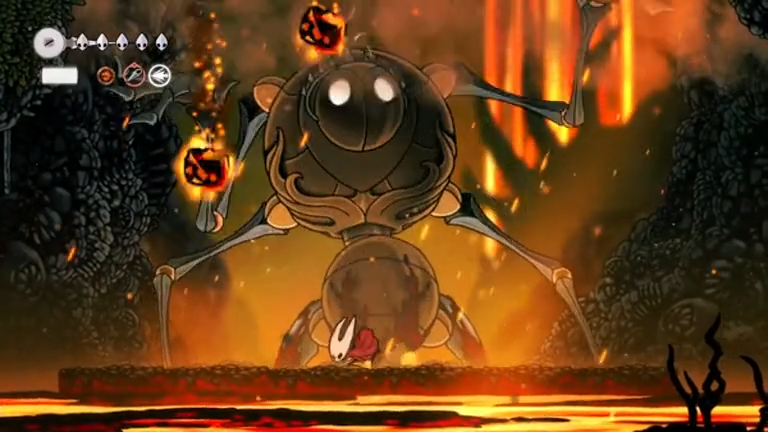
Once you’ve knocked Fourth Chorus down twice, air vents appear on both sides that let you glide to the ceiling. Hitting the two glowing molten rocks on the ceiling causes a large stalactite to drop onto the boss for an instant kill.
Step 1: Focus on safe head hits until you down the boss two times. Use Attack + Up during short hops to connect with the head, then back away to reset.

Step 2: Watch for two vertical updrafts to open on the far left and right edges of the arena. These appear after the second knockdown to signal the finisher phase.
Step 3: Ride an updraft with your glide. Hold your glide input (for most players: Hold Jump) inside the air stream to ascend steadily without drifting into hazards.
Step 4: Strike the first glowing molten rock on the ceiling. Land safely, then cross to the opposite updraft and repeat to hit the second rock.
Step 5: Move out from under the center of the ceiling. The central rock will drop as a massive stalactite and crush Fourth Chorus, ending the fight on impact.
Method 2 — Standard damage route (consistent and simple)
You can defeat Fourth Chorus by repeatedly striking the head between patterns. This route prioritizes positioning and short, safe punishes.
Step 1: Hold the center lane beneath the boss’s head. From here, you can step left or right to avoid follow-ups without overcommitting.
Step 2: Punish the Ground Slash. When a hand winds up and sweeps across the platform, jump it and poke the head with one or two Attack + Up hits, then drop back to center.
Step 3: Rotate away from Ground Smash. When an upper arm aims directly downward, walk off the threatened segment before the slam removes the platform, then take a quick head hit as the arm recovers.
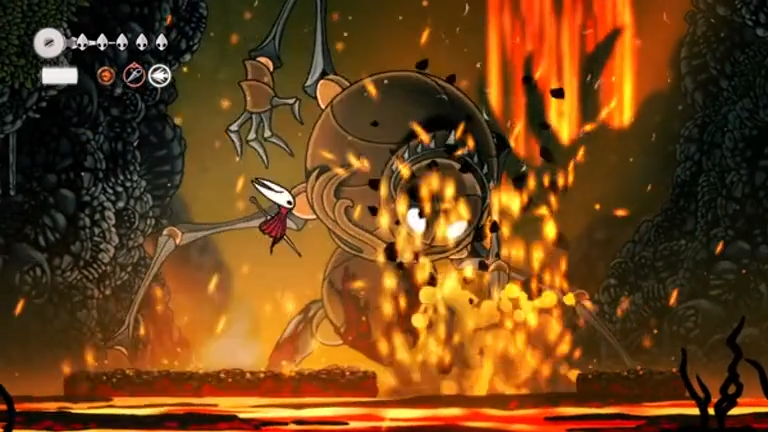
Step 4: Keep mobile during falling rocks. When the boss hammers the ceiling, lava stones fall straight down. Watch the floor/camera and keep moving vertically under safe gaps; squeeze in brief head hits only when the path is clear.
Step 5: Maintain arena access with glide and dash. If you’re pushed toward an edge or lose floor, use glide to cross gaps and a quick air Dash to stabilize before resuming head pokes.
Fourth Chorus attack patterns and tells
- Ground Slash. A hand brightens slightly, then sweeps horizontally across the floor segment; jump the hand and counter with a short hop head poke.
- Ground Smash (platform removal). The upper arm points straight down before the slam; step off the affected segment early to avoid losing footing, then punish recovery with a quick hit.
- Ceiling hammer (falling molten rocks). Both hands pound upward and rocks drop vertically at random spots; keep moving through safe columns and limit attacks to clear openings.
Loadout and positioning tips
- Head-only damage. Don’t waste time hitting hands—they don’t take damage. All offense should be short, upward head strikes.
- Use the middle lane. Standing center reduces travel time to safe ground after platform breaks and simplifies rock dodge paths.
- Leverage glide and air dash. Glide gives precise height control in drafts and over gaps; an air
Dashcan save a slip during rock sequences. - Optional mitigation. If you have a lava/magma damage reduction crest such as Magma Bell, equip it to reduce chip from mistakes near the lava.
What happens after victory
Defeating Fourth Chorus clears the way forward; don’t expect a direct item drop. From the lava pit, head left in Far Fields and ride the large vertical updraft shaft with the Drifter’s Cloak to progress.
Whether you end it fast with the ceiling drop or chip the head safely, the fight rewards steady movement and short punishes. Use the vents once they appear—the quick kill route saves time and risk.