
Crystals are some of the most striking blocks in Hytale’s caves, but they’re also easy to lose by mining them the wrong way. If you hit them with basic tools, they shatter and disappear instead of dropping anything you can use.
How crystal nodes work in Hytale
Crystal formations appear underground in different colors, but they all behave the same in gameplay terms. The block itself is fragile. If you try to break it with anything below the right tool tier, it simply destroys itself and leaves nothing behind.
When you meet the tool requirement, the node doesn’t drop a full crystal block. Instead, it yields Crystal Shards, which act as the common crafting ingredient for all crystal-themed decorations.
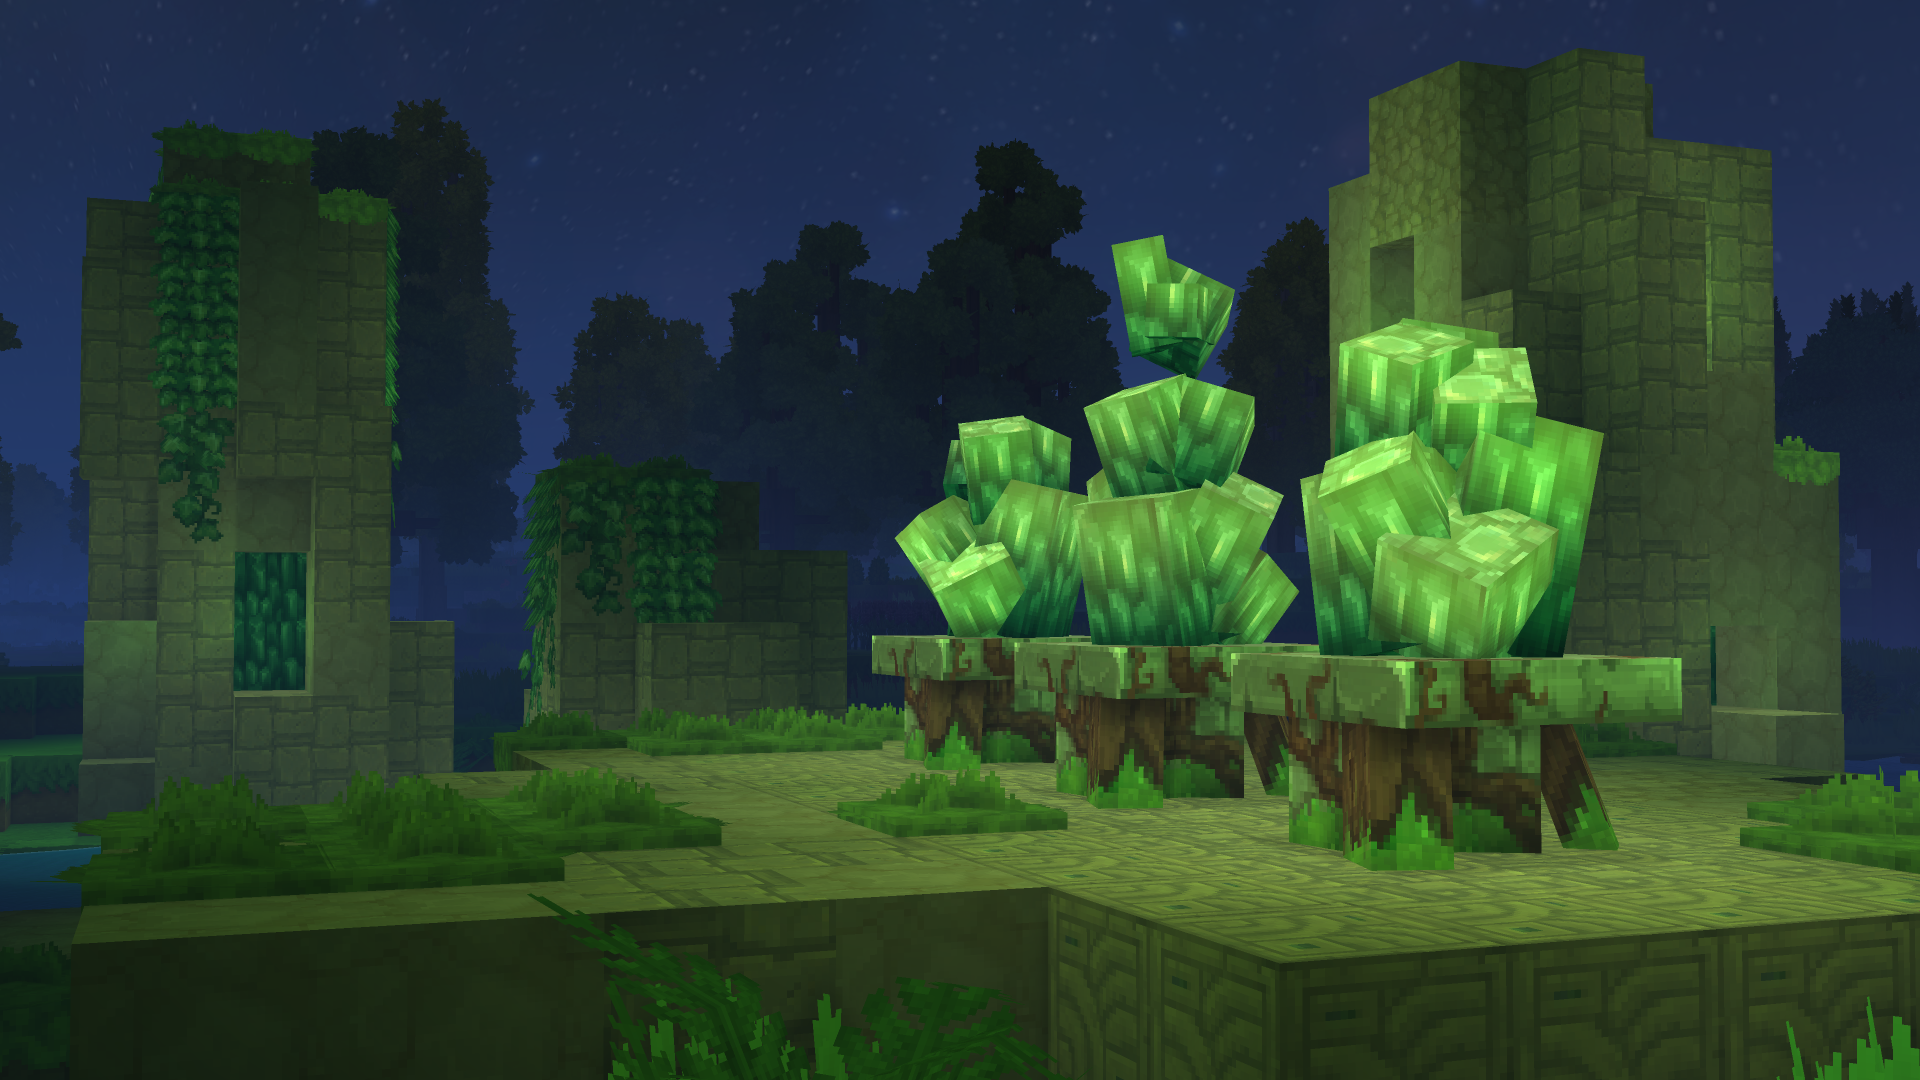
Color only affects the look of the light and blocks you eventually craft, not the mining rules. A glowing green cluster and a blue one both need the same pickaxe tier and both drop shards rather than intact blocks.
How to unlock the Iron Pickaxe (the only tool that works on crystals)
To reliably harvest any crystal node, you need an Iron Pickaxe. Lower-tier picks cause the crystal to break with no drops, which is why early trips into caves often feel punishing.
Step 1: Place a basic Workbench. Craft it from x4 Any Tree Trunk and x4 Any Stone, both of which are easy to gather in the starting area near spawn. Once crafted, put the Workbench down in your base so you can access tool recipes.
Step 2: Open the Workbench and switch to the Tools tab. The Iron Pickaxe recipe appears there once you have the required materials in your inventory.
To craft the Iron Pickaxe, you need three different resources:
| Material | Amount | Where it comes from |
|---|---|---|
| Iron Ingot | x5 | Smelted from iron ore at a Furnace, with ore commonly found in the Badlands biome (the desert-like zone). |
| Light Leather | x2 | Produced by tanning Light Hide on a Tanning Rack. Light Hide drops from small animals such as cows that roam forests near spawn. |
| Linen Scrap | x2 | Dropped by Skeletons, a common hostile mob in the forested areas around your starting position. |
Step 3: Forge your Iron Ingots before you worry about the rest of the recipe. Set up a Furnace, smelt the iron ore you bring back from the Badlands, and make sure you have all five ingots ready.
Step 4: Build a Tanning Rack so you can turn Light Hide into Light Leather. Hunt cows or other small animals in the forest near spawn until you have enough hides, then tan them into two pieces of Light Leather.
Step 5: Fight Skeletons in nearby forests to gather at least two Linen Scraps. Once you have all three ingredients in the right quantities, return to the Workbench Tools tab and craft the Iron Pickaxe.
Once the Iron Pickaxe is in your hotbar, you’re finally equipped to mine crystal nodes properly rather than watching them disintegrate.
Where to find crystals and how to mine them without losing drops
Crystals live in caves, often visible from a distance thanks to the colored glow they emit. They are visually distinct from lava; if you see light that looks blue, green, pink, or any non-orange hue, it’s worth investigating.
Step 1: Head underground with your Iron Pickaxe, food, and basic gear. Follow tunnel systems until you notice a soft colored glow ahead. Avoid confusing it with lava’s harsh orange light.
Step 2: Approach the glowing formation and mine the crystal block only with the Iron Pickaxe. If you switch to a weaker pick or another tool, the block breaks and yields nothing.
Step 3: Collect the Crystal Shards that drop. These are the only form crystals take in your inventory and serve as the input for every craftable crystal decoration.

There is also at least one combat source of shards. An Earthen Golem that guards the Forgotten Temple Gateway can drop Green Crystal Shards when defeated. The golem respawns over time, so it can be farmed if you want a focused supply of that specific color.
What Crystal Shards are used for
Crystal Shards feed directly into building recipes rather than weapon or armor upgrades. Their entire role is decorative, but they offer more atmospheric options than simple torches.
With enough shards and the right workstation, you can craft several shapes and block types:
- Small Crystals that work as subtle accent pieces on shelves, walls, or tables.
- Medium Crystals that stand out more in rooms and corridors.
- Large Crystals that act as strong visual anchors in a build, such as the center of a shrine or a cave base.
- Crystal Blocks that behave like full building blocks for walls, floors, or structural accents.
All of these items keep the glow of their parent shards, so a green shard leads to green-lit crystals and blocks, and so on. None of these recipes introduce new mechanics beyond light and aesthetics; they are not tied to special weapons, tools, or progression systems.
How to craft crystal decorations at the Builder’s Workbench
Crystal recipes don’t appear at the basic Workbench. They live behind the Builder’s Workbench, which focuses on construction and decorative items.
Step 1: Craft a Builder’s Workbench. The recipe uses x6 Any Tree Trunk and x3 Any Stone. Place it somewhere central in your base so you can reuse it for general building pieces as well.
Step 2: Open the Builder’s Workbench and browse its categories. Crystal recipes become available once you are holding Crystal Shards in your inventory.
Step 3: Choose which crystal size or block you want and craft it using shards of the color you prefer. The more dramatic pieces, like Large Crystals or full Crystal Blocks, naturally consume more shards per craft.
Crystal decorations can’t be dismantled back into shards. Once crafted, they are a one-way conversion. If you build more Small Crystals than you need, they will sit in storage unless later systems change how they work.
At the moment, Small Crystals in particular do not appear to have further uses or upgrades once crafted. They function purely as decorative light sources or set dressing, so craft them only if you are confident they fit your build plans.
Why crystals keep breaking with “no drop” and how to avoid it
The most common frustration with crystals comes from hitting them without the right pickaxe. The game doesn’t present a special warning; the block simply shatters and despawns.
There are two simple checks to avoid wasting them:
- Make sure your active pickaxe is explicitly an Iron Pickaxe, not a stone or wooden one.
- Avoid switching tools mid-swing. If you change items as you click, the game may register the hit with a weaker tool.
If a crystal breaks and you see no shards at all, treat that as a sign to upgrade your gear before mining any further clusters in that cave system.
How crystals relate to other decorative blocks in Hytale
Crystals sit alongside other decorative blocks such as the Zone 1 Elemental Crystal found in Emerald Grove stone circles. That specific block is categorized as decoration as well and emits light, but it is tied to environmental structures rather than standard cave ore generation.
The Zone 1 Elemental Crystal has a thematic connection to the Earth element, yet no specific quest, crafting recipe, or drop behavior is defined for it. It reinforces a pattern: Hytale uses crystals primarily as atmospheric and thematic set pieces, not as direct power spikes for combat.
For practical base building, cave crystals plus the Builder’s Workbench are the route to repeatable, player-placed glowing blocks. World-embedded crystals like the Zone 1 variant instead signal lore and elemental themes across the map.
Once you have an Iron Pickaxe and a Builder’s Workbench in place, crystals shift from being frustrating, breakable props to a reliable lighting and building resource. Treat Crystal Shards as you would any other mid-tier material: mine them deliberately with the proper tool, store them until you have a clear design in mind, and only then convert them into specific crystal items you know you’ll use.