
Lighttpd is a fast and flexible open-source web server that’s comparable in performance to Nginx. For hosting PHP applications like WordPress, Magento, etc. on a Lighttpd server, you need to set up an LLMP stack on your server. LLMP stands for Linux, Lighttpd, MySQL, and PHP.
Thanks to Lighttpd’s performance, an LLMP stack easily outperforms a LAMP (Apache) set up on any given traffic volume. As far as LLMP vs LEMP (Nginx) goes, performance is mostly similar. But Nginx being a more popular choice among the masses, there’s excellent community support for LEMP setups.
If you are looking for a server to handle loads of traffic with minimal memory consumption, then an LLMP setup is a good choice. In this guide, we will look at how to install the LLMP stack on an Ubuntu 20.04 LTS machine.
Prerequisites
You will need an Ubuntu 20.04 LTS server and logged in as a sudo enabled user. You will also need to have a basic understanding of Linux commands.
Before we begin, update and upgrade the packages on your Ubuntu 20.04 server by issuing the command below:
sudo apt-get update && apt-get upgradeInstall the Lighttpd web-server
To install the Lighttpd web server on your Ubuntu 20.04 machine just enter the following command in your terminal.
sudo apt-install lighttpdOnce the installation process is complete, type the following commands to start and enable the Lighttpd web server.
systemctl start lighttpd
systemctl enable lighttpd
To check the status of the Lighttpd server, type the command shown below.
systemctl status lighttpd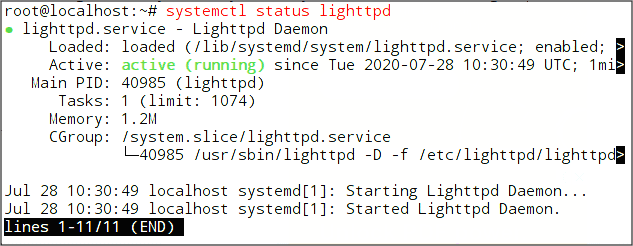
💡 Tip: To remove the last line with (END) written on it, press ESC and q to be able to enter further commands.
Now we will set up HTTP, HTTPS, and SSH service in the UFW firewall. UFW is the default firewall configuration tool for Ubuntu, also called as Uncomplicated Firewall. Type the following commands and press enter one-by-one.
sudo ufw allow ssh
sudo ufw allow http
sudo ufw allow https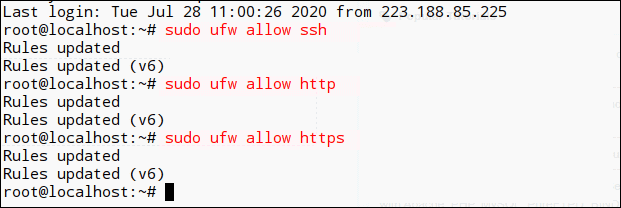
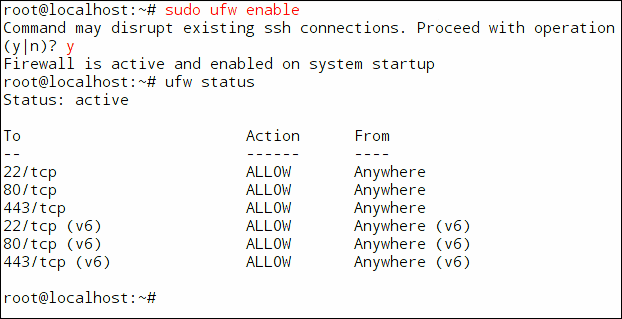
Enable UFW firewall by issuing the following command:
sudo ufw enableIf you get prompt for ‘Command may disrupt existing ssh connections”, type y and hit enter.
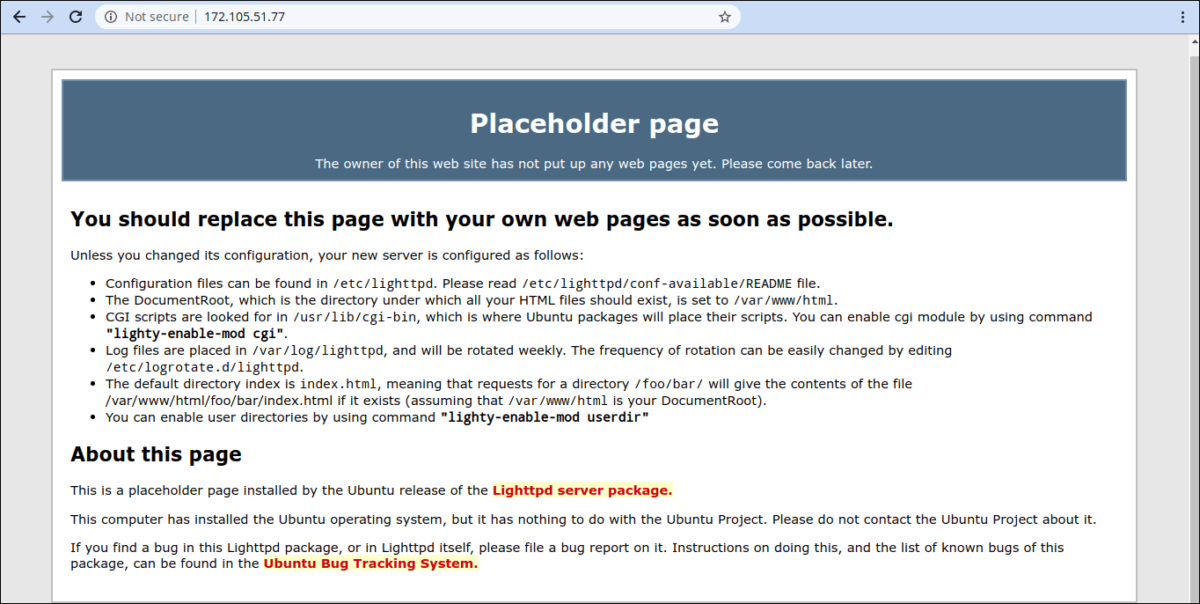
To verify Lighttpd installation, access the server by its IP address in a web browser. If it shows the following screen, then it means your Lighttpd web server is installed successfully on your Ubuntu 20.04 machine.
Install and Configure MySQL server
MySQL is a relational database management system based on structured query language. To install the MySQL server and client on Ubuntu 20.04, copy/paste the following command and hit enter.
sudo apt-get install mysql-server mysql-clientIt will prompt you with a message that this operation will take 247 MB of additional disk space after installation. So, type y and hit enter.
Once the installation process is complete, start and enable MySQL server and add it to the system boot by issuing the following commands one-by-one.
systemctl start mysql
systemctl enable mysql
You’ll see the following message on your screen:

To check the status of your MySQL service, type the following command in the terminal. The mysql.service status should show as “active (running).
systemctl status mysql
To configure MySQL security settings, we will execute a security script that comes with the MySQL package. Type the following command and hit enter to execute the script.
mysql_secure_installationThe above command will prompt you a few questions to configure the MySQL server.
It will ask you to set up your password using VALIDATE PASSWORD COMPONENT. This plugin will help you to set up a strong password for your MySQL databases. Press y and hit enter to enable this plugin. Type 0, 1, or 2 to choose the password validation policy which determines the strength level of your password.
Enter a strong password, the VALIDATE PASSWORD plugin will tell you about the estimated strength of your password. Press y and hit enter.
After setting up a secure password, configure the rest of the setup as explained below.
- Remove anonymous users – Enter
y|Y
Because MySQL by default contains anonymous user that allows anyone to connect into the MySQL server without having the user account. Therefore, remove it. - Disallow root login remotely – Enter
y|Y
Because root should only be allowed from the ‘localhost’. It ensures that someone cannot login as root outside of your network. - Remove test database and access to it? – Enter
y|Y
Because MySQL comes with a test database that anyone can access. Thus, remove it before moving into the production environment. - Reload privilege tables now? Enter
y|Y
Because this will ensure that the changes that you have made so far take effect immediately.
To check all users that can access the MySQL server, first, log into the MySQL as root using the command below:
mysql -u root -pThen, issue the following command to get the users list on your MySQL server:
select User, Host from mysql.user;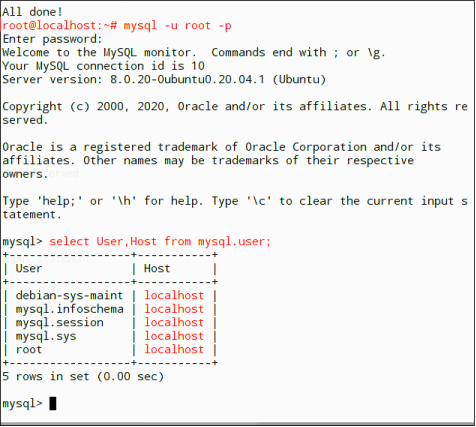
Once you’ve verified the users list, type exit to log out from the MySQL shell.
Installing PHP – Fast CGI process manager (PHP-FPM)
PHP-FPM enables a server to handle tremendous amount of load even on a low-end server. It claims to cut the loading time by 300 per cent on certain PHP applications.
To install the latest PHP-FPM packages, issue the following command and hit enter.
sudo apt-install php-fpm php-cgi php-mysqlFine tune the PHP-FPM configuration by making some changes in the php.ini file.
To do this first navigate to the directory/etc/php/7.4/fpm using the cd command as shown below.
cd /etc/php/7.4/fpmThen use the command below to open php.ini file in the vim editor.
vim php.iniUncomment the cgi.fix_pathinfo=1 line. Search for the line containing ‘cgi.fix_pathinfo=1‘ in the editor. To do this press ‘Esc’ and type /cgi.fix_pathinfo=1 and hit enter.
Then, press i to switch to insert mode and remove the ; (semicolon) symbol before the line or press the x button to uncommenty the line in php.ini file.
Once done, save the changes you made in the file and exit the vim editor by pressing Esc to enter into command mode and then type :wq and hit enter to exit the editor.
Start and Enable PHP-FPM by issuing the following commands:
systemctl start php7.4-fpm
systemctl enable php7.4-fpm
To check the status of PHP-FPM, run the following command:
systemctl status php7.4-fpm
Configuring the Lighttpd and PHP-FPM
We will now make some changes in the 15-fastcgi-php.conf configuration file to configure Lighttpd and PHP-FPM.
Navigate to the adequate directory by typing this command and hit enter.
cd etc/lighttpd/conf-available/If you want to keep a duplicate copy of the ‘15-fastcgi-php.conf‘ file then use the command below.
cp 15-fastcgi-php.conf 15-fastcgi-php.conf.origNow, we will open and edit this file using the vim editor using the command below:
vim 15-fastcgi-php.conf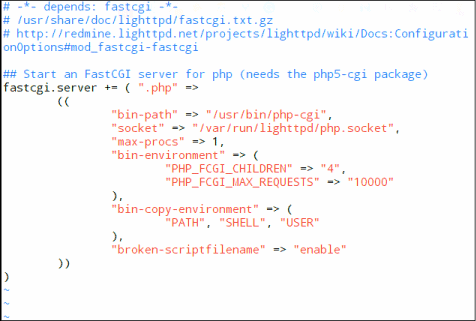
In here, replace the default PHP-CGI configuration content with the content shown below.
fastcgi.server += ( ".php" =>
    	((
            	"socket" => "/var/run/php/php7.4-fpm.sock",
            	"broken-scriptfilename" => "enable"
    ))
)
To do this follow the steps in the specific order as shown below.
- Press ‘
Esc’ and ‘i’ to get into the insert mode. - Now navigate to the lines that we have to delete using the
upordownarrow keys (up and down arrow keys work in vim editor and not in the vi editor). - To delete a specific line press
dd. And to remove a single word pressx. - Now copy/paste the above code in the file.
- Then save the file and exit vim by pressing
Esc,:wq, andenter.
Now Lighttpd will work adequately with the PHP-FPM and is appropriately configured.
Enable FastCGI Lighttpd modules using the commands below:
lighttpd-enable-mod fastcgi
lighttpd-enable-mod fastcgi-php
Lastly, restart the Lighttpd web server to apply the new configurations and settings.
systemctl restart lighttpdTest your LLMP Server
To test your freshly created LLMP server, we will create a file in the root of the public directory at /var/www/html.
First navigate to directory using the cd command as shown below.
cd /var/www/html/Create a new file let’s say file.php as shown below using the vim editor.
vim file.phpNow type this simple script in the editor by entering into the insert mode by pressing i.
<?php
phpinfo();
?>
Save and exit the file by pressing Esc and :wq.
The phpinfo() is a function that invokes information related to php. This script is just to test whether it’s working or not. You can also use other php scripts of your choice.
Finally, to test your server, open a web browser access the file we just created by entering the following address http://your-server-ip/file.php.

If the PHP Version page appears as a result then we can say safely say the LLMP stack is successfully installed on your Ubuntu 20.04 machine. You can now install the PHP applications you wish to run on the server.