
The Forge looks simple at first: throw ores into a pot, get a sword or a helmet out. Under the surface, it is a probability machine wired to ore counts, multipliers, and hidden traits. Once those three systems click, “recipes” stop being random guesses and start becoming reliable builds for Colossal Swords, Heavy Armor, and high‑value gear you can sell.
How crafting works in The Forge (weapons and armor)
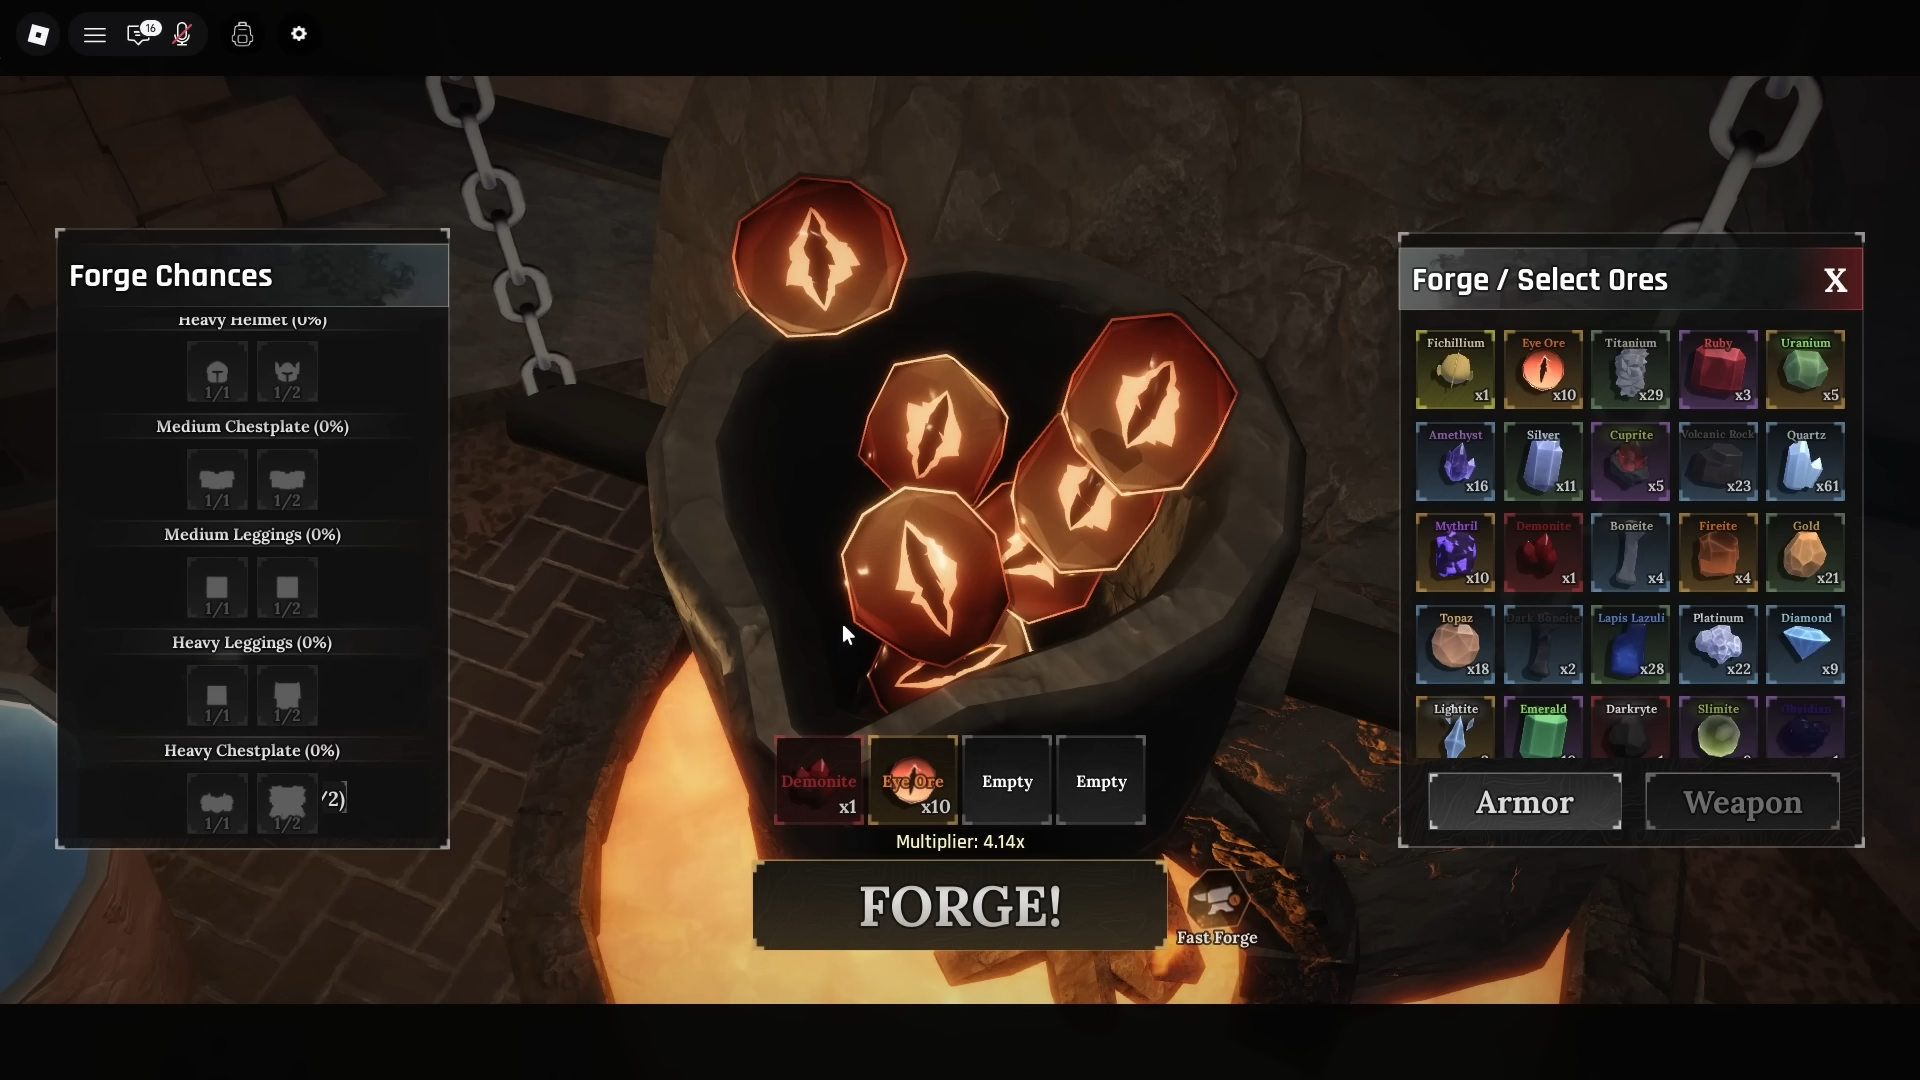
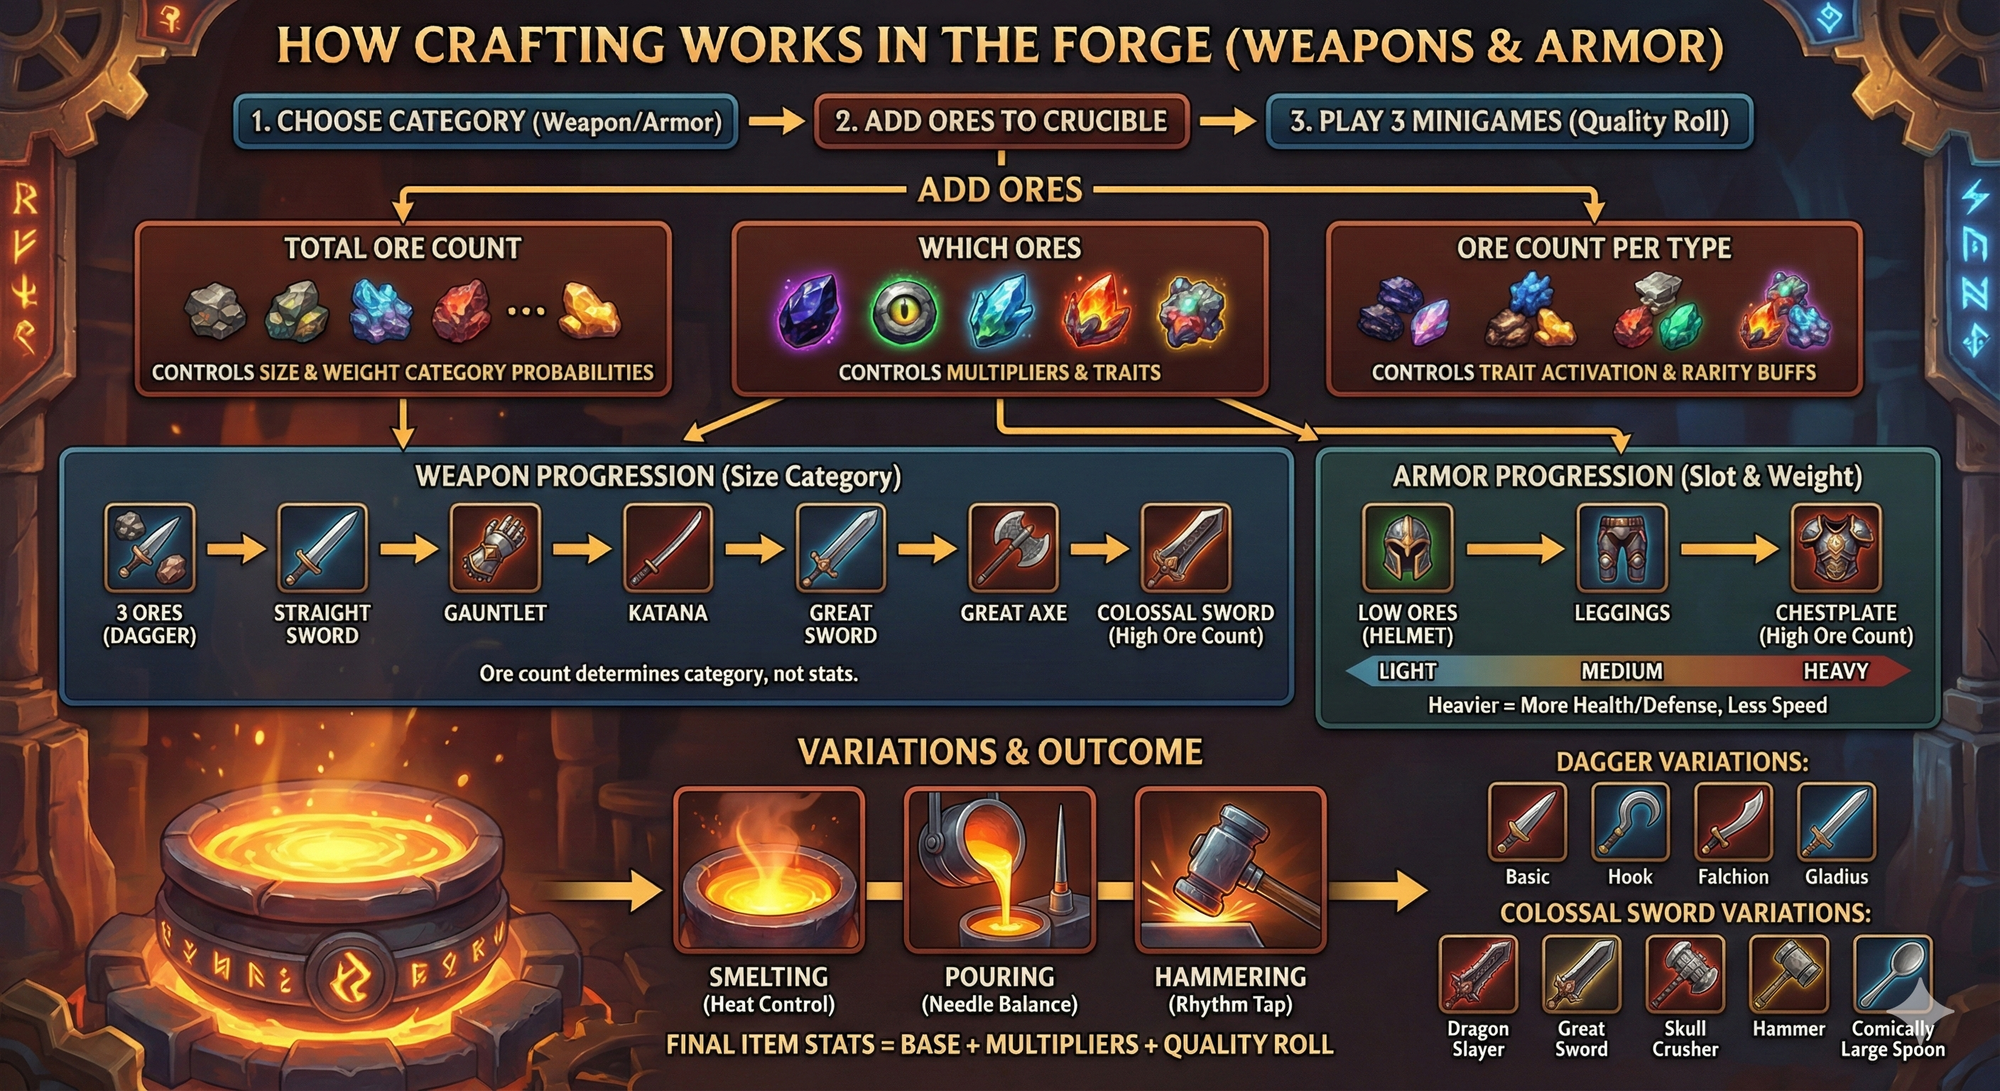
Crafting always follows the same structure: you choose an item category (weapon or armor), add ores into the crucible, then play three short minigames (smelting, pouring, hammering) that determine the quality roll. The important part happens before the minigames, when you choose:
- How many ores to add (controls size/weight category probabilities).
- Which ores to add (controls multipliers and traits).
- How many of each ore (controls which trait actually applies and which rarity’s buffs you get).
For weapons:
- At 3 ores you unlock the Dagger category.
- Adding more ores gradually pushes chances up through Straight Sword → Gauntlet → Katana → Great Sword → Great Axe → Colossal Sword.
- The ore count only affects what category you roll into, not the raw stats by itself. Stats come from base weapon + ore multipliers + quality roll.
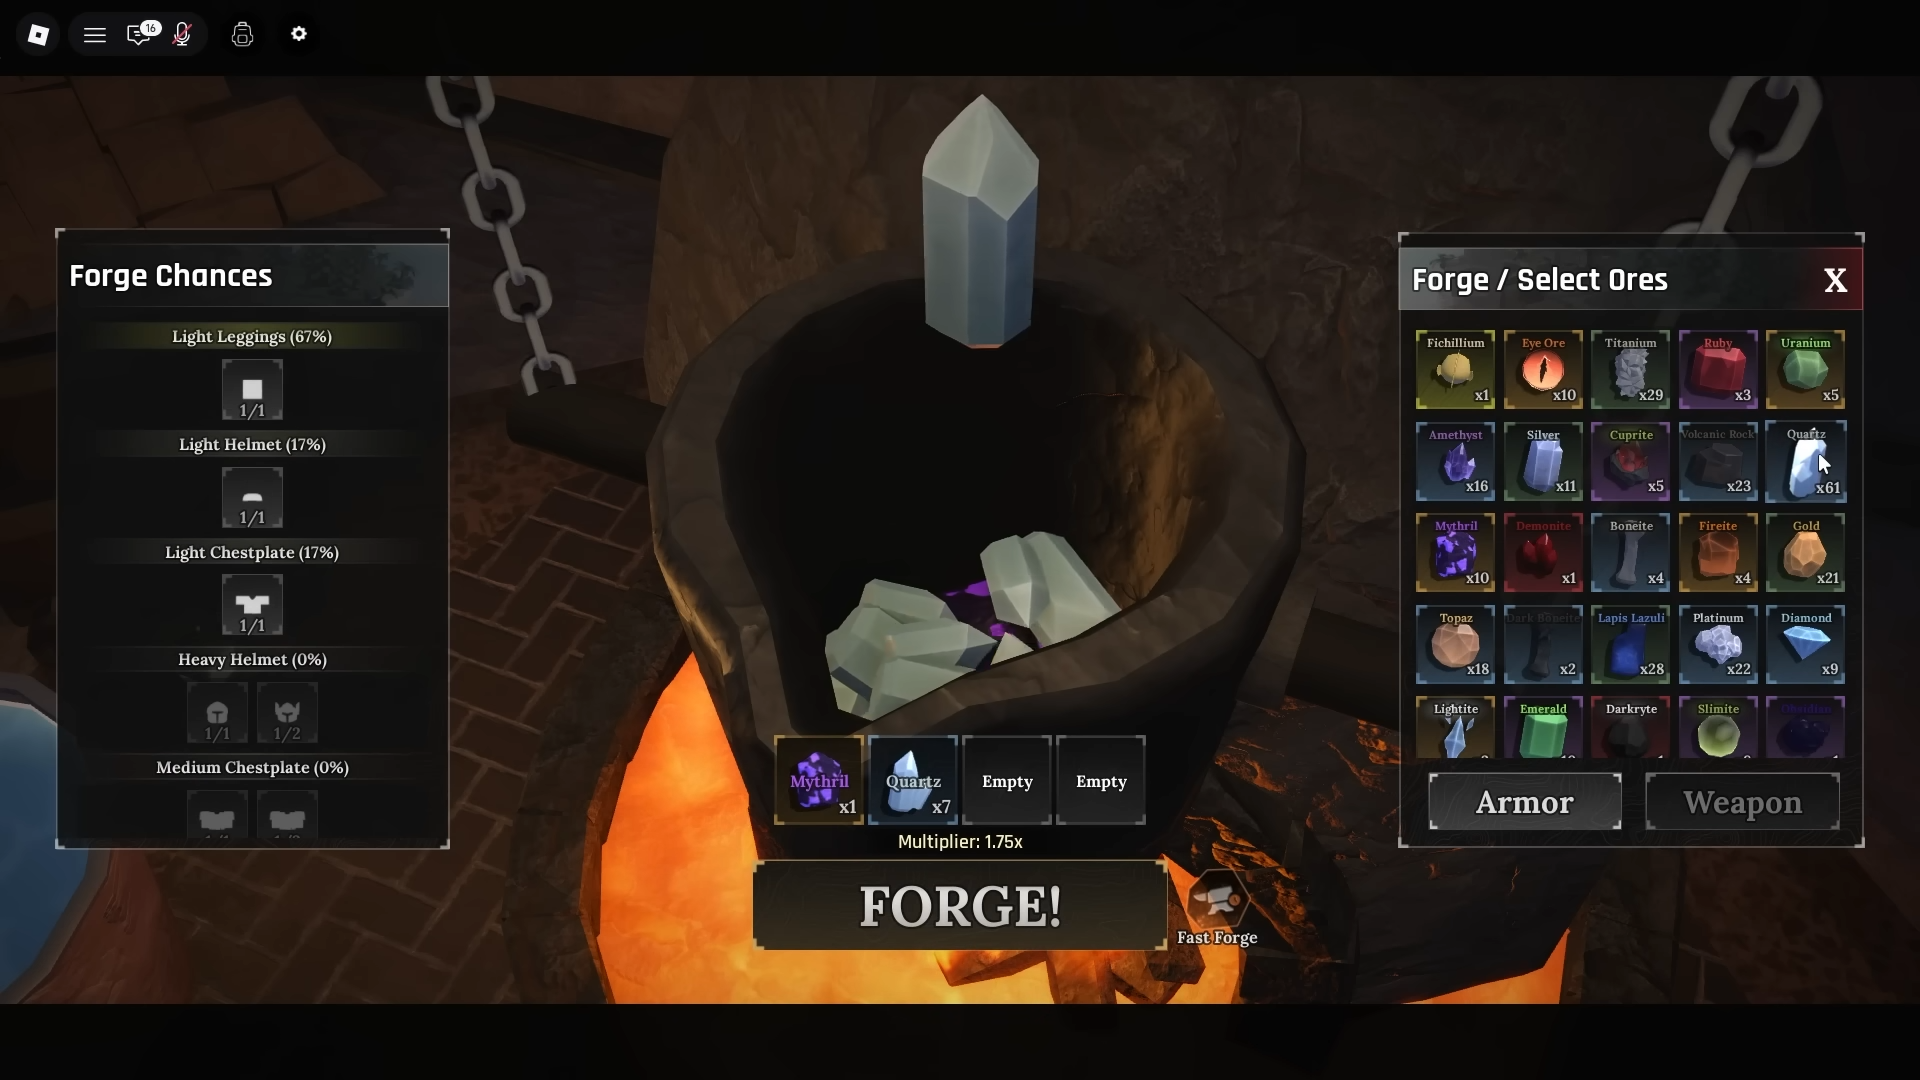
For armor:
- Ores first decide slot size: Helmet → Leggings → Chestplate as total ore count rises.
- Then they push you from Light → Medium → Heavy as you keep adding more.
- Heavier armor gives more Health/Defense but slows you down compared to Light.
Weapon and armor variations sit under these categories. For example, “Dagger” can become a basic Dagger, Hook, Falchion Knife, or Gladius Daggers with different chances. Colossal Swords can roll Dragon Slayer, Great Sword, Skull Crusher, Hammer, or a Comically Large Spoon with their own odds.
Ore multipliers and why “dilution” is your enemy
Every ore has a multiplier that scales the base stats and selling price of the item you forge. Think of it as:
Final stat ≈ Base stat × Average ore multiplier × Quality roll
Key rules:
- High‑rarity ores (Epic, Legendary, Mythical) have higher multipliers (for example, Darkryte at 6.3x vs low‑tier ore at 1x).
- When you mix ores, the game uses the average of their multipliers.
- Throwing low‑multiplier ores (like cobalt or quartz) into a pool of strong ores drags the average down.
So an efficient “recipe” has two goals:
- Reach enough total ore to unlock the weapon/armor category you want.
- Keep the average multiplier high by using mostly Legendary/Mythical ores and, at worst, a small amount of Epics.
Tip: If you plan to sell items for gold instead of using them, multipliers still matter. High‑multiplier items sell for much more, especially in Colossal and Heavy categories.
Ore traits (passives) and the 10% / 30% thresholds
Several endgame ores from the Forgotten Kingdom add powerful traits to whatever you craft. These traits only apply if that ore is a large enough share of the total ore count.
The rule is simple:
- ≥10% of total ore: the trait activates on the finished item.
- ≥30% of total ore: you get close to the full listed effect.
For example, if you use 10 ores to craft armor and you want the Obsidian defense trait:
- 1 Obsidian (10%) is enough to activate the trait but at reduced strength.
- 3 Obsidian (30%) gives you near the full “30% extra defense on Armor” effect.
Important: Very rare Mythical ores like Demonite and Darkryte are hard to maintain at 30% because you rarely own many copies. In practice you often run them at 10–20% just to get the passive at all, then build around Legendaries for multipliers.
Trait ores: what each one is good for
The strongest crafting “recipes” mostly revolve around a small group of trait ores mined in the Forgotten Kingdom’s Basalt and Volcanic areas. These are the ones that matter most:
| Ore | Rarity | Best on | Trait summary | Multiplier |
|---|---|---|---|---|
| Poopite | Epic | Armor/Weapons | Poison aura when below 35% HP, with fear effect. | 1.2x |
| Obsidian | Epic | Armor | ~30% extra defense on Armor. | 2.35x |
| Rivalite | Epic | Weapons | +20% critical strike chance on Weapons. | 3.33x |
| Uranium | Legendary | Armor | Deals 5% of max HP as AOE damage while in combat. | 3x |
| Mythril | Legendary | Armor | ~15% extra defense on Armor. | 3.5x |
| Eye Ore | Legendary | Weapons/Armor | -10% health, +15% damage boost. | 4x |
| Fireite | Legendary | Weapons | 20% burn for 2s with 30% chance on-hit. | 4.5x |
| Magmaite | Legendary | Weapons | 50% AOE explosion damage with 35% chance on-hit. | 5x |
| Lightite | Legendary | Armor | Movement speed boost. | 4.6x |
| Demonite | Mythical | Armor | Burn effect plus Demon’s Backfire passive. | 5.5x |
| Darkryte | Mythical | Armor | 15% chance to turn into shadow and dodge on hit. | 6.3x |
As a shortcut, the high‑impact ores split into two buckets:
- Weapon ores: Rivalite, Eye Ore, Fireite, Magmaite.
- Armor ores: Obsidian, Uranium, Mythril, Demonite, Darkryte, plus Lightite if you want speed.
Poopite is technically flexible, but its low multiplier and niche trigger make it more of a fun modifier than the core of a meta build.
Optimal ore counts for each weapon and armor tier
There is a practical range of total ore counts where you reach strong odds for each category without wasting materials. These “optimal” values give you high chances for a category while leaving room to manage traits and multipliers.
| Item category | Minimum ore | Optimal ore (approx.) |
|---|---|---|
| Dagger | 3 | 3 |
| Straight Sword | 4 | 8 |
| Gauntlet | 7 | 11 |
| Katana | 9 | 15 |
| Great Sword | 12 | 20 |
| Great Axe | 16 | 37 |
| Colossal Sword | 21 | 46 |
| Light Armor (Helmet) | 3 | 3 (more for Leggings/Chest) |
| Medium Armor (Helmet) | 10 | 17 |
| Heavy Armor (Helmet) | 20 | 46 |
Tip: For high‑end crafts like Colossal Swords or Heavy Chestplates, the ore requirements are so large that it is easy to push a rare trait ore under 10% by accident. Plan your totals first, then check that each key ore still meets its percentage target.
Best armor recipes (Heavy, with strong traits)
Heavy armor is the endgame target for most players because it packs the highest Health and Defense. The tradeoff is movement speed, so the goal is to stack defense traits while using multipliers strong enough to justify the slow playstyle.
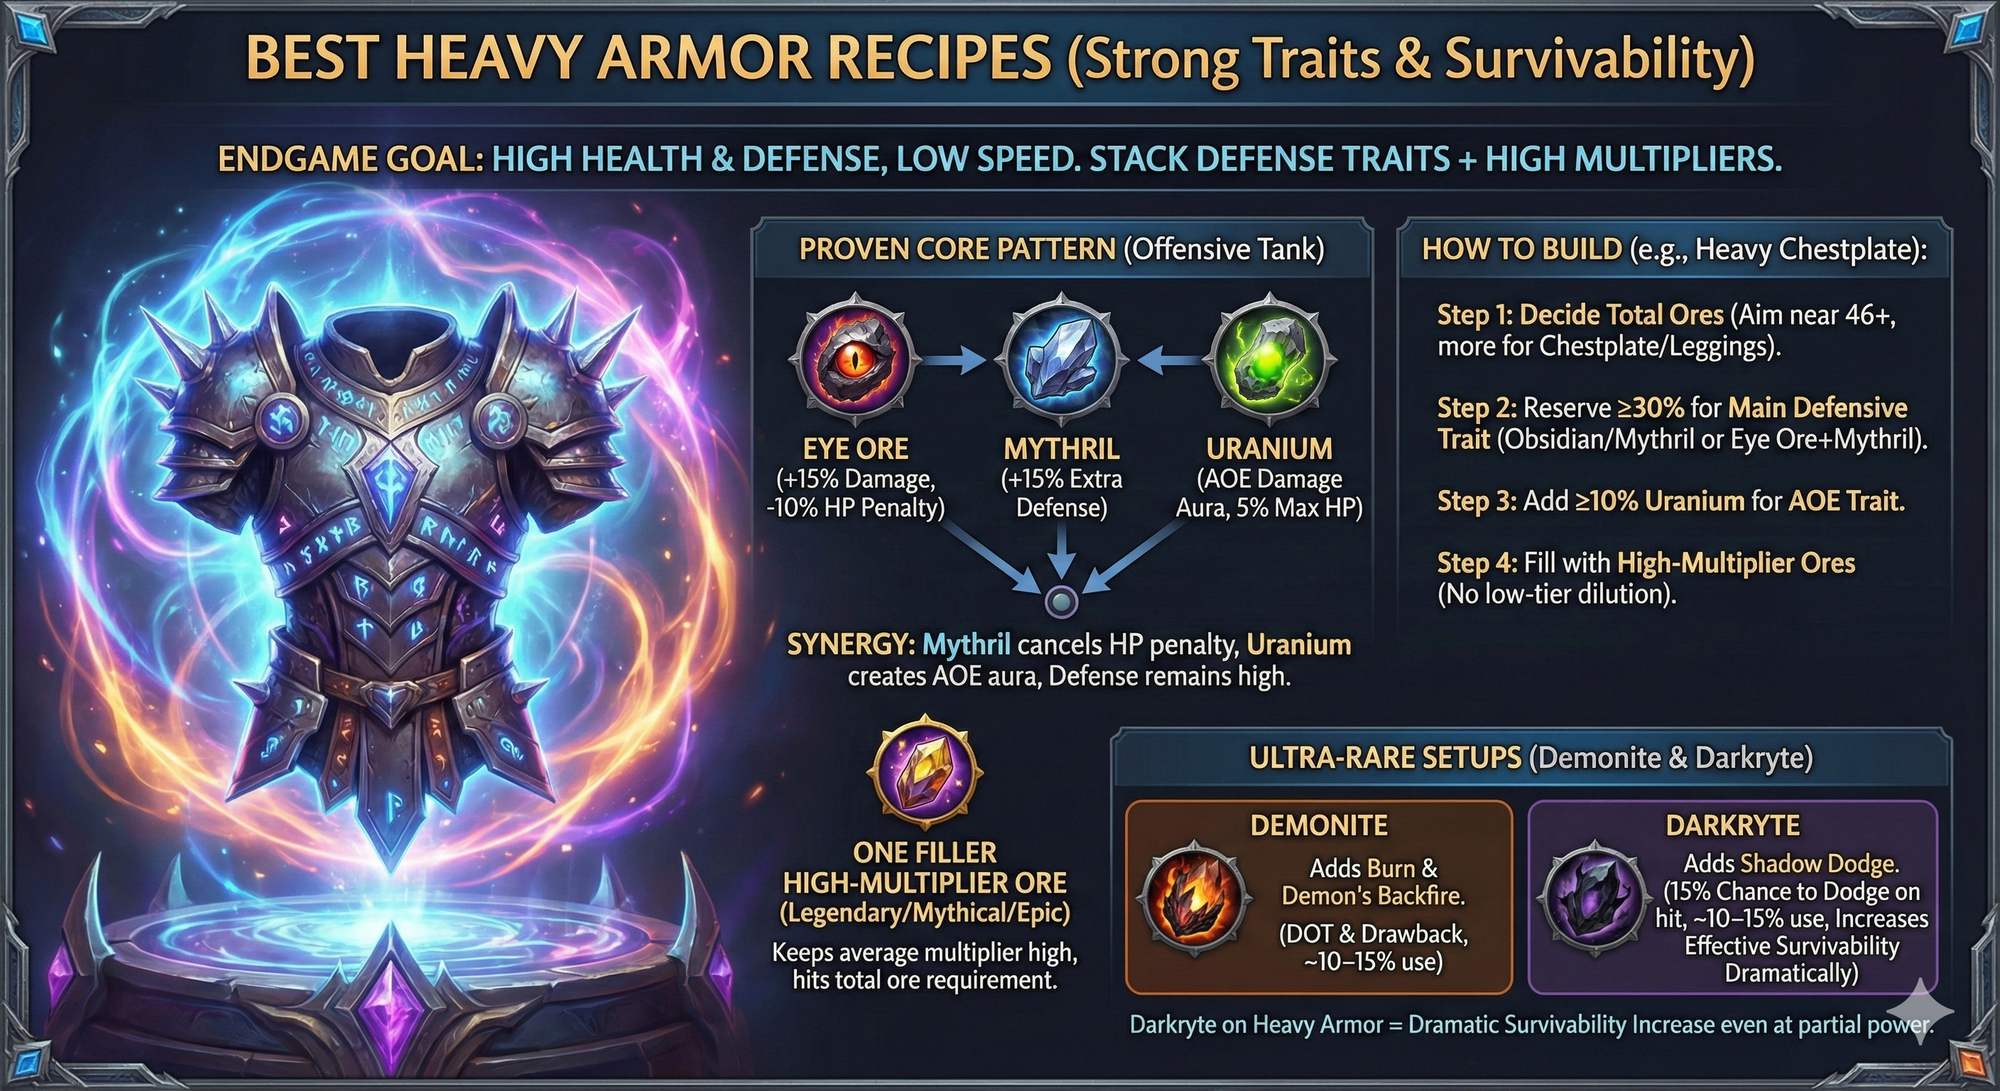
A proven pattern for late‑game Heavy armor is:
- Eye Ore (for +15% damage, accepting the -10% HP penalty).
- Mythril (for 15% extra defense).
- Uranium (for 5% max HP as AOE damage around you).
- One filler high‑multiplier ore to hit the total ore requirement and keep averages high (another Legendary or Mythical, or a solid Epic if needed).
This combination does three things at once:
- Cancels most of Eye Ore’s HP penalty with Mythril’s defensive boost.
- Turns you into a walking AOE with Uranium’s damage aura.
- Still pushes your raw defense high, making you hard to kill in close quarters.
When building a specific piece like a Heavy Chestplate:
Step 1: Decide how many total ores you will use (aim near the 46‑ore optimal mark for a Helmet, more if you are crafting Leggings or a Chestplate and want stronger Heavy odds).
Step 2: Reserve at least 30% of that total for your main defensive trait ore. For a pure tank, that is usually Obsidian or Mythril; for an offensive tank, Eye Ore + Mythril is the core.
Step 3: Add Uranium until it is at least 10% of the pool so the AOE trait activates.
Step 4: Fill remaining slots with high‑multiplier ores that do not dilute the average too much. Avoid low‑tier ores like cobalt or quartz at this stage.
For ultra‑rare setups, Demonite and Darkryte layer even more survivability on top.
- Demonite adds burn and Demon’s Backfire on armor, giving damage over time and a unique drawback.
- Darkryte adds a 15% chance on hit to become a shadow and dodge the attack completely, which is extremely strong on Heavy armor.
Because these ores are so rare, you usually run them at 10–15% of the total and accept a sub‑maximum trait strength. Even at partial power, Darkryte on a Heavy Chestplate dramatically increases effective survivability.
Best sword recipes (Colossal and Great weapons)
The current meta heavily favors large weapons—especially Colossal Swords—because traits that scale off “weapon damage” grow much stronger on high‑damage swings than on fast, low‑damage daggers.
For example, a burn effect that deals a percentage of weapon damage per second looks mediocre on a 10‑damage Dagger but explosive on a 200‑damage Colossal Sword.

A strong Colossal Sword “recipe” leans on these ores:
- Eye Ore for +15% damage (and the -10% HP penalty, which you offset with armor).
- Fireite for burn: 20% burn for 2 seconds with 30% chance on hit.
- Magmaite for AOE explosions: 50% AOE explosion damage with 35% chance on hit.
- Rivalite for +20% critical chance, making those massive hits crit more often.
Weapon‑focused players sometimes simplify this down to Eye Ore + Fireite + Magmaite, adding Rivalite or another Legendary only when they have enough copies to hit at least 10% per trait.
Step 1: Decide the total ore count. Aim near 46 ores to get very high Colossal Sword odds, or slightly lower if you are comfortable with Great Axe / Great Sword rolls as backups.
Step 2: Give Eye Ore at least 30% if you want the full +15% damage on the weapon. If you cannot afford that much, stay above 10% to activate the trait.
Step 3: Add Fireite and Magmaite until each sits above 10% of the total so both the burn and explosion traits are active.
Step 4: If you have enough Rivalite, slot it until it also reaches 10–30%, then fill remaining space with high‑multiplier ores of any type that do not sabotage your averages.
Tip: Once trait percentages are secured, you can lean into one “main” ore—such as a specific Legendary you have stacked—to increase the chances of rolling certain weapon variations, including Dragon Slayer on a Colossal Sword. Large single‑ore pools also naturally raise the probability of hitting the biggest size tiers.
Daggers vs Colossal Swords: what stats actually say
The size system is not as lopsided as it looks. Base stats illustrate the trade‑off clearly:
- A basic Dagger sits around 5 base damage, 0.35‑second attack speed, and 6‑stud range.
- A Great Sword–class weapon like a Colossal Sword variant can reach 20+ base damage, with 1.2‑second swing times and roughly 10‑stud range.
On raw DPS, a perfectly crafted Dagger with excellent ores can match or exceed a poorly crafted Colossal Sword built with low‑tier materials. But once you put Legendary and Mythical ores into a Colossal Sword, its per‑hit damage becomes huge, and any trait that scales off “weapon damage” (burn, explosions, lifesteal, percentage burn runes) multiplies with it.
As a practical rule:
- Use high‑multiplier ores on small weapons only early on, when you cannot afford the ore cost of big weapons.
- Transition to Colossal or Great weapons once you have enough Legendary stacks to both maintain traits and hit the ore count required for that size tier.
Getting specific variants: Dragon Slayer, Dark Knight, Samurai, more
Once you are in the right size tier, weapon and armor variation rolls kick in.
- For Colossal Swords, Dragon Slayer has a specific chance within the Colossal category (for example, 1/3 or lower depending on your UI odds).
- To push Dragon Slayer odds, you simply need more attempts at Colossal Swords with good multipliers; there is no separate “Dragon Slayer ore.”
Armor has its own set of special variants:
- Dark Knight — a Heavy Armor variant with better Health than the base Knight Heavy set.
- Samurai — a Medium Armor variant, also tuned for higher Health than its base counterpart.
Both Dark Knight and Samurai:
- Only appear when crafting on Island 2; they do not show up on Island 1.
- Share the same ore mechanics as other armor but have special variation odds, often 1/2 rather than a guaranteed 1/1.
To seriously chase Dark Knight armor, treat it like Dragon Slayer: craft many Heavy armor pieces on Island 2 with high‑multiplier, trait‑optimized recipes until the variant drops.
How ore rarity ties into buffs (who “wins” in a mixed pool)
On top of traits and multipliers, ore rarity controls an internal set of “buffs” that apply when you use enough ore of that rarity. When you mix rare and common ores together, only the rarity with the highest count contributes these buffs.
For example:
- If you add 15 common ores and 3 Legendaries, the common ores win the “who’s in majority” check, and you do not receive Legendary rarity buffs.
- If you add 10 Legendary and 6 common, the Legendary ores now dominate the pool and grant their buffs, while the commons are effectively just lowering the average multiplier.
This is another reason to avoid throwing many low‑rarity ores into serious crafts. Let your highest rarity win on quantity to claim their rarity buffs, then trim weaker ores out of the recipe so they do not dilute either multipliers or trait percentages.
Where to get the ores you actually need
High‑end recipes depend on Forgotten Kingdom rocks:
- Volcanic Rock for Obsidian, Fireite, Magmaite, Demonite, Darkryte.
- Basalt Vein for Rivalite, Uranium, Mythril, Lightite, Eye Ore.
- Basalt Rock/Core also contribute Eye Ore and other upper‑tier drops.
The Volcano region is particularly efficient because it combines high‑value rocks with enemies that drop powerful runes like Drain Edge and Flame Spark. While you mine, you also farm runes that later push your crafted weapons even further.
Forging a weapon: The mini‑games that decide quality
Once your ore pool is set, the forging animation actually matters. Better performance in the three mini‑games means better quality rolls and higher stats.
Step 1: Smelting — You move the green arrows on the left to heat the ores while watching a bar on the right. Keep heating until the progress bar fills without overshooting.
Step 2: Pouring — A black bar with a needle appears. Hold the mouse button to raise the needle and release to lower it, keeping it inside the yellow zone for as long as possible.
Step 3: Hammering and shaping — Tap the mold to hammer, then watch for two circles on the molten weapon: one static, one shrinking. Click exactly as they overlap to earn “Perfect” hits instead of “Bad” ones.
Nailing these steps does not change what item type you get—that was decided by ore counts and categories—but it can swing your damage or defense by a noticeable margin on the final item.
Enhancing gear and adding runes
Crafted gear is only step one. Enhancers and runes turn a good recipe into a late‑game weapon.
Enhancing uses monster‑dropped essences to boost your stats and unlock rune slots:
Step 1: Visit an Enhancer NPC in town and choose the weapon or armor piece you want to upgrade.
Step 2: Spend essence to increase its level. Early upgrades boost raw stats; around the third upgrade, you unlock a rune slot, with more appearing on later levels.
Runes then drop from enemies across the world. Some of the strongest for weapons and armor right now include:
- Drain Edge — strong sustain and on‑hit effects.
- Flame Spark — stacks well with Fireite and other burn sources.
- Blast Chip and Miner Shard — various offensive and farming benefits.
- Ward Patch — defensive rune that suits tanky armor sets.
Many of these runes drop reliably in Volcano‑area enemy lists, making that region the default farming spot once you can survive there consistently.
Tip: Only enhance and rune items that already have good ore multipliers and active traits. There is little value in pumping essence into gear made from weak ores.
Once you understand how ore counts, multipliers, and trait thresholds interact, “recipes” in The Forge stop being guesswork. For armor, anchor around Eye Ore, Mythril, Uranium, and, if you can get them, Demonite or Darkryte to build Heavy sets that feel unkillable. For weapons, lean into Colossal or Great weapons loaded with Eye Ore, Fireite, Magmaite, and Rivalite, then refine them with enhancements and runes. From there, it is just repetition—mining Forgotten Kingdom rocks, rolling the crucible, and chasing that perfect Dragon Slayer or Dark Knight drop.