
Leapers sit near the top of the food chain in Arc Raiders. They are fast, heavily armored ARCs that can cross huge gaps in a single jump and crush you even when you think you are already out of reach. That mix of mobility and durability makes them one of the most dangerous enemies to hunt on purpose, which is exactly what you need to do once weapon benches, Exhibitions, or Trials start demanding Leaper cores or Leaper Pulse Units.
Leaper stats, behavior, and weak points
A Leaper is a four-legged, fully plated brute. It patrols open ground, often around valuable points of interest or alongside lighter ARCs that screen for it. When it commits, it closes distance by jumping rather than slowly walking you down.
Its key traits are simple but punishing:
- Threat level is flagged as critical, with heavy armor across most of the body.
- Primary attack is a long-range leap that slams into the ground and deals high damage even if the impact is slightly off target.
- Shockwave pulse punishes anyone standing close when it lands.
- Accuracy on the jump is high enough to tag sprinting Raiders who try to run in a straight line.
There are two important weaknesses:
- Structural weak spots at the joints and at the eye in the center of its “head” assembly.
- Fire vulnerability that makes sustained burning damage much more efficient than raw bullet spam.
On paper, Leapers are avoidable mini-bosses that stomp around high-risk zones. In practice, progression systems and Trials turn them into a resource that you eventually need to track down on purpose, which is where spawn knowledge and setup come in.
How Leaper spawns work in Arc Raiders
Leapers do not behave like low-tier patrol enemies that can show up almost anywhere. They tend to anchor specific encounters in tougher parts of the map and are often tied to other conditions such as environmental events or nearby objectives.
Two patterns stand out when looking for them:
- They favor open, long-sightline spaces where their jump and shockwave can reach full potential. Dams, plateaus, and wide facility yards are common examples.
- They frequently appear alongside other ARCs, particularly smaller adds that force you to divide attention while the Leaper charges up a leap.
For farming, that means the best locations are not random; they are specific, repeatable spots that line up with these patterns and can be approached from safe angles.
Reliable Leaper spawn locations
Several locations are particularly useful when you want Leapers on demand, especially for Trials or material farming. These are not just places where Leapers can exist, but places where players repeatedly encounter them under similar conditions.
Leaper spawn near Testing Annex
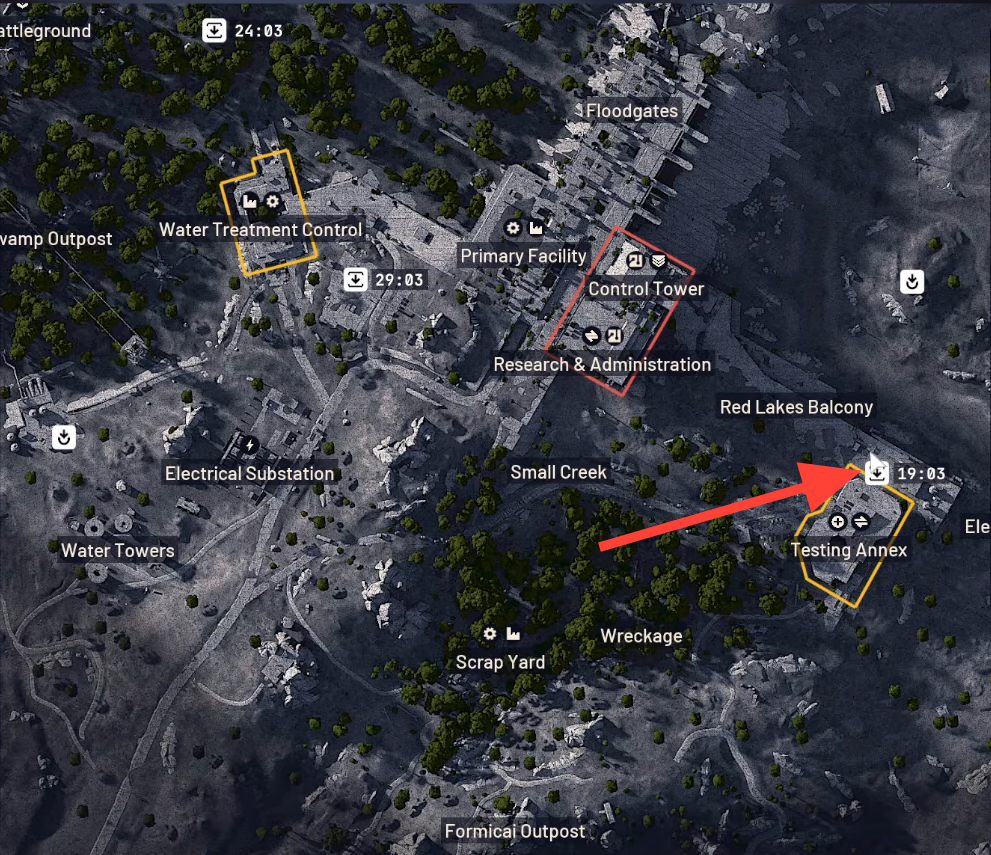
Testing Annex is one of the most straightforward solo-friendly Leaper spawns. A Leaper can appear in the area below the structure, which gives you a strong vertical advantage if you set up correctly.
One consistently effective position uses the balcony window that overlooks the yard with the elevator nearby. From there, you can:
- Watch for the Leaper patrolling or aggroing into the open space below.
- Fire from above while using the balcony rail and window frame as partial cover.
- Force the Leaper to commit to jumps that either fail to reach you or leave it exposed mid-animation.
Tip: If you are running solo, clear out lighter ARCs around Testing Annex first. Removing side threats makes it much easier to focus on dodging and punishing the Leaper’s leap timing.
Leaper spawns around the dam (Research & Administration ↔ Testing Annex)
A second cluster of Leaper encounters sits around the dam area between Research & Administration and Testing Annex. This zone has wide concrete spans and elevation changes that naturally favor Leaper behavior.
It becomes especially productive during an electromagnetic storm event. In that state, multiple Leapers can show up in a single match across the dam and the immediate approaches, with players reporting up to three encounters in a single storm window. For Trial objectives that require multiple Leaper kills, this area is one of the best routes.
Because the dam is exposed, you trade density for risk. You gain more opportunities to find Leapers in one run but also face crossfire from other ARCs and Raiders attracted by the storm. Plan a retreat line along the dam’s structures so you are not caught in open concrete while kiting a Leaper and dodging additional enemies.
How to approach Leaper spawns when playing solo
Once you know where Leapers are likely to appear, the next step is setting up fights in a way that you can repeat without constant wipes. Two principles matter most in solo runs: control their pathing and exploit their fire weakness.
Solo positioning and movement against Leapers
Leapers are built to punish straight-line running in open fields. Surviving their jumps is less about raw speed and more about how and where you move.
- Use verticality whenever possible. Balconies, gantries, and platforms around Testing Annex or the dam force the Leaper to commit to predictable jumps, often onto lower levels. From above, you can watch the wind-up and adjust your angle instead of sprinting blindly.
- Fight near obstacles, not in empty lots. Pillars, railings, and vehicles can break sightlines and give you hard cover from splash damage when its shockwave hits.
- Change direction noticeably when it crouches. When you see the Leaper settle before a jump, stop running in a straight line and sidestep or roll at a clear angle. The goal is to be at the edge of the predicted impact, not directly downrange.
In both the Testing Annex balcony setup and the dam encounters, the safest opening is one where you have at least one solid wall or vertical drop between you and the Leaper’s first jump. If you lose that advantage, pull back instead of trying to tank a slam in the open.
Best weapons and gadgets to kill Leapers
The Leaper’s full plating makes normal gunfire inefficient unless you have a high-damage heavy weapon aimed at weak spots. Fire damage, on the other hand, cuts through its health pool quickly and ignores much of the armor problem.
Fire-based Leaper kills with Blaze Grenades
Blaze Grenades are the most accessible answer to Leapers. They are inexpensive to bring and line up directly with the enemy’s element weakness.
To make the most of them, treat the fight like a cycle of burn windows instead of a constant DPS race.
Step 1: Lure the Leaper into an area where you have space to move laterally and at least one piece of cover to duck behind after the jump. Do not open immediately if other ARCs are still crowding the space.
Step 2: When the Leaper is committed to your position and closing the gap, throw a Blaze Grenade directly onto its body, ideally landing near the central eye or on top of the chassis so the flame sticks.
Step 3: Back away and focus entirely on dodging while the burn ticks. There is no need to add extra fire at this stage; let the damage play out while you stay out of slam range.
Step 4: As soon as the burning effect ends, repeat the throw with another Blaze Grenade. Two full burns will usually bring the Leaper into a low enough health range to be safely finished.
Step 5: After the second burn expires, switch to a reliable heavy ammo weapon and land one or two clean hits, either into the eye or joints, to complete the kill.
Tip: Use enclosed or semi-enclosed spaces such as bunkers and building interiors to limit how cleanly the Leaper can land a jump on top of you. It may struggle with pathing around doors and corners, which buys extra time for the fire to do its work.
Trap-based Leaper farming with Blaze Grenades and Jolt Mines
For repeated farming runs, a trap setup minimizes risk and reduces the need for precise aim. A Blaze Grenade combined with a Jolt Mine turns the Leaper’s own leap into a weakness.
Step 1: Identify a predictable approach path, such as a narrow ramp, corridor, or the funnel leading up to a balcony. This should be a space where the Leaper naturally lines up in a straight path toward you.
Step 2: Place one or more Blaze Grenades on the ground in that path so the ignition zone covers the landing area you expect the Leaper to target. The goal is for the fire to already be active before the jump connects.
Step 3: Arm a Jolt Mine slightly behind or within the same area. The mine is there to keep the Leaper in place and extend the time it spends inside the flame patch, not to replace the fire damage.
Step 4: Move a short distance ahead of the trap and let the Leaper lock onto you. Once it starts its leap animation, back up past the explosives so it lands in the burning zone.
Step 5: If needed, detonate or trigger the Jolt Mine effect and then maintain distance while the Leaper burns. Only engage with direct fire once it is visibly weakened, and avoid stepping into the trap area yourself.
This setup is especially powerful in the Testing Annex balcony scenario. You can seed the area below with fire and a Jolt Mine, peek from the balcony to draw aggro, then let gravity and pathfinding do the rest as the Leaper repeatedly lands into the kill zone.
Balancing spawn density and survivability for farming runs
Once you are comfortable winning Leaper fights, the last problem is efficiency. You want a route that provides enough Leaper encounters without putting you in no-win situations every few minutes.
For solo players, one practical loop looks like this:
- Start near Testing Annex and check the yard for the balcony-window Leaper spawn.
- If present, set up from the balcony, use Blaze Grenades or the trap combo, and secure the kill quickly.
- Then move toward the dam between Research & Administration and Testing Annex, especially if an electromagnetic storm is active, to chain additional Leaper encounters while you still have grenades and mines.
Because storms can draw more enemy activity overall, it helps to reserve your cleanest trap setups and highest-damage explosives for the dam area and use more straightforward Blaze Grenade burns for the relatively controlled Testing Annex spawn. That balance lets you keep recoil, ammo consumption, and time investment down while still meeting Trial or upgrade requirements.
Once you understand where Leapers like to appear and how to exploit their weaknesses, they shift from roaming disasters into predictable, repeatable farm targets. The key is to treat every spawn as a planned encounter rather than a surprise brawl, especially when you are running solo.