


If you share your PC with someone, setting up multiple users is a great way to keep things streamlined. You can separate settings, and apps, and set up your user account just the way you want it, without interference from the other person. Multiple accounts can also come in handy when you wish to have separate avenues for your work and personal life.
However, it all becomes obsolete if you (or the other user) don't know how to switch between users. Whatever the scenario, there are multiple ways to switch users in Windows 11, and you can adopt one, depending on which one strikes a chord with you.
Switch Users from the Start Menu
Using the Start Menu has to be the least fussy and easiest method for switching user accounts in Windows 11.
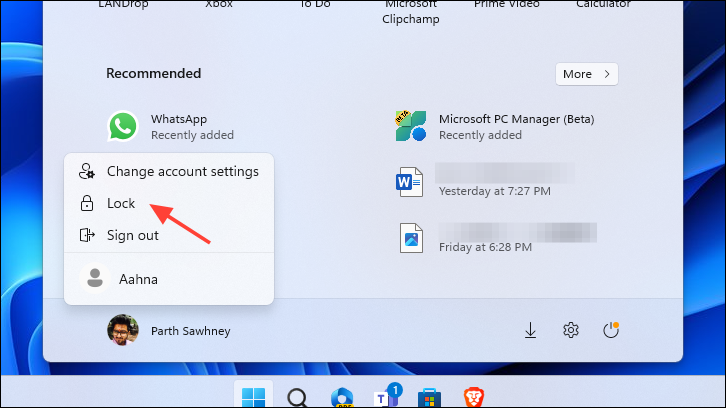
- Open the Start Menu by clicking on the Windows icon or pressing the
Windowskey on your keyboard. - Then, click your 'Account picture' in the bottom left.

- The other user account(s) should be displayed here. Click on the user account you wish to switch to.

- You'll need to enter the credentials for the selected user account on the login screen.
- Once signed in, you can toggle between both users without entering login credentials until you shut down your computer or sign out from any of the users.
Switch Users from the Lock Screen
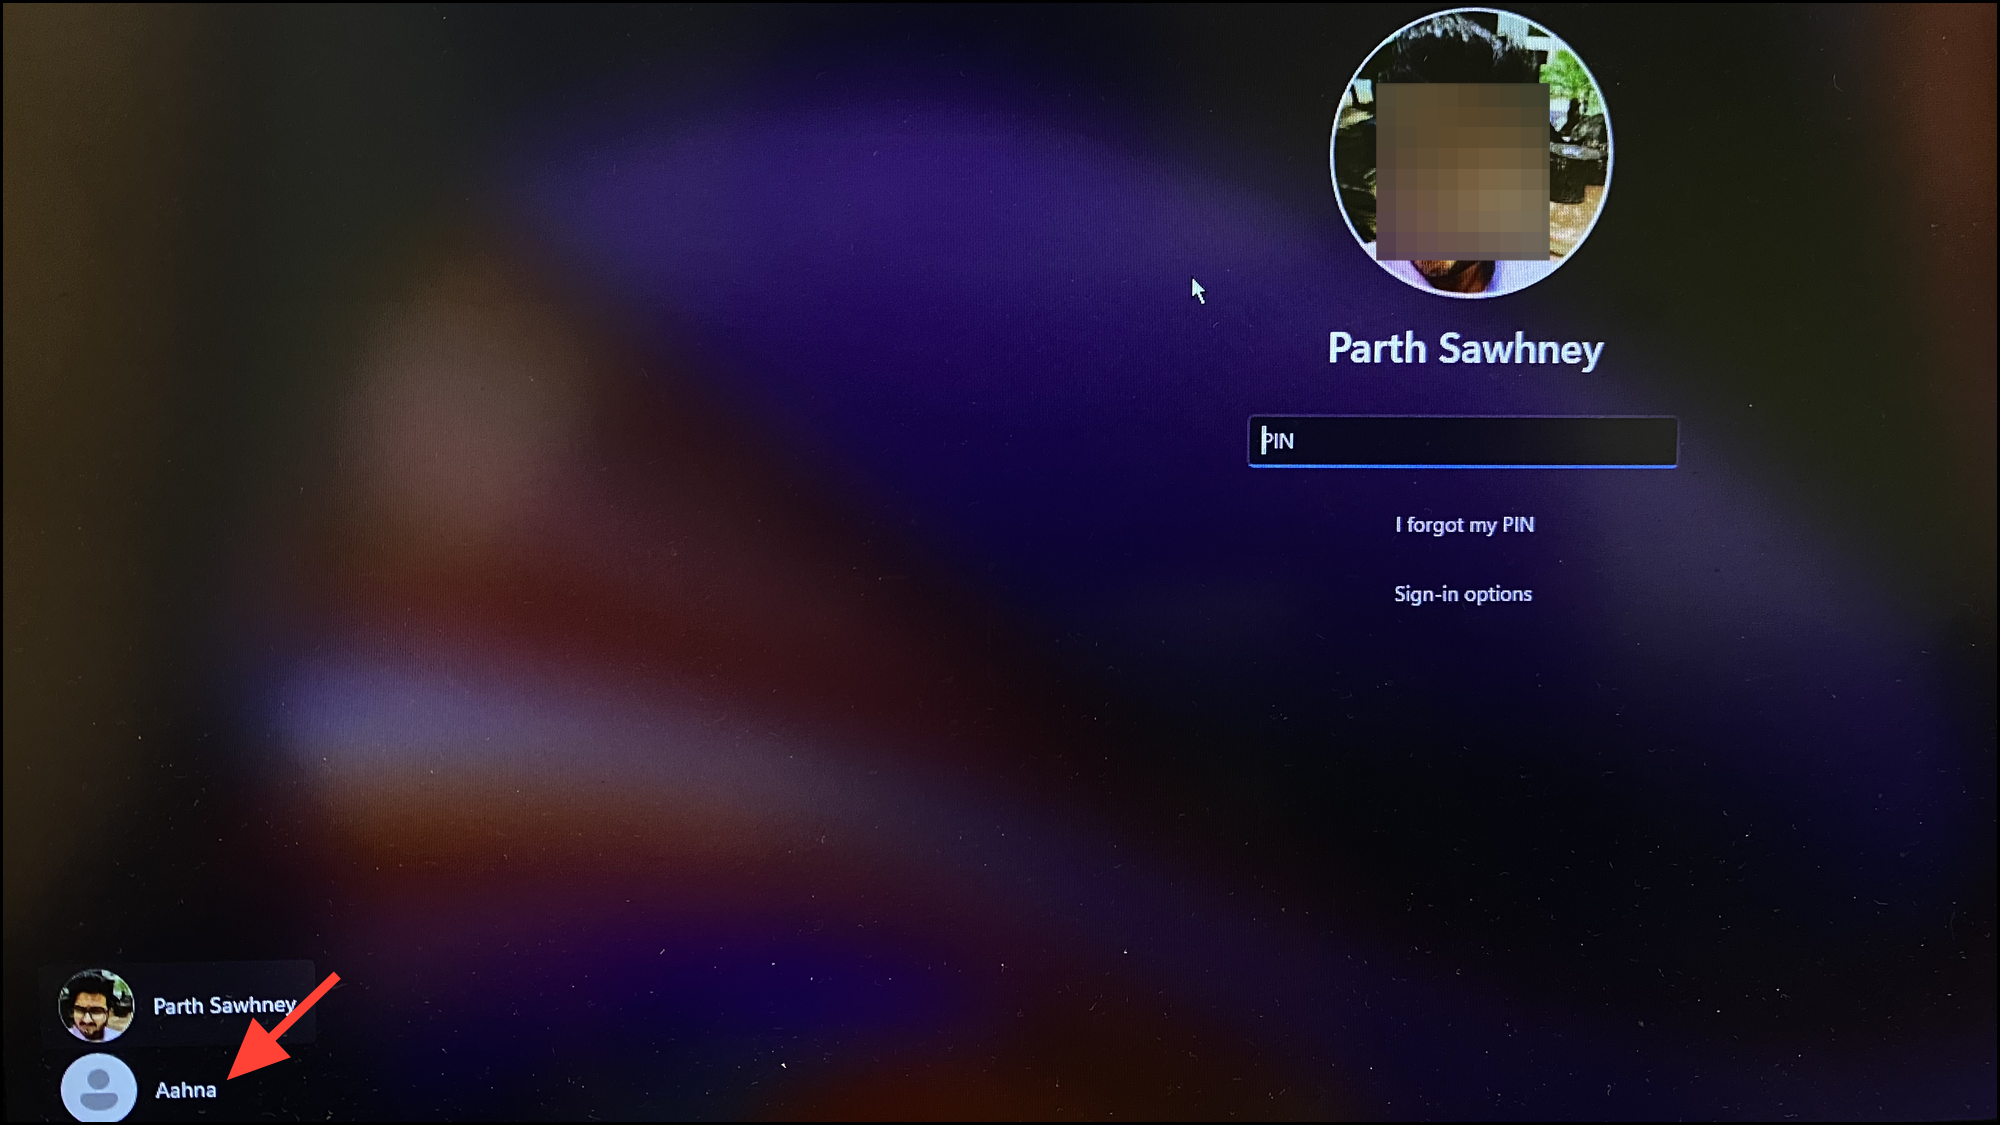
Another way you can switch user accounts easily is from the lock screen. Windows also has a handy shortcut for locking the current user session. Pressing the shortcut will immediately bring you to the login screen, from where you can choose another user account to log in.
It only locks your user session and does not terminate apps or services. That means when you log in back to the user account, all the apps and documents will be as is when you locked the session.
- To go to the lock screen, press
Windows+Lkey on your keyboard. Alternatively, you can also open the Start Menu and select the 'Lock' option from the profile menu.
- From the Sign-in screen, choose the user account you wish to log into and enter authentication details for it.
Switch User Accounts Using the Security Screen
Another place to switch user accounts in Windows 11 is the Security screen.
- Press
Ctrl+Alt+Delkeys on your keyboard. This will bring up the Windows security screen. You might have used this shortcut to access Task Manager at times. - Select the 'Switch User' option. You will be locked out of the current user and taken to the login screen.
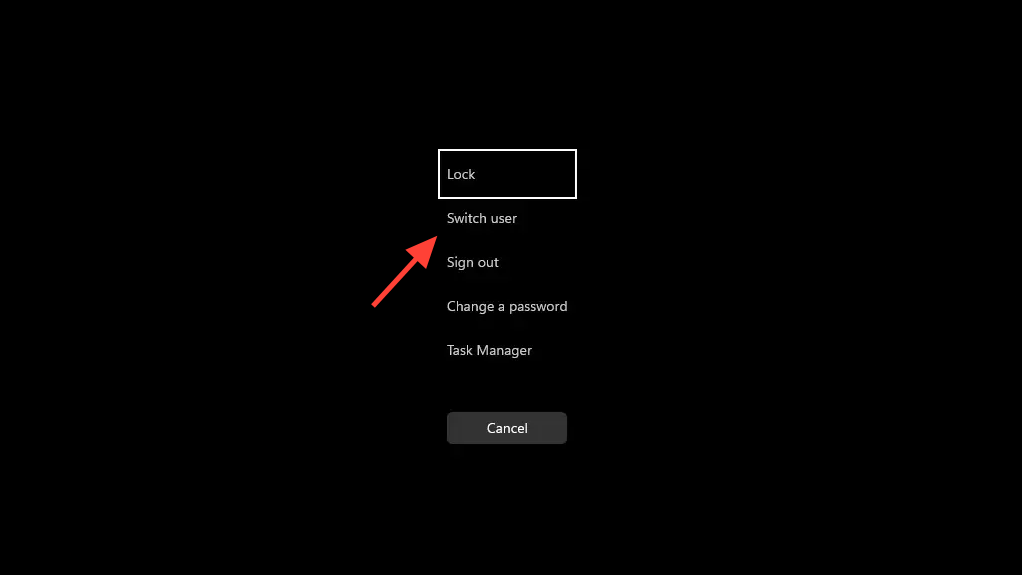
- On the sign-in screen, select a user account from the bottom-right corner you wish to switch to.
Switch User Accounts from the Shut Down Window
The shutdown window is not only for shutting down your computer. You can also perform other tasks from here, including switching the user account.
- Press
Alt+F4keys together on your keyboard. A window shall appear on your screen. - Select the 'Switch User' option from the drop-down menu and click 'OK'.
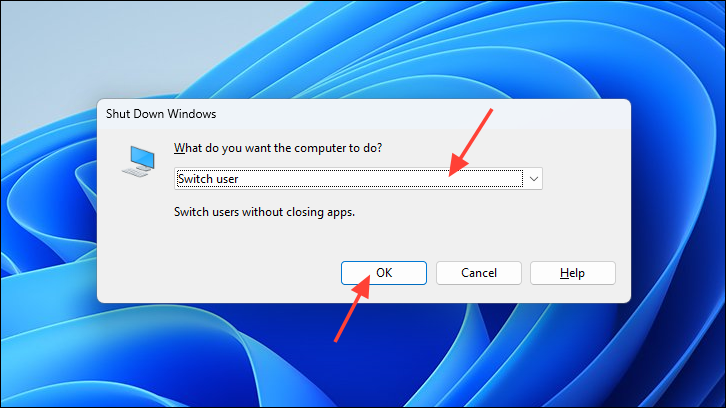
- You will be returned to the login screen. You can log in to a different user account by entering its credentials.
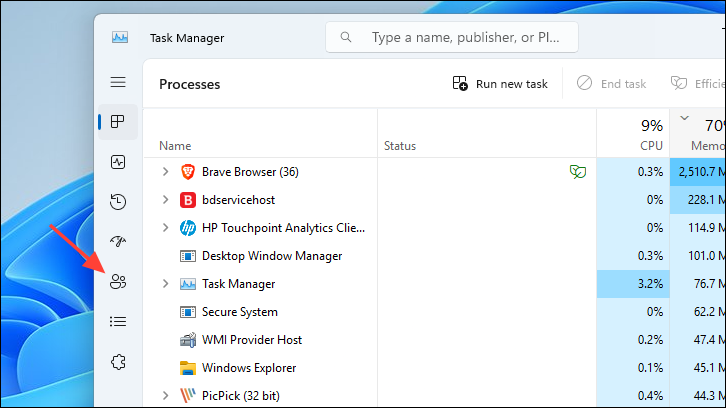
Switch User Accounts Using the Task Manager
Task Manager is another handy place in Windows 11 to switch user accounts.
- Press
Ctrl+Shift+Escsimultaneously on your keyboard to bring up the Task Manager. Alternatively, you can also search for it from the Start Menu. - Head to the 'Users' tab from the left sidebar.
- Select the current user account and click on 'Disconnect'. You will be logged off from the current user account and returned to the login screen.
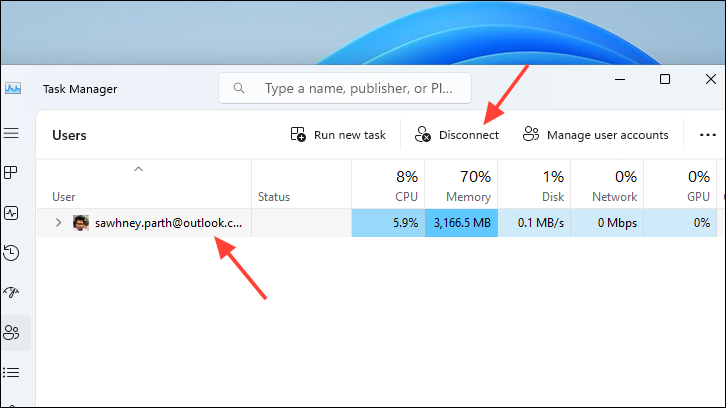
- Choose a different user account to log in by clicking on the account picture/initials.
Switch User Accounts Using Windows Terminal
If you prefer using command-line tools over GUI on your computer, there's a way for you as well.
tsdiscon command-line tool is only available in Windows Pro and Enterprise versions.- Open the Start Menu and search for 'Terminal'. From the search results, right-click on the 'Terminal' tile and select 'Run as administrator'.
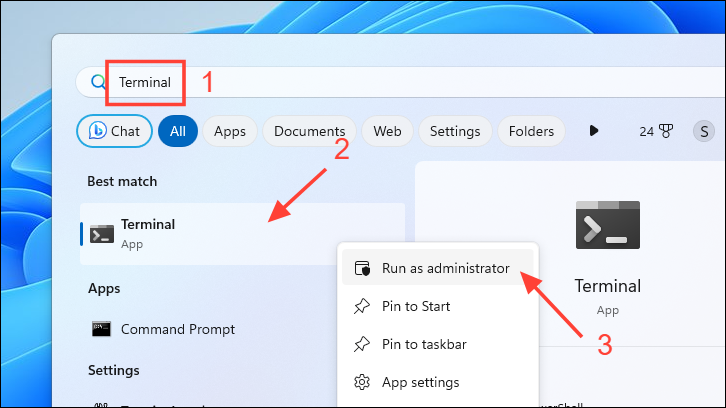
- If a UAC (User Account Control) window appears on your screen, select 'Yes' to continue. If you are not logged in with an administrator account, enter credentials for one.
- On the 'Terminal' window, type or copy and paste the below-mentioned command and press
Enterto execute. This will immediately lock your PC and take you to the sign-in screen.tsdiscon
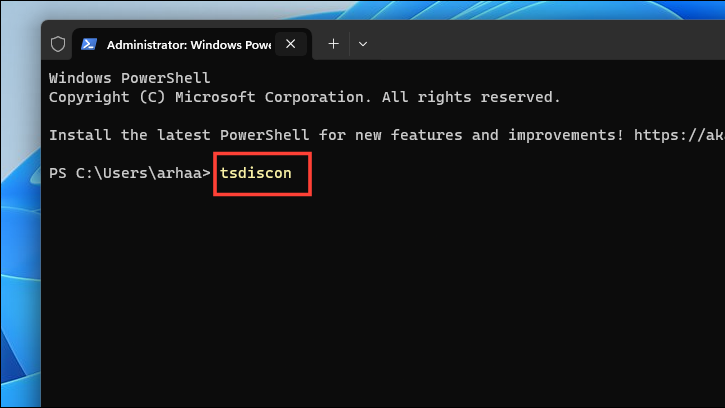
- Choose another user account to switch from the login screen.
Create a Desktop Shortcut to Switch User Accounts
If you switch users frequently on your computer, creating a shortcut to switch to another user is more convenient.
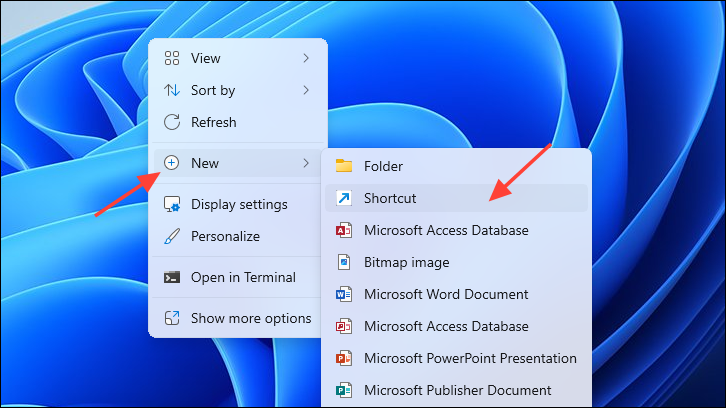
- Right-click in the empty Desktop area and hover over 'New'. Then, select 'Shortcut' from the sub-menu.
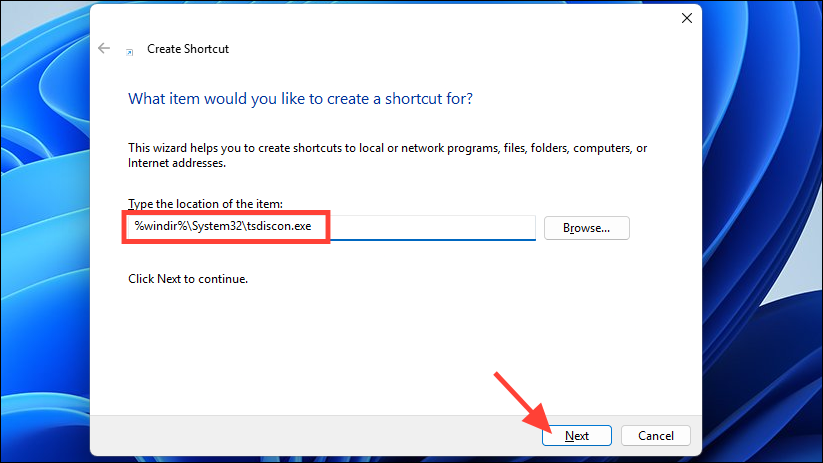
- From the window that appears on your screen, type or copy and paste the command mentioned below. Click on 'Next' to continue.
%windir%\System32\tsdiscon.exe
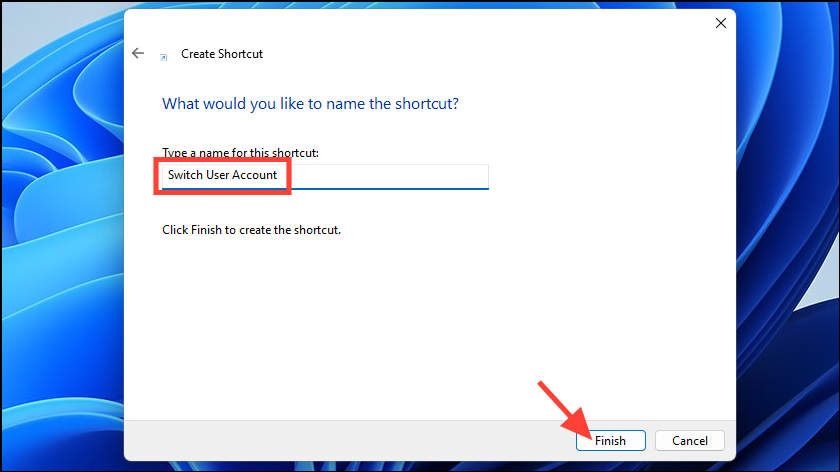
- On the subsequent screen, provide an apt name as the title for the shortcut. Finally, click 'Finish' to create the shortcut.
- To switch user accounts, double-click on the shortcut that is now available on your Desktop. This will immediately return you to the sign-in screen.

- Click on a different user account tile and provide authentication for it. That's it, you have switched the user account.
For users with multiple user accounts on their computers, the ordeal can become frustrating quite easily. However, knowing how to switch between them in a jiffy can make all the difference between being productive and wanting to smash your PC to bits.


Member discussion