
Barren Clearing in Blue Gate looks straightforward on the map, but the With a Trace quest (sometimes displayed as “With A Trace”) hides its key interaction in plain sight. On top of that, the quest tracker often jumps ahead before you are in the right place, which makes a lot of players search the wrong wreckage.
Everything hinges on two very small interactions:
- Investigating a specific leg joint on the huge Baron husk at Barren Clearing
- Using a small computer terminal at the Adorned Wreckage landmark
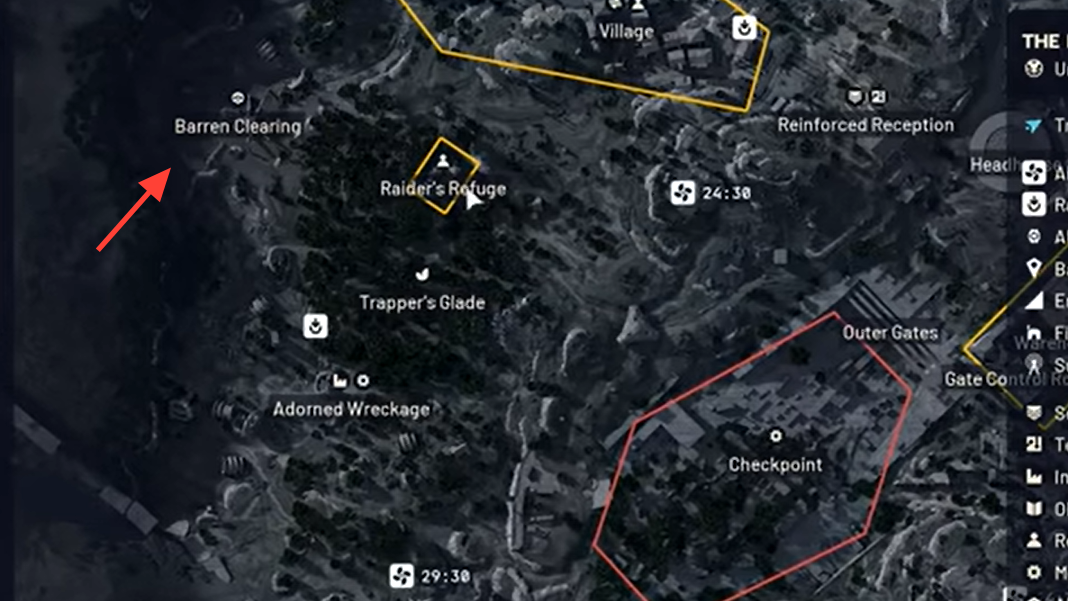
Where Barren Clearing is on the Blue Gate map
Barren Clearing is a named point of interest in the Blue Gate region. It sits on the western side of the map:
- On the far west edge of Blue Gate
- Directly west of Raider’s Refuge
- Roughly southwest of the large Village area on the map
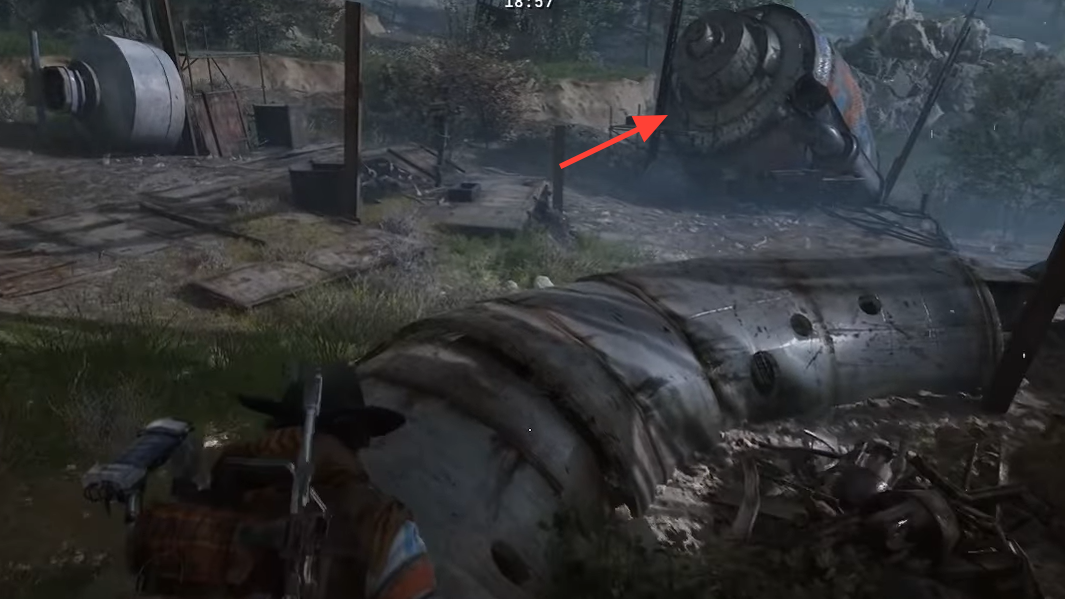
When you get close, you’ll see what is effectively a Baron graveyard: a massive dead ARC “Baron Husk” lying in low, marshy terrain with scattered limbs around it.
How to find the interaction at Barren Clearing
The quest text asks you to “find signs of who brought down the ARC machines.” The objective is not on the main body of the Baron husk but on one of its severed legs.
Step 1: Move to the center of Barren Clearing, where the huge Baron husk lies in the open. Stand so that the main body of the husk is directly in front of you.
Step 2: Look for a detached leg to the southwest of the main body. It rests on a small mound or in shallow water, slightly away from the core wreck.
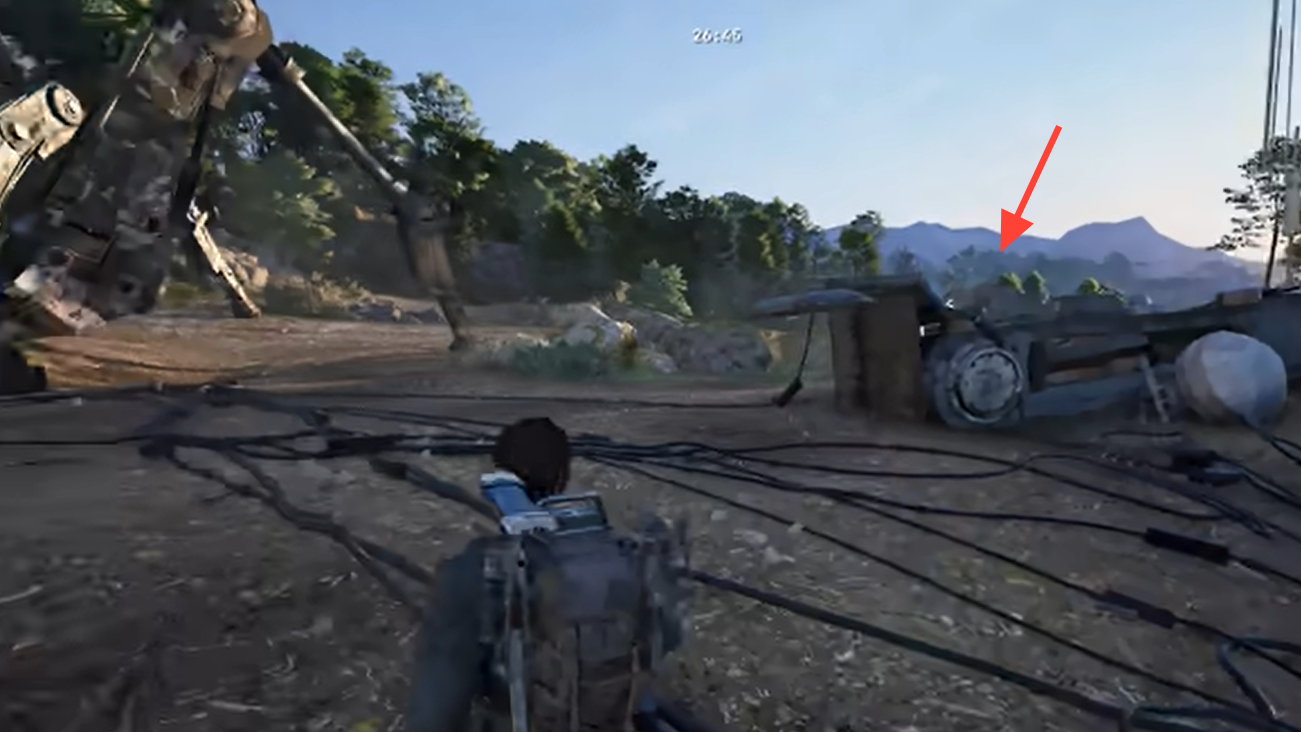
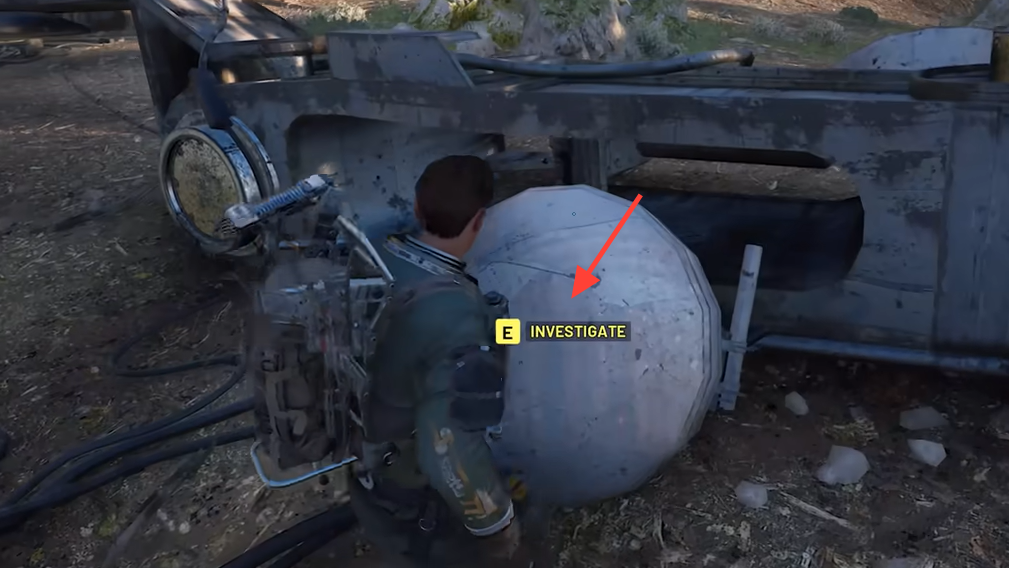
Step 3: Approach the ball joint at the end of that leg. This joint is more noticeable than the rest of the metal: it appears lighter gray and is shaped like a rounded “orb” or socket, sometimes compared to a small metal ball or radar dish.
Step 4: Walk right up to this joint until a gold/yellow Investigate prompt appears. Interact when the prompt shows. This completes the “find signs of who brought down the ARC machines” task and reveals the next objective that sends you to Adorned Wreckage.
If you do not see the prompt, reposition around the joint and ensure you are at the specific bright, circular section. The rest of the leg is just background geometry and will not react.
How the With a Trace objective chain is structured
| Internal step | What you do | Where |
|---|---|---|
| 1 | Reach Barren Clearing | Western Blue Gate |
| 2 | Investigate the glowing leg joint on the Baron husk | Barren Clearing |
| 3 | Reach Adorned Wreckage | South / south-east of Barren Clearing, below Trapper’s Glade |
| 4 | Interact with the small computer under the antenna | Adorned Wreckage |
In the quest log, this can look like two bullet points, but functionally there are four actions: travel + interact at Barren Clearing, then travel + interact at Adorned Wreckage.
How to reach Adorned Wreckage from Barren Clearing
After you investigate the leg joint, the quest tells you to inspect the Adorned Wreckage. The important detail: the “Adorned Wreckage” the text refers to is its own named landmark, not the Baron husk you just examined.
From Barren Clearing, Adorned Wreckage is:
- A short run to the south or south-east from the Baron husk
- Roughly below the Trapper’s Glade landmark
- Visible on the map as a POI labeled “Adorned Wreckage”
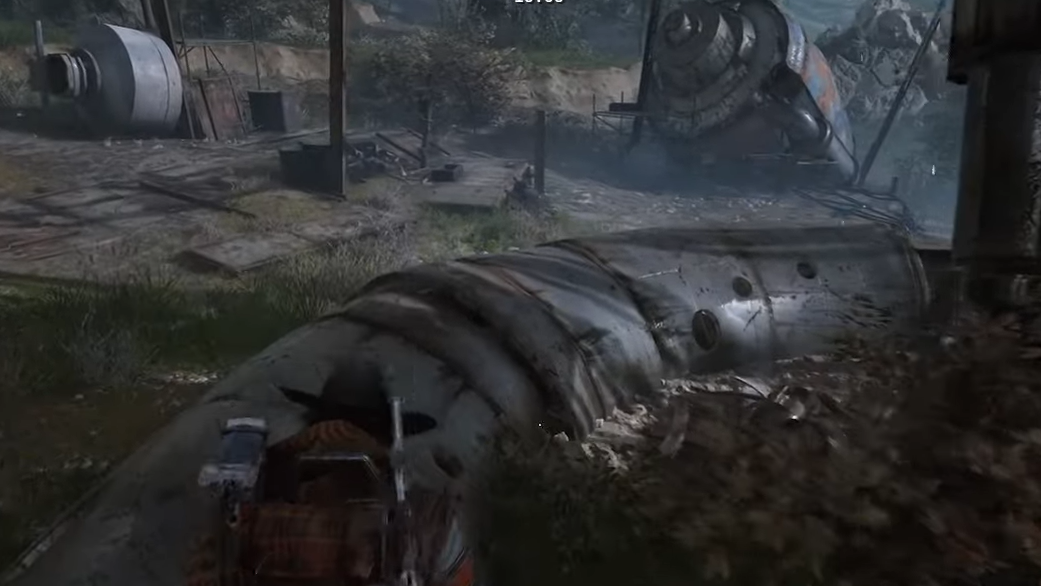
As you get close, you’ll see a distinctive cluster of wrecked rocket-like structures. One of them is tall and heavily decorated with graffiti, banners, and scrap – that’s the “adorned” centerpiece.
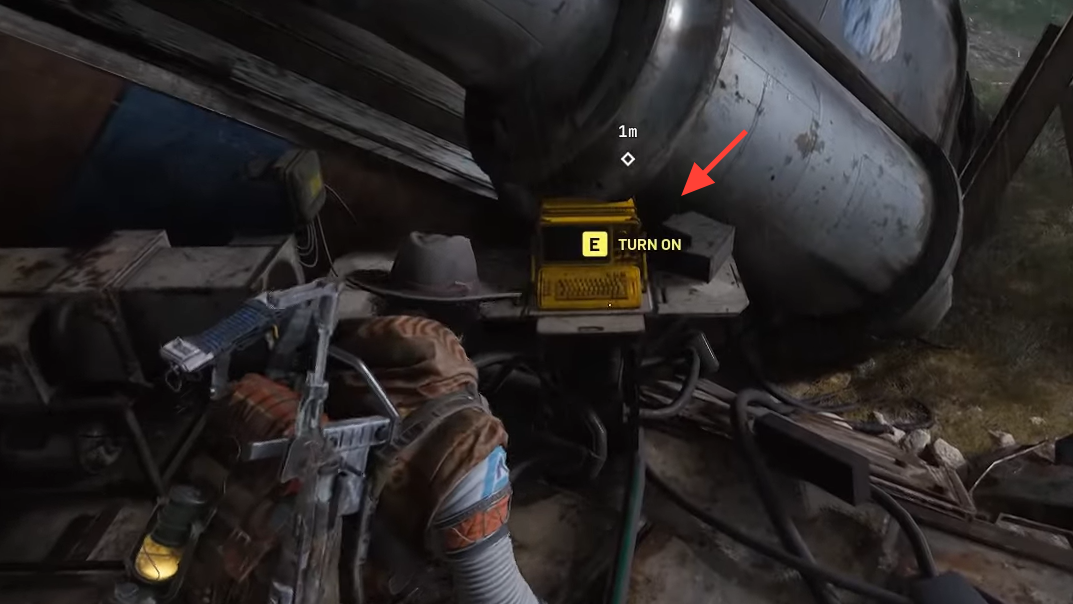
Where the terminal is at Adorned Wreckage
The quest wording can make it sound like you need to inspect the big decorated rocket or climb it. You do not need to climb anything or interact with the largest piece of wreckage. The objective is a small communication setup just beside it.
Step 1: Enter the Adorned Wreckage area and orient yourself using the tallest graffiti-covered rocket in the middle of the site as your reference point.
Step 2: Look for a slightly smaller, rocket-like chunk of wreckage near the base of the main structure. A makeshift desk or table is propped up against this smaller piece.
Step 3: On this improvised desk, locate a yellow computer terminal. Cables run from this terminal toward a nearby antenna or satellite dish that leans up against the scrap.
Step 4: Move right up to the computer until you see the interaction prompt, then use it. This single interaction completes the Adorned Wreckage objective and finishes With a Trace, regardless of whether you later extract alive from the raid.
What happens if the computer at Adorned Wreckage is not interactable
Some players reach the Adorned Wreckage terminal and find that it is not highlighted in yellow and has no prompt. In most cases this comes down to quest state rather than a permanent bug.
Use this sequence to recover:
Step 1: Confirm that With a Trace is still your active quest and that it is on the step that mentions Adorned Wreckage or a communications device, not Barren Clearing.
Step 2: If the log shows that Barren Clearing is already checked, but you are not sure you interacted with the leg joint correctly, load into Blue Gate again and return to Barren Clearing. Walk back to the glowing ball joint and check whether an Investigate prompt still appears. Interact again if it does.
Step 3: In the same run, travel directly from Barren Clearing to Adorned Wreckage and head straight to the yellow computer under the antenna. When the quest state is correct and the chain has been triggered in this order, the terminal becomes active and can be used.
If the terminal remains dead despite repeating the interaction at Barren Clearing in a fresh raid, the safest approach is to abandon the run and try the full four-step chain again in a new deployment, without visiting Adorned Wreckage first.
Rewards for finishing With a Trace
With a Trace is given by Shani at Speranza and is a follow-up to Reduced to Rubble, continuing the investigation into damaged Baron husks around Blue Gate.
When you return to Speranza after successfully interacting with both the leg joint and the Adorned Wreckage terminal, Shani grants:
- Looting Mk. 2 Augment – an upgrade that increases carrying capacity and adds an extra Safe Pocket slot.
- Medium Shield – a heavier shield class with more health and better damage resistance than a Light Shield, at the cost of extra weight.
Both items can be sold for coins, but they are more valuable as early progression tools. The augment opens up more inventory flexibility for future raids, while the Medium Shield provides a clear defensive upgrade once your loadout can accommodate the weight.
Handled properly, Barren Clearing is one of the simpler quest beats in Blue Gate: a short walk to a Baron husk, a single hidden leg interaction, then a quick detour to a graffiti-covered rocket and a small computer. The difficulty comes from misleading distance-based objective ticks and how small the interaction points are compared to the scenery. Once you know you are looking for a glowing leg joint and a yellow terminal under an antenna, the whole quest falls into place.