
ARC Raiders' Expedition system is Embark Studios' opt-in prestige mechanic. Rather than forcing a server-wide wipe, you choose to build a caravan, load it with resources, and send your Raider beyond the Rust Belt permanently. Your next Raider starts from scratch but inherits stacking bonuses — extra Stash space, bonus Skill Points, cosmetics, and temporary buffs. The second Expedition window runs from December 22, 2025, through March 1, 2026, with sign-ups opening February 25 and the actual departure on March 1.
Quick answer: Expedition 2 has six stages. Stages 1–4 require specific crafting materials and loot items committed from your Stash. Stage 5 requires you to commit items by category until you hit coin-value thresholds. Stage 6 is simply the departure-ready state — no additional resources needed.
One critical detail that confuses many players: you must complete Expedition 1 before you can work on Expedition 2. If you skipped the first Expedition or didn't finish it, the game will show you the Expedition 1 requirements instead, even during the current window. Your progress carries over between windows, so you can finish Expedition 1 now and then start Expedition 2 if time allows — but you cannot skip ahead.
Expedition 2 stage requirements (Phases 1–4)
The Expedition Project unlocks at Level 20. Each phase demands that you commit items permanently — once donated, they cannot be retrieved. Below are the exact requirements for players on their second Expedition journey.
| Phase | Item | Quantity |
|---|---|---|
| 1 — Foundation | Metal Parts | 150 |
| Plastic Parts | 200 | |
| ARC Alloy | 80 | |
| Steel Spring | 15 | |
| 2 — Core Systems | Durable Cloth | 35 |
| Wires | 25 | |
| Electrical Components | 20 | |
| Cooling Coil | 4 | |
| 3 — Framework | Light Bulb | 4 |
| Battery | 30 | |
| Shredder Gyro | 10 | |
| Exodus Module | 1 | |
| 4 — Outfitting | Frequency Modulation Box | 5 |
| Advanced Electrical Components | 5 | |
| Ion Sputter | 3 | |
| Leaper Pulse Unit | 3 |
Where to find the hardest Phase 3 and Phase 4 items
Shredder Gyros drop exclusively from Shredders on Stella Montis. The archive room spawns two Shredders that respawn roughly every eight minutes, making it one of the most efficient farming spots. A Hullcracker can two-shot them. Bring cover-friendly weapons — Shredders deal heavy damage in the open.
Frequency Modulation Boxes and Ion Sputters are both found in Exodus-tier loot areas, concentrated on Stella Montis. The Medical Bay, Assembly, and Business Center are the most reliable locations for Frequency Modulation Boxes. Ion Sputters appear in the same zones but at noticeably lower rates — many players report spending hours on Stella Montis before finding all three. Put Ion Sputters directly into your safe pocket the moment you pick one up.
Leaper Pulse Units come from destroying Leapers, which spawn frequently on Spaceport and Dam Battlegrounds. Blaze Grenades make quick work of them.
Exodus Modules can be purchased daily from Celeste for 55 Seeds, or looted from Exodus areas on Stella Montis. Night Raids increase the drop chance.
Phase 5 — Loading the caravan with item value
Phase 5 shifts away from specific items. Instead, you commit gear and materials by category until you reach a coin-value threshold for each type. Items only count toward Phase 5 progress after you've unlocked it — stockpiling beforehand won't help.
| Category | Coin value required | What counts |
|---|---|---|
| Combat Items | 250,000 | Weapons, Weapon Mods, Grenades, Ammo, Traps |
| Survival Items | 100,000 | Shields, Augments, Gadgets, Utilities, Regeneratives |
| Provisions | 180,000 | Trinkets, Nature items, Miscellaneous, Old World items, Keys |
| Materials | 300,000 | All crafting materials |
Some earlier community lists showed the Provisions threshold at 150,000 coins. The wiki and the official Expedition Project screen in-game list it at 180,000 for the second journey. Double-check your in-game tracker to confirm your exact target.
Phase 6 and the departure window
Once all five resource phases are complete, Phase 6 simply marks your caravan as ready. No additional items are needed. When the departure window opens on February 25, you can sign up, and all signed-up Raiders depart on March 1.
Stash value and Skill Points — the 3 million coin target
Embark lowered the Stash value requirement for maximum bonus Skill Points after community feedback that the original 5 million target was too steep. For the second Expedition, you need 3 million coins in combined Stash and Wallet value at the time of departure to earn the full 5 bonus Skill Points — that's 600,000 per point, down from 1 million per point during the first Expedition.
A new catch-up mechanic also lets returning Raiders reclaim Skill Points they missed from the first Expedition at a discounted rate of 300,000 per missed point. Coins apply to the current Expedition's Skill Points first, then overflow into catching up on missed ones. The theoretical maximum after two consecutive Expeditions is 85 total Skill Points (75 base cap plus 10 bonus).
Full reward breakdown for the second Expedition
| Reward type | Details |
|---|---|
| Stash space (permanent) | +12 slots (24 total if you did both Expeditions) |
| Skill Points (permanent) | Up to 5 new + catch-up on missed first-Expedition points |
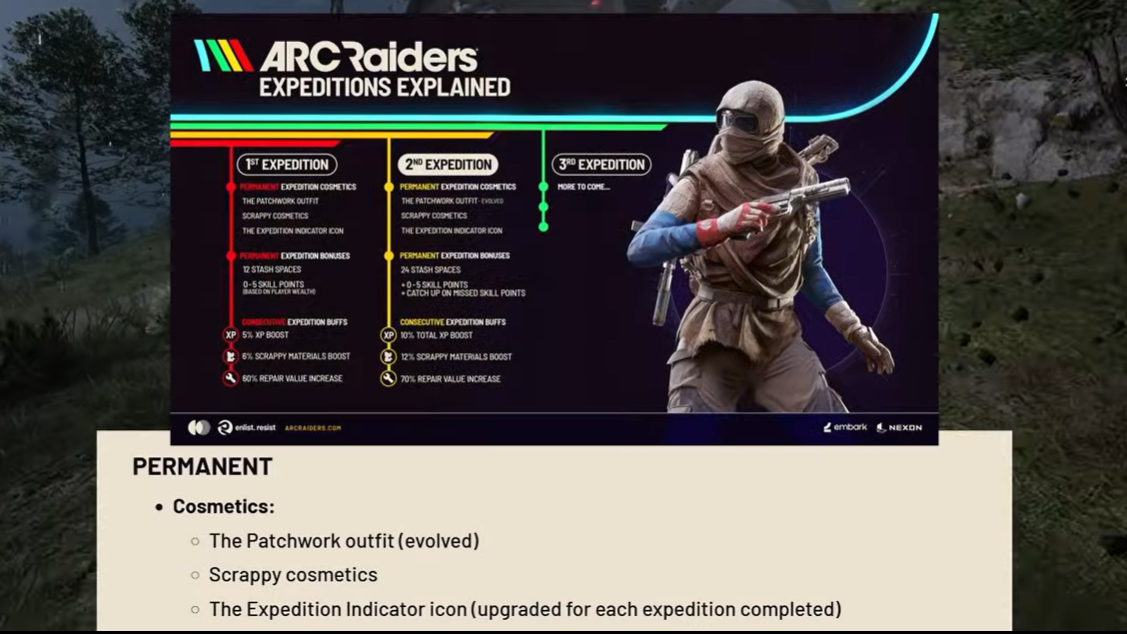
| Cosmetics (permanent) | Evolved Patchwork Raider outfit with new toggles and colors, new Scrappy cosmetics, upgraded Expedition Indicator icon |
| XP boost (consecutive) | 5% → 10% |
| Scrappy materials boost (consecutive) | 6% → 12% |
| Repair value increase (consecutive) | 60% → 70% |
Permanent rewards stick to your account forever, even if you skip future Expeditions. The three consecutive buffs (XP, Scrappy materials, repair value) stack up to three times across consecutive departures but reset to zero if you skip one.
What resets and what survives
Departing wipes your Stash, inventory, Blueprints, Coins, player level, Skill Points, Raider Den, Workshop stations, and quest progress. You keep unlocked maps, Codex entries, Cred, Raider Tokens, Merits, Raider Deck progress, Trials, leaderboard positions, cosmetics, and all previously earned Expedition bonuses (Stash slots and Skill Points from past Expeditions).
The loss of Blueprints is the biggest pain point for most players. If you play in a group, it can be worth having one member skip the Expedition to retain Blueprints and craft gear for teammates who reset.
Earning coins fast before departure
Trinket runs remain the most efficient coin-farming method. Running Grandioso Apartments in Buried City takes roughly eight minutes and yields 60,000–80,000 coins per extraction. Stella Montis offers the highest-value loot overall, particularly from Medical Research and Assembly, but competition and PvP risk are significantly higher as the departure window approaches.
At the new 3 million target, you need roughly 43,000 coins per day if you start from zero with 70 days remaining. A single daily trinket run puts you close to that pace with minimal risk, especially if you use a budget loadout rather than a free kit — even a 6,000-coin setup dramatically increases your earning potential per run compared to going in empty-handed.
Whether the Expedition is worth doing depends entirely on how much you value the permanent Stash space and bonus Skill Points versus the grind of re-acquiring Blueprints and leveling back up. The gameplay rewards alone are modest, but many players find the fresh start itself to be the real draw.