
This contract from Tian Wen plays out on Buried City’s outskirts at the Su Durante Warehouses. It’s a short objective chain that turns on noticing a small visual cue, then tracking a footprint trail to the stashed item before extracting.
| Quest | Map area | Trader | Objectives | Rewards |
|---|---|---|---|---|
| Marked for Death | Outskirts, Buried City (Su Durante Warehouses) | Tian Wen |
1) Reach Su Durante Warehouses 2) Search Tian Wen’s cache near the warehouses 3) Follow the clues |
Shotgun Choke II, Angled Grip II |
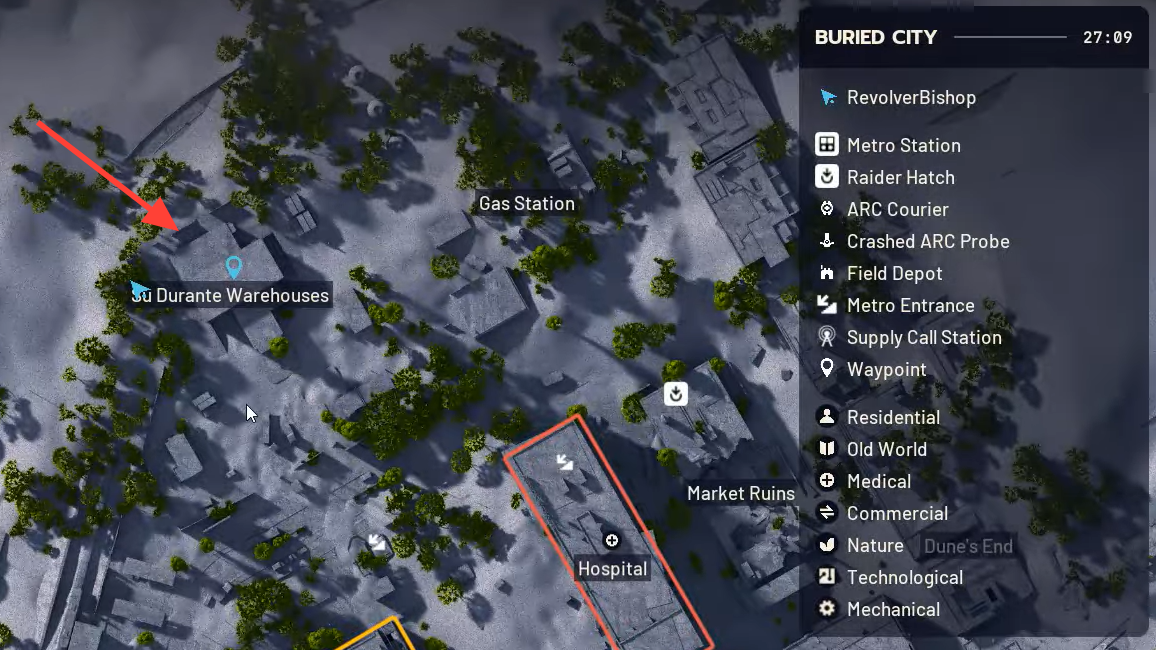
Where to start: Su Durante Warehouses (Outskirts)
Head to the Su Durante Warehouses on the edge of Buried City. Players often confuse a single “warehouse” marker with the actual cluster — you want the multi-building Warehouses on the outskirts.
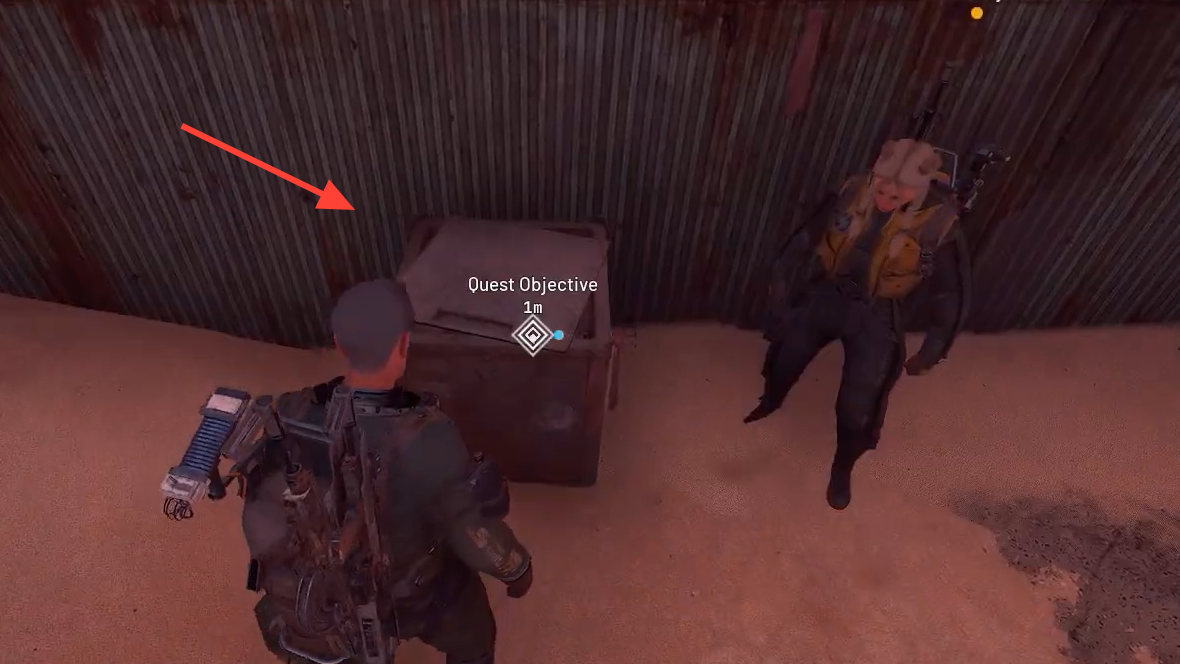
Look for the cache on the outside of one of the warehouse buildings, along the wall. Multiple players report consistently finding it on the west-facing side, right up against the exterior wall. Interact with the stash to trigger the clue phase.
How the clues work: red ribbon, footprints, fence breach
The handoff from “search” to “follow the clues” hinges on a small visual tell near the stash:
- Find the red ribbon next to the safe/cache.
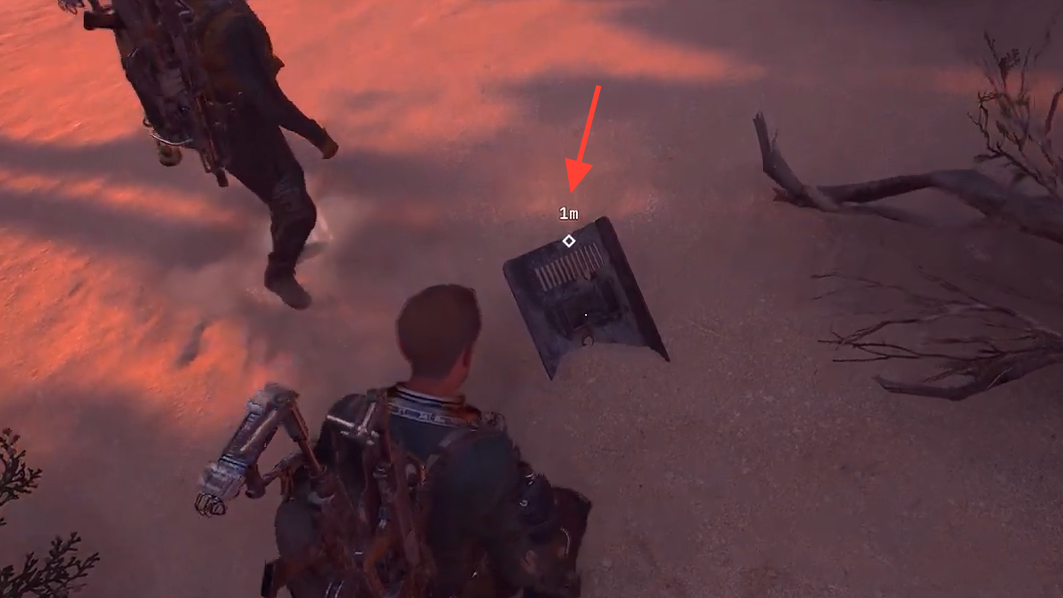
- From that ribbon, pick up the footprint trail on the ground.
- Track the prints as they lead out through a hole in the fence and onward to the hidden item.
Move slowly and scan at ground level; the footprints can be easy to miss in low light. As with other tasks, interactive quest items and spots often present as clearly highlighted objects when you’re close enough, so keep an eye out for a distinct interaction prompt as the trail ends.
Concise walkthrough
- Reach the Su Durante Warehouses in the Outskirts (Buried City).
- Go to the outer perimeter of the warehouse buildings; check the west side wall for Tian Wen’s cache.
- Loot/search the cache to progress the objective.
- Spot the red ribbon by the safe and pick up the footprints leading away.
- Follow the prints through the fence breach and continue until the interaction prompt appears.
- Secure the quest item and prep your exit.
Extraction basics for this quest
You keep the item and complete progress only if you make it back to Speranza. Plan your exit before you touch the cache.
| Extraction type | Key required | Noise | Wait | Risk |
|---|---|---|---|---|
| Cargo Elevator | No | Very high (loud alarm) | ~90s (lever to depart sooner) | High (players and ARC converge) |
| Metro Station (Buried City) | No | Very high | ~90s | High |
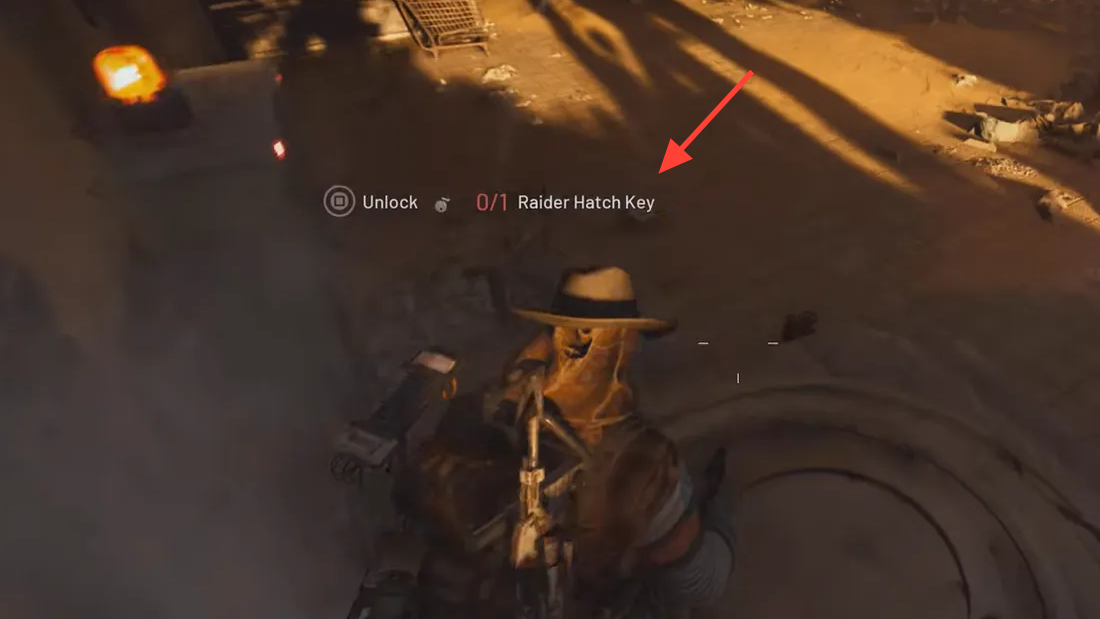
| Raider Hatch | Yes (single-use key) | Low (silent) | Instant on open | Low |
- Timers close exits: extraction points on your map shut down when their individual timers hit zero. Fewer exits remain as the match goes on.
- End-of-raid bombardment: when the main match timer expires, the map is bombed, and everyone remaining dies. Anything not in Safe Pockets is lost.
- Safe Pockets matter: move the quest item to a Safe Pocket immediately so you keep it even if you die.
Practical plays:
- Scout extraction for 30–60 seconds before calling. Check rooftops, windows, and corners for campers.
- Carry smoke grenades. When the elevator doors open, smoke the entrance and pull the lever inside.
- Use a Raider Hatch Key for silent exits on high-value runs, and store the key in a Safe Pocket before deploying.
Route and survival tips at Su Durante Warehouses
- Approach along cover and break sightlines frequently; the area draws both ARC patrols and opportunistic squads.
- If ARC flyers arrive, target rotors to quickly ground them, then reposition before calling an elevator.
- If you’re light on gear or outnumbered, extract early via the nearest available exit rather than crossing the zone to a contested point.
Common pitfalls and quick fixes
- Wrong location: don’t stop at a single “warehouse” marker; you need the Su Durante Warehouses cluster on the outskirts.
- Can’t find the cache: check the outside of the warehouse buildings, along the wall — players consistently report it on the west side.
- Missing the clues: the red ribbon by the safe marks the start; from there, follow footprints through a hole in the fence.
- Dying with the item: put the quest item in a Safe Pocket as soon as you pick it up.
What you get for finishing Marked for Death
| Item | Type | Notes |
|---|---|---|
| Shotgun Choke II | Weapon modification | Attachment reward |
| Angled Grip II | Weapon modification | Attachment reward |
The quest is brief once you’re at the right place and looking for the right visual tells. Treat the footprint trail like a stealth puzzle — move deliberately, secure the pickup, and extract on your first safe window instead of chasing fights around the Warehouses.