
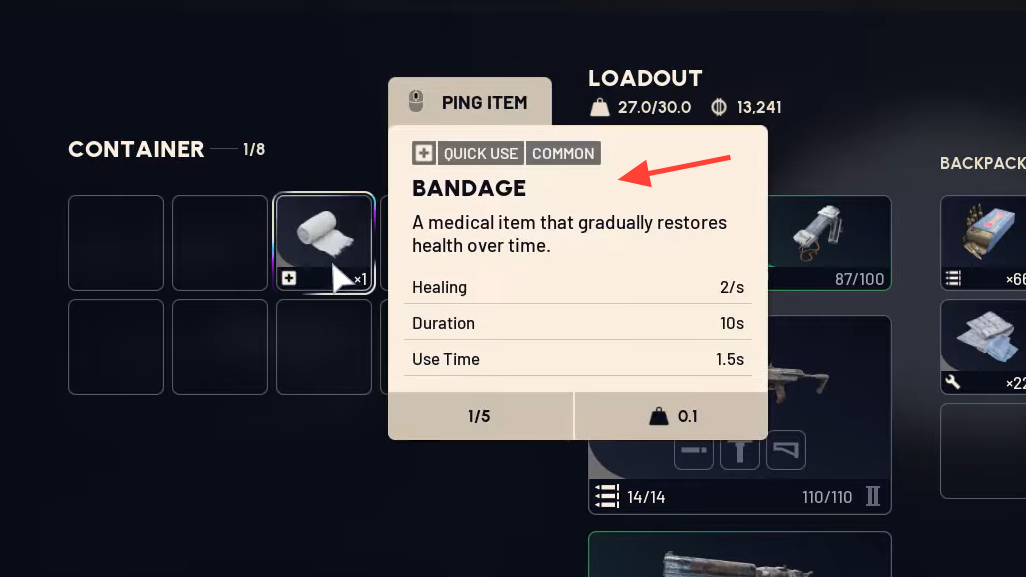
Arc Raiders splits survivability into three lanes: health healing, shield recharging, and stamina. Medical items are the backbone of that system, and you can’t use them unless they’re assigned to a Quick Use slot. Below is a compact breakdown of what each item does, how long it takes to apply, and what it costs to make.
Health vs. shields vs. stamina
- Health healing restores HP either instantly or over time. Bandages and “Vita” items live here.
- Shields are a separate pool. They don’t raise max HP and require their own rechargers.
- Stamina tools restore or boost stamina; they don’t heal HP.
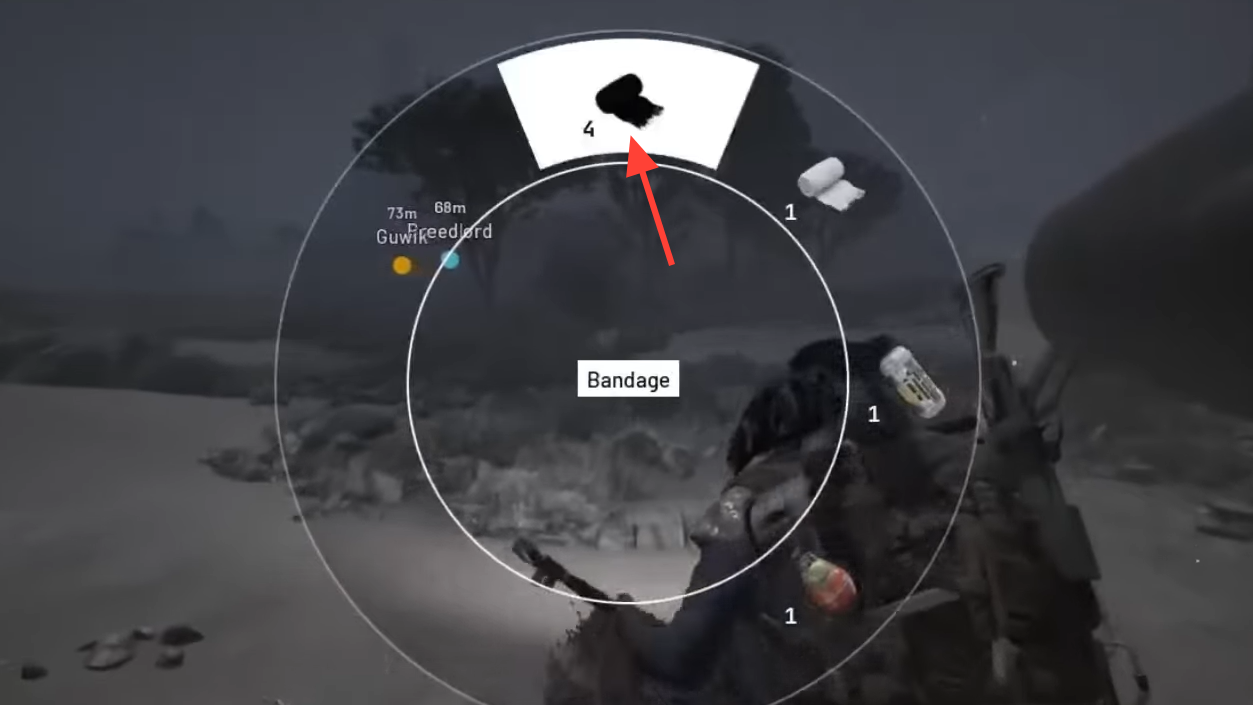
How to use medical items mid‑raid
- Assign items to a Quick Use slot before deploying. Items in your backpack won’t activate from the wheel unless slotted.
- Open the Quick Use wheel (default
Q), select the item, then hold fire to self‑use. - Hold alt‑fire to use a healing item on another player. You can revive with the Defibrillator and even heal enemy players if you allow it.
- Augments can increase Quick Use slots, usually at a weight capacity trade‑off.
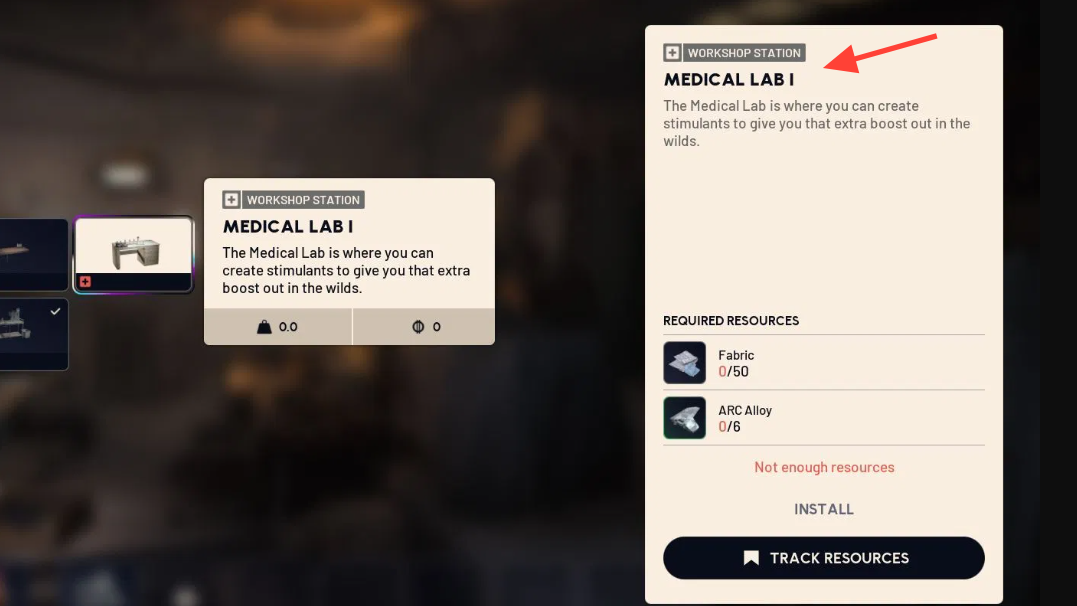
Crafting and Med Station tiers
- Base crafting uses standard material costs at your Med Station.
- Mid‑raid crafting consumes roughly double the materials for the same item.
- Tier unlocks matter:
- Tier I: Bandage, basic Shield Recharger, Adrenaline Shot.
- Tier II: Herbal Bandage, Sterilized Bandage, Defibrillator, Surge Shield Recharger.
- Tier III: Vita Shot, Vita Spray.
Health healing items (effects, use time, recipes)
| Item | Effect | Use time | Crafting tier and recipe | Buy price (Lance) |
|---|---|---|---|---|
| Bandage | 2 HP/s for 10s (over‑time) | 1.5s | Tier I · 5× Fabric | $750 |
| Herbal Bandage | 3.5 HP/s for 10s (over‑time) | 1.5s | Tier II · 1× Durable Cloth, 1× Great Mullein | $2700 |
| Sterilized Bandage | 5 HP/s for 10s (over‑time) | 1.5s | Tier II · 2× Durable Cloth, 1× Antiseptic | $6000 |
| Vita Shot | 50 HP instant | 4s | Tier III · 1× Antiseptic, 1× Syringe | — |
| Vita Spray | 10 HP/s while channeled | — | Tier III · 2× Antiseptic, 4× Canister | — |
| Defibrillator | Revives a downed player and restores 50 HP | 1.5s | Tier II · 3× Plastic Parts, 1× Moss | $3000 |
| Mushroom | 15 HP instant | 1s | — | — |
| Expired Pasta | 15 HP instant | 1s | — | — |
| Resin | 1 HP/s for 10s | 1s | — | — |
| Fabric | 0.4 HP/s for 25s | 1s | — | — |
Shields and stamina (what to pack alongside heals)
| Item | Effect | Use time | Crafting tier and recipe | Buy price (Lance) |
|---|---|---|---|---|
| Shield Recharger | Recharges shields 4/s for 10s | 2s | Tier I · 5× Rubber Parts, 1× ARC Powercell | $1560 |
| Surge Shield Recharger | Restores 50 shields (burst) | 5s | Tier II · 1× Electrical Components, 1× Advanced ARC Powercell | $3600 |
| ARC Powercell | Restores 20 shields | 3s | — | — |
| Adrenaline Shot | Fully restores stamina and boosts regen for 10s | 1s | Tier I · 3× Chemicals, 3× Plastic Parts | $900 |
| Apricot | +20 stamina | 1s | — | $640 |
| Lemon | +20 stamina | 1s | — | $640 |
| Olives | +20 stamina | 1s | — | $640 |
| Bloated Tuna Can | +25 stamina | 1s | — | $1000 |
Mid‑raid crafting (double costs, fast stabilization)
| Item | Effect | Use time | Mid‑raid recipe | Out‑of‑raid craftable? |
|---|---|---|---|---|
| Bandage | ~2.5 HP/s for 10s | 1.5s | 8× Fabric | Yes |
| Herbal Bandage | ~3 HP/s for 10s | 2s | 4× Fabric, plus 1× Root or 1× Moss or 1× Agave or 1× Torch Ginger | Yes |
| Shield Recharger | 50 shields (burst) | 5s | 2× Battery, 10× Metal Parts | Yes |
| Adrenaline Shot | Stamina fully restored; regen boost for 10s | 1s | 4× Plastic Parts, 6× Chemicals | Yes |
| Agave Juice | Stamina regen boost for 10s, small initial health cost (-5 HP) | 1s | 1× Agave, 1× Empty Wine Bottle | No |
| Fruit Mix | Stamina consumable (mixed fruit) | — | 1× Lemon, 1× Apricot, 1× Prickly Pear | No |
Loadout planning that actually works
- Carry one instant heal (Vita Shot or a 15 HP pickup) and one over‑time bandage (Sterilized or Herbal).
- Slot a Defibrillator if you expect squad fights or objective standoffs; it brings a downed player back with 50 HP.
- Don’t skip shield tools. A Shield Recharger or Surge variant prevents your HP from getting shredded in the first place.
The mix you bring is limited by Quick Use slots and weight capacity, so use augments to expand slots if your build allows it.
If a quest sends you hunting for “medical merchandise,” it’s pointing you straight at this ecosystem: bandages for steady recovery, Vita items for emergencies, rechargers for shields, and stamina tools to keep you moving. Craft what your Med Station tier supports, and upgrade it to unlock stronger options before your next drop.