
The Shredder is the first ARC that turns Stella Montis’ tight corridors into a real panic check. It hovers, soaks damage, and deletes shields at close range. It also has a clear weakness, and once you understand that, the fight becomes much more manageable.
What the Shredder is and why it feels so lethal
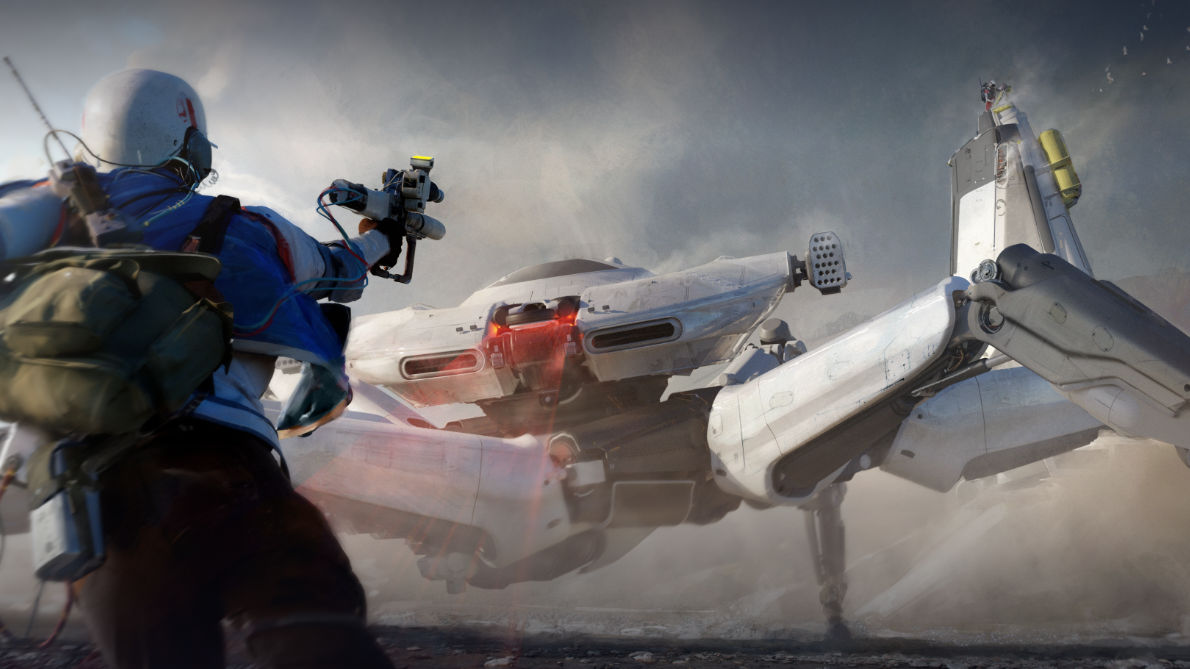
Shredders are small, hovering, cylindrical ARCs that spawn inside the Stella Montis facility. They sit in the “basic enemy” tier alongside Wasps and Hornets, but in practice, they behave more like a mini‑boss for interiors.
On paper, they are:
| Property | Value / Behavior |
|---|---|
| Threat level | High |
| Armor | Fully plated, highly resistant to light ammo |
| Mobility | Low to moderate hover speed, can be pushed around by heavy hits |
| Primary attack | 360° shrapnel / shotgun blast (“Shrapnel Blast”) |
| Map presence | Primarily indoors on Stella Montis |
| Listed weakness | Thrusters (underside turbine and side maneuvering thrusters) |
The danger profile is simple: if it gets close and you’re not behind solid cover, it can strip your shield and chunk your health in one or two volleys. In free loadouts or with weak shields, that often means a quick wipe.

How the Shredder attacks
The Shredder’s behavior is straightforward and predictable, which is what you exploit:
- It moves directly toward you once aggroed. It doesn’t really play around cover or reposition intelligently.
- At a certain range, it stops and charges. There’s a brief audio and visual tell as it winds up.
- It then fires a four‑round burst of shrapnel in all directions, functioning like a 360‑degree shotgun.
That blast works more like multiple short‑range projectiles than a single explosion. Cover completely breaks the line of fire; stepping behind a wall, column, or doorway will nullify the volley even if you’re quite close.
Arc Raiders Shredder weakness: where to aim
Almost everyone’s first instinct is to shoot the glowing “eye” on the front. That’s the wrong target. The eye is heavily armored and soaks rounds with little payoff.
The Shredder’s real weakness is its propulsion system:
| Weak part | Location | Effect when damaged |
|---|---|---|
| Main turbine / big thruster | Large thruster on the underside | High damage; shots can destabilize and eventually kill the unit |
| Maneuvering thrusters | Small blue/white engine ports around the body | Breaking two or more can knock it to the ground and slow it dramatically |
Consistent reports and in‑game behavior line up with the rest of the ARC roster: movement hardware is the weak point. Wasps, Hornets, and Rocketeers all go down faster when you target thrusters, and Shredder follows that pattern.
In practice, that means:
- Prioritize shots on the small blue or white thruster ports along its sides when it’s circling you.
- When recoil or a stagger exposes the bottom, feed heavy shots straight into the main underside thruster.
- If you break multiple maneuvering thrusters, expect it to sag, fall, or at least move sluggishly, giving you safer windows to aim at the underside.
What actually hurts Shredder (and what doesn’t)
Shredder is heavily armored. Ammo choice matters more than with most standard enemies.
| Damage type | Effectiveness vs Shredder | Notes |
|---|---|---|
| Light ammo (SMGs, pistols, basic rifles) | Poor | Chews through magazines for minimal damage; only consider if you are finishing a nearly dead unit. |
| Heavy ammo (Ferro, Anvil, railgun‑style weapons) | High | Penetrates armor plating and reliably damages thrusters. Expect ~10–18 well‑placed shots from a Ferro‑class weapon when solo. |
| Shotguns | High at close–mid range | Can stagger and push Shredder back, especially if you connect with thrusters, but exposes you to its blast range if you misjudge the distance. |
| Standard grenades / heavy grenades | Very high | Deadmine, Heavy Fuse, and similar explosives can heavily damage or outright kill a Shredder if you catch it during a charge or stall. |
| Snap Blast Grenades | Extremely high | Two Snap Blasts reliably destroy a Shredder when you stick them and keep your distance until detonation. |
| Wolfpack and other premium explosives | Overkill but effective | Expensive but will erase a Shredder in one use if you want to avoid any risk. |
In short, Shredder is a hard counter to light, low‑commitment loadouts. If you walk into Stella Montis with only a Kettle or a basic SMG, you’re not meant to reliably win that fight; you’re supposed to disengage or out‑maneuver it.
Recommended loadouts against Shredders
For consistent kills, you want some combination of heavy ammo and sticky explosives. A practical loadout for Shredder hunting includes:
- One heavy weapon that can repeatedly hit thrusters (Ferro, Anvil, or equivalent).
- Snap Blast Grenades as your default throwable; they are relatively cheap and stick where they land.
- Optional: a shotgun as a secondary to stagger it if it gets too close or to push it back down corridors.
- A shield tier suitable for high burst damage; green is survivable with careful play, blue or better lets you tank a mistake.
Snap Blast Grenades sit in a sweet spot of cost versus reliability: two clean sticks on the Shredder’s body will kill it without needing to count individual weapon shots. Save more expensive options like Wolfpack for larger ARCs unless you are in immediate danger.
Positioning: how to survive the 360° blast
The Shredder’s weakness is directional: it needs line of sight for the shrapnel to connect. Indoors, that gives you a simple rule—never let it charge while you’re in the open.
When you hear or see the charge animation:
- Break the line of sight entirely. Step behind a doorway, wall, pillar, or even a high crate.
- Avoid merely backpedaling in a straight hallway; the spread and range are enough to catch you even if you try to outrun it.
- Once the volley ends, immediately peek back out and punish it while it recovers and starts moving again.
If you have hard cover like a central column, you can “ring around the rosie” the Shredder: kite it in circles, forcing it to waste volleys into the obstacle while you land deliberate shots at its thrusters.
Solo vs squad: how much of a threat is it really?
Shredders are tuned to be scary for solo players and opportunistic threats during PvP fights, but they scale down dramatically when multiple Raiders focus them.
| Scenario | Risk level | Practical tactic |
|---|---|---|
| Solo, light gear, no explosives | Very high | Best option is to avoid aggro, close doors between you and it, or rotate out of the area entirely. |
| Solo, heavy weapon + a few grenades | Moderate | Use cover aggressively, bait a charge, stick a grenade, and finish thrusters with heavy shots. |
| Trio with mixed heavy weapons | Low to moderate | Assign one player as bait to keep aggro while others flank and burn down thrusters. |
| Multiple squads in the same interior | Chaotic | Shredder becomes a third party; let it pressure enemies while you snipe thrusters from safety. |
Teams can treat Shredders almost like a turret with a predictable cycle. Once everyone understands “thrusters, not eye” and respects the charge window, a focused burst of heavy damage will often delete a Shredder before its second attack.
Fighting Shredder in Stella Montis
Putting everything together, a clean Shredder kill looks like this in practice:
- You hear its distinctive hover and shotgun wind‑up somewhere ahead in a corridor or loading bay.
- Before you push into a large room, you identify at least one solid object you can use as hard cover.
- On first visual, you immediately tag the small side thrusters with heavy shots rather than centering on the eye.
- As it moves closer and starts to charge, you break line of sight—through a doorway, behind a pillar, or around a corner.
- During that charge animation, you throw a Snap Blast and stick it onto the Shredder’s body or the floor right under it.
- Once the blast resolves and the shrapnel volley ends, you peek to see whether it’s smoking or staggering. If it’s still up, you continue focusing the underside turbine with your heavy weapon.
- If it falls to the ground after losing thrusters, you keep your distance and finish the remaining engines; it can still be dangerous while disabled.
Loot and why you might choose to engage
Shredders are not just punishment; they are also moving loot containers. Defeating one can reward:
- ARC Alloy
- ARC Powercells
- Shredder Gyros (a unique component drop)
- Shotgun ammo
- Simple Gun Parts
- Mechanical Components
Given the resource cost—heavy ammo, grenades, occasional shield damage—you should treat Shredders as deliberate engagements. If you’re low on supplies, skipping a Shredder is often the smarter play. If you’re stocked and hunting components, their predictable behavior and clear weakness make them very profitable once you know how they work.
The Shredder is designed to punish lazy indoor play: rushing corners, relying on light weapons, and ignoring audio cues. Once you retrain your aim toward its thrusters and start fighting it on your terms—using hard cover, heavy ammo, and sticky explosives—it shifts from “run away” horror to something closer to a dangerous but manageable interior objective.