
Week 19 of ARC Raiders Trials runs from March 9 through March 16, 2026, and it features five objectives spread across Dam Battlegrounds, The Blue Gate, and Stella Montis. Every Trial requires 4,000 points in a single raid — and you must successfully extract to bank your score. The smartest move you can make is running each Trial during a Major Map Condition, which doubles all points earned.
Quick answer: Play during any Major Map Condition (Night Raid, Hurricane, Electromagnetic Storm, Locked Gate, Cold Snap, or Hidden Bunker) to get 2x points on every Trial. Two miniboss kills, three or four cache opens, or about ten small ARC destroys will hit 4,000 under a 2x modifier.
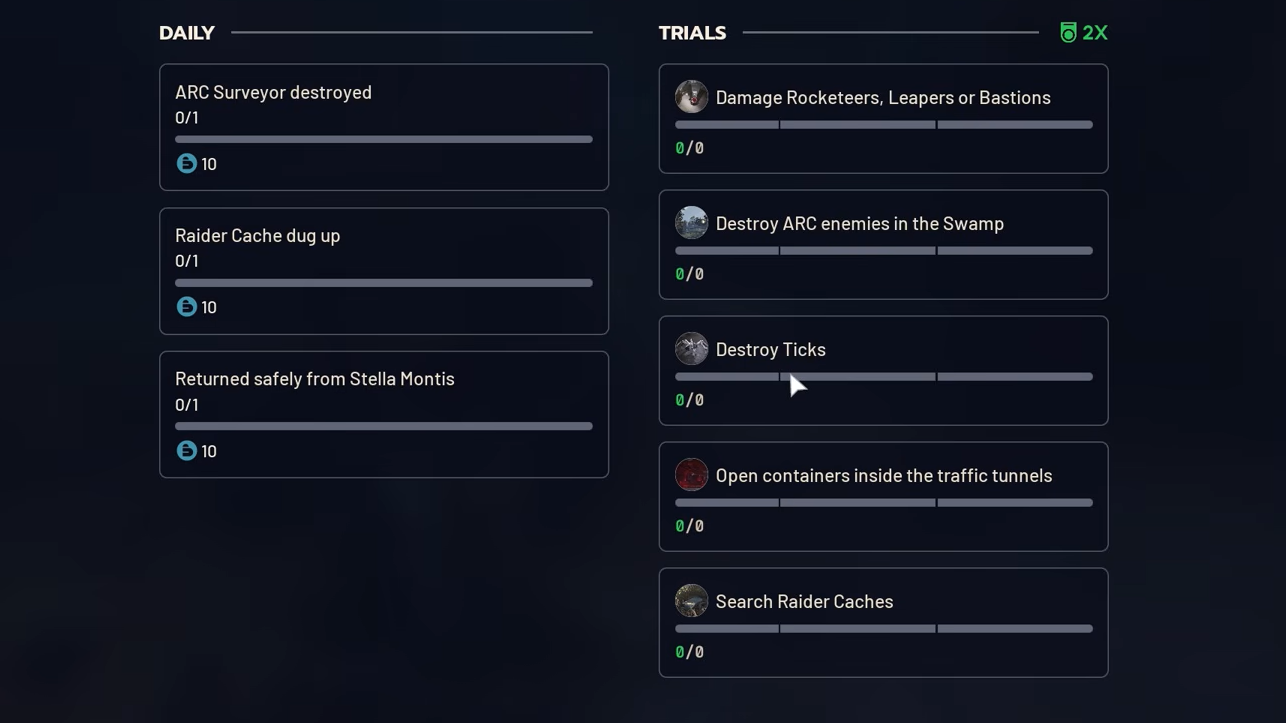
Week 19 Trials Objectives
| Trial | Best Map | Key Condition |
|---|---|---|
| Search Raider Caches | Dam Battlegrounds | Hurricane |
| Damage Rocketeers, Leapers, or Bastions | Dam Battlegrounds / The Blue Gate | Any Major Condition |
| Destroy ARC Enemies in the Swamp | Dam Battlegrounds (Swamp zone) | Night Raid |
| Destroy Ticks | Stella Montis | Night Raid |
| Open Containers Inside Traffic Tunnels | The Blue Gate | Locked Gate |
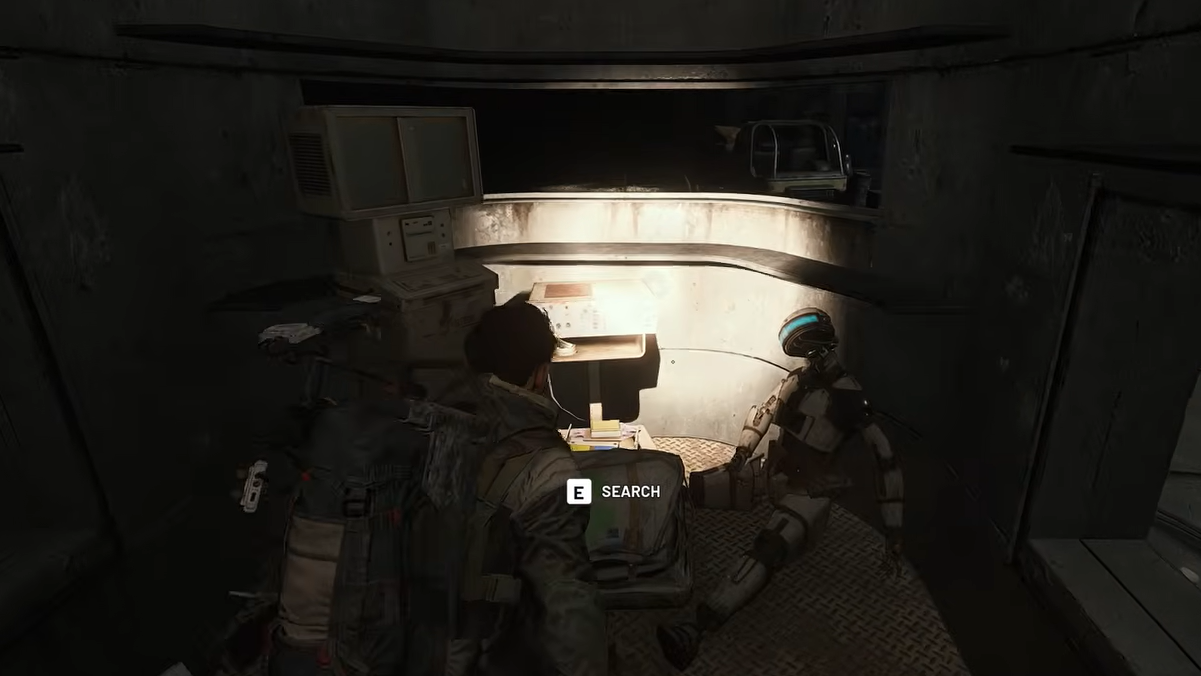
Search Raider Caches
Raider Caches are small buried containers that emit a distinct humming sound. They appear on every map except Stella Montis, but Dam Battlegrounds has the highest density of spawn points. During the Hurricane condition, each cache you interact with awards roughly 1,600 points, meaning you only need to open three caches to clear the 4,000-point threshold.
A crucial detail: caches that have already been looted by another player still count. You can search a previously opened cache and receive full Trial credit. Hurricane caches also remain audible after being looted, so you can track them by sound rather than scanning the ground visually. Plan a loop through several Points of Interest, listen for the hum, and interact with everything you find.
Loadout suggestion: Anvil, two stacks of ammo, Light Shield with Shield Rechargers, Herbal Bandages, and optionally Adrenaline Shots to cover ground faster.

Damage Rocketeers, Leapers, or Bastions
This Trial targets the three toughest ARC minibosses. The math is straightforward under a 2x condition: killing one Leaper yields around 2,200 points, and a single Rocketeer kill pushes you past 4,000 combined. A Bastion is worth approximately 3,500 points. In practice, destroying any two of these minibosses in a single raid gets the job done.
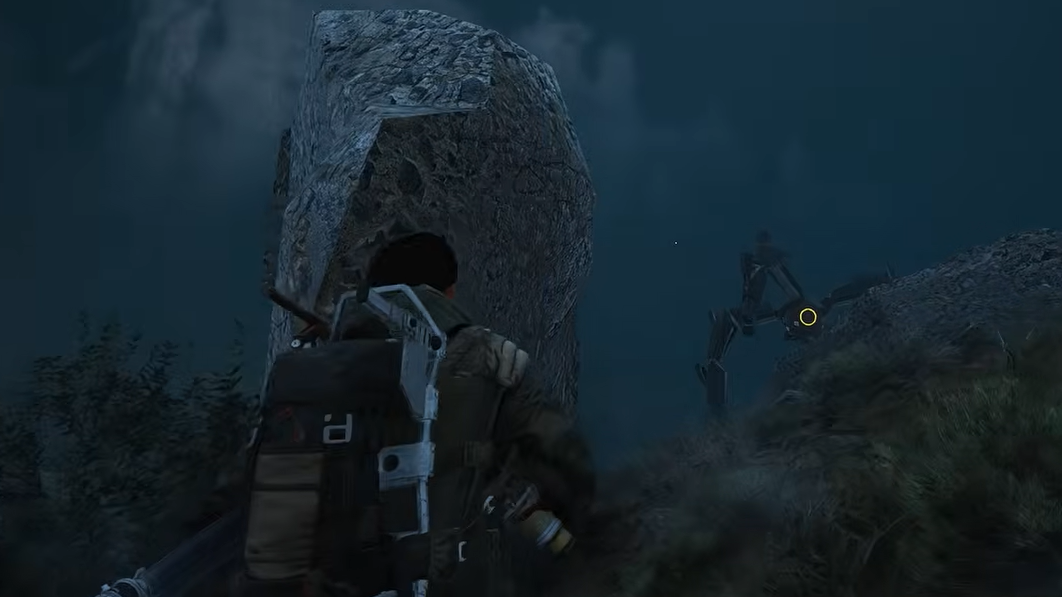
The Swamp area on Dam Battlegrounds is ideal because both a Leaper and a Rocketeer patrol there, letting you stack this Trial with the Destroy ARC in the Swamp objective simultaneously. On The Blue Gate, Leapers appear near the Wreckage site on the southwest side, Bastions patrol the Checkpoint area, and Rocketeers spawn around Pilgrim's Peak and the Headhouse.

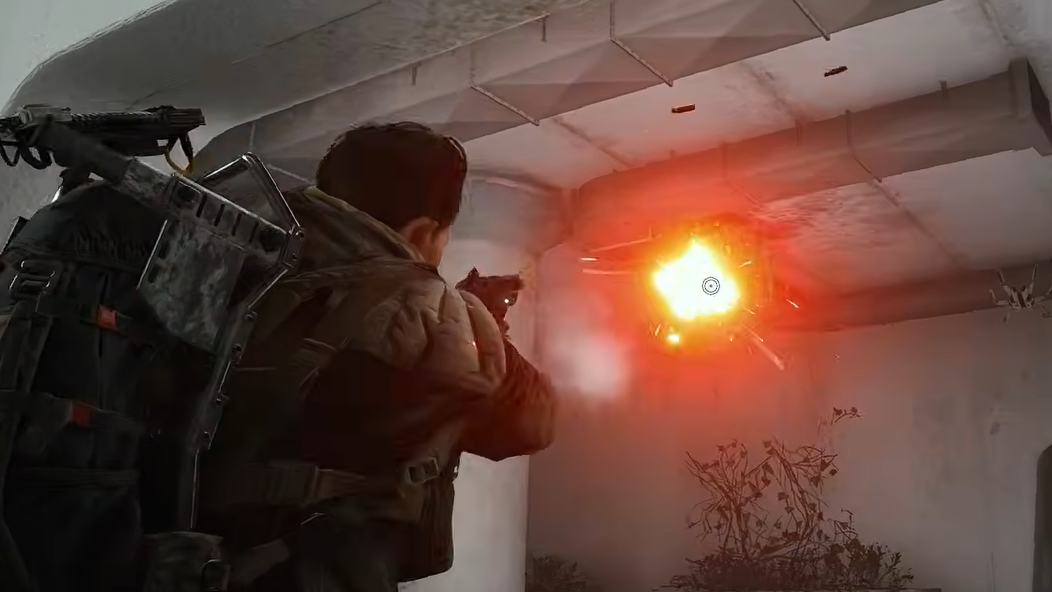
Combat Tips per Miniboss
| Miniboss | Weak Points | Recommended Approach |
|---|---|---|
| Leaper | Yellow leg joints, central eye | Bait into a doorway or narrow space, then use Wolfpacks or Trailblazers. Two Wolfpacks or two Trailblazers plus Anvil shots will finish it. |
| Bastion | Leg weak spots → yellow canister on back → exposed core | Cripple legs first, circle behind to hit the canister, then unload on the core for massive damage. |
| Rocketeer | Thrusters | Engage from elevation. One Wolfpack plus a few Anvil rounds kills it. Alternatively, use an Osprey at range and target one thruster at a time. |
Loadout suggestion: Ferro or Anvil (Level 4), 60+ Heavy Ammo, Medium Shield with Shield Rechargers, Wolfpack x2, and a Showstopper or Trailblazer for backup.
Destroy ARC Enemies in the Swamp
This Trial is locked to the Swamp zone on Dam Battlegrounds — the forested, marshy area around the Hydroponic Dome Complex, Old Battleground, and South Swamp Outpost. Any ARC destroyed in this zone counts, but the key word is destroy, not damage. You receive zero points until the enemy is fully eliminated.
Small ARC types — Wasps, Hornets, Fireflies, and Spotters — each award 400 points. A Sentinel Turret is worth 1,200 points. Larger ARC like Rocketeers and Leapers award significantly more. Under a 2x condition, destroying ten small ARC or two large ones clears the Trial.
A useful trick: shooting off a Hornet's propellers causes it to fall and crash into the ground, which counts as a full destroy. You also get credit for ARC summoned by Snitch Scanners, so throwing a few of those down and picking off the incoming Wasps is a fast way to farm points.
Because a Leaper and Rocketeer both patrol the Swamp, you can clear this Trial and the Damage Rocketeers/Leapers/Bastions Trial in a single run. Deploy during Night Raid for 2x points and increased ARC patrol density.
Loadout suggestion: Anvil or Renegade (Level 3–4), three to four stacks of ammo, Light or Medium Shield with Shield Rechargers, Herbal Bandages.
Destroy Ticks on Stella Montis
Ticks are the small spider-like ARC that infest building interiors. They die in one or two light weapon shots, but you need volume to hit 4,000 points. Stella Montis is the best map by far since the entire layout is indoors, and Ticks spawn consistently throughout.
Each Tick destroyed awards roughly 300–400 points on a standard condition. During Night Raid, that doubles, meaning around seven to ten Tick kills reach three stars. On a Day Raid without the multiplier, expect to need roughly twenty kills.
The optimal farming route on Stella Montis runs: Seed Vault → Cultural Archives → Business Center (or Business Lounge) → Communications → Security Bridge, then loop back. Cultural Archives is especially dense with Tick spawns. Ticks respawn relatively quickly, so running the circuit a second time usually finishes the job.
Loadout suggestion: Kettle (Level 3–4 with Extended Mag), Anvil (Level 4), 160 Light Ammo, 80 Heavy Ammo, Light or Medium Shield with Shield Rechargers, Herbal Bandages.
Open Containers Inside the Traffic Tunnels
This is the grindiest Trial of the week and the most condition-dependent. It only works on The Blue Gate during the Locked Gate Major Map Condition. The traffic tunnels sit behind the Outer Gates, which require four unique keys to open.
The keys are found inside lootable containers at four locations across the map: Ancient Fort, Pilgrim's Peak, Raider's Refuge, and Reinforced Reception. Each key is a small slip of paper. Once all four are collected — by you, your squad, or other players in the lobby — they're slotted into terminals in the Gate Control Room, and the Outer Gates open for everyone.
Inside the tunnels, every lootable object counts: vehicle hoods, bus trunks, lockers, briefcases, and side bays. Each container awards roughly 200 points, and since Locked Gate is itself a Major Condition, those points automatically double. That brings the requirement down to approximately 10 containers for three stars.
Containers that have already been opened by other players can still be searched for Trial credit. This means you don't need to race other Raiders — just methodically work through the tunnel and interact with everything.
Be aware that a Bastion patrols the tunnel interior. If it's blocking your path, a Deadline or a couple of Trailblazers can neutralize it. Extract immediately after hitting 4,000 points; dying before extraction means you lose all progress from that raid.
Fastest Route to Three-Star All Five Trials
Two of the five Trials can be stacked into a single Dam Battlegrounds run, which saves an entire raid's worth of time. Here's the most efficient order:
Step 1: Drop into Dam Battlegrounds during Night Raid and head straight to the Swamp zone around the Hydroponic Dome Complex. Destroy the Leaper and Rocketeer there to clear both the Swamp ARC Trial and the Damage Rocketeers/Leapers/Bastions Trial in one go. Mop up small ARC if needed to top off the Swamp score.
Step 2: Run Stella Montis during Night Raid. Follow the Seed Vault → Cultural Archives → Business Center loop to destroy Ticks. Seven to ten kills under the 2x modifier finishes it.
Step 3: Return to Dam Battlegrounds during Hurricane. Open three to four Raider Caches — listen for the humming sound — and extract.
Step 4: Wait for the Locked Gate condition on The Blue Gate. Collect or help collect the four keys, enter the traffic tunnels, and open roughly ten containers. This Trial is the most event-dependent, so save it for last.

How Trials Ranking Works
Reaching three stars on a Trial earns you the best reward tier, including chances at Epic items and blueprints. Your cumulative score across all Trials determines your position on a 100-player leaderboard within your current rank. At the end of each week, positions 1–30 earn a double promotion, positions 31–60 earn a single promotion, and positions 61–100 stay at their current rank. Nobody gets demoted for a low finish — you simply don't advance.
If you're playing in a party, all squad members earn the same Trial score, which makes group play especially efficient for the miniboss-focused Trials. Prioritizing 2x conditions across every run is the single biggest factor in climbing the leaderboard faster and reaching Cantina Legend.