
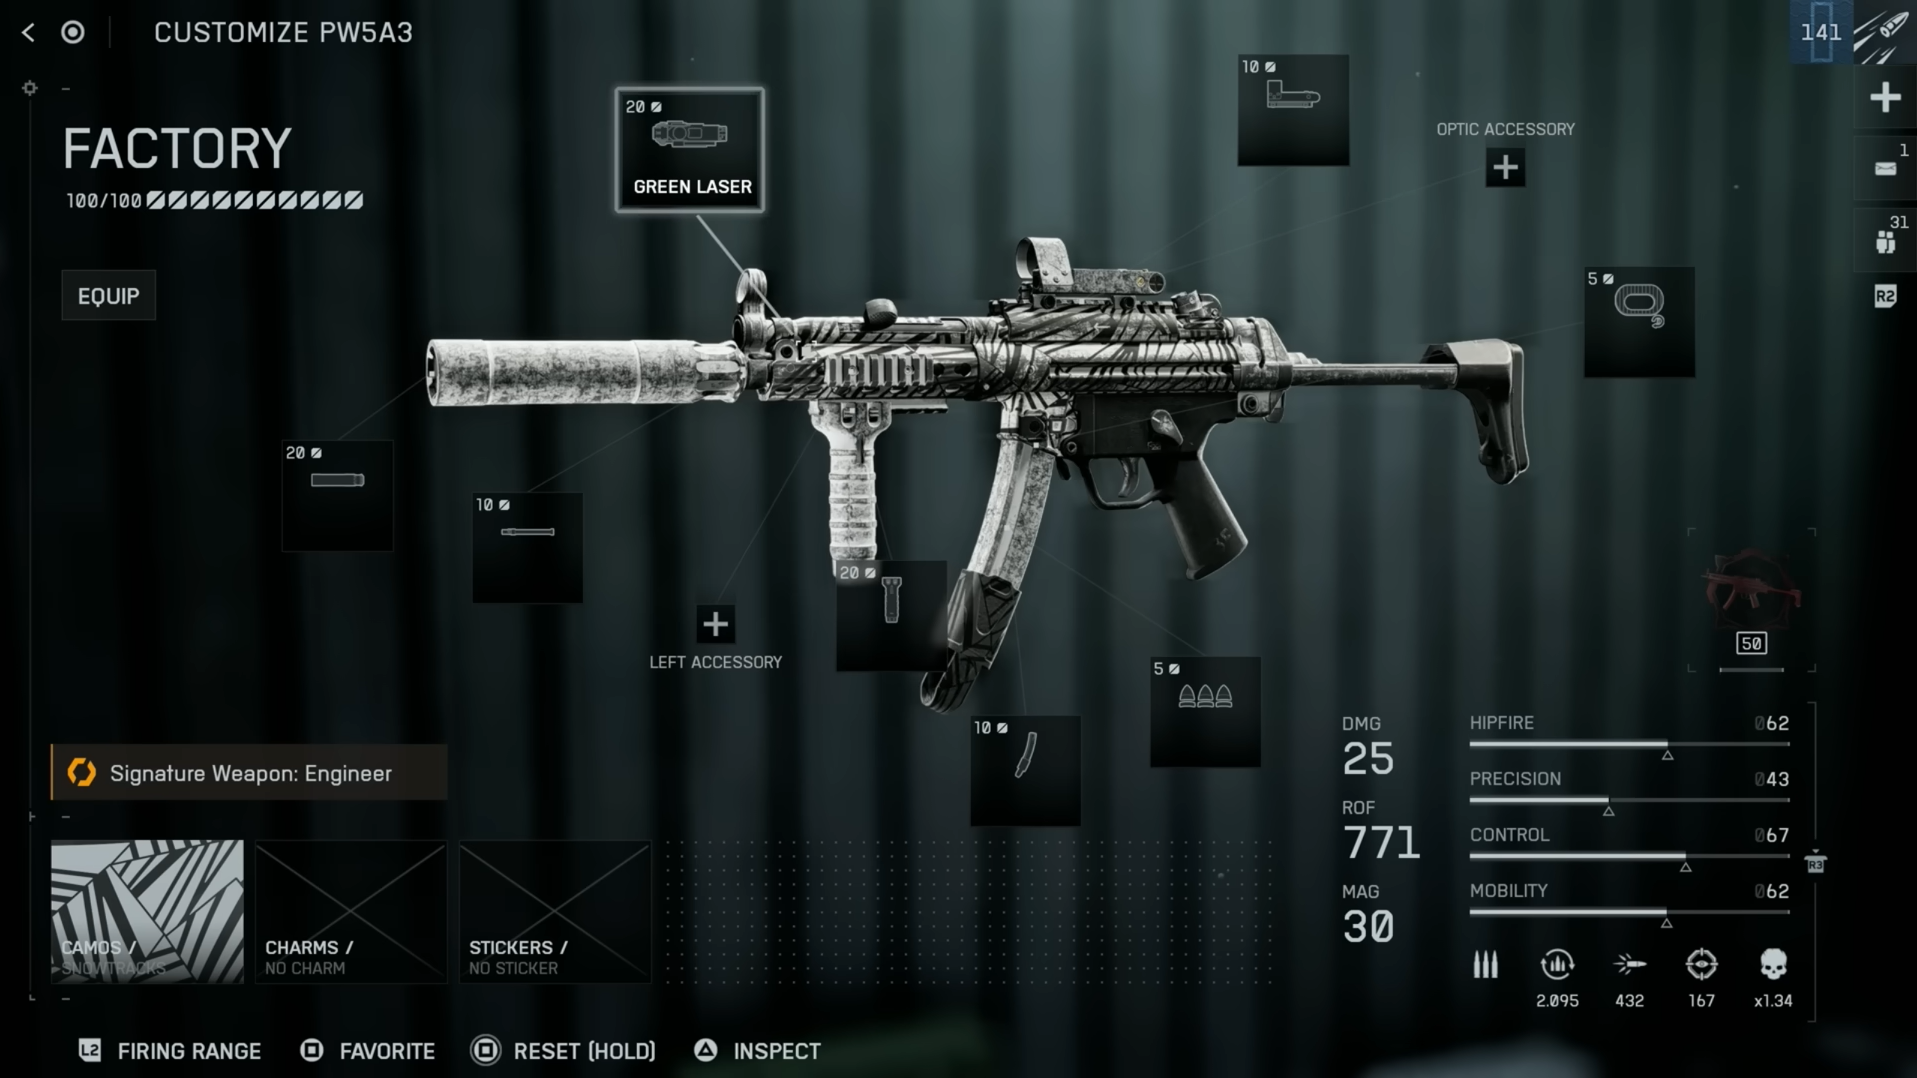
The PW5A3 sits in a useful middle ground in Battlefield 6: it is slower and more controlled than the PW7A2, but still fast enough to shred in close quarters. Its low base recoil and strong mobility mean the weapon really comes alive once you lean into flanking and hip-fire focused setups rather than forcing it to behave like a long-range rifle.
Below are three grounded meta variants that all revolve around the same core: keep recoil essentially nonexistent, stay off the radar when it matters, and preserve the SMG’s snappy aim-down-sights (ADS) speed.
Core PW5A3 meta loadout (aggressive flanker)
This build assumes you are constantly taking side routes, diving into hills, and chaining kills before the enemy can react. The priority is fast handling, tight hip-fire, and minimal visual clutter when snapping between targets.
| Slot | Attachment | Role in the build |
|---|---|---|
| Muzzle | Flash Hider (10) | Reduces how easily you are spotted while firing without the hip-fire penalties of most suppressors. |
| Barrel | Extended 245mm Custom (15) | Improves bullet velocity and noticeably speeds up ADS, keeping the gun responsive in close and mid-range fights. |
| Underbarrel | Slim Angled (20) | Further improves ADS speed and adds recoil control so the PW5A3 stays laser-stable during short bursts. |
| Magazine | 30RND Fast Magazine (10) | Maintains default capacity but cuts reload time so you are rarely caught empty after a multi-kill. |
| Ammunition | Standard (5) | Leaves damage profile and penetration unchanged while filling out the attachment budget. |
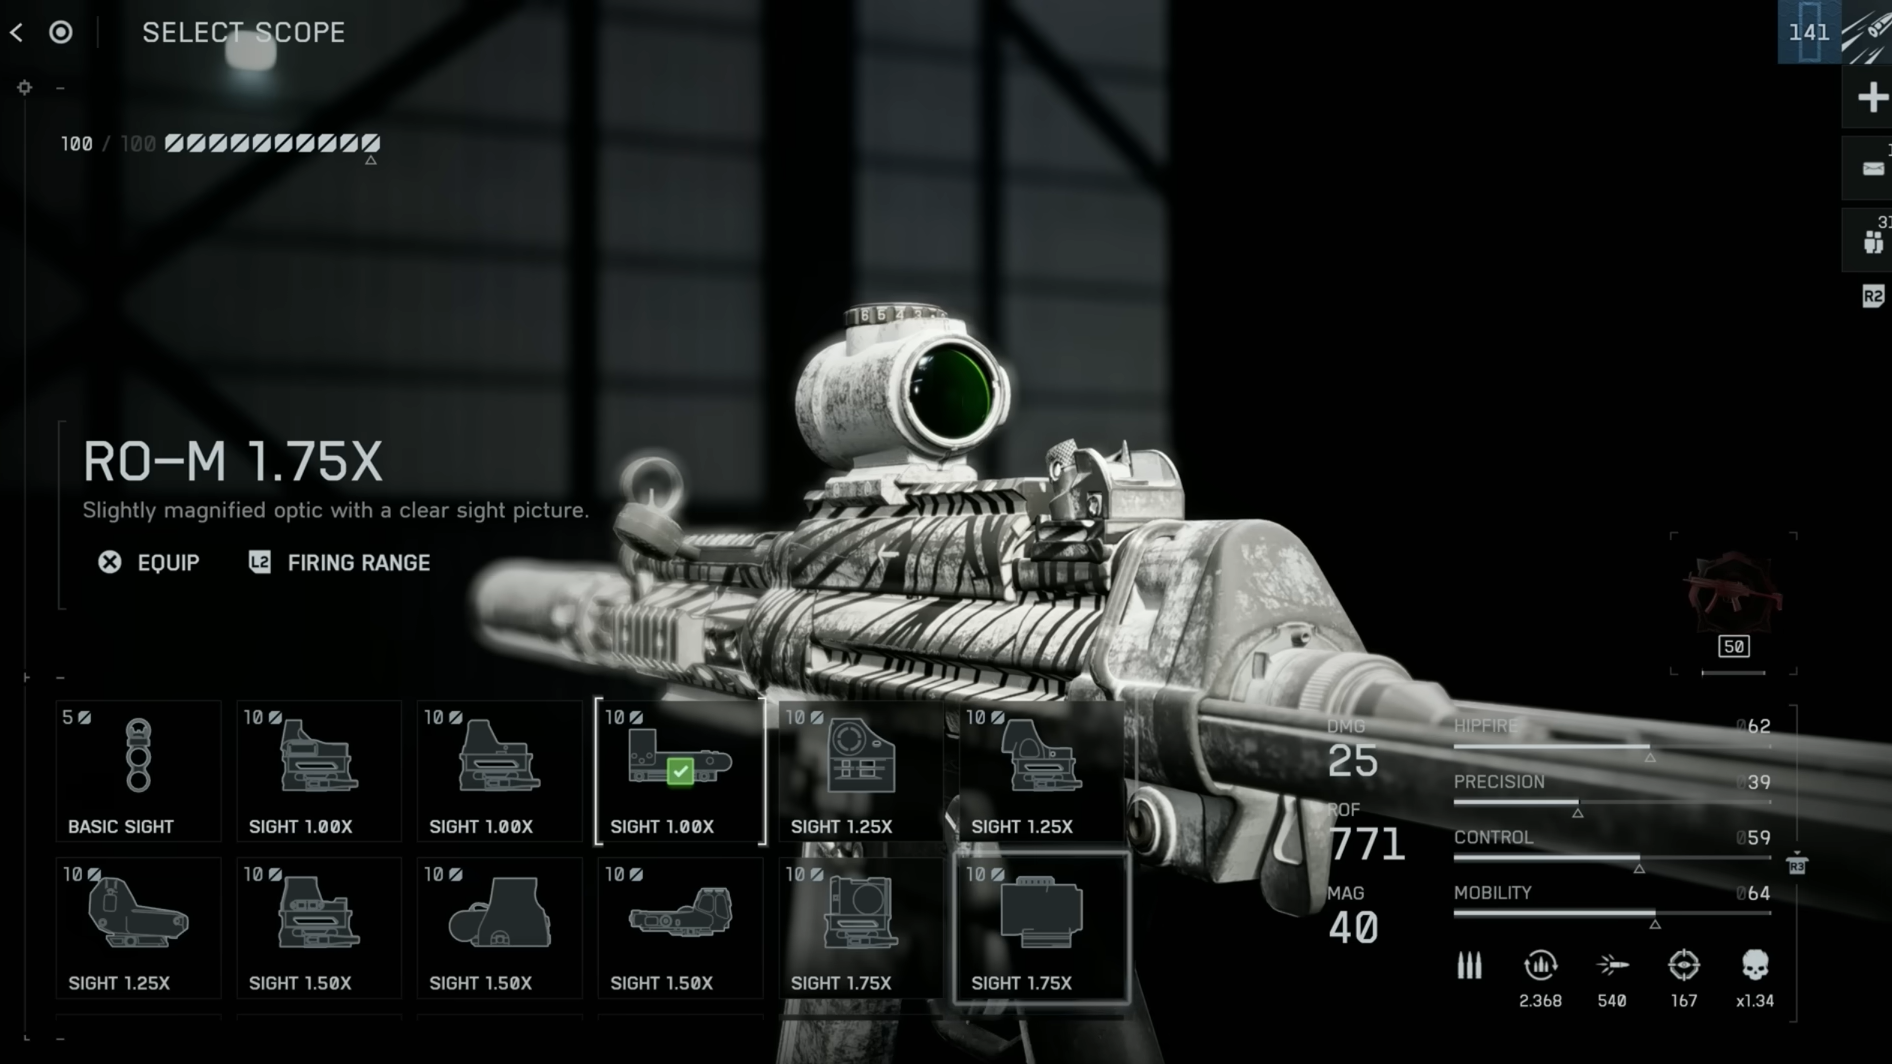
| Scope | Mini Flex 1.00x (10) | Provides a very clean 1.0x picture, much clearer than the default red dot or irons in frantic close fights. |
| Accessory | 120MW Blue (30) | Heavy boost to hip-fire accuracy and moving ADS, at the cost of a large chunk of your point budget. |
This configuration leans into how stable the PW5A3 already is. With the Extended 245mm Custom barrel and Slim Angled grip, both feeding into ADS speed and recoil, the gun feels closer to a mobile carbine than a jittery SMG. The Flash Hider trims your visible signature when firing without dragging hip-fire performance down, which keeps it compatible with an aggressive, always-sprinting style.
The main trade-off is attachment cost: the 120MW Blue laser is expensive, but its effect is obvious the moment you start hip-firing into a crowded hill. Shots land far more reliably when you shoulder the gun while moving, which is exactly what you want when you slide into a point and need to track three targets at once.
Use this variant on mid-sized objective maps where you can chain constant flanks and rarely need to challenge full AR lanes. Iberian-style lanes and urban chokepoints are where it shines.
PW5A3 suppressed meta loadout (stealth first)
When you care more about staying invisible on the minimap and behind enemy lines than about pure hip-fire spread, a suppressed variant makes sense. The key is choosing the right suppressor and not overpaying with points that could go into handling.
| Slot | Attachment | Role in the build |
|---|---|---|
| Muzzle | Standard Suppressor (20) or CQB Suppressor | Removes firing pings from the minimap and tames recoil; the CQB version keeps hip-fire healthier than heavier suppressors. |
| Barrel | Extended 245mm Custom (15) | Compensates for the suppressor’s velocity hit and preserves the “snap” when ADSing out of a sprint. |
| Underbarrel | Rib Stubby or Folding Stubby (≈20) | Adds recoil control and faster ADS transition, which is crucial once a suppressor slightly softens your handling. |
| Magazine | 30RND Fast Magazine or 40RND Magazine | Fast mag keeps you mobile and quick; 40RND suits longer on-gun streaks but costs points and some agility. |
| Ammunition | Standard / FMJ (5) | FMJ-style ammo is useful when you expect to shoot through soft cover when holding flanks. |
| Scope | Mini Flex 1.00x or iron sights | Mini Flex gives a clean picture; dropping the optic frees 10 points if you want a stronger laser or ergonomic perk. |
| Accessory | 50MW Blue or invisible Red laser | Lower-powered or invisible lasers keep hip-fire respectable without broadcasting your position as harshly. |
Suppressors in Battlefield 6 often come with hidden downsides beyond simple sound reduction. Heavy options can hurt hip-fire or introduce odd accuracy penalties that undermine what makes SMGs strong. The CQB or Standard Suppressor variants avoid most of the extreme drawbacks while still keeping you off the radar.
With a suppressed PW5A3, play even more methodically than with the flash hider setup. Work wide flanks, clear one or two enemies from the back of a hold, and only then flood the point. The underbarrel choice matters more here: Rib Stubby is ideal when you like to ADS into every gunfight; Folding Stubby is a good pick if you split your time between hip-fire at very close range and snap ADS at short corners.
On class choice, the Engineer and Support both work well with a silenced SMG. Engineer’s hip-fire bonuses help reclaim some of the spread you surrender to suppressors, while Support’s ammo and revive tools let you hold deep flanks for much longer without resetting.
No-optic meta loadout (maximum budget and “no recoil” feel)
The PW5A3’s irons are unusually clean for an SMG, which makes it viable to skip optics and pour every remaining point into recoil control, magazine size, and ergonomic perks. This is the path to the “point-and-shoot” feel that barely moves even during long sprays.
| Slot | Attachment | Role in the build |
|---|---|---|
| Muzzle | Long or Standard Suppressor | Combines stealth with additional recoil control so the weapon stays flat at medium range. |
| Barrel | 245mm Custom (Extended) (15) | Mandatory here; improves bullet travel and keeps ADS transition quick even with a suppressor equipped. |
| Underbarrel | 6H64 Vertical or Alloy Vertical | Direct vertical recoil reduction, letting you hold the trigger down in mid-range fights with minimal correction. |
| Magazine | 40RND Magazine | Raises capacity for multi-kills without drastically impacting reloads on an already fast-reloading SMG. |
| Ammunition | FMJ / Standard | Pairs well with longer sprays into cover and through doorframes. |
| Scope | Iron sights | Frees 10 points for more impactful handling attachments and keeps the sight picture uncluttered. |
| Accessory | Red laser (non-visible to enemies) | Improves hip-fire without the give-away beam that high-power visible lasers project. |
| Ergonomic | Improved Mag Catch | Uses leftover budget to shave reload time, essentially turning the 40RND into a “fast” mag. |
With no optic equipped, this setup can easily hit the 100-point ceiling while stacking multiple forms of recoil control. The result is a PW5A3 that barely drifts off target even when you commit to full-auto at medium range. The extra 10 rounds from the 40RND Magazine synergize well here: you can clear one angle, instantly swing to another, and still have enough bullets to win the follow-up duel without an emergency reload.
Iron sights are a matter of preference, but they are functional enough that the extra budget almost always outweighs a 1.0x optic in raw impact. Spend some time in the firing range to adjust to the irons before taking this into high-stakes matches.
Class, role, and map considerations
| Choice | Why it pairs well with PW5A3 | When to prioritize it |
|---|---|---|
| Engineer | Hip-fire control bonuses line up with SMG strengths, especially on stealth and laser-heavy builds. | Vehicle-heavy modes where you still want strong infantry killing power while carrying launchers or gadgets. |
| Assault | Assault sling lets you pair the PW5A3 with a longer-range carbine, DMR, or shotgun for flexibility. | Infantry-only or low-vehicle maps where you constantly swap between long lanes and close brawls. |
| Support | Extra ammo and revives sustain long flanks and hill holds; LMG proficiency is irrelevant but other perks still matter. | Objective modes where you value team sustain and repeated pushes through the same chokepoints. |
The PW5A3’s low recoil encourages you to take slightly longer fights than the typical hip-fire SMG, but it still falls behind ARs at true long range. When queueing into open maps, bring a secondary primary via Assault or rely on teammates to handle the distant lanes while you focus on breaking holds and disrupting spawns.
On tighter layouts, commit to the flanker role. Work edges of the minimap, trade raw time-on-objective for clearing power, and let your faster reloads and low recoil convert every clean flank into multi-kills rather than one-and-done picks.
Each of these meta-friendly PW5A3 setups leans on the same underlying strengths—minimal recoil, strong movement, and flexible hip-fire—but pushes them toward a slightly different role: pure flanker, deep stealth, or near-rifle stability. Rotate between them based on map, mode, and class, and the PW5A3 stays a reliable early- and mid-game SMG even in a meta crowded with faster-firing options.