
Bizarre Lineage is a JoJo-inspired Roblox RPG set in the open world of Morioh Cho, blending PvE story quests with competitive PvP combat. You create a custom character, roll for Stands using Stand Arrows, layer on Fighting Styles and Sub Abilities, and push your power ceiling through a stat system, Conjuration progression, and Stand Awakening. With 15 Stands spread across five rarity tiers, four Raid bosses, and a Prestige system waiting at the endgame, the early hours can feel overwhelming. The priority list below will keep you moving in the right direction.
Quick answer: Level Health first, get a Stand Arrow from the opening quest, train Conjuration at the gym mat near bus stop 2, and push to Level 50 to unlock Stand Awakening — that single milestone separates early-game players from everyone else.

Progression Priority Order
Following this sequence avoids wasted grinding and gets you into meaningful content fast.
- Learn Block [F], Dash [Q], and Evade [G] before anything else — they keep you alive in boss fights and PvP.
- Use your first Stand Arrow immediately, then farm more from quests, ground spawns, and chests.
- Put early stat points into Health, then split between Strength and Power until you land a Legendary or Mythical Stand.
- Train Conjuration at the gym mat to unlock your Stand's full moveset as quickly as possible.
- Complete story quests — they are the primary source of XP, Stand Arrows, and Raid access.
- Hit Level 50 to unlock Stand Awakening, the most important mid-game power spike.
- Start Raids early by talking to Yoshikage Kira. Raid Tokens fund powerful late-game upgrades.
- Pick up a Fighting Style and a Sub Ability to round out your combat build.
- Prestige once you hit max level to open the Prestige Shop and earn extra Stand Storage slots.
Default Controls and Keybinds
All keys can be rebound in the Settings menu at any time. The defaults below cover keyboard and mouse.
| Action | Key |
|---|---|
| Movement | W, A, S, D |
| Basic Attack (M1) | Left Click |
| Critical Attack (M2) | Right Click |
| Summon / Dismiss Stand | Tab |
| Stand Abilities | E, R, Z, X, C, V |
| Stand Awakening / Ultimate | H |
| Block | F |
| Dash | Q |
| Evade | G |
| Slide | Left Ctrl |
| Pose | P |
| Mount (Skateboard) | B |
| Hotbar | 1–9 |
All Six Stats and What to Level First
Every level-up awards Stat Points you invest through the Character Statistics menu. Six stats govern your combat performance.
| Stat | Effect |
|---|---|
| Strength | Increases your character's physical-based attack damage (Fighting Style hits) |
| Health | Increases maximum HP |
| Power | Increases Sub Ability damage and maximum Power meter |
| Weapon | Increases slash and weapon damage |
| Destructive Power | Increases your Stand's physical-based attack damage (barrages, M1s) |
| Destructive Energy | Increases your Stand's special ability damage (burn, poison, etc.) |
Health is the safest early investment because it lets you survive tougher story quests and boss encounters without being one-shot. Once you roll a Legendary or Mythical Stand, pivot hard into Destructive Power and Destructive Energy — those two stats scale your Stand's output far more than Strength or Power at that point. Ignore Weapon entirely unless you plan a dedicated weapon build.

How to Get Stand Arrows
Stand Arrows are the only way to roll a new Stand. Each use gives a random Stand weighted by rarity odds, and your current Stand is permanently replaced if you haven't stored it first. Four farming methods exist.
Ground spawns appear randomly around Morioh Cho, especially near bus stops and landmarks. A useful trick is to ride the bus system and rotate your camera at each stop to scan for arrows on the ground without running across the entire map.
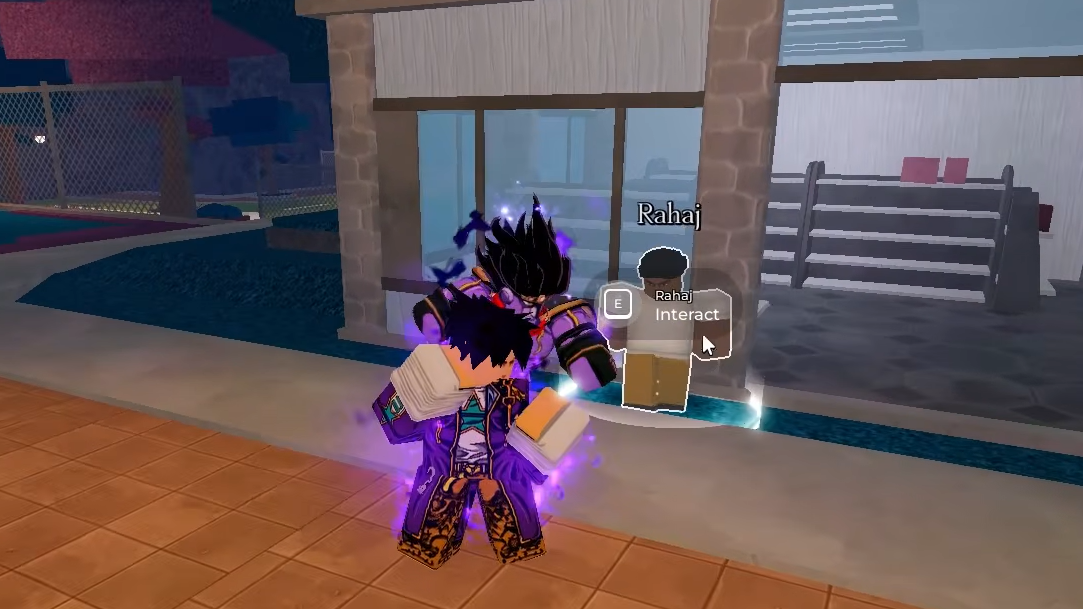
Quests are the best early source. The receptionist at the Grand Hotel hands out discovery quests that each reward a Stand Arrow, and the main storyline drops them regularly alongside XP.
Chests — common, rare, and legendary — drop from bosses, world events, and story missions. Legendary chests have a chance to contain a Lucky Arrow, a special variant that applies a random cosmetic Stand Skin rather than rerolling your Stand.
Meteor showers periodically rain Stand Arrows near bus stop 1 in the center of the map, dropping roughly six to ten arrows per event. Rush there whenever one starts.
Stand Conjuration — Unlocking Abilities
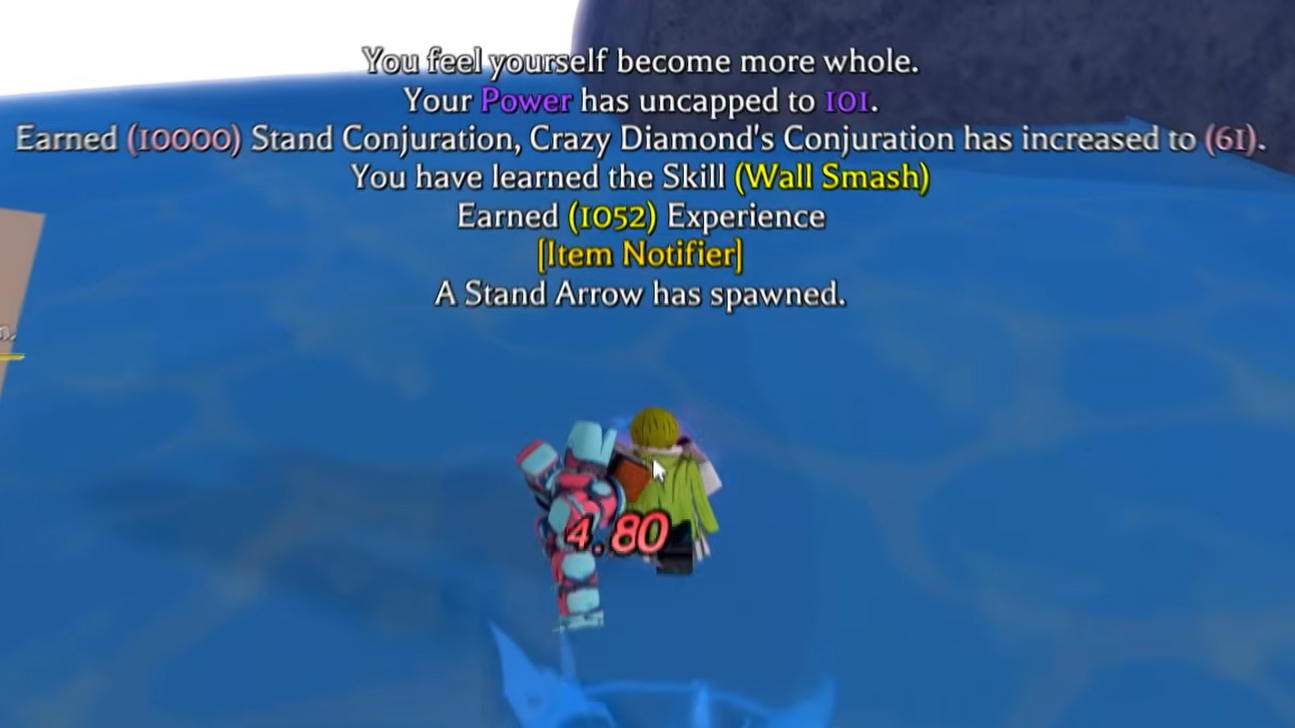
Conjuration is your Stand's individual progression meter. Every Stand starts with a limited moveset, and raising Conjuration unlocks the rest. The max Conjuration level is 100.
The fastest method is the gym mat near the second bus stop. Step onto the mat, meditate, and fight your inner self. The fight scales with your level and stats, awards roughly 20,000 Conjuration per clear, and currently has no cooldown — so you can repeat it back to back. Storyline missions also grant between 10,000 and 20,000 Conjuration each, meaning you can reach max Conjuration within about 50–60 story quests (roughly two hours of play). Defeating NPCs and winning PvP fights contribute smaller amounts as well.
Stand Awakening at Level 50
Stand Awakening raises your Stand's stat cap beyond its normal limit, dramatically increasing combat power. Two requirements must be met before you can trigger it: reach Level 50 and hit 100 Conjuration.
Once both conditions are satisfied, return to the gym and speak to your inner self again. You'll receive an Awakening quest line that involves defeating specific bosses — Jotaro, Dio, and Akira — and completing 50 world events. Finishing the chain unlocks your Stand's Ultimate, activated in combat with the H key. Further Awakenings require even higher Conjuration thresholds, so keep training between milestones.

How Raids Work
Four Raid bosses are currently in the game, and they are the best source of high-value rewards. Talk to Yoshikage Kira in Morioh Cho to enter a Raid. Each Raid spawns waves of NPCs followed by a boss fight. Rewards include Raid Tokens, Stand Arrows, cosmetics, and weapons.
Raid Tokens are spent at the Raid Store for Stand Stat Essences, accessories, perks, and Lucky Arrows. Some Raids — like the Kira Raid around storyline quest 60 — are extremely difficult to solo, so bring a friend. The Avdol Raid, by contrast, spawns the boss immediately and is manageable alone.
All Fighting Styles and Where to Find Them
Fighting Styles add three active moves and change your M1/M2 attack animations. They complement your Stand rather than replacing it. Unlock them by speaking to specific NPCs around the map — use the bus system to fast-travel between numbered stops.
| Style | Moves | NPC & Location |
|---|---|---|
| Boxing | White Fang, Liver Crusher, Dempsey Roll | Boxing Coach — Gym upstairs, bus stop 2 |
| Karate | Sixth Massacre, Seiken Barrage, Tatsumaki | Karate Sensei — near Hospital, bus stop 15 |
| Kendo | Whirlwind (Ground), Whirlwind (Aerial), Silent Edge, Rising Tempest | Samurai Master — Kame Yu Market, bus stop 15 |
Don't rush Fighting Styles in the first hour. The story questline naturally introduces them once you're strong enough to handle the associated content.

All Sub Abilities (Specs) and How to Unlock Them
Sub Abilities — also called Specs — grant three additional active abilities, passive buffs, unique dodge visuals, and altered dash effects. Unlike Fighting Styles, they do not change your M1 animations.
| Spec | Moves | How to Unlock |
|---|---|---|
| Hamon (Ripple) | Sunlight Yellow Overdrive, Sendo Ripple Overdrive, Scarlet Overdrive | Talk to the Ancient Ghost near bus stop 13 and complete his quest |
| Cyborg | Ultraviolet Radiation Apparatus, Missile Volley, Machine Gun | Talk to Rudol von Stroheim near bus stop 3 and complete his quest |
| Vampire | Space Ripper Stingy Eyes, Leeching Terror, Flash Freeze | Use a Vampire Mask item, then talk to the Elder Vampire in Dio's Chapel |
| Spin | Ricochet, Cyclone Breaker, Corkscrew | Not yet available (TBA) |
Hamon is the most beginner-friendly Spec. It's easy to unlock, provides passive HP regeneration, and pairs well with virtually every Stand and Fighting Style. Vampire hits harder but demands a Vampire Mask drop and has a steeper learning curve.
Every Stand — Rarity and Full Moveset
Fifteen Stands exist across five rarity tiers: Common, Uncommon, Rare, Legendary, and Mythical. White Snake is the sole Mythical, with an estimated pull rate around 0.5%. Legendary Stands sit near 2%, Rares around 15–20%, and the remainder fills out Uncommon and Common pools.
| Stand | Rarity | Moves |
|---|---|---|
| Red Hot Chili Pepper | Common | Barrage [E], Thunder God [R], Flash [Z], Pinky Slash [X], Electrical Surge [C] |
| Magician's Red | Uncommon | Barrage [E], Flame Punch [R], Flamethrower [Z], Life Sensor [X], Crossfire Hurricane [C], Ignition Burst [V] |
| The Hand | Uncommon | Barrage [E], Hard Left [R], Erasure Swipe [Z], Erasure Pull [X], Erasure Launch [C] |
| Purple Haze | Uncommon | Barrage [E], Bulb Punch [R], Fury Strike [Z], Infection Frenzy [X], Infectious Bulb [C], Bulb Smash [V], Idle Rage [Passive] |
| Crazy Diamond | Uncommon | Barrage [E], Heavy Punch [R], Bearing Shot [Z], Heal Mode [X], Wall Smash [C], Pulverizer [V] |
| Golden Experience | Uncommon | Barrage [E], Soul Strike [R], Restoration [Z], Root Strike [X], Overgrowth [C], Frog [V] |
| Anubis | Rare | Barrage [E], Rend [R], Dice Out [Z], Cursed Severance [X], Flash Strike [C] |
| Killer Queen | Rare | Barrage [E], Primary Bomb [R+R], Sheer Heart Attack [Z], Stray Cat [X], Bomb Bounce [C], Learn To Be Tough [V] |
| Weather Report | Rare | Barrage [E], Howling Blitz [R], Charged Vault [Z], Frog Downpour [X], Heavy Weather [C], Ice Nova [V] |
| Stone Free | Rare | Barrage [E], Sting Punch [R], Dropkick [Z], String Trap [X], Spiralling Thread [C], String Bandage [V] |
| Star Platinum | Legendary | Barrage [E], Star Finger [R], Inhale [Z], Skull Crusher [X], Harpoon [V], Time Stop [C] |
| The World | Legendary | Barrage [E], Hard Fight [R], Encirclement [Z], Knives [X], Timestop [C], Kick Volley [V] |
| King Crimson | Legendary | Chop [R], Impale [Z+Z], Time Erase [X], Epitaph [C], Eye Gouge [V] |
| The World High Voltage | Legendary | Barrage [E], Spin Kick [R], Revolver Barrage [Z], Knives [X], Time Stop [C], Gunpowder Smoke Bomb [V] |
| White Snake | Mythical | Barrage [E], Sweep Kick [R], Revolver [Z], Disc Throw [X], Acid Rupture [C], Disc Extraction [V] |
Each Stand also rolls with randomized letter grades for Strength, Speed, and Specialty, plus a Personality trait that grants passive bonuses like increased health regeneration. Storing multiple Stands in Stand Storage gives you access to their perks simultaneously, so collecting a variety is worthwhile even if you only fight with one.

Leveling Up Efficiently
Story quests are the most enjoyable and well-rounded XP source — they also feed you Stand Arrows, Conjuration, and Raid access along the way. When you hit a difficulty wall in the storyline, switch to one of these alternatives.
World events fire every 10–15 minutes and award roughly 20,000–25,000 XP, scaling with the number of participants. Deathmatch events are the better option because even if you die, your team's win still grants full rewards including a legendary chest. Graveyard Shift events pit you against NPCs that hit hard in groups and are generally less rewarding for the effort.
Mission boards (press N to locate the nearest one) offer PvE delivery missions and PvP extermination tasks. Delivery missions are faster and safer — you simply run an item to an NPC for around 2,000–2,300 XP each.
Overworld bosses like Kira spawn on a timer and drop 3,000–10,000 XP plus chests and gold. Kira has only 700 HP and is the easiest boss to farm repeatedly.

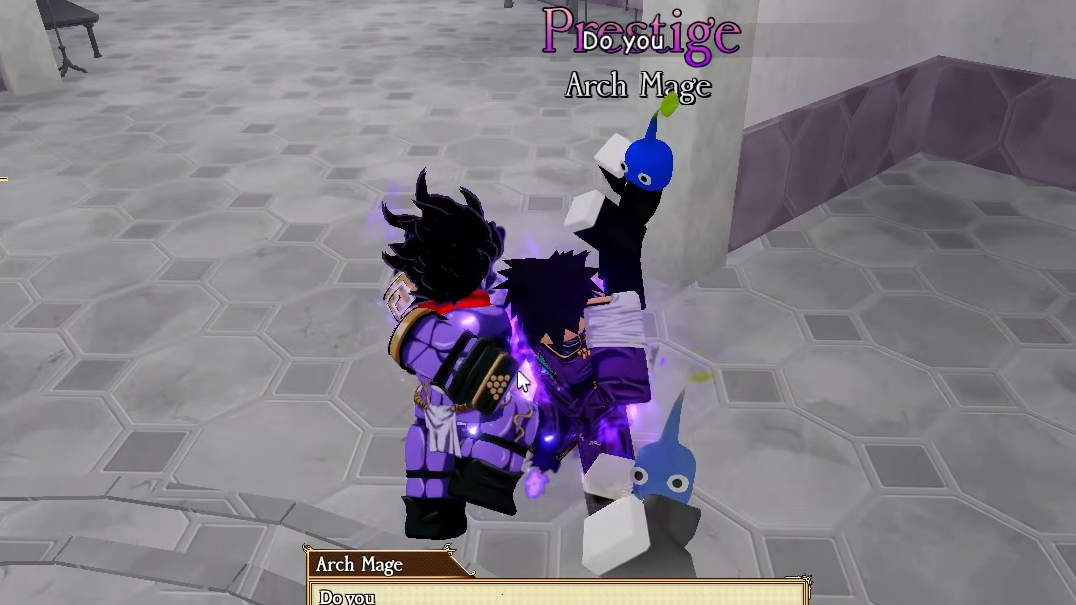
How to Prestige
Once you reach the maximum level, visit the Arch Mage NPC at the TC Hospital near bus stop 10. Prestiging requires max level and 10,000 Cash. You can Prestige up to three times, and each Prestige grants 5 Prestige points and one free Stand Storage slot.
Prestige points are spent at the Arch Mage for exclusive items like Stand Stat Essences, Personality Essences, and unique skins such as the Prestige World High Voltage. The trade-off is real: Prestiging resets your level and forces you to replay story missions and PvP content from scratch. Your Stands and their Conjuration progress carry over, though, so your core combat power stays intact. Most players recommend finishing Stand Awakening and fully maxing your primary Stand before Prestiging.
Crafting a Skateboard for Faster Travel
Running across Morioh Cho is slow. The Plank Skateboard is a craftable mount that dramatically increases movement speed. Talk to the NPC named Gupta at the shop near bus stop 1 to access the crafting menu. The materials — bones, fabrics, leather — drop from chests and quests, so you should have enough after a handful of early missions. Once crafted, press B to mount it anywhere on the map.

Bizarre Lineage packs a lot of systems into its first few hours, but the core loop is straightforward: roll a Stand, raise Conjuration at the gym, push to Level 50 for Awakening, and start Raids for tokens. Everything else — Fighting Styles, Sub Abilities, Prestige — layers on top of that foundation once you're ready.