
Black Ops 7 pushes movement further with wall jumps, active rolls, and refined omnimovement. Out of the box, it feels quick, but small controller tweaks make aiming steadier and inputs more consistent. Use the tables below as a clean baseline, then adjust a notch at a time until it fits your hands and playstyle.
Set a strong baseline (layout, sensitivity, vibration)
| Setting | Recommendation | Why it helps |
|---|---|---|
| Button layout | Tactical (standard pads), Default (if you use paddles) | Maps crouch/slide/dive to right stick click, so you can move without leaving the aim stick. |
| Stick layout preset | Default | Keeps muscle memory intact unless you have a specific need to invert. |
| Horizontal / Vertical sensitivity | Start at 1.65 (typical range 1.50–1.85) | 1.65 is a balanced starting point; raise for faster turns, lower for finer aim. |
| Controller vibration | Off | Removes rumble-induced hand shake during gunfights. |
| Trigger effect (PS5) | Off | Eliminates resistance for cleaner, faster shots and ADS pulls. |
| Simplified controls / Low motor strain | Off | Prevents unexpected remaps that can clash with learned inputs. |
| L1 button ping / Swap L1/R1 with L2/R2 | Off | Keeps inputs predictable; toggle only if you have a specific need. |
Dead zones and triggers (fast activation, no drift)
Set stick minimum dead zones just high enough to eliminate drift, then leave the maximum near the default upper bound.
- Use the in-game stick dead zone test to read baseline drift per stick. Set each stick’s Min one tick above what the test shows for that stick.
- Typical stick Min ends up around 0.02–0.04 (or “2–4” on granular sliders) if your sticks are healthy; raise further only if drift remains.
- Keep stick Max near 0.99 so full deflection still registers as maximum turn speed.
| Control | Recommendation | Why it helps |
|---|---|---|
| Left/Right Stick Min | Lowest value that removes drift (often 2–4) | Tightens stick response without causing unintended camera movement. |
| Left/Right Stick Max | ~0.99 | Preserves full-speed turns when you peg the stick. |
| L2/R2 trigger dead zones | 0.0 for instant actuation (raise slightly if you get accidental inputs) | Fires sooner and scopes in faster; bump up a notch if you see phantom shots/ADS. |
Aim behavior and assist (feel of the stick and ADS transition)
| Setting | Recommendation | Notes |
|---|---|---|
| Aim response curve type | Dynamic | Gives finer control near center with more speed at the edge. Switch to Standard if you prefer a linear feel. |
| ADS sensitivity transition | Instant or Gradual | Instant = snappier, great for flicks; Gradual = smoother handoff if the switch feels jarring. Try both. |
| ADS Sensitivity Multiplier (Focus) | ~0.90 | Slightly slows ADS when focusing for steadier long-range tracking. |
| Custom sensitivity per zoom | Off | Keep it simple until your baseline is dialed; enable later if you want per-optic tuning. |
| Target aim assist | On | Consistency boost for tracking and micro-corrections. |
| Motion sensor aiming (PlayStation) | Off | Useful as an accessibility option; otherwise stick-only aim is more predictable. |
Movement settings for wall jumps, slides, and rolls
BO7’s movement is fast enough to throw off aim if assistive actions trigger when you don’t expect them. Start conservative, then add assists only where they solve a problem for you.
| Setting | Recommendation | Why it helps |
|---|---|---|
| Sprint assist | Off (or Tactical Sprint Assist if you rely on it) | Keeps sprints intentional; add assist only if your sprint timing is inconsistent. |
| Mantle assist / Crouch assist | Off / Off | Prevents unwanted mantles or crouches during fights. |
| Corner Slice | Off | Removes the visual/aim disruption when peeking tight angles. |
| Wall Jump Assist | Sideways Only (learning) or Off (confident movers) | Sideways Only helps with parallel runs; turn Off if it triggers when you hug cover. |
| Active Roll Assist | Off or Partial | Partial can help in hectic fights; Off gives full control. |
| Slide/Dive behavior | Tap to Slide | Faster, more reliable slides on demand. |
| Slide maintains sprint | On | Helps string together slide chains without losing speed. |
| Automatic airborne mantle | Off | Avoids surprise mantles when you just want to cling to an edge. |
| Sprint Restore | On | Gets you back to full speed quicker after actions. |
| Wingsuit activation | Manual | Prevents accidental deploys. |
| Wall Jump activation | Press | Keeps wall tech deliberate. |
| Active Roll camera | 1st Person | Less disorienting than 3rd person. |
| Sprint/Tactical Sprint behavior | Toggle | Reduces finger fatigue over long sessions. |
| Tactical sprint activation | Single Tap Sprint | Quicker to engage in the moment. |
| Auto move forward / Auto door peek | Off / Off | Prevents unwanted movement and peeks during fights. |
| Plunging underwater | Trigger | Simple, reliable input mapping. |
| Sprinting door bash | On | Lets you keep momentum through doors. |
Combat behaviors that reduce input errors
| Setting | Recommendation | Notes |
|---|---|---|
| Aim Down Sight behavior | Hold | Standard for precise aiming control. |
| Weapon mount activation | ADS + Melee | Harder to trigger by accident than single-button binds. |
| Dedicated melee weapon activation | Hold Melee | Prevents stray taps from pulling melee in a gunfight. |
| Body shield / finishing move | Choose by mode | Prioritize body shield in objective/BR modes; finishing move in pubs. |
| Armor plate behavior | Apply All | Fewer presses during recovery. |
| C4 detonation activation | All at Once | Quicker detonation flow. |
| Equipment behavior | Hold | Reduces accidental throws. |
| Manual fire behavior | Press | Standard, predictable firing. |
| Change zoom activation | Sprint/Tac Sprint/Focus | Keeps zoom changes tied to deliberate states. |
| Weapon mount exit | Short Delay | Prevents instant unmount on a twitchy input. |
| Interact/Reload behavior | Prioritize Reload (or Tap to Reload if you rarely interact) | Prioritize Reload avoids opening doors while reloading in tight fights. |
| Mantle cancels reload / Sprint cancels reload | On / Off | Protects reloads while moving; mantle cancels if you must climb out. |
| Akimbo behavior | Independent | Lets each trigger fire separately. |
| ADS stick swap | Off | Conventional mapping keeps aim on right stick. |
| Depleted ammo weapon switch | On | Auto-swaps in emergencies. |
| Weapon mount movement / return | On / Off | Allows strafing while mounted; doesn’t snap you back after moving off. |
View and audio tweaks that help controller consistency
These aren’t controller settings, but they directly affect how steady the game feels on a pad.
- Field of View: test 90–120; set ADS FOV to Affected. Higher FOV shows more at the cost of perceived target size—don’t overdo it.
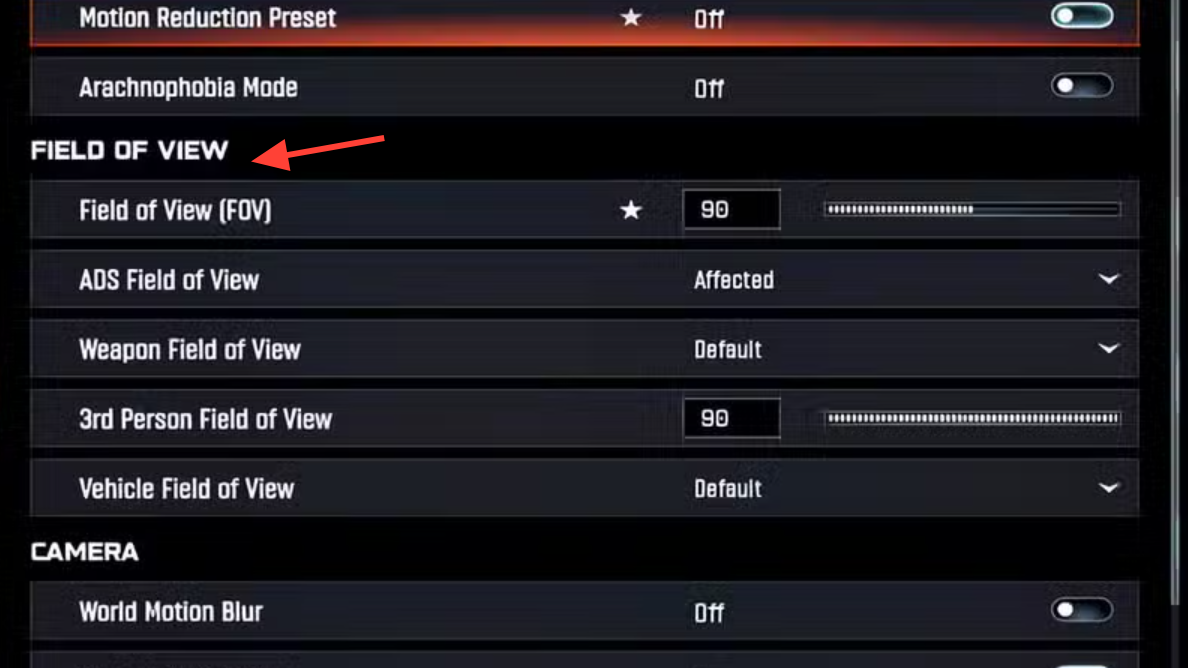
- Turn off World Motion Blur and Weapon Motion Blur; disable Depth of Field. These effects hide visual detail when tracking targets.
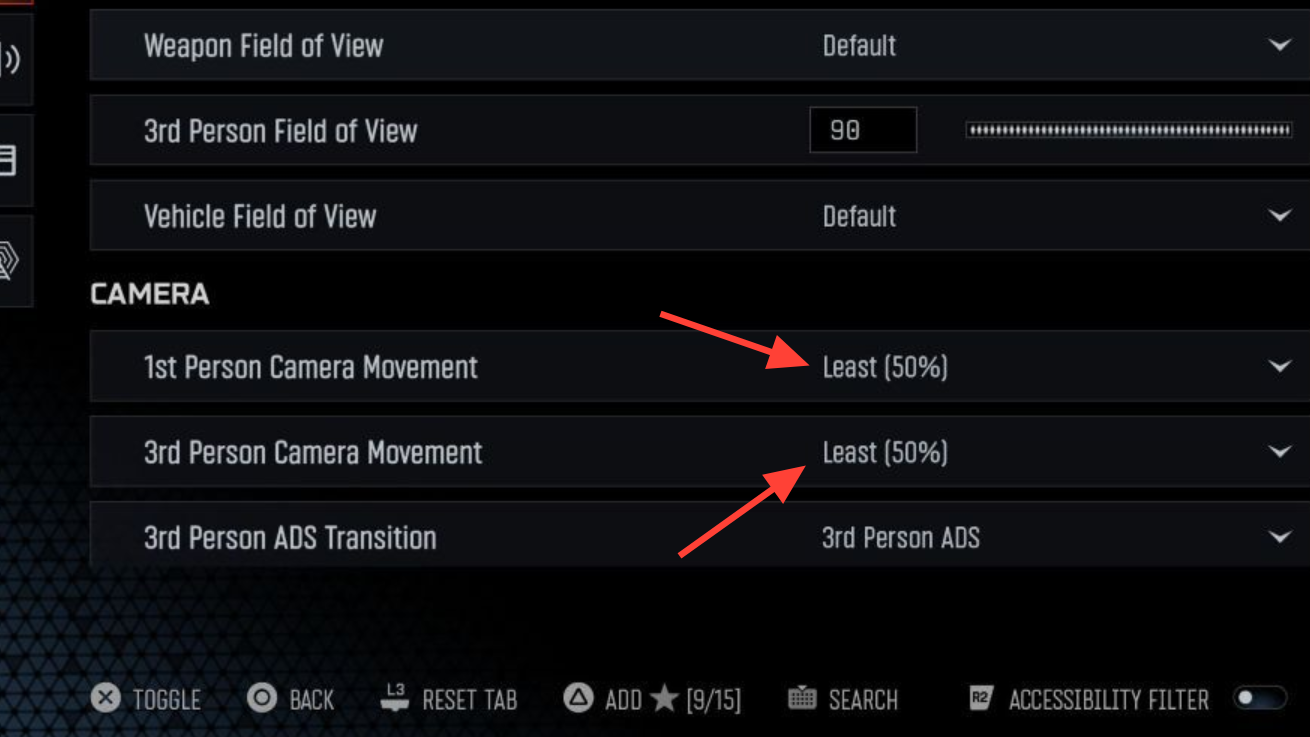
- Camera movement: set First-person and Third-person to the Least 50% options to cut camera shake.
- Audio: keep Effects high for footsteps, set Dialogue around 80–100 for callouts, and turn gameplay/cinematic music down so combat audio isn’t masked.
- If bright flashes bother you, enable the inverted flashbang option; the screen briefly darkens instead of flashing white.
Quick presets (use these to start, then adjust)
| Category | Baseline pick | Adjust if… |
|---|---|---|
| Sensitivity | 1.65 H / 1.65 V | Raise to 1.75–1.85 for snappier turns; drop to ~1.50 for tighter micro-aim. |
| Aim curve | Dynamic | Switch to Standard if Dynamic feels inconsistent near-center. |
| ADS transition | Instant | Use Gradual if the speed change feels jarring when you scope. |
| Stick Min dead zones | Set per-stick just above drift | Raise a tick if the camera drifts; lower if inputs feel sluggish. |
| Triggers | 0.0 | Raise slightly if you get phantom ADS/shots. |
| Wall Jump Assist | Sideways Only | Turn Off if it triggers during close-quarters strafing. |
| Slide/Dive | Tap to Slide | Keep if you rely on slide-cancelling; try Hybrid only if you want both quickly. |
Work through these groups in order: baseline controls, dead zones, aim behavior, then movement assists. Test after each change rather than flipping everything at once. Once your aim stops fighting your hands and your movement stops triggering by surprise, you’ve found your settings—stick with them long enough for the muscle memory to settle before making more changes.