
Windows 11 installation and many core security features require both Secure Boot and a Trusted Platform Module (TPM) version 2.0. Lacking proper configuration or running outdated firmware leaves systems exposed to boot-level malware and can block critical OS upgrades. Reviewing your PC’s TPM and Secure Boot status is the first step to addressing compatibility gaps and known vulnerabilities such as the BlackLotus bootkit exploit.
Check TPM 2.0 and Secure Boot Status in Windows
Step 1: Open the Windows Security app by selecting Start > Settings > Update & Security > Windows Security > Device Security. This section displays your device’s hardware security configuration, including TPM and Secure Boot status.
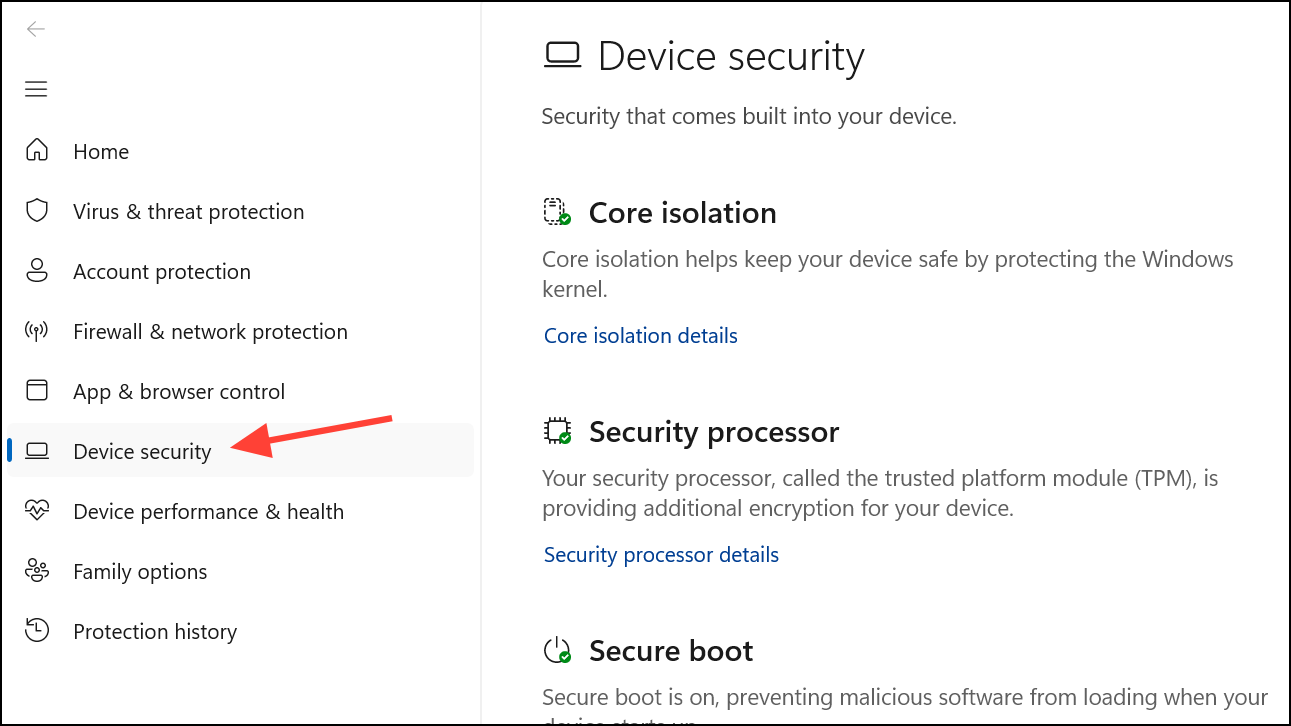
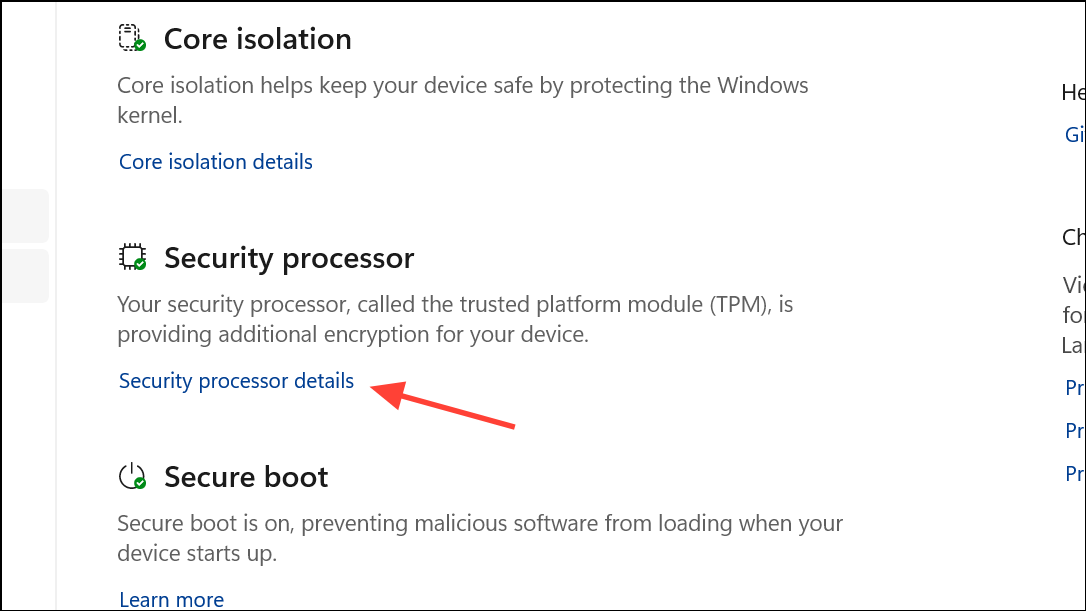
Step 2: Under "Security processor," check for details about the TPM. If you see a "Security processor details" link, select it to view the specification version. TPM 2.0 is required for Windows 11; if the version is lower, your device does not meet the necessary requirements.
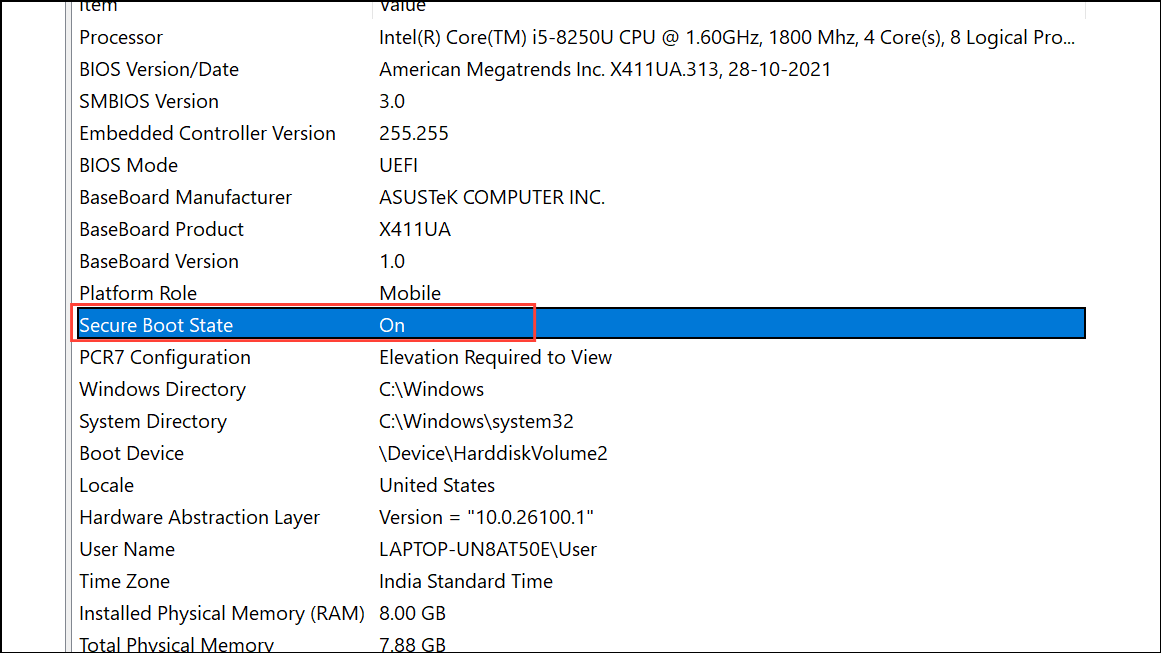
Step 3: For Secure Boot, open the System Information utility by pressing Windows Key + R, typing msinfo32, and pressing Enter. Look for "Secure Boot State" in the summary. If it reads "On," Secure Boot is active. If it says "Off" or "Unsupported," further action is needed.
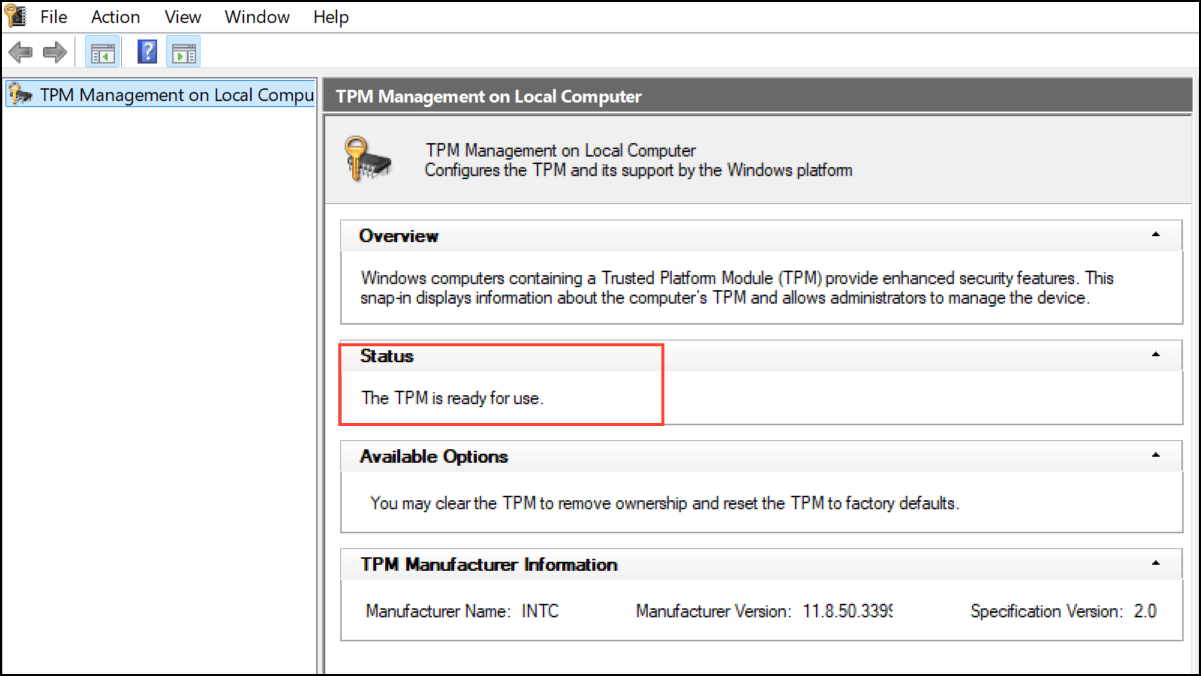
Step 4: To view TPM details directly, press Windows Key + R, type tpm.msc, and press Enter. Review the "Specification Version" and "Status" under "TPM Manufacturer Information." If you see "Compatible TPM cannot be found," the TPM may be disabled or missing.
Enable or Troubleshoot TPM 2.0 in UEFI/BIOS
Most modern PCs ship with TPM 2.0 support, but it may be disabled by default—especially on custom builds or after BIOS updates. Enabling TPM is necessary to activate security features such as BitLocker, Windows Hello, and to comply with Windows 11 requirements.
Step 1: Restart your computer and enter the UEFI/BIOS setup. This is usually done by pressing F2, DEL, or a manufacturer-specific key as soon as the PC starts (watch for on-screen prompts).
Step 2: Navigate to the security settings. The TPM option may appear as "TPM Device," "Security Device," "TPM State," "Intel PTT" (Platform Trust Technology), or "AMD fTPM" depending on your hardware and BIOS version. For Dell, Asus, HP, and Lenovo, refer to your manufacturer’s documentation for the exact menu.
Step 3: If TPM is present but set to "Disabled," switch it to "Enabled" or "On." For AMD systems, ensure "AMD fTPM" is enabled; for Intel, enable "Intel PTT."
Step 4: Save changes and exit BIOS. Allow the system to reboot into Windows. Return to tpm.msc or the Windows Security app to confirm TPM 2.0 is now active.
Step 5: If your device still does not recognize TPM after enabling it, check for firmware updates from your motherboard or PC manufacturer. Outdated BIOS can cause TPM detection failures or compatibility issues with Windows 11 and some security features.
Enable or Troubleshoot Secure Boot
Secure Boot restricts the system to loading only trusted operating systems and prevents rootkits or unauthorized bootloaders from taking control before Windows loads. Secure Boot requires the system to use UEFI firmware and a GPT-formatted system disk.
Step 1: Enter the UEFI/BIOS setup as described above. Locate the Secure Boot option, often found under the "Boot," "Security," or "Authentication" tab.
Step 2: If Secure Boot is set to "Disabled," switch it to "Enabled." Some BIOS versions require you to set the Secure Boot mode to "Standard" or "Default" before enabling.
Step 3: If you cannot enable Secure Boot, verify your disk is partitioned as GPT (GUID Partition Table). Secure Boot does not work with MBR (Master Boot Record) disks. To check, open Disk Management, right-click the system disk, and select "Properties" > "Volumes" to view the partition style. If it reads "MBR," you must convert it to GPT before Secure Boot will function.
Step 4: To convert MBR to GPT without data loss, use the built-in mbr2gpt.exe tool from an elevated Command Prompt. Always back up your data before making partition changes.
Step 5: After conversion, return to BIOS and enable Secure Boot. Save and exit, then verify the Secure Boot state in Windows System Information.
Addressing Known Vulnerabilities and Update Issues
Recent threats such as the BlackLotus UEFI bootkit exploit have prompted Microsoft to release new boot manager certificates and revocation lists. However, some TPM 2.0 systems, especially those running older Windows Server editions or with outdated firmware, may block critical mitigations or fail to update the Secure Boot database correctly.
Step 1: Install all available Windows updates. Microsoft’s June 2024 and later updates include new boot manager files and certificates required to block vulnerable bootloaders. For advanced users, the application of these mitigations can be monitored and triggered via specific registry key changes and reboots, as described in Microsoft’s enterprise guidance.
Step 2: If your system blocks the update or you encounter errors such as mitigations not being applied after multiple reboots, check for updated BIOS/UEFI firmware from your PC or motherboard manufacturer. Some systems require firmware-level changes to support the new Secure Boot certificates and revocation lists.
Step 3: Use PowerShell scripts or tools recommended by Microsoft to verify which Secure Boot certificates are installed in your UEFI database. This step is important to confirm that the new "Windows UEFI CA 2023" certificate is present and the old, vulnerable boot managers are revoked.
Step 4: If you experience persistent issues (such as registry values not updating or mitigations not applying), consult your hardware vendor’s support or Microsoft’s updated documentation. Avoid forcing registry changes or revocations unless you are certain your system supports the new boot manager signing certificates, as incorrect changes can prevent Windows from booting.
Common TPM and Secure Boot Troubleshooting Tips
- Always update your system BIOS/UEFI before troubleshooting TPM or Secure Boot issues. Many detection problems are resolved by firmware updates.
- If TPM disappears after a BIOS update, try toggling the TPM setting off and on again, or clear the TPM from within the BIOS or Windows Security app.
- For systems reporting "No TPM detected" despite BIOS settings, disconnect unnecessary USB hubs or devices, as hardware conflicts can interfere with TPM initialization.
- When Secure Boot is enabled but Windows reports it as unsupported, double-check that your disk uses GPT and that CSM (Compatibility Support Module) is disabled in BIOS.
- After enabling TPM or Secure Boot, always save changes and fully reboot the system for the settings to take effect.
- Back up recovery keys for BitLocker before making changes to TPM or Secure Boot, as clearing TPM or changing boot configurations can trigger recovery prompts.
Verifying and configuring TPM 2.0 and Secure Boot ensures your PC meets Windows 11 security requirements and is protected from emerging boot-level threats. Regularly check for firmware updates and review your security status after major system changes or updates.