
Iris needs your help gathering revenant remnants in Code Vein 2, and completing her request involves defeating three Over-Boosted bosses scattered across the game's open areas. The quest becomes available once you return to the present day (2277) during the Vanquishing the Heroes main quest. Find Iris standing next to Lavinia in MagMell, select "Catch Up," and she'll explain that she's developing a booster and needs these remnants to finish her research.
Quick answer: Collect Revenant Remnant I from the Over-Boosted Abomination in the Sunken City, Revenant Remnant II from the Over-Boosted Golden Werebeast in the Corroded Scar, and Revenant Remnant III from the Over-Boosted Werebeast in the Undead Forest. Return each to Iris, then accompany her to the Church Overlooking the Ruins to complete the second part of her request.
Sunken City: Revenant Remnant I
The Sunken City remnant is likely the first you'll encounter since it's the initial area accessible after leaving MagMell Island. Travel to the Western Gatehouse Ruins Mistle, located at the crossroads south of Josée's Outpost. From there, head north along the road and take the first right when you see a destroyed building with a walkway entrance.
Progress through this building, clearing enemies as you go. At the end, you'll find a boss door leading to the Over-Boosted Abomination. This enemy fights similarly to the Resurgence Abomination but lacks ranged attacks and focuses entirely on close-range heavy sword combat.
Watch for three main attacks. The Shield Bash has the Abomination surge forward to knock you off balance before following up with sword slashes. The Sword Uppercut involves a slow wind-up where it pulls its right arm back before slashing forward, giving you time to roll away or sidestep for a back attack. The Mid-way Slash is a quick spin followed by a three-hit combo that you can parry or dodge through.
Stay close to this boss, parry its predictable swings, and unleash heavy damage with your Jail during openings. Defeating it rewards Revenant Remnant I. Return to Iris in MagMell and select "Catch Up" again to continue.

Corroded Scar: Revenant Remnant II
The Corroded Scar region becomes accessible after progressing through the Slaying the Hero Lyle quest and helping the Chorus take Pioneer Castle. Head to the Western Plateau Military Camp Mistle, located west of Pioneer Castle. From Forward Base Two, travel west through the Miner's Rest Stop and Valley Overlook Hot Springs until you reach the camp.
Exit the camp and walk a short distance to find the boss arena. The Over-Boosted Golden Werebeast awaits, wielding a massive halberd. Despite its size, the weapon's attacks are highly telegraphed and parryable.
The Halberd Slash swings from left to right and can be dodged to close distance or parried for a counterattack window. The Halberd Chop brings the weapon down in an overhead strike that you can sidestep or parry to catch the boss off balance. The Halberd Stab is a forward thrust that leaves the Werebeast vulnerable on either side if you dodge laterally.
Defeating this boss grants Revenant Remnant II. Bring it back to Iris at MagMell.

Undead Forest: Revenant Remnant III
Finding the Undead Forest remnant requires navigating through the northern Sunken City first. Locate the Hill Overlooking Clock Tower Mistle northwest of the Arcade Ruins by following roads north from Josée's Outpost. From there, travel north through the Collapsed Tunnel to reach the Pathway Entrance Mistle, then head west to the Plagued Village Mistle.
Navigate through the Plagued Village toward the western side. You'll find a fenced-off graveyard area with a grey shroud indicating a boss door. Inside waits the Over-Boosted Werebeast, a massive creature with a multi-wolf skull and a large spear.
This boss uses heavy, lumbering attacks that hit hard but leave significant openings. The Spear Slash sweeps from right to left, then follows with a wider left-to-right swing. The Spear Thrust steps forward and stabs on the right side, leaving the left completely exposed for several seconds. The Left Spear Slash goes from left to right and chains into a forward lunge from the right.
Position yourself on the boss's left side during the Spear Thrust to deal free damage while it recovers. Defeating it rewards Revenant Remnant III. Return this final remnant to Iris.

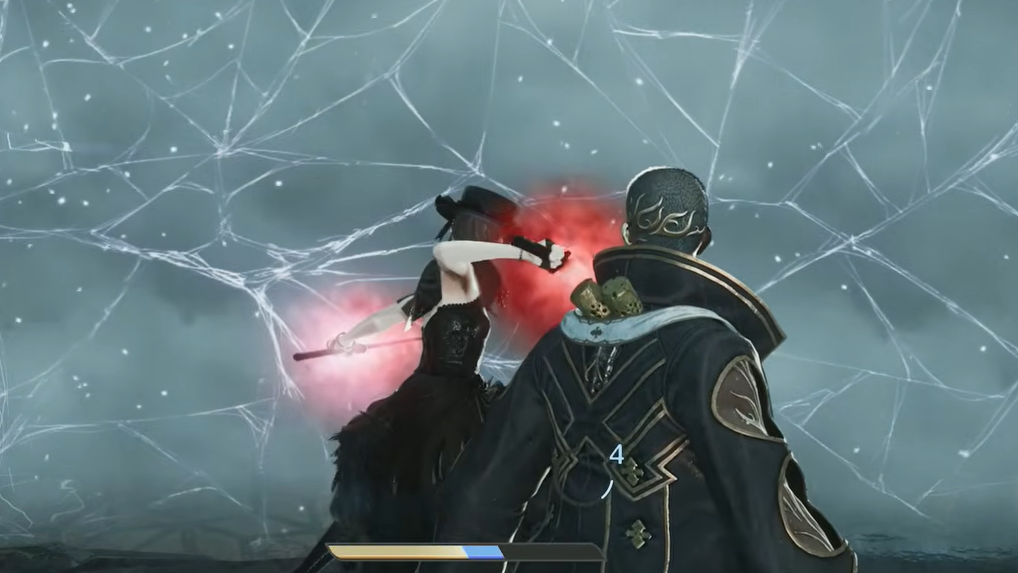
Iris's Request 2: Church Overlooking the Ruins
After delivering all three remnants, Iris reveals she's been searching for an old colleague named Judy who betrayed her. She asks you to accompany her to the Corroded Scar to settle things. Set Iris as your partner and bring blood resistance gear for the upcoming fight.
Travel to the Church Overlooking the Ruins, northeast of Forward Base Two. Grab the Mistle on the church's west side before entering to ensure a nearby respawn point.
Inside, you'll face Judy the Overloaded Berserker. This fight introduces blood-based attacks that require careful positioning. Blood Rain launches a red orb that brings down a spray of blood from above. You cannot parry this, so dodge away and use the recovery time to close the distance while Judy is vulnerable. Blood Orb summons a floating red sphere near Judy that periodically fires projectiles. Block or dodge these depending on your defensive setup. Staff Strike consists of vertical swings from left and right, meant to push you away. These can be parried to catch Judy off balance.
After defeating Judy, a Bond appears in the church. Interact with it to trigger a cutscene revealing the history between Iris and her former colleague, including what happened with their booster research.

Rewards for completing Iris's Request
Upon returning to MagMell, Iris explains that she used Judy's old booster model to perfect her own experiment. She gives you Phalanx I and Phalanx J as rewards. These boosters can be equipped to enhance your character's capabilities.
All portions of Iris's request must be completed during 2277: The Present. If you accepted the quest in this time period, you cannot turn in items or progress the questline while in the Free Exploration Era. Keep this timing requirement in mind when planning your exploration routes across the three regions.