
The Vaporizer is the most dangerous aerial enemy in ARC Raiders right now. Introduced with the Flashpoint update on March 31, 2026, it combines the speed of a Rocketeer, a Matriarch-grade energy shield, and precision laser attacks that will obliterate your shield and set you on fire in under two seconds. Unlike most flying ARC units, it cannot be brute-forced with center-mass shots. Killing it requires targeting specific components in the right order, using the right weapons, and respecting its reactive shield mechanic.
Quick answer: Destroy the Vaporizer's eight small rotors to force it to the ground, then strip the belly armor and shoot the exposed yellow core underneath. Use the Hullcracker for raw damage and the Aphelion for rotor precision. Only throw Wolfpack Grenades after the energy shield drops.
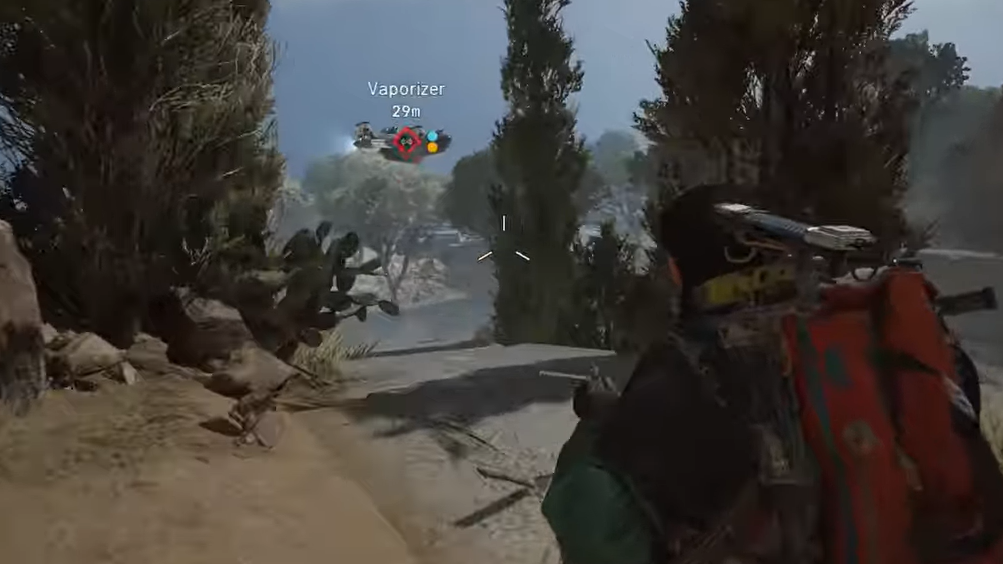
Where Vaporizers Spawn
Vaporizers appear exclusively during the Close Scrutiny Major Map Condition, the ARC Operation added in Flashpoint. They patrol around Assessors — breachable probes that fire red beams into the sky, marking their location for every squad on the map. Approaching an Assessor will often trigger additional Vaporizer spawns, and multiple units can be active in the same area simultaneously.
If you need Vaporizer Regulators but aren't geared enough for a direct fight, ARC Couriers occasionally contain them as a rare drop. It's an unreliable method, but it avoids the combat entirely.

Vaporizer Attack Patterns
The Vaporizer carries three offensive abilities and one defensive mechanic. Each demands a different response, and ignoring any of them will get you killed quickly.
| Attack | Behavior | Counter |
|---|---|---|
| Delayed Laser Blast | Locks onto a single player with a visible targeting animation, then fires a concentrated beam that destroys shields and applies burn | Break line of sight the moment you see the lock-on. Get behind solid geometry — partial cover can still let fire damage through |
| Ground Sweep | Drags a continuous laser across the ground, leaving a lingering fire trail | Move perpendicular to the sweep path rather than running along it. Call it out to squadmates so they don't walk into the trail |
| Laser Barrage | Fires multiple smaller lasers at several players simultaneously, dealing damage comparable to the Aphelion Energy Rifle per hit | Spread out with roughly 10 meters between players. Clustering guarantees everyone takes hits |
| Energy Shield | Activates a Matriarch-level barrier that negates all incoming damage, including tracking projectiles from Seeker Grenades and Wolfpack Grenades | Stop shooting and stop throwing consumables. The Vaporizer cannot fire while shielded — use this window to reload and reposition |
Vaporizer Weak Spots
Shooting the Vaporizer's armored body while it's airborne wastes ammunition. Unlike the Rocketeer, it has no exposed thrusters. There are three actual weak points worth targeting, and the order matters.

Rotors (first priority)
Eight small rotors keep the Vaporizer airborne — two at each corner, visually similar to those on a Snitch. Destroying these rotors progressively reduces the machine's maneuverability and forces it to lose altitude. Grounding the Vaporizer is the single most important step in the fight because it makes every subsequent action easier. Position yourself beneath the machine when possible; a more vertical shooting angle concentrates fire on the rotors and speeds up the altitude drop.
Belly Core (primary damage target)
Once the underside armor is stripped away, a yellow canister becomes visible directly beneath the chassis. This is the core, and it takes significantly more damage than any other part of the Vaporizer. Hitting it requires you to stand underneath the machine and aim upward, which feels counterintuitive when a laser-equipped drone is hovering above you. It's uncomfortable positioning, but it's where the real damage happens.
Top Weak Spot (high-risk, high-reward)
After enough rotors are destroyed and the Vaporizer drops low enough, you can climb on top of it and deploy a Deadline mine directly onto the frame. A single Deadline mine will destroy the Vaporizer instantly. This is impractical in chaotic multi-squad fights, but in controlled situations, it remains the fastest possible kill method.

Best Weapons for Killing the Vaporizer
| Tier | Weapon | Role | Drawback |
|---|---|---|---|
| S | Hullcracker | Primary damage and armor stripping — built specifically to destroy ARC plating | Difficult to land on a fast-moving aerial target |
| S | Wolfpack Grenade | Burst damage — splits into homing missiles that can end the fight in a few uses | Must only be thrown when the shield is down |
| A | Aphelion Energy Rifle | Best precision tool for destroying rotors, which is the fastest path to grounding the machine | Legendary rarity; many players won't have it |
| A | Equalizer | Sustained damage with a high ammo count; reliable when you lack the options above | Struggles to strip armor efficiently on its own |
| B | Hornet Driver | Cost-effective stun tool, best used from 20–30 meters | Vaporizer shields immediately upon detecting it |
| B | Jupiter | Strong per-shot damage on exposed core (up to 242 with armor stripped) | Slow fire rate against a constantly moving target |
| C | Ferro | Budget sniper option with respectable ARC plating penetration at Tier IV with mods | Slow kill time overall |
| C | Anvil | Revolver with decent precision damage; rotors can't survive a couple of shots | Struggles against this level of mobility and armor |
A fully upgraded Renegade can also work if you're accurate enough to consistently hit the rotors, though it requires more skill than the Aphelion or Hullcracker. The Dolabra Energy Shotgun — which you craft from Vaporizer Regulators — is itself effective against Vaporizers once you have it, creating a useful farming loop.
Full Takedown Strategy
Step 1: Get to solid cover immediately. Fighting a Vaporizer in the open is not viable. Its laser attack will strip your shield and apply burn damage before you can react. A concrete wall, a building interior, or any geometry that fully blocks line of sight is mandatory.
Step 2: Bring a squad and spread out. While solo kills are possible, the Vaporizer's unpredictable attack patterns and high health pool make group play significantly safer. Keep roughly 10 meters between squad members to minimize the ground sweep and barrage damage.
Step 3: Focus fire on the rotors. Eight rotors, two per corner. Use the Aphelion or Anvil for precision shots. As rotors break, the Vaporizer loses speed and drops altitude. This is the foundation of the entire fight.
Step 4: When the energy shield activates, stop attacking entirely. Do not throw grenades, do not use the Hornet Driver, and do not waste ammunition. The shield negates everything. Use this pause to reload, heal, and reposition. The Vaporizer cannot attack while shielded, so you're safe during this window.
Step 5: The instant the shield drops, commit your heavy ordnance. Launch a Wolfpack Grenade immediately, then follow up with Hullcracker fire aimed at the belly. If the underside armor is already stripped, target the yellow core directly.
Step 6: Stay mobile between attack windows. The Vaporizer's targeting is more erratic than that of other ARC enemies. Standing still for even a second invites the delayed laser blast, which will lock on and fire before you can react.
Step 7: Loot all drop sections after the kill. The Vaporizer's wreckage splits into two or three separate loot nodes. Missing one means potentially losing a Vaporizer Regulator. Check the entire debris field before extracting.

Solo Approach
Solo players lose the ability to split rotor pressure and shield-watching between teammates, but the multi-target laser barrage becomes irrelevant since it only targets one player anyway. The safest solo method is to skip rotor destruction and focus entirely on the belly core during shield-down windows. Keep a Wolfpack Grenade ready for the first opening, use the Hullcracker or Anvil for burst damage, and stay behind cover between every engagement. The Deadline mine remains an option if you can position yourself above the grounded Vaporizer, but executing it alone requires precise timing.
Vaporizer Regulator Drops and Crafting Uses
Every destroyed Vaporizer drops a Vaporizer Regulator as salvage, and the drop appears to be guaranteed unless another player loots the wreckage first. The Regulator sells for 6,000 in-raid and recycles into one Advanced Electrical Component plus two ARC Circuitry.
| Use | Quantity Needed |
|---|---|
| Dolabra Energy Shotgun craft | 2 Regulators (plus 3 Shredder Gyros and 3 Magnetic Accelerators) |
| High-Gain Antenna project | 19 Regulators total across two stages |
The Dolabra Energy Shotgun blueprint is locked inside the Assessors that Vaporizers guard, so you need to clear the Vaporizers to access the blueprint in the first place. The High-Gain Antenna project is currently active and requires donating Regulators at two of its stages — save those before recycling any extras.
Common Mistakes to Avoid
- Shooting center mass while it's flying. Armored body shots deal negligible damage and waste ammo. Target rotors or the belly core only.
- Throwing grenades into an active shield. The Vaporizer's shield is reactive and will catch Wolfpacks and Seeker Grenades. Wait for the shield to drop.
- Standing in the open. The delayed laser blast will find you. Always fight from behind solid cover.
- Clustering with squadmates. The ground sweep laser punishes grouped players. Maintain spacing.
- Ignoring other squads. Close Scrutiny maps attract multiple teams to the same Assessor. Other players will contest your kill and loot the Regulator if you aren't paying attention.
- Looting only the main wreckage. The Vaporizer drops in multiple sections. Check every loot node before leaving.
The Vaporizer is the most mechanically demanding flying enemy in ARC Raiders right now, but the fight becomes manageable once you stop treating it like a standard aerial target. Ground it through rotor destruction, respect the shield timing, and commit your best weapons to the belly core during every opening. The Vaporizer Regulators are worth the effort — both for the Dolabra craft and the High-Gain Antenna project — so expect to run this fight many times over.