
You wake inside a pod and must pass a basic check before the hatch unlocks. Hit the green first aid button on your left when prompted, then answer the remaining questions using clues written around the pod and room:
- 2+2 = 4
- Planet: Mars
- Ship name: Deimos-3

Open the utility closet (Emergency Bypass)
Collect the 3D print from the back of the couch and the Personal Log near the lockers. At the utility closet panel, swap tiles so the traces satisfy both conditions shown on the log:
S1 → AS2 → BandS2 → C
When correct, the cabinet opens. Take the Power Core and the Screwdriver.
Rewire the airlock keypad (Rewired Access)
Wipe the glass window to reveal the entry code, then unscrew and open the airlock keypad with the Screwdriver. Reassign missing digits to working buttons inside the panel, confirm with the triangle, and enter:
- Code: 41892
The scanner blocks you with an infection warning, so you’ll need to build a cure before proceeding.
Mira’s locker (Stellar Model)
Use the nearby hologram hint and follow the arrow on the 3D model to derive Mira’s code:
- Locker code: 1638
Take the Key Card.
Tarin’s locker (Paper Trail)
Open pod CP-2 and read the note that maps a hexagonal keypad pattern to digits by dash count. Use it to unlock Tarin’s locker:
- Locker code: 3864
Take the Power Core and the Clipboard.
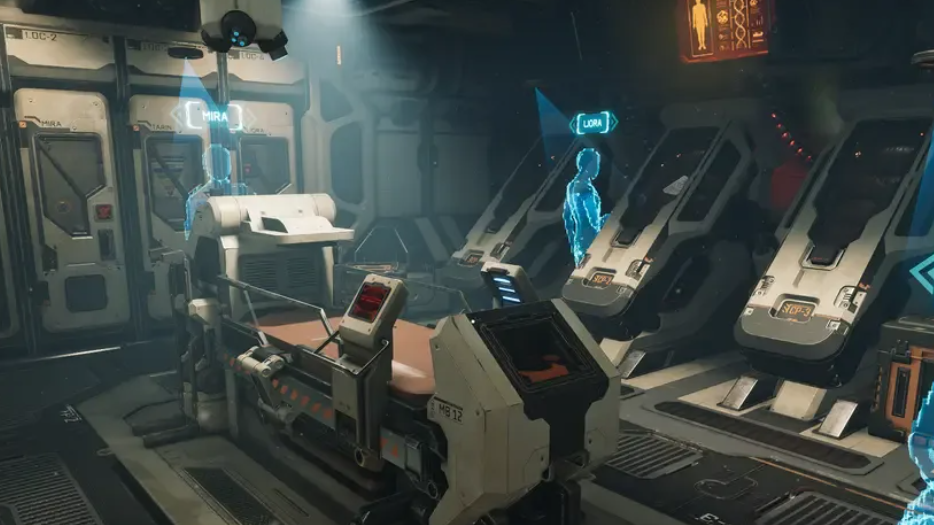
Power and configure the med‑bed (Med‑Bed Connection)
Insert the Key Card into the med‑bed, then slot in three Power Cores (utility closet, Tarin’s locker, and the already unlocked locker). Gather four Med‑Components (two in the airlock, one behind a crate near the couch, one in the main room) and attach them to the med‑bed sides by matching their front symbols to the diagram.
When all four are correct, the body scanner activates.
Scan and identify the bacteria (Culture Analysis)
Lie on the med‑bed and start the scan. Choose Manual Scan and slowly pass the beam over the hologram until “detecting” appears; locate all three hotspots. Then run Match Detection and rotate each sample bubble to find the bacterium that appears in all three. Produce and take the Bacteria Sample.
Synthesize the cure (Prototype Panacea)
Insert the Bacteria Sample into the wall scanner near the couch. Use the Clipboard to select four codes whose edges align along white guide lines; arrange them in the square as indicated. Create the substance, release the cure, and scan yourself at the airlock again to clear the infection and open the second room.
Calibrate crew logs, get a key card
Press the console button to project holo recordings and pick up the Crew Log. Using its timeline (work from the bottom upward), set each crew member’s last known location on the console. When the calibration checks out, collect the Key Card below the screen. A passphrase is still required to exit.
Decode the captain’s cryopod (Number in the Noise)
On the console’s other screen, adjust line shapes and rotations to resolve the three‑digit code from the four blocks. Use the result to open the captain’s pod:
- Cryopod code: 930
Take the note describing the voice passphrase you’ll need at the exit. Your character can’t speak, so you’ll assemble it from recordings.
Unlock the RFID tool (Perfect Sync)
On the wall to the right of the airlock door, place directional arrows around a 2×3 grid so that moving panels one space at a time reveals four glowing shapes. When complete, take the RFID Device.
Scan all RFID points (Signal Verified)
Use the RFID Device to ping four wall tags:
- Near the captain’s cryopod
- On the wall by the far right cryopod
- Left of the lockers
- Inside Liora’s locker (you’ll unlock this next)
Open Liora’s locker (Sequence Accepted)
Read the Personal Log found in the second room to spot the password pattern used over time. Apply it to get Liora’s code:
- Locker code: 4535
Scan the final RFID tag inside.
Splice the voice override (Lost Transmission)
The RFID Device now plays four audio logs. Use its sliders and trim controls to cut and order clips so the combined audio says the passphrase written on the captain’s note. Hold the device to the exit lock; with the Key Card inserted and the phrase recognized, the door opens.
Quick reference: all puzzle solutions
| Puzzle | What to do | Solution/result |
|---|---|---|
| Stasis Escape | First aid, then answer quiz | 4, Mars, Deimos-3 |
| Emergency Bypass | Tile route S1/S2 to A/B/C | Cabinet opens; get Power Core, Screwdriver |
| Rewired Access | Rewire keypad, enter code from window | 41892 |
| Stellar Model | Use model arrow for Mira’s code | 1638 (Key Card) |
| Paper Trail | Use CP‑2 paper on hex keypad | 3864 (Power Core, Clipboard) |
| Med‑Bed Connection | 3 Power Cores + 4 Med‑Components | Scanner activated |
| Culture Analysis | Manual scan, match common bacterium | Bacteria Sample |
| Prototype Panacea | Align four codes by edge lines | Cure released; airlock scan clears infection |
| Crew Logs | Set last known locations by timeline | Key Card dispensed |
| Number in the Noise | Resolve digits from line blocks | 930 (Captain’s cryopod) |
| Perfect Sync | Arrow moves reveal 4 shapes | RFID Device |
| Signal Verified | Scan four RFID tags | Requires Liora’s locker |
| Sequence Accepted | Apply password pattern | 4535 (Liora’s locker) |
| Lost Transmission | Splice audio to voice passphrase | Use RFID at exit to open door |
All eight token locations (optional)
- On the side of the med‑bed
- Inside the terrarium behind the couch
- In the curve of the blue pipe behind the wall sample scanner
- Inside the light above the med‑bed
- In the hibernation pod closest to the lockers
- Inside Tarin’s locker (after Paper Trail)
- Visible through the cleaned window; reachable from the second room (after Prototype Panacea)
- In the captain’s gold tooth (after Number in the Noise)
That’s the entire Hibernation Pods loop. With the exit open, you’re ready to move on to the next room in The Lost Starship.