
Bizarre Lineage gives you four perk slots to work with alongside your Stand and Fighting Style, and filling those slots wisely is one of the most impactful decisions you'll make. Perks are passive abilities that quietly shape every fight — boosting damage, extending combos, regenerating power, or keeping you alive when things go sideways. Some are universally strong, while others only shine in narrow situations or actively hurt you more than they help.
Quick answer: The strongest perks in Bizarre Lineage right now are I'm in Your Area, The Godfather, Accelerated Instinct, and Hidden Impact — all S-tier picks that work across virtually every build type.
S-Tier Perks — The Best Passives in Bizarre Lineage
These are the perks you should prioritize filling your four slots with whenever possible. They offer the highest impact across the widest range of builds and situations.
| Perk | Effect | Why It's S-Tier |
|---|---|---|
| I'm in Your Area | Close-range enemies deal 8% less damage and take 8% more from you | A dual offensive-defensive passive that's always active in melee range, where most fights happen |
| Commanding Presence | Gang members gain 5% damage and defense, stacking up to 30% globally | The single best team perk; dominant in gang wars and group play |
| Protection Racket | Incoming damage reduced by 20% in gang-controlled areas | A massive flat damage reduction during territory fights |
| Emperor of Time | Time-altering abilities last 2 seconds longer | Extends Timestop windows for devastating extra damage; essential for time-based Stands like The World |
| The Godfather | Stand abilities apply lifesteal (5s cooldown) | Universal sustain that works with any Stand; excellent in both 1v1 duels and prolonged gang fights |
| Accelerated Instinct | Doubles dodge frames | Works with every build and dramatically increases survivability if you can time dodges |
| No Escape | Blockbreaking prevents evasion for 3 seconds (10s cooldown) | Locks opponents into your combo after a blockbreak; strong at every stage of a fight |
| Fists of Fury | Blockbreaking ragdolls the opponent (10s cooldown) | Creates guaranteed combo openings and applies heavy pressure |
| Shock Conduit | Perfect block → guard break within 6s grants 300% power regen for 7s (20s cooldown) | Enormous power regeneration reward for skilled players who can execute the perfect block timing |
| Hidden Impact | Next attack after dodging deals 15% more damage | Easy to activate, works with all builds, and turns every dodge into a damage opportunity |
| Erasure | Enemies below 5% HP are instantly executed | Guarantees kill confirms so opponents can't escape at low health |
Commanding Presence and Protection Racket are both tied to the gang system, so their value drops significantly for solo players. Emperor of Time is similarly build-dependent — it's only worth equipping if you're running a time-based Stand. The remaining S-tier picks are broadly useful regardless of your loadout.

A-Tier Perks — Strong Picks With Minor Drawbacks
A-tier perks are powerful and worth equipping in most builds, but they tend to come with a condition or a narrower use case compared to S-tier options.
| Perk | Effect | Key Consideration |
|---|---|---|
| The Fever | Defeating a player steals 10% of their stats for 20s | Snowballs hard in gang wars but requires you to land the kill |
| Hustle Bones | All money gained +5% | Great for farming; zero combat value |
| Curve and Light | Stand Awakening cooldown reduced by 10% | More frequent awakenings, but the impact per fight is modest |
| Intimidation | Grabbed opponents take 10% more damage for 7s | Strong damage amplifier if you grab consistently |
| King of Flames | Stand abilities apply Burn | Adds free damage-over-time to every Stand ability; excellent for ability-heavy playstyles |
| Serial Killer | +20% damage to enemies below 40% HP | Extremely potent finisher perk but does nothing in the early phase of a fight |
| King of Time | +10% damage during Timestop | Timestop-dependent; pair with Emperor of Time for maximum effect |
| Absolute Destruction | Knocking an opponent into a wall blockbreaks them (15s cooldown) | Powerful near structures but useless in open areas |
| Two Steps Ahead | Dodge → block within 3s grants 15% defense for 10s (20s cooldown) | Solid defensive layer if you follow the dodge-then-block pattern |
| Nature's Armor | Gaining a status effect grants 25% defense for 10s (22s cooldown) | Turns enemy debuffs into a defensive advantage; purely reactive |
| Line Tension | Every 3rd non-basic attack deals 4% true damage based on current HP (15s cooldown) | Rewards combo-heavy play with bonus true damage |
| Resourceful | +5% global damage | Always active, no conditions — but the flat number is modest |
| Heart Attack | Damage dealt over 3s; −15% damage but +45% penetration (uncapped) | Trades raw damage for massive penetration; strong against high-defense opponents |
| No Witnesses | Defeating an enemy grants +15% damage for 10s | Snowball perk for gang wars and raids |
| Ignition Boost | Burning enemies take +10% damage and deal −20% damage to you | Dual-purpose offensive and defensive passive, but requires consistent burn application |
| Brute Force | Barrages deal +20% damage | Direct DPS boost if your build relies on barrages |
| Charge Conduction | Holding block grants 50% power regen | Good for restoring power mid-fight; no damage benefit |
B-Tier Perks — Situational but Functional
B-tier perks aren't bad, but they tend to be either too conditional, too narrow in scope, or offer buffs that are too small to justify a precious slot over higher-tier alternatives. They're worth using if you haven't unlocked better options yet or if they happen to synergize perfectly with a specific build.
Notable picks in this tier include Grappler (+15% grab damage), Martial Artist (+10% Martial Art damage), and Flow State (restores 10% HP and power when dropping below 50% HP). Each of these does something useful but only in specific scenarios. Conjurer, which doubles Stand Conjuration gained, is excellent for farming Conjuration Points but contributes nothing to combat.
Defensive options like Null Memory (first attack from an opponent deals 25% less damage) and Synthetic Focus (+20% defense at full power) sound appealing on paper, but their conditions limit real-world usefulness. Null Memory only matters for the opening hit, and Synthetic Focus evaporates the moment you start spending power.
Utility perks like Blackout (blockbreaking drains 10% of enemy power) and Impatient (+50% power regen below 50% HP) can fit into niche power-control or comeback builds, but they rarely outperform the raw damage or survivability of higher-tier perks.
C-Tier Perks — Narrow and Underwhelming
C-tier perks are limited to very specific builds or carry downsides that make them hard to recommend. Thunderous (+10% lightning damage) only benefits lightning-based attacks, making it dead weight for most Stands. Detonate applies Burn on blockbreak but has limited scaling and a 20-second cooldown. Scorchstep applies Burn when you dodge, but it also burns you in the process — a trade that rarely works out favorably. Kindled Resolve requires you to already be on fire before it does anything, which is a terrible prerequisite. Resilient gives a small damage boost against enemies with more max HP than you, a condition that's too inconsistent to build around.
D-Tier Perks — Avoid These
The bottom of the barrel. These perks either actively hurt you or are so unreliable that they're not worth a slot under any circumstances.
Frenzied State grants 20% damage while under a status effect, but strips 25% of your defense. The defense loss is far too punishing, especially for less experienced players who may not be able to end fights quickly enough to offset it. Unpredictable sometimes reflects attacks onto you and rewards you with 25% damage, 25% penetration, and lifesteal for 10 seconds when it triggers — but the activation is entirely luck-based, making it impossible to plan around. Rapid Flow gives a brief speed boost when you start sprinting, which sounds fine until you realize it provides zero combat benefit in an actual fight.

How to Get Perks in Bizarre Lineage
Perks come from two main sources. Location-based perks are obtained from NPCs, boss raids, the Money Shop, and the gang system. Stand perks unlock automatically when you obtain a Stand through regular or lucky Arrows or through evolutions. Crucially, you keep all perks from every Stand you've ever owned, even after switching to a different Stand. This means rolling through multiple Stands over time expands your perk library permanently.
Key raid locations for some of the best perks:
- Dio Raid (Bus Stop 18, inside the smaller castle past the graveyard cave) drops Emperor of Time and The Godfather
- Avdol Raid (Bus Stop 14, swim across the sea behind the bus stop) drops King of Flames and Conjurer
- Yoshikage Kira Raid (Bus Stop 1, across from the Rengatei cafe) drops Serial Killer and A Quiet Life
- Jotaro Kujo Raid (Bus Stop 2, Chumbo NPC behind the Gym) drops Grappler and Intimidation
The Rahaj NPC at the Money Store near Bus Stop 1 sells perks including I'm in Your Area, The Fever, Hustle Bones, and Curve and Light. Gang-related perks like Commanding Presence and Protection Racket come from participating in gang wars and controlling territories.
How to Equip Perks
Step 1: Open the game and reach the main menu. Tap the three-striped icon at the bottom right of the screen.
Step 2: Press the Stand Icon, which is the first icon in the circular UI that appears.
Step 3: Scroll to the bottom of the menu where you'll see your perk slots. Select and equip up to four passives from your unlocked collection.
Pairing Perks With the Right Stand and Sub Ability
Perks don't exist in a vacuum — they interact with your Stand and Sub Ability choices. White Snake currently sits at the top of the Stand tier list thanks to its high damage ceiling, strong crowd control, and decent AoE coverage. Pairing it with The Godfather for lifesteal and Hidden Impact for post-dodge damage creates a build that sustains through fights while dealing consistent burst damage.
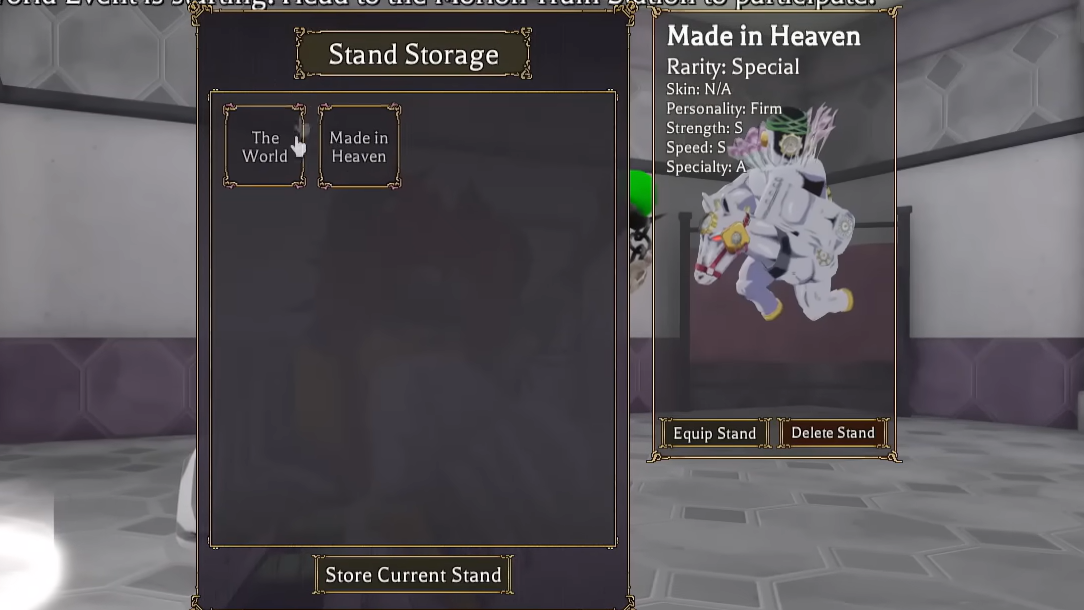
For time-based Stands like The World, stacking Emperor of Time with King of Time maximizes your Timestop windows. Made in Heaven users benefit heavily from Accelerated Instinct since the Stand already emphasizes mobility and dodge-based play.
On the Sub Ability side, Vampire is the strongest overall option, offering stun control and lifesteal that complement aggressive perk setups. Cyborg provides ranged pressure and zoning for players who prefer a safer playstyle, while The Ripple serves as a solid counter-pick against Vampire users specifically.
The meta will shift as Bizarre Lineage receives updates and balance patches, but the core principle stays the same: prioritize perks that are always active or easy to trigger, avoid perks with harsh downsides, and make sure your four slots work together rather than pulling your build in different directions.