
Endfield’s world is not fully open, but it is dense. Rare Growths and Rare Ores sit on long respawn timers, are tied directly to Operator promotions, skill levels, and weapon tuning, and many of them only appear in one or two locations in the entire Beta Test II map. Planning a route matters more here than in most games that lean on field materials.
How Rare Growths and Rare Ores work
Rare Growths are the mushrooms and plants used to raise Operator levels and skills. They are not processed in the Factory and cannot be obtained from mineral beds or production lines. You either pick them in the field or cultivate them later using the Growth Chamber on OMV Dijiang once you have at least one copy to turn into a seed.
Rare Ores are manual pickups used for weapon tuning. They are different from bed-mined originium, amethyst, and ferrium, which run through mining rigs and production lines. Rare Ores never go into the Factory. They are either harvested at fixed nodes in the field or grown on OMV Dijiang, and they gate weapon tuning breakpoints (20–40, 40–60, 60–80, and so on).
None of these materials can be farmed via the AIC Factory itself. The Factory is for industrial ore derivatives and other products, not rare growths or tuning stones.

Mushroom-type Rare Growths (Operator level promotions)
Pink Bolete (Valley IV and early side areas)
Pink Bolete is the first fungus you need for promotions, used to take Operators from level 20 into their first E1 patch. It appears several times in the starting hub and along early story branches:
- Valley IV Hub, near Originium Byproduct Processing Center: A node just north of the teleport point, easy to walk to at any time.
- Valley IV Hub, near Hub Base Power Plant: Southwest of the Power Plant teleport, again on open ground.
- Valley IV Hub, Rockhill Logistics Platform area: A third node in the hub, but locked behind progress in the logistics platform restoration side quest; that side quest only unlocks once you advance the main story.
- Aburrey Quarry: A Pink Bolete node tucked into Valley IV’s Aburrey Quarry. You must finish the Quarry questline and obtain the area’s Repair Logic before you can even reach this section. The first approach involves platforming, but you can drop a rope down to the starting teleport to shorten later runs.
- Valley Pass Arsenal: A node in the Arsenal of the Valley Pass, reachable once you complete the Valley Transfer quest and are heading toward Valley Fort. It sits beyond an easy gap jump with a rope nearby for future trips.
- Originium Science Park, Cliffside Trail pocket: A node in a small side pocket off the Cliffside Trail, blocked by Aether contamination. Industrial explosives in your quickbar are required to clear the contamination.
- Originium Science Park, The Depression: A node in a basin-like area called The Depression. The path is simple, but you must defeat the local Originium guardian before you can safely harvest the fungus.
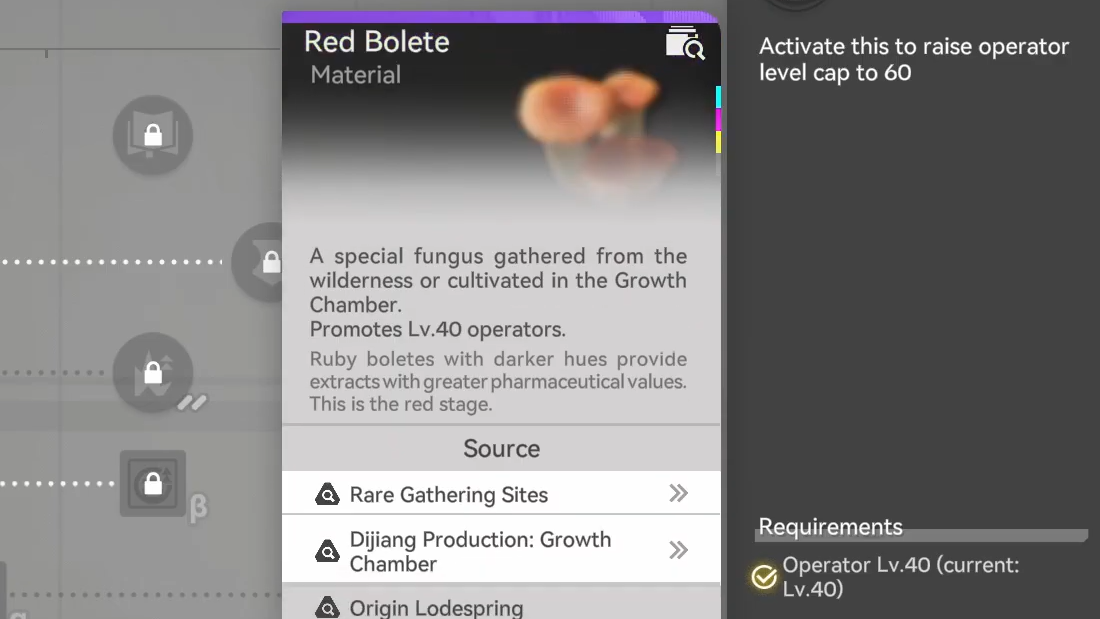
Red Bolete (mid-game promotions)
Red Bolete is the next-tier mushroom for promoting Operators to E2. In Beta Test II, it appears only in Originium Lodespring and on the Power Plateau, and you are expected to carry explosives while exploring these maps.
- Originium Lodespring, Logistics Area: Near the Mines Cable Car Station teleport once you have cleared nearby corruption.
- Originium Lodespring, torn highway crossing: Across a broken highway that must be rebuilt using Repair Logic tiles and associated puzzles. A zipline can later shorten the route.
- Originium Lodespring, Mountain Passage ledge: Slightly hidden just over a ledge on the Mountain Passage, requiring you to look down rather than ahead.
- Power Plateau, pit accessible from above: Visible through a wall at first. Walk around to a ramp leading above it, drop in, and use the rope there to climb out after harvesting.
Ruby Bolete (high-tier mushrooms in Wuling)
Ruby Bolete only appears once you reach Wuling and move into Jingyu Valley. Both known nodes are clustered around the Ecological Research Station:
- Close to the Ecological Research Station teleport.
- Near the teleport south of the Threadway.
Both spots are trivial to access once you have unlocked Jingyu Valley’s teleports.
Bloodcap and Cosmagaric (single-location fungi)
Two unique mushroom growths currently exist with just one node each:
- Bloodcap: Found on Chenshan Way, just north of Wuling City. The growth sits in an alcove immediately past the pillar gate on the left.
- Cosmagaric: Found at the top of Sanku Ridge, south of Wuling City. Start from the Guhou Marsh teleport and approach the ridge from the west so you can climb a gentle slope instead of fighting sheer rock.
Flower-type Rare Growths (Operator skill levels)
Kalkodendra (skill levels 1–3)
Kalkodendra is the entry-tier plant for skill levelling, used to push skills up to level 3. It appears repeatedly in Valley IV, especially around core early-game infrastructure:
- Core AIC Area: One of the first Rare Growths you are likely to see, only a short hike from the Core AIC Area.
- Valley IV Hub, Southern Meadows: A node sitting next to the Southern Meadows teleport.
- Valley IV Hub, Rockhill Passage: Unlocked as part of the Rockhill Passage after clearing the Hub’s main quest.
- Aburrey Quarry, west mini-cave: Hidden in a tiny cave in the Quarry’s western section, reachable only once you acquire the Quarry Repair Logic. The node is on a mid level, not on the upper ledges.
- Aburrey Quarry, lower ledges: Another node reachable by dropping down several obscured ledges from the starting Quarry teleport.
- Originium Science Park, Kohl Park ledge: Locked behind a powered gate near Kohl Park. You must route electricity to the gate, then use crates inside to jump beyond the compound fence to the Kalkodendra patch on an outer ledge.

Chrysodendra (mid-tier skill plant)
Chrysodendra is a tier 2 flower found in Originium Lodespring and on the Power Plateau, used in higher skill brackets.
- Originium Lodespring, lowland near meteorological station: On the edge of a low area close to the meteorological station.
- Originium Lodespring, container mechanism area: Hidden inside an area sealed by a movable container system. You must repair and power the container-moving mechanism using appropriate Repair Logic tiles, then slip through the gap the half-raised container leaves. An Aurylene crystal visible below the container hints at the entrance.
- Planned Construction Area Sub-PAC: Found just under a road on the approach to the Sub-PAC.
Vitrodendra (high-tier skill plant in Wuling)
Vitrodendra supports skill levels 7–9 and, like other tier 3 materials, sits entirely in Wuling:
- Jingyu Valley, Stragglers Grove exit: Near the point where you emerge from Stragglers Grove, more easily approached from the Sky King Flats Sub-PAC.
- Wuling City, Guhou Marsh vicinity: Close to the Guhou Marsh teleport, on straightforward ground.
Blighted Jadeleaf and False Aggela (unique high-tier plants)
Two additional high-value plants currently appear once in Wuling’s city region:
- Blighted Jadeleaf: Located in Tianjing Courtyard in the Wuling City area. A teleport deeper into the courtyard gives quick access.
- False Aggela: Perched on a ledge in front of Wuling City. It cannot be approached from the west since no climbable route or zipline exists there. The fastest path begins from the Maintenance Zone teleport; expect Bonekrusher enemies along the way.
Rare Ore nodes (weapon tuning materials)
Rare Ores define weapon tuning thresholds and are never mined by rigs. Each category corresponds to a tuning band, and all of them are manual pickups or OMV-grown.
Kalkonyx (weapon tuning 20–40)
Kalkonyx is the base tuning ore, used to tune weapons from level 20 to 40. Its six nodes are all in Valley IV:
- Valley IV Hub, Originium Byproduct Processing Center: A very easy node north of the teleport, accessible at any time.
- Valley IV Hub, Woodland Fringes: A node in the Woodland Fringes. The north approach is blocked by a Bonekrusher camp; instead, come from the south up a slope through a clearing of blue flowers. You can secure a rope route from below for faster access later.
- Valley IV Hub, Rockhill Passage slope: Hidden on a mountainside near the Rockhill Passage teleport. Unlocked once you clear the hub’s main story and gain access to the slope.
- Aburrey Quarry, Stockpile Area ledge: A node just over a ledge from the Stockpile Area teleport, requiring only a short hop.
- Originium Science Park, behind Research Center: Located behind the main Research Center building, best reached from the Mountain Slope teleport.
- Valley Pass cave system: Inside the underground cave beneath the valley settlement. The route to it is naturally revealed during a rescue quest involving Arclight, after which you can return via the Refugee Camp Sub-PAC.
Auronyx (weapon tuning 40–60)
Auronyx is the next tuning tier, used from level 40 to 60. Three nodes exist across Originium Lodespring and Power Plateau, and all of them demand explosives and some navigation.
- Originium Lodespring, deep cave corridor: Behind an obstacle that must be blown open with craftable industrial explosives. The Mines Cable Car Station teleport is the closest entry point.
- Originium Lodespring, eastern abyss route: From the Mines Cable Car Station teleport, jump over the fence and use a jump pad to cross an abyss toward the east. The Auronyx growth lies in a cave to the south. Two Aether corruption cores block this path and must be cleared first.
- Power Plateau, underground Bonekrusher route: The only Auronyx node on Power Plateau. Start at Plateau Trunkway, follow the torn highway south toward the Bonekrusher warcamp, and hug the right-hand wall until you find a concealed underground entrance. Industrial explosives are needed again for an internal obstacle.
Umbronyx (weapon tuning 60–80 in Wuling)
Umbronyx is the tier 3 tuning ore for pushing weapons from level 60 to 80, and it currently appears only in Wuling.
- Jingyu Valley, Treasure Grotto: Easily harvested from near the Treasure Grotto teleport.
- Zhailing Islet route from Sky King Flats: Reached by hiking south from Sky King Flats toward Zhailing Islet. A broken bridge blocks the last segment; repairing it requires 20 ferrium bottles with fluid. Once fixed, the islet becomes accessible and hosts the Umbronyx node. Some worlds may also allow a zipline from Straggler’s Grove, but relying on your own bridge repairs keeps the route consistent.
Igneosite and Wulingstone (single-node endgame ores)
Two final rare ores currently have only a single node each and point toward late-Wuling tuning and crafting needs.
- Igneosite: Located near the Guhou Marsh teleport in Wuling. From the Field Logistics Depot teleport, the narrow path toward it is blocked by Aether corruption and must be cleared first. The route features Aether slugs, so be prepared for combat in close spaces.
- Wulingstone: Found on a cliff below the Wuling AIC area. Despite its apparent proximity to Chenshan Way, no climbable route exists from that side. Instead, warp to the Wuling AIC area, then look southwest for a rope hanging along the cliffs. This rope is the first and only intended access point; you can later set up ziplines if you want a faster loop.
Farming strategy and OMV Dijiang cultivation
All Rare Growth and Rare Ore nodes refresh slowly. Once you have cleared a loop in Valley IV or Wuling, it can take considerable real time for the nodes to respawn. Sprinting the same path repeatedly is inefficient if you are trying to prepare a full roster for higher content.
The Growth Chamber on OMV Dijiang is the intended solution. Once you hold at least one copy of a given plant or ore, you can convert it into a seed and grow multiple copies inside the chamber, decoupling your upgrade pace from strict field timers. The ship’s cultivation loop rewards early exploration: picking up even a single Cosmagaric or Igneosite gives you access to a sustainable source later.
None of these systems tie back into the AIC Factory: there is no Factory recipe for Pink Bolete, Auronyx, or any of the other rare materials. The Factory remains focused on industrial ores and crafted derivatives such as bottles used in EMS F&M and Fine F&M recipes, while OMV Dijiang and manual exploration handle the rare layer.
With that split in mind, the most efficient approach in Beta Test II is to clear every unique node once in each region, unlock OMV cultivation for anything you care about, and then revisit only the densest clusters (such as hub Kalkonyx or Lodespring Ferrium) when you are already in the area for other objectives.