
Varka is a 5-star Anemo Claymore Main DPS in Genshin Impact who deals mixed elemental damage through a dual-infusion playstyle. He's a Hexerei character whose kit revolves around his Elemental Skill, Windbound Execution, which transforms his Normal and Charged Attacks into enhanced versions dealing both Anemo and a secondary element based on your party composition. His constellations range from borderline essential to completely ignorable, and knowing where to invest makes a significant difference in how he performs.
Quick answer: C1 is Varka's most important constellation, delivering roughly a 34% DPS increase. His signature weapon (Gest of the Mighty Wolf) should be prioritized over C1 if you must choose. The recommended stopping points are C0 with his weapon, C1, C3, or C6 — avoid chasing C2 or C4 specifically.

C6 — "Beloved Mondstadt, Steadfast You Shall Shine" (Rank 1)
Varka's final constellation is his strongest by a wide margin. It enhances his Sturm und Drang state so that after using Four Winds' Ascension, tapping his Elemental Skill or holding Normal Attack triggers the special Charged Attack Azure Devour without consuming any charges. The reverse also works — after Azure Devour, tapping the Skill fires off another Four Winds' Ascension for free. This effectively doubles the number of high-damage actions in a single rotation window, from three uses to six. On top of the chaining improvement, each stack of Azure Fang's Oath from his ascension passive now grants CRIT DMG, adding up to 60% total. The rotation becomes dramatically smoother and far more powerful, but C6 requires heavy investment and is realistically only for dedicated fans or big spenders.

C1 — "Come, Friend, Let Us Dance Beneath the Moon's Soft Glow" (Rank 2)
C1 is the single most impactful breakpoint in Varka's kit. When he switches to Sturm und Drang, his special Elemental Skill Four Winds' Ascension gains an additional use. He also receives the Lyrical Libation effect, which causes the first special Skill or special Charged Attack Azure Devour to deal 200% of its original damage. That one doubled hit, combined with the extra charge, results in approximately a 34% DPS increase alongside better rotation flow. At C0, Varka struggles to compete with other modern 5-star DPS characters — his damage loop feels limited, and his scaling is minimal. C1 reshapes how his kit functions in practice and is widely considered borderline mandatory for anyone planning to use him seriously.
C3 — "O Friend, Quaff Not the Bitter Wine That Brings Tears of Woe" (Rank 3)
A straightforward +3 levels to Windbound Execution, Varka's Elemental Skill. Since the Skill accounts for the vast majority of his damage output — his enhanced Normal Attacks, special Charged Attacks, and special Skill hits all scale from it — this is a reliable and effective power increase. It's not flashy, but it raises his overall ceiling meaningfully, especially if you already have C1. At C3, Varka's performance reaches a level more comparable to other strong DPS characters at lower constellation counts. This is the recommended stopping point for players willing to invest moderately beyond C1.
C5 — "Fill High the Cup With Fine Wine, for Tyrants Come and Go" (Rank 4)
C5 adds +3 levels to Varka's Elemental Burst, Northwind Avatar. The problem is that Varka's Burst is not part of his optimal rotation. It costs 60 Energy, has a 15-second cooldown, and his own buffs often don't apply to it. Using the Burst is generally a DPS loss compared to spending that time on Skill-based combos. C5 functions as a stepping stone toward C6 and nothing more — it's not a reason to stop pulling, and it's certainly not a reason to start.
C2 — "When Dawn Breaks, Our Journey Shall Take Flight" (Rank 5)
C2 triggers an additional AoE Anemo strike dealing 800% of Varka's ATK whenever he uses Four Winds' Ascension or Azure Devour. On paper, that multiplier sounds impressive. In practice, the damage is pure Anemo and doesn't benefit from Pyro DMG%, Viridescent Venerer shred, or most of Varka's own passive buffs. It also doesn't synergize with C1's Lyrical Libation effect. The constellation adds some raw numbers but feels poorly designed relative to the rest of his kit. Community calculations suggest that C1 paired with his signature weapon (C1R1) actually outperforms C2 without the weapon (C2R0), which underscores how much more valuable the weapon is as an investment. Don't pull specifically for C2.
One upside worth noting: at C2 and above, Faruzan with her C6 becomes a much stronger teammate for Varka since the increased Anemo damage gives her buffs more to work with. If you happen to land C2, consider swapping in Faruzan over Venti when grouping isn't critical.
C4 — "For None May Take From Us Our Freedom of Song" (Rank 6)
When Varka triggers a Swirl reaction, all nearby party members gain a 20% Anemo DMG Bonus and a corresponding Elemental DMG Bonus for 10 seconds based on the elements involved. A team-wide 20% damage bonus sounds decent in isolation, but the actual numerical impact is underwhelming. It benefits sub-DPS teammates more than Varka himself, and it doesn't justify targeted investment. If you get it on the way to C6, fine. Otherwise, ignore it entirely.
Varka constellation investment priority
| Constellation | Rating | Verdict |
|---|---|---|
| C6 | ★★★★★ | Transformative — smoother rotations, free skill chaining, +60% CRIT DMG |
| C1 | ★★★★★ | Essential power spike, ~34% DPS increase, borderline mandatory |
| C3 | ★★★★ | Strong passive boost to his core Skill damage |
| C5 | ★★★ | Stepping stone only — Burst isn't part of optimal play |
| C2 | ★★ | Extra Anemo hit with poor synergy, not worth targeting |
| C4 | ★★ | Marginal team utility, not worth chasing |
Weapon vs. constellation — where Primogems matter most
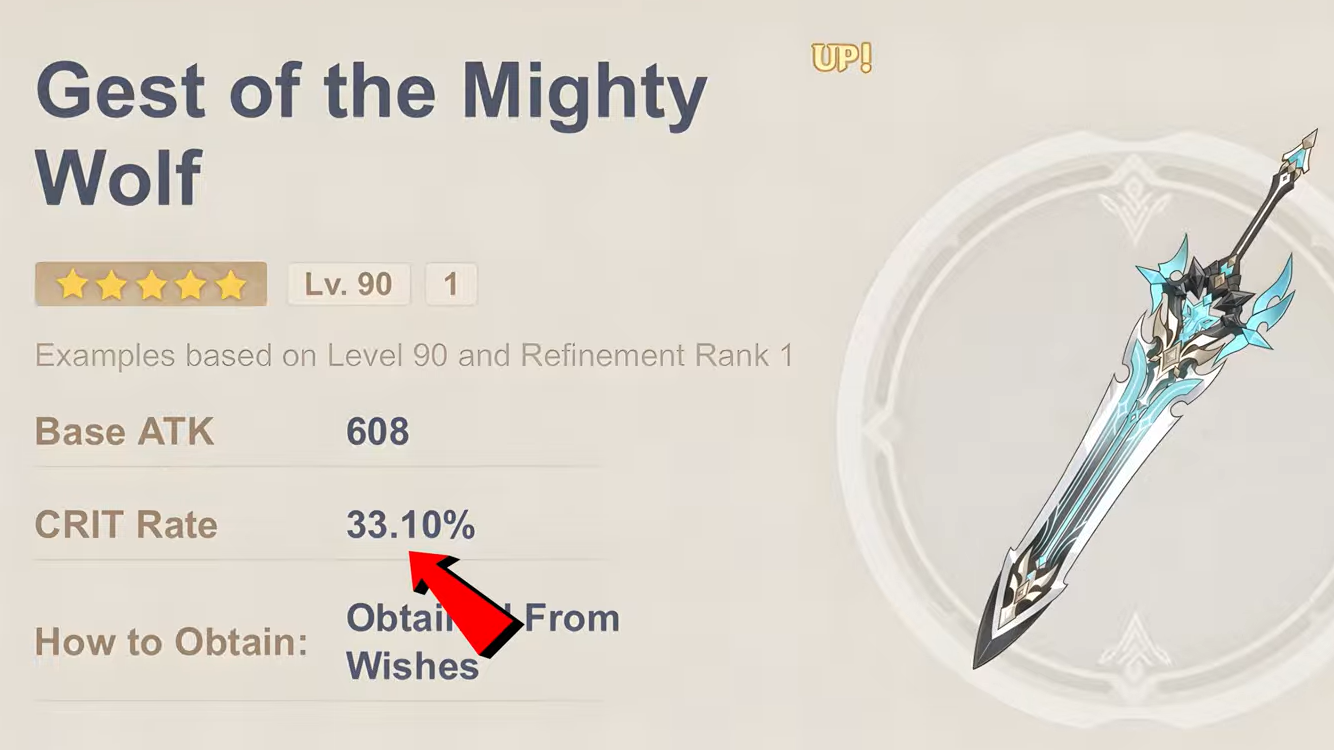
Varka's signature weapon, Gest of the Mighty Wolf, provides 608 base ATK, 33.1% CRIT Rate, a 10% ATK SPD increase, up to 30% DMG bonus through Four Winds' Hymn stacks, and an additional 30% CRIT DMG when the party has the Hexerei: Secret Rite effect active. The ATK SPD alone shaves roughly 0.2–0.6 seconds off his combo, effectively squeezing in an extra Normal Attack without extending rotation time.
The weapon outperforms C1 in direct comparisons. If you're choosing between Gest of the Mighty Wolf and C1, the weapon wins. It also outperforms Serpent Spine R1 (the best 4-star option) by approximately 23%. For players who already own A Thousand Blazing Suns or another strong 5-star Claymore, C1 becomes a more reasonable target — but for everyone else, the weapon should come first.
The general investment priority is: Signature Weapon → C1 → C2 (only if continuing) → C3 (strong stop) → C6 (whale territory).
Pull recommendations by budget
Free-to-play or low spenders should either grab Varka at C0 with his signature weapon or skip him entirely. At C0 without the weapon, he sits around mid-Fontaine DPS levels and falls comfortably outside the top 10 in premium team setups. He's functional but unimpressive.
Moderate spenders should aim for C1 as the minimum meaningful breakpoint. It's the single pull that makes Varka feel like a complete character. Pairing C1 with the signature weapon (C1R1) is the sweet spot for cost-to-performance ratio.
Committed players can push to C3 for a solid all-around improvement. Beyond C3, returns diminish sharply until C6. The C4 and C5 constellations offer very little on their own.
High-investment players who want Varka at his absolute best should go all the way to C6. The rotation improvements and CRIT DMG scaling make him feel like a fundamentally different character. But this is a luxury purchase — C3 with his weapon already delivers strong results for the vast majority of content.
If you can't reach at least C1, it's generally better to save your Primogems for a character who performs well at C0. Varka's viability is more constellation-gated than most modern 5-star DPS units, and planning your pulls around that reality will save you from buyer's remorse.