
Raider Hatch Keys are one of the most practical items in Arc Raiders. They unlock designated hatch extraction points scattered across the map, giving you a faster way out when the main elevator feels too far away or too dangerous. Losing a run because you couldn't reach an extract in time is painful, and carrying a Raider Hatch Key in your inventory is cheap insurance against that.
Quick answer: The most reliable way to stockpile Raider Hatch Keys is to craft them at a Level 2 Utility Workbench using one Advanced Electrical Component and three Sensors. You can also buy up to two per day from the Security Trader for 9,000 credits each, or loot them randomly from bags in the world and from other players' bodies.
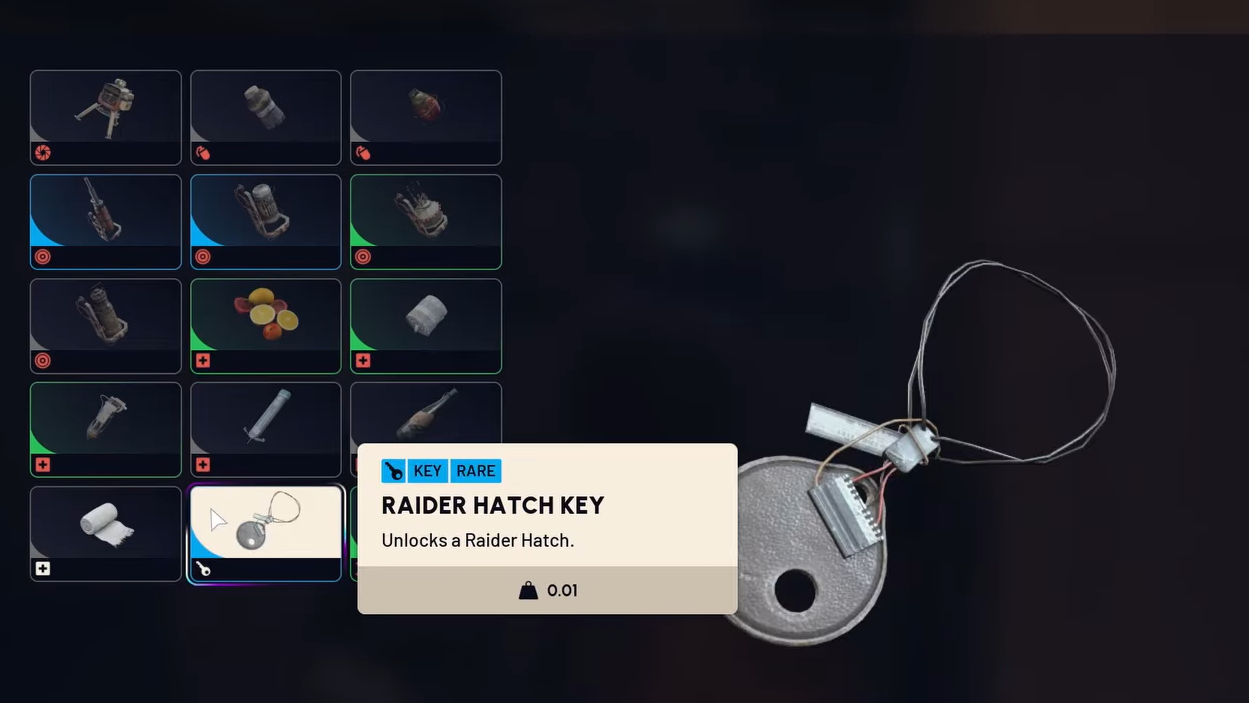
Raider Hatch Key Crafting Recipe
Crafting is the cheapest and most repeatable method. Once you upgrade your Utility Workbench to Level 2, the Raider Hatch Key recipe becomes available. The materials are common enough that you can churn out several keys per session without much effort.
| Material | Quantity |
|---|---|
| Advanced Electrical Component | 1 |
| Sensor | 3 |
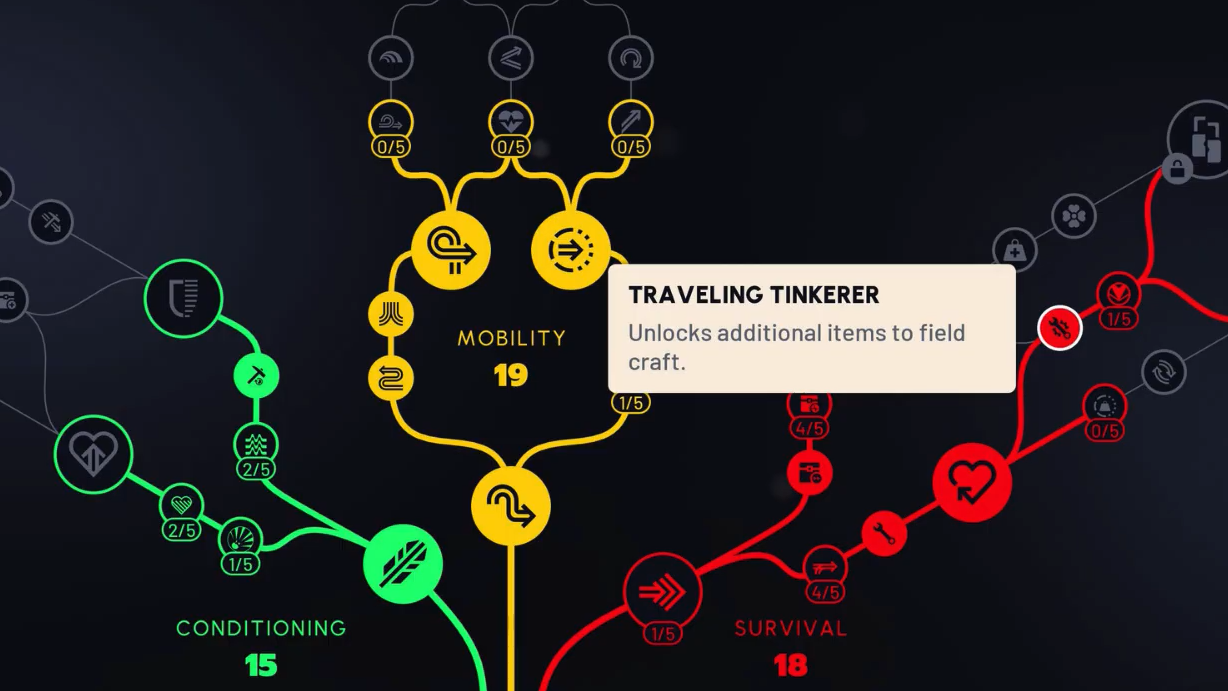
If you don't have a Level 2 Utility Workbench yet, there's an alternative. The Traveled Tinkerer trait in the Survival skill tree expands your in-raid crafting options, letting you build Raider Hatch Keys at field crafting stations during a deployment. The recipe is the same, so keep Sensors and Advanced Electrical Components in your stash or grab them while topside.
Buying Raider Hatch Keys from the Security Trader
The Security Trader sells Raider Hatch Keys for 9,000 credits (the blue currency you earn through gameplay). There's a daily purchase limit of two keys, so this method works best as a supplement to crafting rather than your primary supply line. If you're flush with credits but short on crafting materials, it's a convenient option to top off your stock before heading topside.
Looting Raider Hatch Keys in the World
Raider Hatch Keys can appear as random world loot during topside deployments. They spawn inside bags and containers, though the drop rate is low. Veteran players report finding only a handful across dozens of hours of play, so don't count on looting alone to keep you supplied. You can also recover them from the bodies of other players you eliminate, which makes PvP encounters a potential — if unpredictable — source.

How Raider Hatch Extraction Works
Raider Hatches are secondary extraction points placed around the map. Unlike the main elevator extracts, they require a key to activate. When you interact with a Raider Hatch and have a key in your inventory, one key is consumed, and the extraction sequence begins. This is especially useful when you're far from the primary elevator or when other squads are camping the main extract. The key is single-use, so each extraction costs one key.
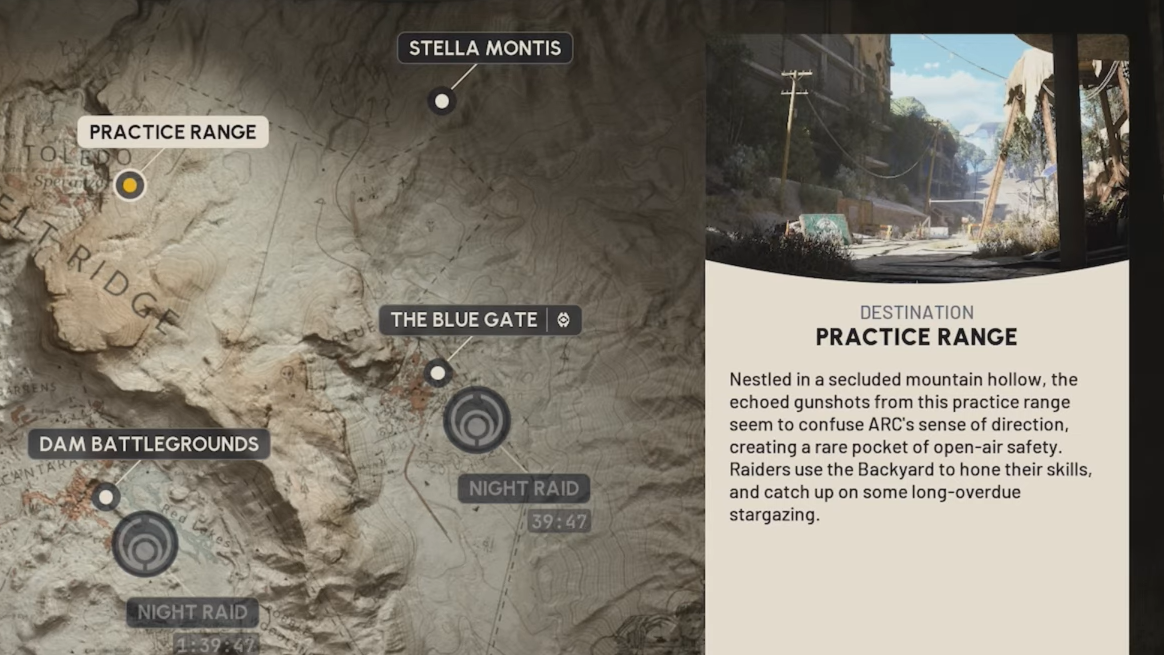
Raider Hatch Keys in the Practice Range
The Practice Range — Arc Raiders' solo training area — contains its own set of Raider Hatch Keys hidden inside lootable bags. These keys exist within the range's self-contained environment and cannot be taken back to your shelter or into real deployments. Your loadout and inventory reset completely when you leave the Practice Range, so anything you pick up there stays there.
That said, the Practice Range keys have drawn significant community attention because of their unusual placement and the presence of a disabled Raider Hatch in the range itself. Five keys can be found per session, spread across four randomized spawn groups and one fixed spawn near the hatch at the end of the road. Within each spawn group, only one bag appears per visit, cycling between several possible positions.
Practice Range Key Spawn Groups
| Group | Location | Known Spawn Positions |
|---|---|---|
| 1 | Inside Metro Entrance (near electrical boxes behind spawn) | 3 positions: left side on ground, on top of box, right side leaning against box |
| 2 | Outside Metro Entrance | 5+ positions: overhang roof, ledge above roof, parkour building lower level, turret building front, base of parkour building near car wrecks |
| 3 | Parkour Building roadside | 5+ positions: left ledge (zipline may be needed), trailer wreck top, trailer wreck low, hatch-side ruin top, additional spots discovered over time |
| 4 | Bus Side Ruin | 6+ positions: ruin right, left pillar base, leaning on bus, upper level near pillar, bottom floor hole, below ruin near tree trunk |
| Fixed | Directly at the Raider Hatch (end of road) | 1 position: always spawns here |
Each bag contains one Raider Hatch Key plus a random throwable — either a Tagging Grenade, Smoke Grenade, Blaze Grenade, or Jolt Mine. The grenade type appears to be random with no known pattern.
Practice Range Easter Egg Clues
The community has uncovered several oddities in the Practice Range that may or may not connect to the hidden keys. A room at the end of the parkour course contains a TV surrounded by five seats — one couch, three chairs, and one toppled chair — with a yellow tarp marked with a large "X" hanging above. The number five mirrors the total key count, and the arrangement of seats loosely maps to the one fixed spawn and four random groups.
A painted symbol on the wall above the Metro entrance has changed over time. It originally depicted an eye (matching symbols found at the Dam Tower elevator shaft and on the dam walls), but a later update replaced it with what appears to be a leaper mid-jump — a circle with a dot and four diagonal lines. The same leaper symbol has been spotted on other maps, including buildings in the Dam Battlegrounds area.
Players have also explored out-of-bounds areas behind the hatch by pushing past the "turn back" boundary and hugging buildings to trigger teleportation into otherwise inaccessible interior rooms. Some reported faint green lights on a door in these rooms, though at least one player determined those lights were visual artifacts caused by certain anti-aliasing upscaling settings rather than intentional game elements.
No confirmed reward, unlock, or progression outcome has been tied to collecting all five keys or interacting with the disabled hatch in any specific way. Attempts, including dropping all keys on the hatch, throwing all grenades at it, placing keys in the extract train, and playing the recorder near it, have all produced no result so far.
For practical purposes, crafting at a Level 2 Utility Workbench remains the best path to a steady Raider Hatch Key supply. The materials are common, the recipe is cheap, and you can even build keys during a deployment if you've invested in the right Survival traits. The Practice Range keys are worth exploring if you enjoy hunting for hidden details, but they won't follow you into a real raid.