
Bridger Western blends Wild West gunfights with JoJo's Bizarre Adventure–style Stand powers on Roblox, and your choice of firearm matters just as much as your supernatural abilities. The game currently has 14 weapons, each with distinct Head, Torso, and Limb damage values, different fire rates, and varying effective ranges. Picking the right gun — or the right pair of guns — can be the difference between dominating a duel and getting sent back to the respawn screen.
Quick answer: The Maverick 88, Malcolm.70, Tommy Gun, and Mare's Leg are the strongest weapons right now, offering the best mix of damage, accuracy, and versatility across both PvE and PvP.
Bridger Western Weapons Tier List — April 2026
| Tier | Weapons |
|---|---|
| S Tier | Maverick 88, Malcolm.70, Tommy Gun, Mare's Leg |
| A Tier | Sabre, DB Shotgun, Winchester Repeater, Colt Ocelot |
| B Tier | Bow, Whitney Dragoon, Mauser, Dual Derringers |
| C Tier | Schofield 6, Taurus.357 |
Raw damage numbers alone do not tell the full story. Effective range, fire rate, reload speed, accuracy under pressure, and synergy with your Stand, Cards, and Utilities all factor into how a weapon actually performs when fights get chaotic. A gun that looks mediocre on a stat sheet can outperform a high-damage option if it fits your loadout better.
S Tier Weapons Explained
Maverick 88
The Maverick 88 is one of the most reliable weapons in the entire game. It delivers high burst damage at close range and maintains strong accuracy, making it a top pick for aggressive players who like to push into fights. Its combination of stopping power and fire rate means you can drop opponents before they have time to react, and it pairs well with almost any Stand or Utility setup.
Malcolm.70
For long-range engagements, the Malcolm.70 stands alone. It deals heavy damage per shot and, crucially, suffers no distance drop-off. That means your headshots hit just as hard from across the map as they do at mid-range. If you prefer a methodical, precision-based playstyle — picking off targets before they can close the gap — the Malcolm.70 is the weapon to build around.
Tommy Gun
The Tommy Gun compensates for its lower per-shot damage with an extremely high fire rate. In close-quarters chaos, sustained DPS often matters more than single-hit numbers, and the Tommy Gun excels at keeping constant pressure on opponents. It is especially effective when you need to suppress an enemy while your Stand abilities come off cooldown.

Mare's Leg
The Mare's Leg rounds out the S Tier with high damage and solid accuracy across multiple engagement distances. It is a versatile lever-action option that does not force you into a single playstyle, making it a safe and strong choice for players who want flexibility in their loadout.
A Tier — Strong and Consistent Picks
| Weapon | Strengths |
|---|---|
| Sabre | Melee option with solid damage; useful for Stand-heavy builds that need a reliable close-range fallback |
| DB Shotgun | High burst potential at point-blank range; punishes aggressive rushes |
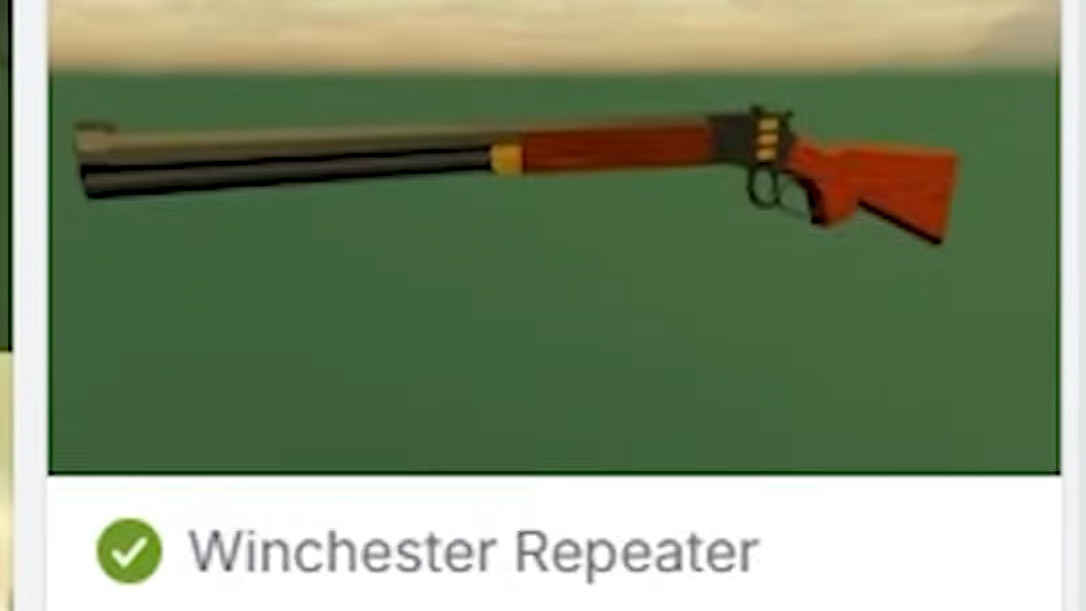
| Winchester Repeater | Fast and reliable at mid-to-long range; pairs well with Stands for hybrid gunplay |
| Colt Ocelot | Second-best handgun in the game; works as a dependable sidearm when your primary runs dry |
The Winchester Repeater deserves a special mention here. It can hit targets at distance with decent damage and fires quickly enough to keep up in faster-paced encounters. If you are running a Stand that benefits from ranged chip damage between ability uses, the Winchester is an excellent companion. The Colt Ocelot, meanwhile, fills the secondary weapon role well — it will not carry a fight on its own, but it is a reliable backup that never feels like dead weight.
B Tier — Functional but Limited
| Weapon | Notes |
|---|---|
| Bow | Offers a unique projectile arc; can be fun but demands more skill for less payoff than S or A Tier options |
| Whitney Dragoon | Decent pistol with middling stats across the board |
| Mauser | Light pistol with passable damage; nothing stands out, nothing is terrible |
| Dual Derringers | Akimbo pistols with wide coverage but lower individual hit damage |
These weapons can handle most PvE threats without major issues, but they require you to compensate for lower range, lower damage, or both. If you are running a powerful Stand, the reduced gun performance may not matter much. For pure gunplay builds, though, you will feel the gap between B Tier and the options above.
C Tier — Early-Game Options That Fall Off
| Weapon | Why It Ranks Low |
|---|---|
| Schofield 6 | Underwhelming damage and no standout trait to justify a loadout slot over higher-tier guns |
| Taurus.357 | Decent enough when you first start playing, but its stats fall behind quickly as you progress |
The Taurus.357 in particular is a classic beginner trap. It feels fine during the opening hours, but once you unlock access to A or S Tier weapons, there is no reason to keep it equipped. The Schofield 6 shares a similar problem — it does not do anything badly enough to be unusable, but it does not do anything well enough to compete.
How Weapon Damage Works in Bridger Western
Every weapon in Bridger Western deals different damage depending on which body part you hit. The three hitbox zones are Head, Torso, and Limb. Headshots always deal the most damage, followed by Torso, with Limb shots being the weakest. For example, the Russian Roulette — a Heavy Pistol that some players swear by for its raw numbers — deals 70 Head / 58 Torso / 52 Limb damage.
Some weapons also suffer from distance drop-off, meaning their damage decreases the farther the target is from you. The Malcolm.70 is notable specifically because it ignores this penalty entirely, which is why it dominates long-range fights.

Loadout Synergy — Weapons, Stands, and Utilities
Weapons do not exist in a vacuum in Bridger Western. Your Stand choice, Utility slots, and Card picks all interact with your gun selection. Equipping a Stand generally lowers your base gun damage, so if you are running a Stand-heavy build, you want a weapon that still delivers meaningful value even with reduced numbers — the Tommy Gun's fire rate or the Malcolm.70's range, for instance.
Utilities are limited to three slots, and the current strongest picks — Knife, Tonic, and Poncho — complement aggressive weapon builds particularly well. The Knife adds burst damage in close quarters, the Tonic keeps you alive through extended fights, and the Poncho provides defensive tech that synergizes with several Stands.
Cards like Quick Draw and Free Runner further shape how your weapon performs. Quick Draw improves weapon handling speed, which benefits slower-firing, high-damage guns like the Malcolm.70 and Mare's Leg. Free Runner enhances your mobility, letting you reposition between shots — a huge advantage for any ranged weapon user.
Best Weapon for Each Combat Range
| Range | Best Weapon | Runner-Up |
|---|---|---|
| Close range | Maverick 88 | Tommy Gun |
| Mid range | Mare's Leg | Winchester Repeater |
| Long range | Malcolm.70 | Winchester Repeater |
If you are unsure what to equip, the Maverick 88 and Malcolm.70 together cover almost every engagement distance you will encounter. The Maverick handles anything within shotgun range, while the Malcolm.70 punishes enemies who try to keep their distance. Adding a Tommy Gun as a third option gives you sustained fire for mid-range skirmishes where neither of the other two is ideal.
Frequently Asked Questions
How many weapons are in Bridger Western?
There are currently 14 weapons to collect and use.
What is the single best weapon overall?
The Maverick 88 is the most well-rounded choice, excelling in close-range burst damage while maintaining good accuracy.
Can I use a weapon and a Stand at the same time?
Yes, but equipping a Stand typically reduces your base gun damage. Some Stands support hybrid gunplay better than others.
Does distance affect weapon damage?
Most weapons suffer damage drop-off at longer ranges. The Malcolm.70 is a key exception, dealing full damage regardless of distance.
Bridger Western's weapon meta rewards players who think about their full build rather than fixating on a single stat line. The S Tier options — Maverick 88, Malcolm.70, Tommy Gun, and Mare's Leg — earn their spots by performing reliably across the widest variety of situations, but even A Tier picks like the Winchester Repeater and Colt Ocelot can carry you through most content when paired with the right Stand and Utilities. The game continues to receive updates, so keep an eye on balance changes that could shift these rankings.