
Windows 11 may automatically change your default printer, causing documents to print on the wrong device or creating confusion in multi-printer environments. This shift often results from system settings that allow Windows to manage the default printer, registry misconfigurations, or persistent legacy printer entries. Addressing this problem ensures your print jobs always use the device you intend, saving time and reducing printing errors.
Disable Windows Automatic Default Printer Management
Step 1: Access the Windows Settings application by pressing Windows + I. This shortcut opens the central hub for all system configurations.
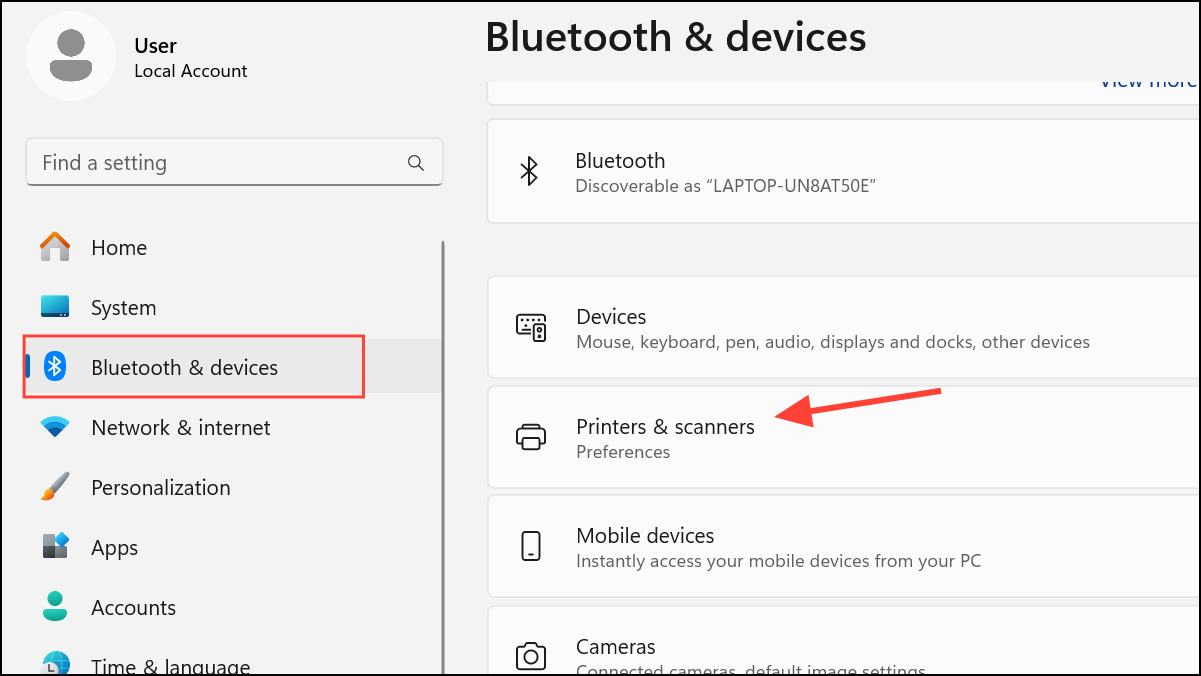
Step 2: Select Bluetooth & devices from the sidebar, then click on Printers & scanners. This section displays all printers recognized by your system.
Step 3: Locate the toggle labeled Let Windows manage my default printer. Switch this setting to Off. Turning off this option stops Windows from automatically setting the most recently used printer as the default, giving you full control over which printer remains selected.
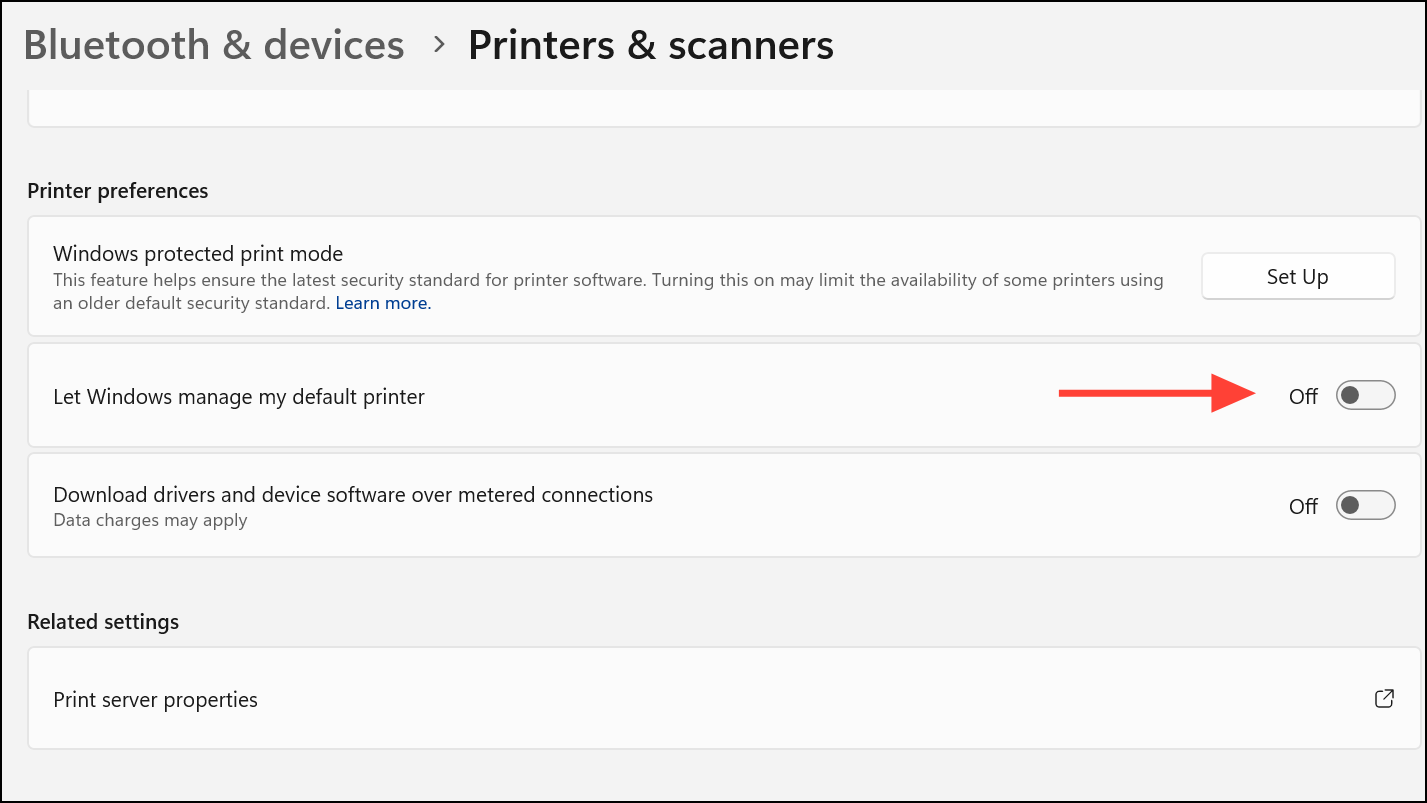
Step 4: In the same Printers & scanners menu, click on your preferred printer from the list. Select Set as default. This manually assigns your chosen device as the default printer, ensuring all print jobs use it unless you specify otherwise.

Modify Registry Settings to Lock Default Printer Behavior
For situations where disabling automatic management does not resolve the issue, such as after system updates or in multi-user environments, editing the Windows registry can reinforce your preference.
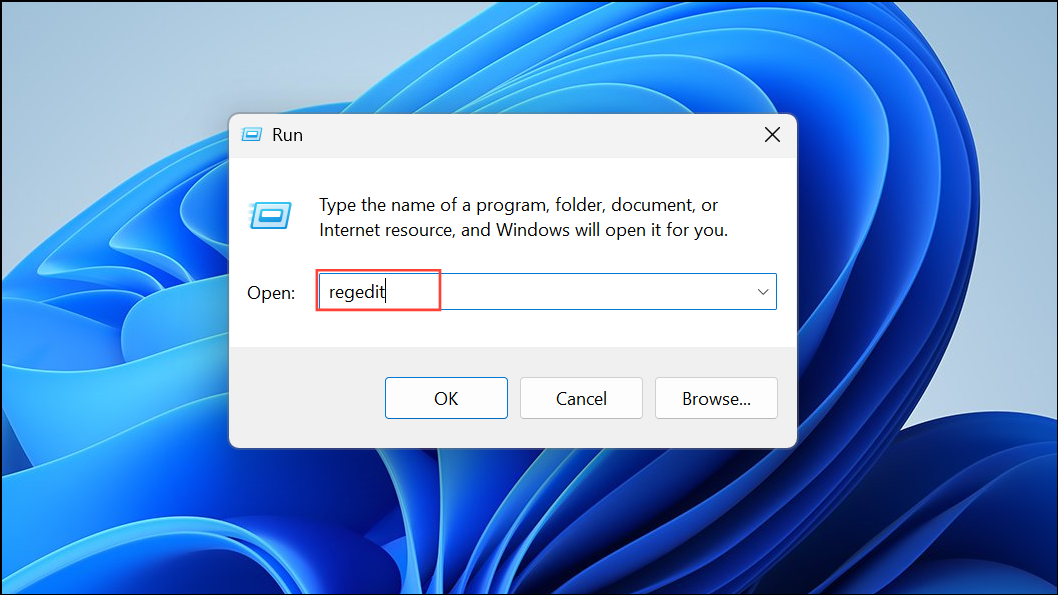
Step 1: Open the Run dialog by pressing Windows + R. Type regedit and press Enter. If prompted by User Account Control, confirm to proceed.
Step 2: In Registry Editor, navigate to:
HKEY_CURRENT_USER\SOFTWARE\Microsoft\Windows NT\CurrentVersion\Windows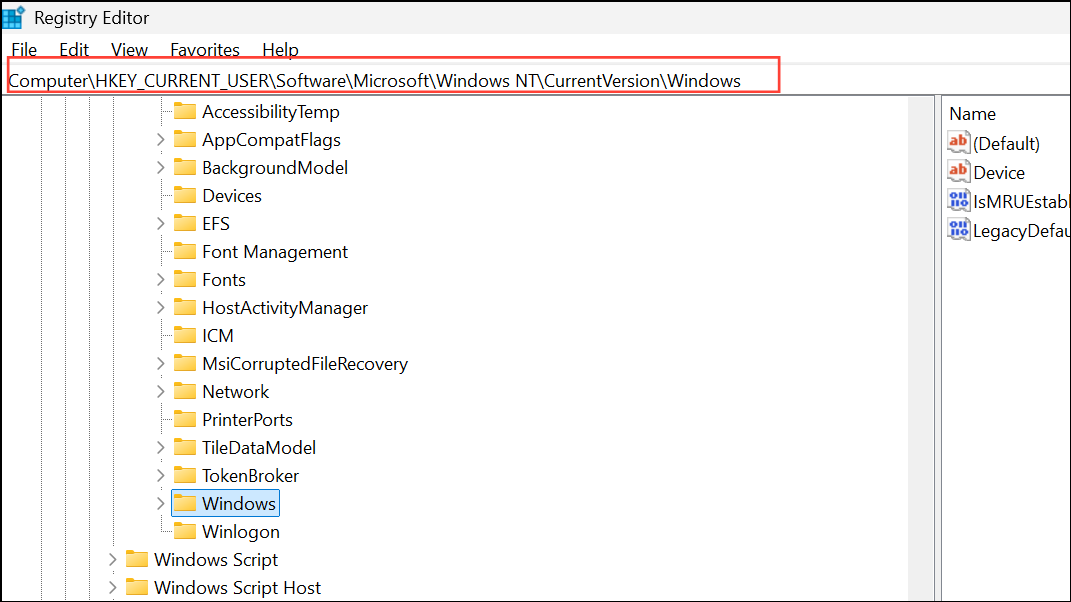
Step 3: On the right panel, find the entry named LegacyDefaultPrinterMode. Double-click it and set its value data to 1. If this entry does not exist, right-click in the right pane, select New > DWORD (32-bit) Value, name it LegacyDefaultPrinterMode, then set the value to 1.
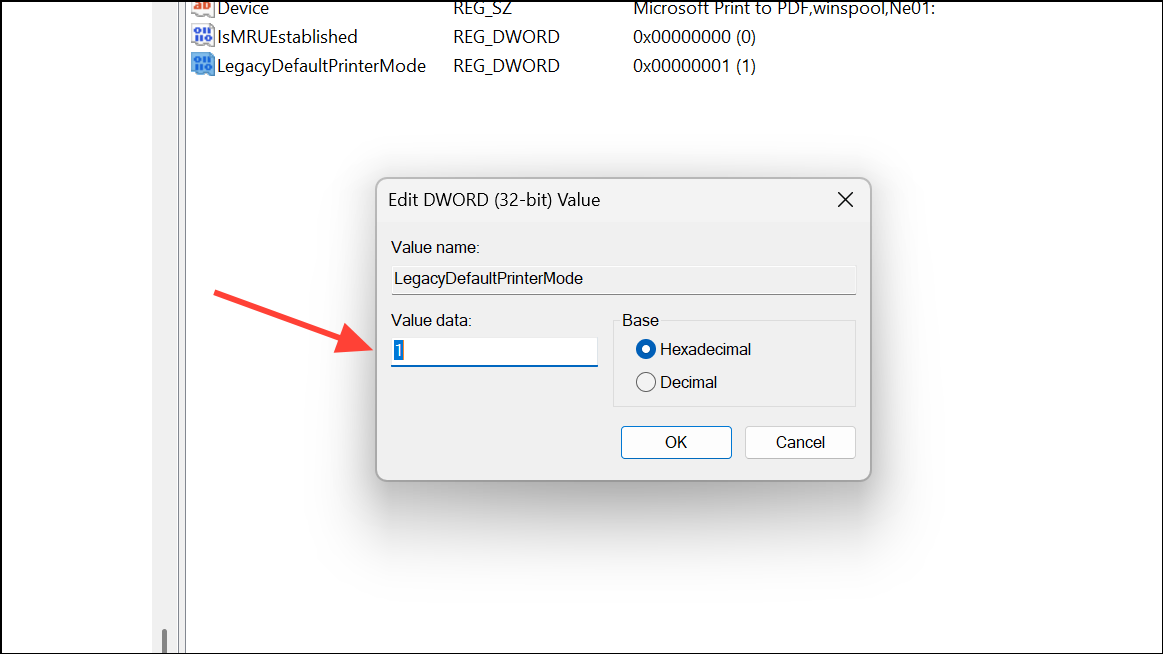
Step 4: Close the Registry Editor and restart your computer. This adjustment instructs Windows to respect your manual default printer selection rather than changing it based on recent usage.
Remove Outdated Printer Entries from the Registry
Legacy printer connections or settings can sometimes override your preferences, especially if you have used multiple printers on the same device. Cleaning up these entries can prevent Windows from reverting to old defaults.
Step 1: Open Registry Editor as described above.
Step 2: Navigate to:
HKEY_USERS\[Your_SID]\Printers\Connections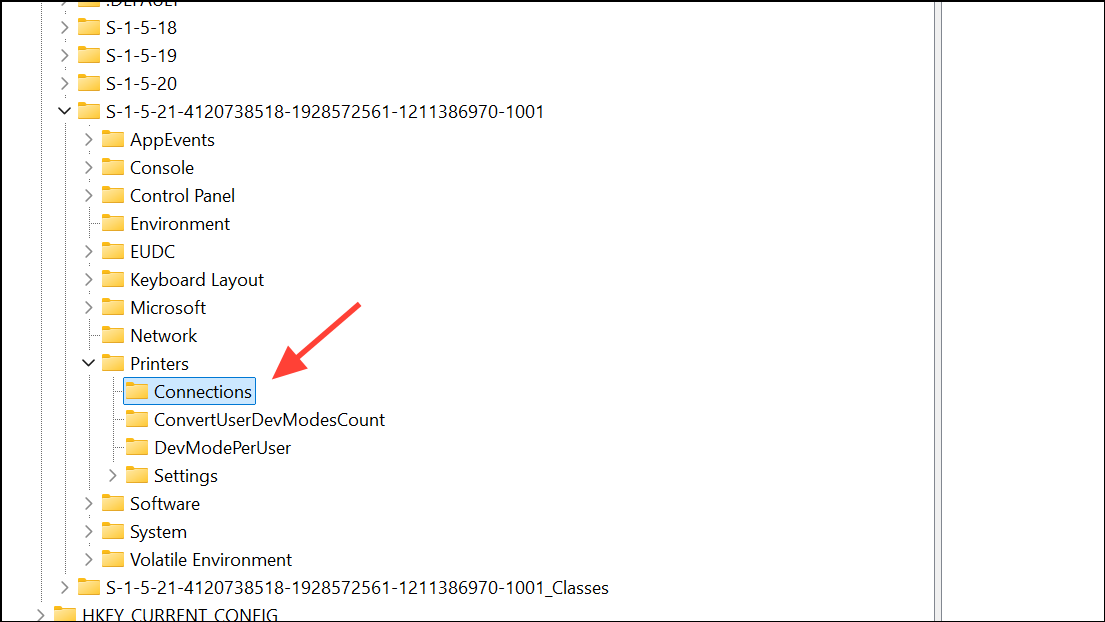
Identify your user SID by looking for the longest string under HKEY_USERS. This typically corresponds to your active user account.
Step 3: Right-click any outdated or unused printer connections listed and select Delete. This step removes old network or shared printer entries that could interfere with your default printer setting.
Step 4: Next, go to:
HKEY_USERS\[Your_SID]\Printers\SettingsRight-click and delete any printer keys you no longer use or want as default. Removing these entries ensures only your active printer remains in the registry.
Step 5: Close Registry Editor and restart your PC. These steps help Windows recognize only your current, preferred printer as the default.
Update Windows and Printer Drivers
System bugs or outdated software can cause the default printer to change unexpectedly, especially after major updates or driver conflicts.
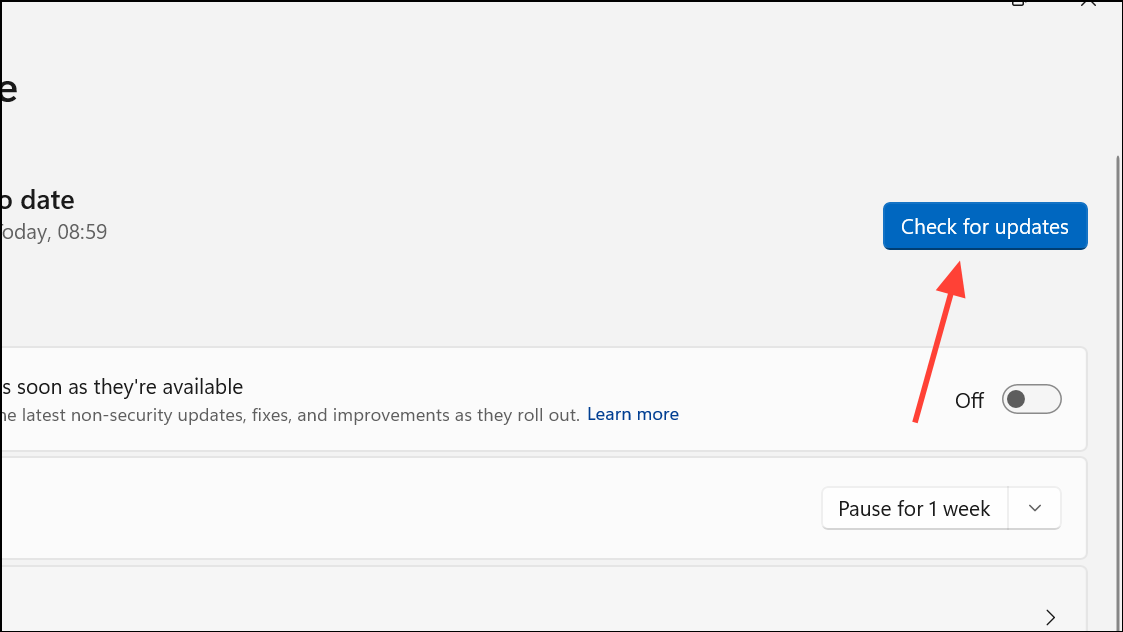
Step 1: Press Windows + I to open Settings, then select Windows Update.
Step 2: Click Check for updates and install any available updates. Keeping Windows up to date addresses known bugs that might affect printer behavior.
Step 3: To update printer drivers, open Device Manager (press Windows + X and select Device Manager), expand Printers, right-click your printer, and choose Update driver. Follow the prompts to search automatically for updated driver software.
Updated drivers and system patches reduce the risk of Windows reverting your default printer due to compatibility issues.
Verify Printer Connectivity and Remove Unused Devices
Intermittent USB or network connections may cause Windows to lose track of your preferred printer, reverting to another available device. Consistent connectivity is crucial for maintaining your default printer setting.
- Check all cables and wireless connections to ensure your printer stays online and accessible at all times.
- Disconnect or remove any unused printers from Settings > Bluetooth & devices > Printers & scanners to prevent accidental switching.
Removing inactive printers and ensuring stable connections minimizes the chances of Windows defaulting to an unintended device.
By following these steps, you regain control over your default printer settings in Windows 11 and reduce the likelihood of unexpected changes, even after updates or system restarts.