
Microsoft Teams is a great tool for workplace collaboration, allowing teams to work in perfect harmony with countless features like team conversations, file sharing, audio and video calls, private chats, meetings, and so on. The app has made remote working not only possible but highly productive for many organizations. But that doesn’t mean that everything is always down to a tee.
A lot of users have reported problems with the camera not working with Microsoft Teams and it is a huge problem when one of the MVP of most remote meetings is video conferencing. A video conference without a working camera is, simply put, not a “video” conference. And it ruins the whole experience.
But, thankfully there are a few fixes you can try if you ever find yourself at the other end of this situation.
Make Sure Microsoft Teams Has Access to the Camera
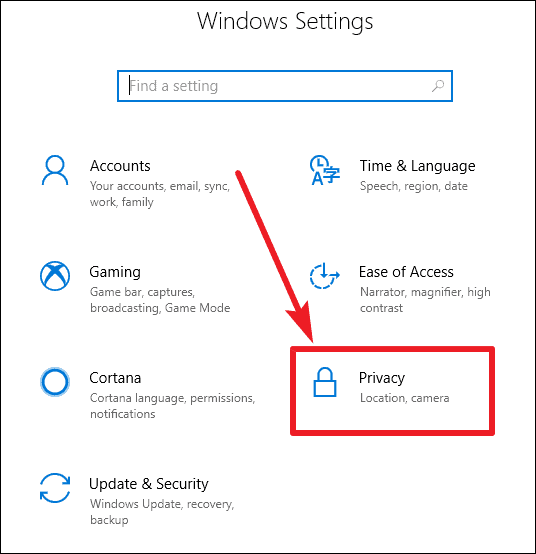
If you are using the Microsoft Teams desktop app, make sure that the app has permission to access the camera. Open Windows Settings from Start menu, then go to ‘Privacy’ settings.
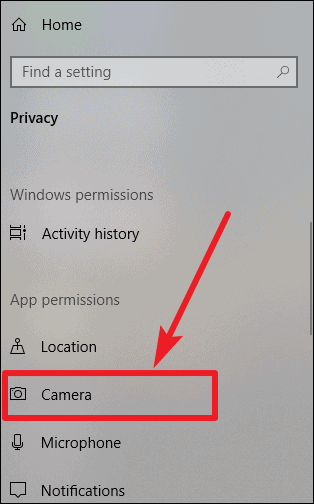
In the Privacy settings, scroll down in the left sidebar to go to ‘App permissions’ and click on ‘Camera’ to open camera settings.
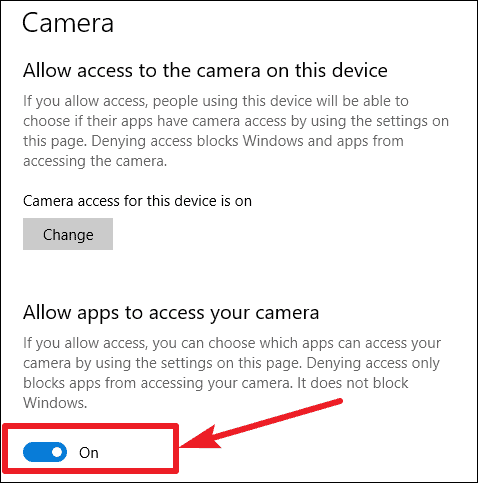
Make sure that the option ‘Allow apps to access your camera’ is on. If it isn’t, click on the toggle to turn it on.
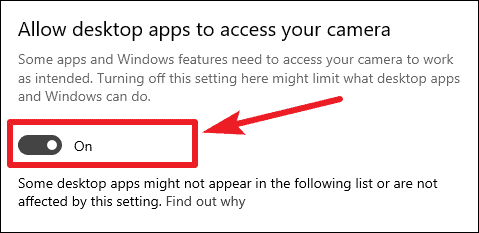
Also, scroll down and enable the toggle for ‘Allow desktop apps to access your camera’ under the same settings.
Additionally, you also want to make sure that the Teams app has permission to access the camera. Under ‘Choose which apps can access your camera’, make sure that the toggle for Microsoft Teams is on if the app is listed. If it is already on, try turning it off and then on again after a few seconds. Sometimes a hard reset is all that is needed to make things work again.
Enable Camera Permission in Microsoft Teams Desktop App
Open the Microsoft Teams desktop app, and click on the ‘Profile’ icon on the Title Bar. Then, select ‘Settings’ from the context menu.
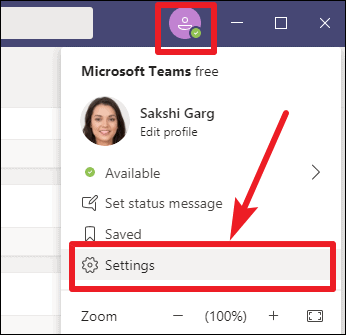
Teams settings will open. Go to ‘Permissions’ on the left panel. Then, turn on the toggle for Media.
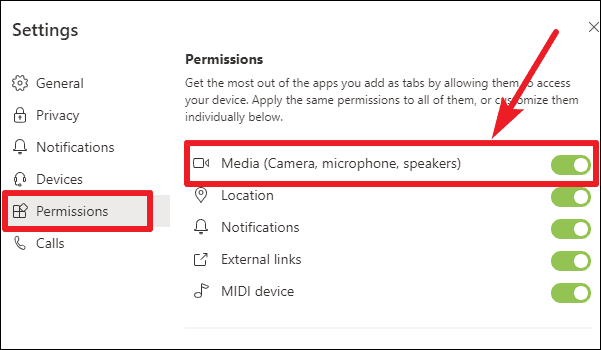
If the toggle is already on, turn it off and wait for a few seconds. Then, turn it on again. And check if the camera started working in the app. If not, proceed to try some other fix.
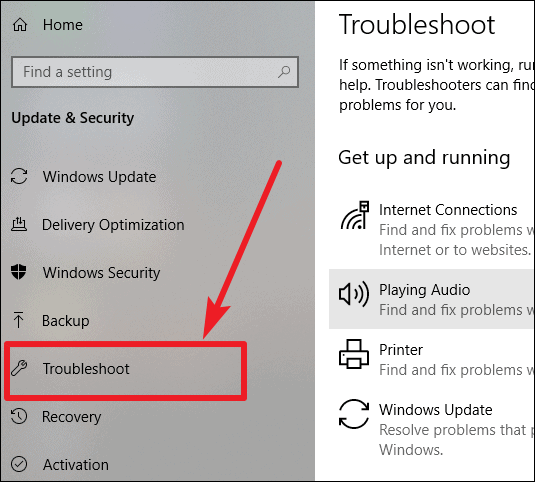
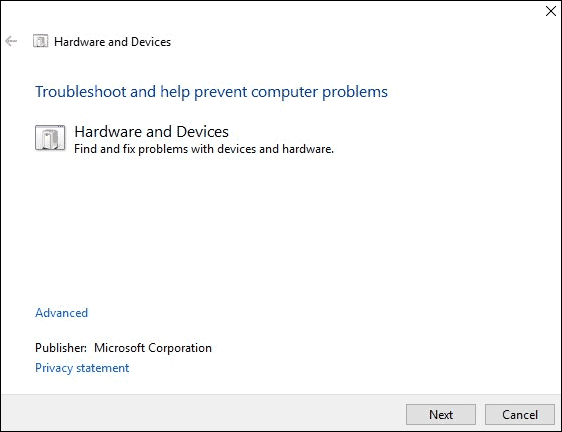
Run the ‘Hardware and Devices’ Troubleshooter
If your camera is not working, there could be some problems with the hardware and running the ‘Hardware and Devices’ troubleshooter could help you solve them.
Open Windows Settings from the Start menu. Then, go to ‘Update & Security’ settings.
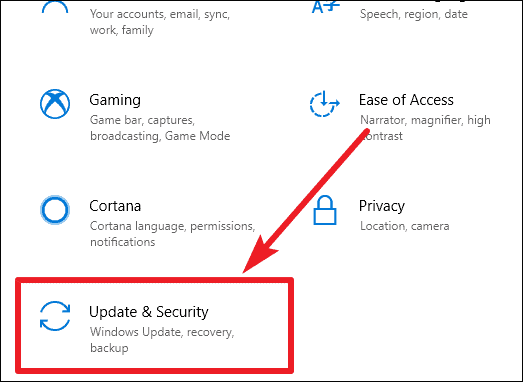
Click on ‘Troubleshoot’ in the left panel to open the troubleshoot settings and then run the Hardware & Devices Troubleshoot to detect any problems with the camera.
If the setting for ‘Hardware & Devices Troubleshoot’ is not available in the Settings app, then launch it by running the command below in Command Prompt.
To open the Command Prompt, you can type ‘cmd’ in the search box in the taskbar or in the Start menu, then execute the following ommand:
msdt.exe -id DeviceDiagnosticAfter you enter the above command and press the ‘Enter’ key, it will open the ‘Hardware & Device Troubleshoot’ window. Follow the steps that appear on your screen to run diagnostics.
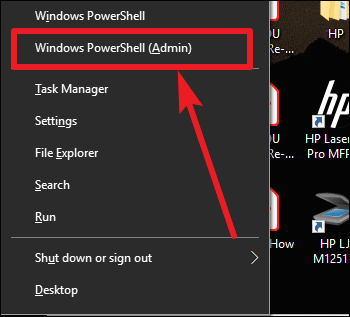
Re-register the Camera Hardware on your Computer
You can also try to re-registering your camera in Windows. This step might seem a little complex to you at first sight, but follow it step-by-step and you would be fine.
Right-click on the start button and select ‘Windows PowerShell (Admin)’ from the available options on the menu.
A User Account Control prompt will appear on your screen, asking whether ‘you want to allow this app [Windows PowerShell] to make changes to your device?’ Click on ‘Yes’ to proceed to the next step.
In the Windows PowerShell console that opens, type or copy/paste the following line and press the ‘Enter’ key.
Get-AppxPackage -allusers Microsoft.WindowsCamera | Foreach {Add-AppxPackage -DisableDevelopmentMode -Register "$($_.InstallLocation)\AppXManifest.xml"}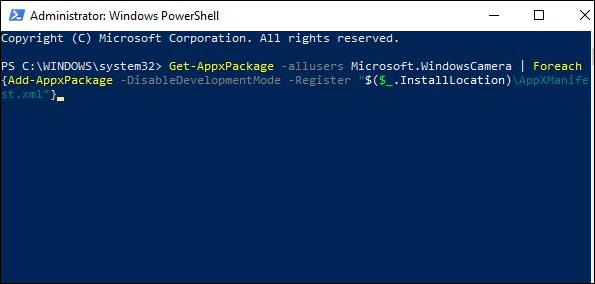
Close Windows PowerShell and go to Microsoft Teams to see if this resolved the issue.
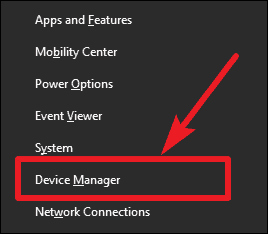
Update the Drivers on your PC
If nothing seems to be working, see if your camera has drivers that need to be updated. Outdated drivers might be the root of your problem.
Right-click on the Start menu and select ‘Device Manager’ from the menu that pops on your screen.
In the list of devices, find ‘Cameras’ and click on the drop-down arrow next to it to view your camera devices. Then, right-click on your Camera device, and select ‘Update Driver’ option if you see it.
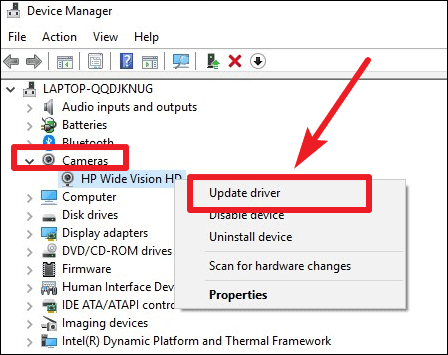
Then select the ‘Search automatically for updated driver software’ option. If a newer update for the driver is available that Windows update missed, the Device Manager would download and install it.
Reset the Camera Hardware
If updating the drivers didn’t work, try this instead. Right-click on the start menu and select ‘Device Manager’ from the available options. Then, go to your camera device and right-click on it. Select ‘Uninstall device’ and click ‘Ok’.
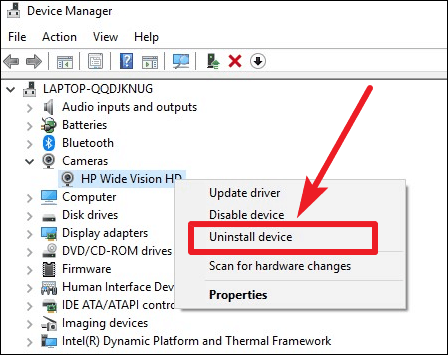
Then, go to ‘Action’ in the toolbar on Device Manager window and select ‘Scan for Hardware Changes’ option.

Wait for the scan to complete and then restart your PC. After this, if there was a problem with your camera, it should go away.
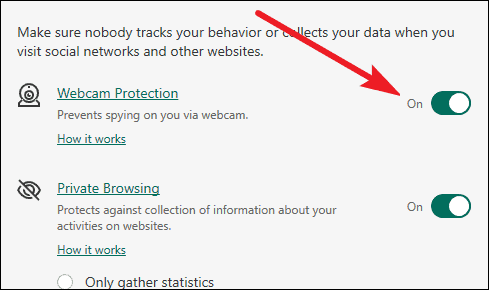
Check your Antivirus Software
You should also check your antivirus software. A lot of antivirus software also provide privacy protection and when enabled, this blocks the apps from accessing your webcam. So, check your antivirus and make sure that webcam protection is disabled for Microsoft Teams. The steps for checking this would be different for every antivirus, so there cannot be a generic guide.
Conclusion
Microsoft Teams won’t be of much use if the camera does not work in the application. But there are several fixes to try if you ever find yourself in this situation. Try one of the fixes to ensure that the Teams app works like clockwork.