
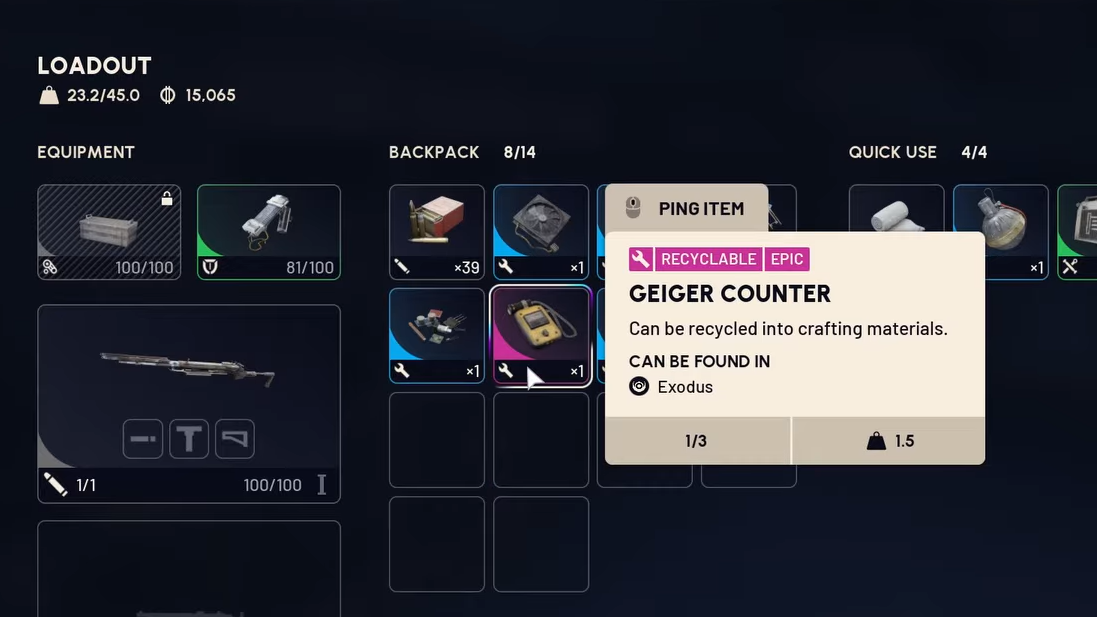
Geiger Counters in Arc Raiders sit in an awkward space between rare loot and pure crafting fodder. They don’t equip to your Raider, they don’t change how you fight, and they take up valuable inventory weight. But they convert directly into Exodus Modules and Batteries, and they are required for the Trophy Display Project, which puts them squarely in the “plan around this” category.
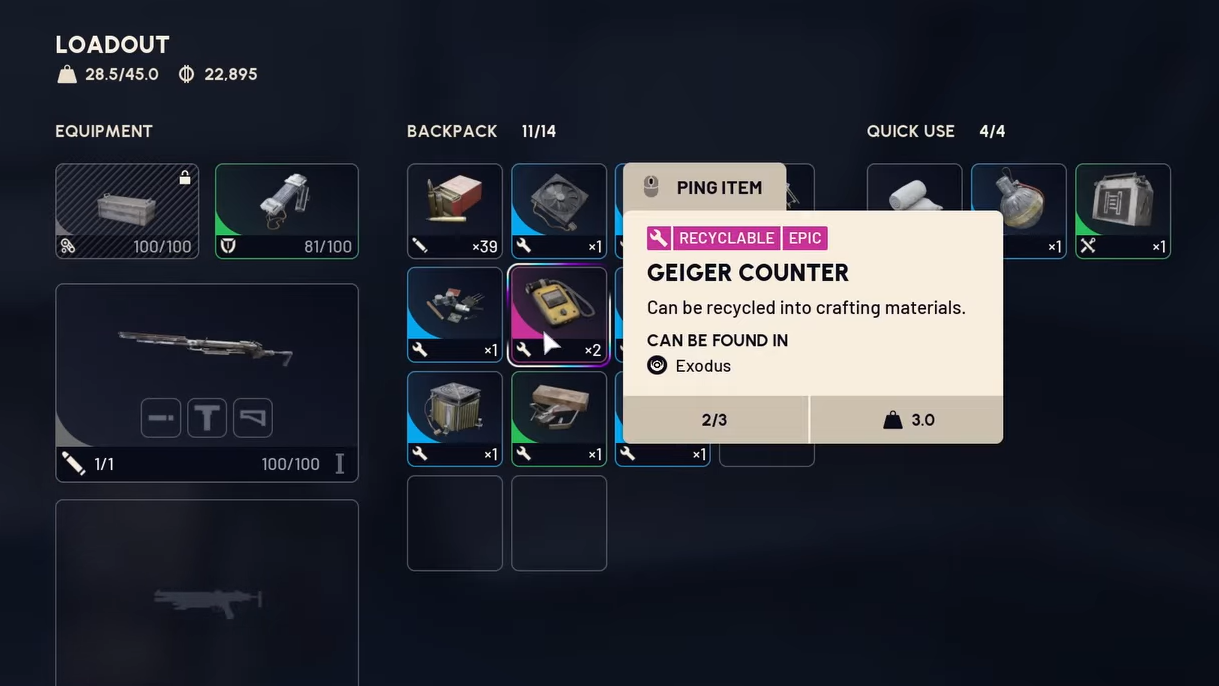
Quick answer: Geiger Counters are Epic recyclable items that only drop as scavenged loot in Stella Montis, mainly inside Exodus areas such as Assembly and Business Center, and in dense medical container clusters like Medical Research. One Geiger Counter weighs 1.5, stacks to 3, recycles into 3× Battery and 1× Exodus Modules, salvages into 3× Battery, and sells for 3,500 Coins. If you are working on upgrades or the Trophy Display Project, prioritize extracting and recycling them instead of selling.
Geiger Counter item stats and outcomes (state)
| Property | Value |
|---|---|
| Item type | Recyclable material |
| Rarity | Epic |
| Category | Can be found in Exodus |
| Weight | 1.5 |
| Stack size | 3 per inventory slot |
| Sell price | 3,500 Coins |
| Recycle result | 3× Battery, 1× Exodus Modules |
| Salvage result | 3× Battery |
| Primary map | Stella Montis |
| Primary loot theme | Exodus areas and medical-style containers |
Knowing that a single Geiger Counter turns into three Batteries and one Exodus Modules is what makes it valuable. Exodus Modules are a core upgrade material, while Batteries are widely used across early and mid-game projects and quests. The alternative is a flat 3,500 Coins per unit, which is substantial but eventually less impactful than guaranteed upgrade inputs.
Where Geiger Counters spawn in Arc Raiders (Stella Montis)
Geiger Counters drop exclusively as scavenged loot in Stella Montis. They are flagged as Exodus loot, which means their spawn logic favors specific “Exodus areas” and container types rather than general ground clutter.
| Location | Type | Containers / loot to prioritize | Notes on likelihood |
|---|---|---|---|
| Assembly / Assembly Workshops | Exodus area (Stella Montis) | White medical pull-out shelves near rocket units; small blue-door medical drawers in server rooms | One of the most reliable areas; high Exodus density across multiple medical containers |
| Medical Research | Medical complex (Stella Montis) | Tall white racks with square plastic drawers; large pull-out medical desk bins | Not tagged as an Exodus zone, but has the highest density of compatible medical containers |
| Business Center | Exodus area (Stella Montis) | Industrial trolleys with loose loot on top | Suitcases and trash bins are low value; the rolling carts can spawn Exodus Modules, Magnetic Accelerators, and occasionally Geiger Counters |
| General Stella Montis interiors | Map-wide | Red mailbox-style resource containers along corridors; any medical drawers or white pull-out racks | Lower chance per container than the focused zones, but still valid spawns wherever these models exist |
Within these spaces, Geiger Counters are rare Epic drops. Multiple runs of the same route are often needed before one appears. A run that produces Batteries and Exodus Modules from the same container types is already on the right track; a Geiger Counter uses that same slot in the loot table.
How to run Stella Montis for Geiger Counters (mechanic + verification)
The underlying mechanic is straightforward: Geiger Counters are part of the Exodus loot pool in Stella Montis and are additionally tied to specific medical container meshes and certain industrial trolleys. To verify that runs are set up correctly, you only need to confirm that you are consistently cycling these container types in the listed areas.
Step 1: Deploy to Stella Montis and path to an Exodus area such as Assembly or Business Center, or to Medical Research if your spawn makes it more convenient. You can confirm you are in an Exodus zone by the typical signage and the concentration of high-tech and corporate interiors rather than open streets.
Step 2: In Assembly Workshops, focus on the white medical pull-out shelves around the base of the large rocket structures and the small blue-door medical drawers inside the surrounding server rooms. Ignore standard industrial yellow carts; they have lower relevance for this item.
Step 3: In Medical Research, rotate systematically through tall white racks with square plastic drawers and any large medical desks that have interactable pull-out bins. These models have a notably higher chance of rolling Geiger Counters than generic office furniture or trash containers.
Step 4: In Business Center, stop opening every suitcase and trash bin. Instead, scan hallways for green or similar industrial trolleys that have loose items placed on top. These carts are capable of spawning Exodus Modules, Magnetic Accelerators, and other high-tier Exodus loot, with a chance for Geiger Counters in the same pool.
Step 5: During general movement through Stella Montis interiors, open red, mailbox-like resource containers mounted along corridors, as well as any additional medical drawers or white pull-out racks in offices or labs. These share the same loot logic and can roll Geiger Counters even outside the named hotspots.
You know the mechanic is paying off when you routinely see Batteries, Exodus Modules, and other Epic-tier components in the exact containers listed above. A Geiger Counter will simply appear as another Epic item roll in that same context.
Night raids and rarity behavior
Geiger Counters are Epic items. Their rarity ties into how often they appear relative to more common scrap and low-tier materials. Night raids on Stella Montis provide a slight bump for specialized tech items like this, which makes them more efficient windows for focused farming when you can choose your deployment timing.
In practice, a night Assembly run that leans heavily on medical carts and server-room drawers can produce multiple Epic items over a single deployment, sometimes filling several inventory slots with high-value scrap. The presence of many Epics on the floor doesn’t guarantee a Geiger Counter, but it is a good indicator that you are hitting the correct grade of container and zone.
Project and progression use: Trophy Display and Exodus crafting
Beyond pure recycling value, Geiger Counters are explicitly embedded in late-stage progression. They are a required component for Stage 5: Imposing Behemoths in the Trophy Display Project. That stage demands:
- 5× Exodus Module
- 3× Geiger Counter
- 8× Bombardier Cell
- 3× Matriarch Reactor
Because a single Geiger Counter recycles into one Exodus Modules plus three Batteries, it effectively double-counts toward that requirement: carrying out three intact Geiger Counters satisfies the direct Geiger Counter requirement and can also provide a portion of the Exodus Module total once recycled.
Recycle, salvage, or sell: how to decide
Once you extract a Geiger Counter, the decision tree is small but important for long-term progression.
| Action | Output | When it makes sense | How you see it worked |
|---|---|---|---|
| Recycle | 3× Battery, 1× Exodus Modules | Best default for upgrades, crafting, and Trophy Display work; converts directly into high-demand materials | Inventory count for Geiger Counter decreases; Battery and Exodus Modules stacks increase accordingly at the recycling station |
| Salvage | 3× Battery | Only if you urgently need Batteries and have other sources for Exodus Modules | Geiger Counter is consumed; Battery stack increases without any new Exodus Modules |
| Sell | 3,500 Coins | Useful when coin-poor, not actively upgrading, or after finishing all project requirements that reference Geiger Counters | Trader UI shows a +3,500 Coin change after confirming the sale; your Geiger Counter stack decreases |
In most situations, recycling is the correct move. It yields both a rare upgrade component and a common but constantly used material in a single action. Selling is attractive in the short term, but trades away future upgrade flexibility for a flat amount of currency.
Inventory management and extraction (verification and failure modes)
Because Geiger Counters are Epic and relatively rare, failed extractions hurt more than usual. Inventory and extraction planning prevent losing them unnecessarily.
Step 1: Before deploying to Stella Montis, free up at least one Safe Pocket slot. Safe Pockets preserve items even if you die or are intercepted by other Raiders before extraction, which is critical for long-farm items like Geiger Counters and other Trophy Display components.
Step 2: On pickup, immediately move any Geiger Counter into a Safe Pocket if one is available. The game UI will show the item occupying the Safe Pocket slot rather than a standard inventory grid slot, confirming protection.
Step 3: Watch total carry weight. With a per-unit weight of 1.5 and a stack size of three, a full stack is 4.5 weight. In long Stella Montis runs, especially night raids with lots of Epic loot, several stacks can quietly push you closer to overweight thresholds, slowing movement and making extraction riskier.
Common failure reasons for “farming but never keeping” Geiger Counters are:
- Extracting infrequently and dying with Geiger Counters in regular inventory instead of Safe Pockets.
- Overweight builds that can’t disengage from fights while carrying multiple Epic stacks.
- Selling Geiger Counters early in progression for short-term Coins and then needing to refarm them for the Trophy Display Project.
Once you consistently leave Stella Montis with Geiger Counters sitting in Safe Pockets and see them appear in your stash as either the raw item or their recycled outputs, the loop is functioning correctly.
Used this way, Geiger Counters become a predictable, if infrequent, part of Stella Montis Exodus runs. You go to specific parts of the map, open specific containers, favor night deployments when you can, stash every unit you find in a Safe Pocket, and convert them into Batteries, Exodus Modules, and Trophy Display progress back at base instead of treating them as random junk.