
The Groundbreaking quest in ARC Raiders is short, but it hides two easy-to-miss details: the locked room at Pilgrim’s Peak and the exact photo angle at the Abandoned Housing Project. Everything happens on the Blue Gate map, and you do not need to extract for the quest to count, but you do need to keep a key safe.
Quest overview and rewards
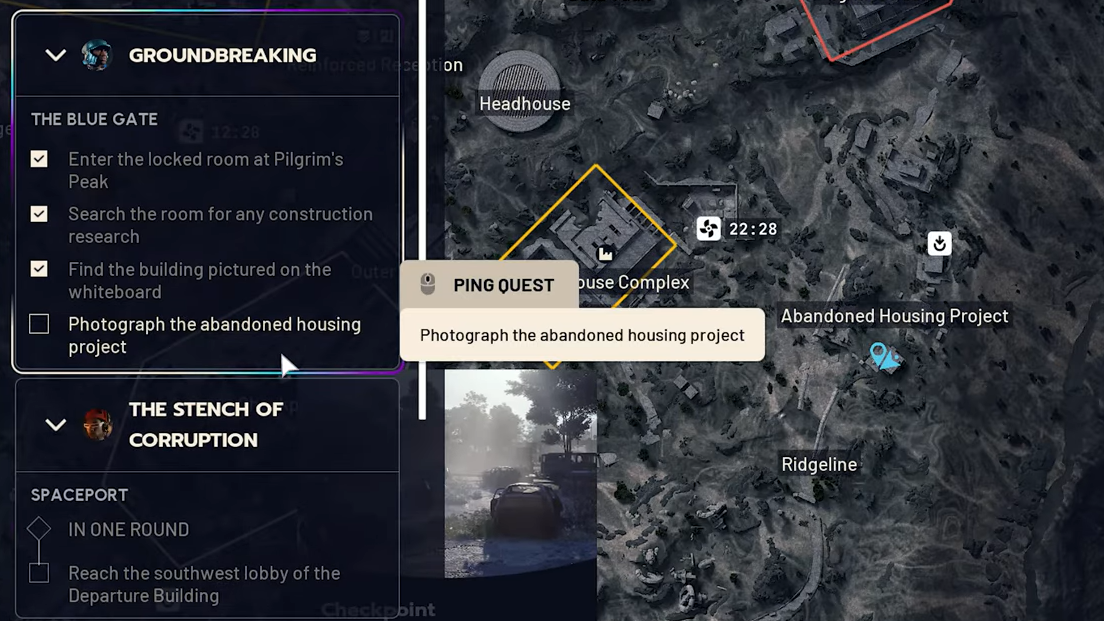
Groundbreaking is a four-part quest on Blue Gate:
- Enter the locked room at Pilgrim’s Peak.
- Search the room for any construction research.
- Find the building pictured on the whiteboard.
- Photograph the abandoned housing project.
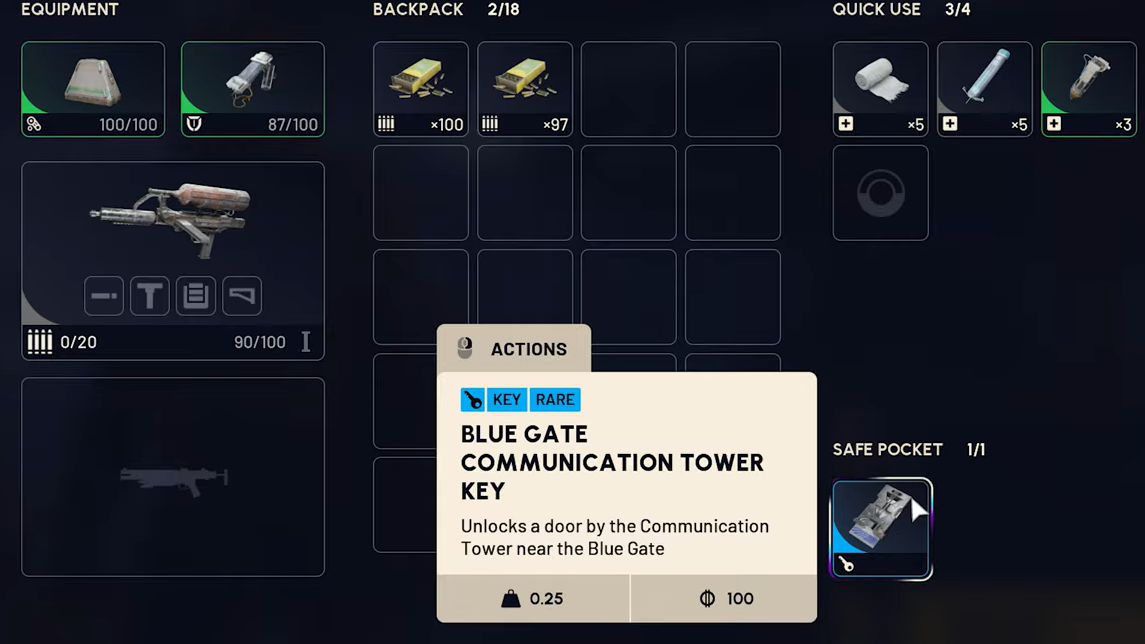
When you accept Groundbreaking from Apollo, you receive a Blue Gate Communication Tower Key in your stash. The quest reward includes a new color variant for the Warden outfit, which builds on the Warden set unlocked through The Stench of Corruption.

Groundbreaking: enter the locked room at Pilgrim’s Peak
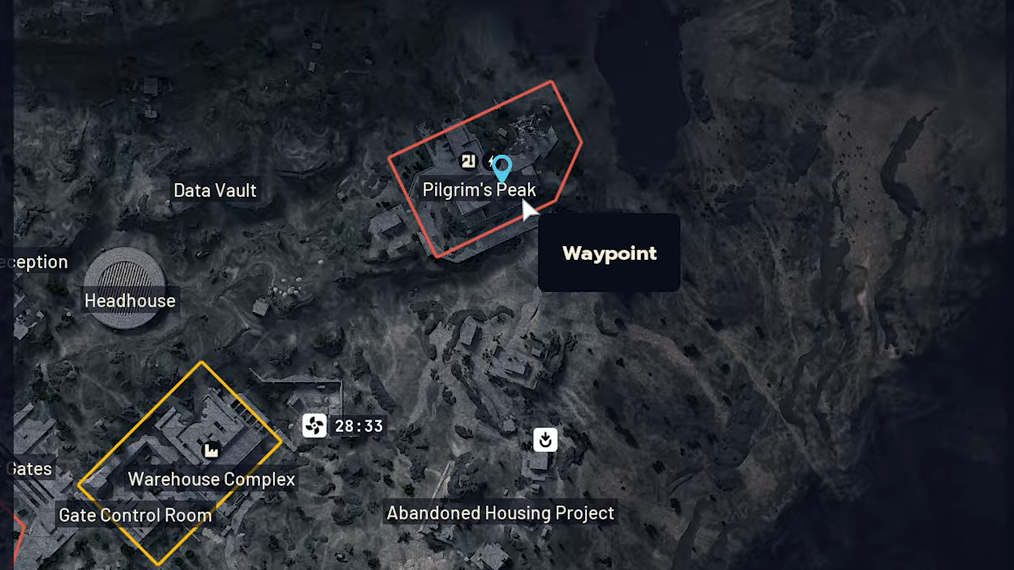
Step 1: Queue into the Blue Gate map and make your way to Pilgrim’s Peak, the tall communication facility in the far north or northeast of the map (depending on how your compass is oriented). Expect high traffic here from other raiders and ARC units, and clear the outside area carefully before committing to a route inside.
Step 2: Before you leave Speranza, move the Blue Gate Communication Tower Key from your stash into your loadout and then into a safe pocket augment slot. Double-check it is in the safe pocket, not in regular inventory, so a death on the way to Pilgrim’s Peak doesn’t set you back.
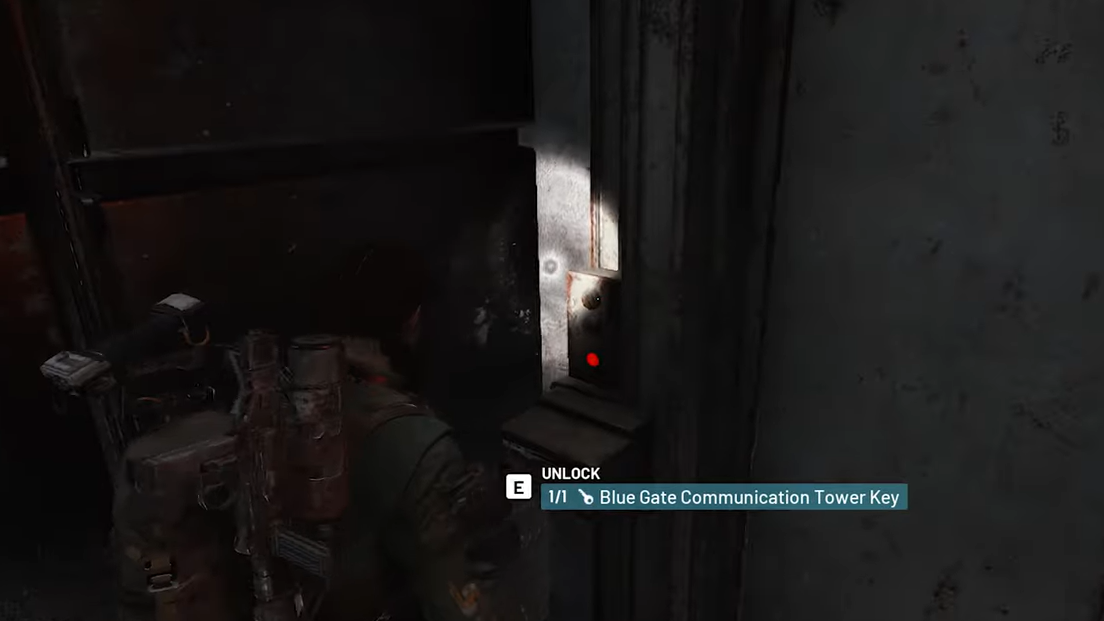
Step 3: Enter Pilgrim’s Peak. Routes differ slightly depending on your entrance, but the goal is the communications room on the eastern side of the complex. If you come in through the main southern entrance and reception, go through the inner door, then take the first corridor that leads toward the right or east. Look for a locked door along this eastern corridor; that’s where the key is used.
Step 4: Interact with the door using the Blue Gate Communication Tower Key. If the door is already open when you arrive, you can walk in without spending your key and decide to hold the key for a later run. Either way, stepping inside the room will advance the quest.
Groundbreaking: search the construction research inside the room
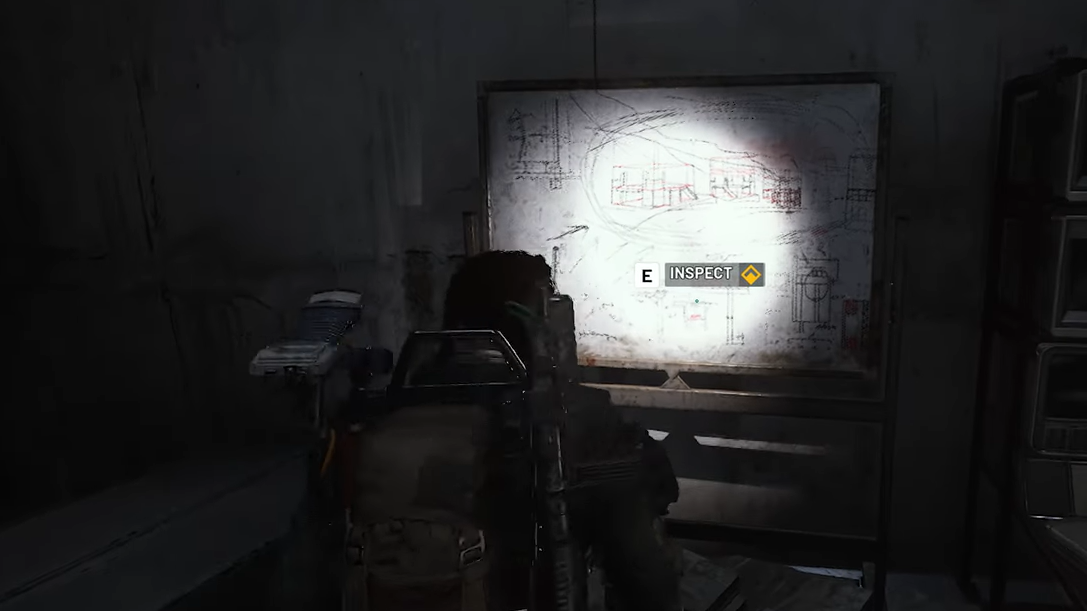
Step 1: Once you are inside the locked room, look to the right-hand side. The room is small, packed with equipment and loot, but there is a single whiteboard on the wall with a sketch of an unfinished building or house. This whiteboard counts as the “construction research” mentioned in the quest log.
Step 2: Interact with the whiteboard. This completes the “Search the room for any construction research” objective and also flags the building in the drawing as your next target. From this point, Groundbreaking asks you to find that exact structure on the surface.
Step 3: Take a moment to loot the room if it is safe. This space often contains valuable containers and sometimes a weapon case, which can provide a stronger gun for the rest of your raid. When you are done, leave Pilgrim’s Peak and prepare to move south toward the Abandoned Housing Project.
Groundbreaking: find the building pictured on the whiteboard
Step 1: Open your Blue Gate map and locate the Abandoned Housing Project point of interest to the south or southwest of Pilgrim’s Peak. This area often serves as a spawn zone for players, so approach with the assumption that other raiders may already be looting or holding angles there.
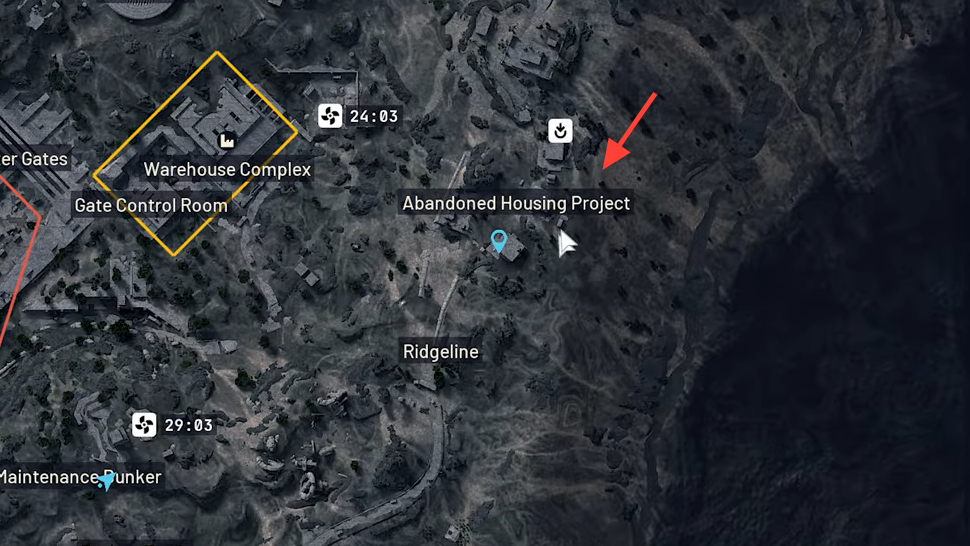
Step 2: Travel to the Abandoned Housing Project and move toward the cluster of unfinished buildings. The building shown on the whiteboard corresponds to the southernmost of the main housing shells in this POI. As you close in on that southern building, the quest should update to prompt you to “Photograph the abandoned housing project.”
Groundbreaking: photograph the abandoned housing project
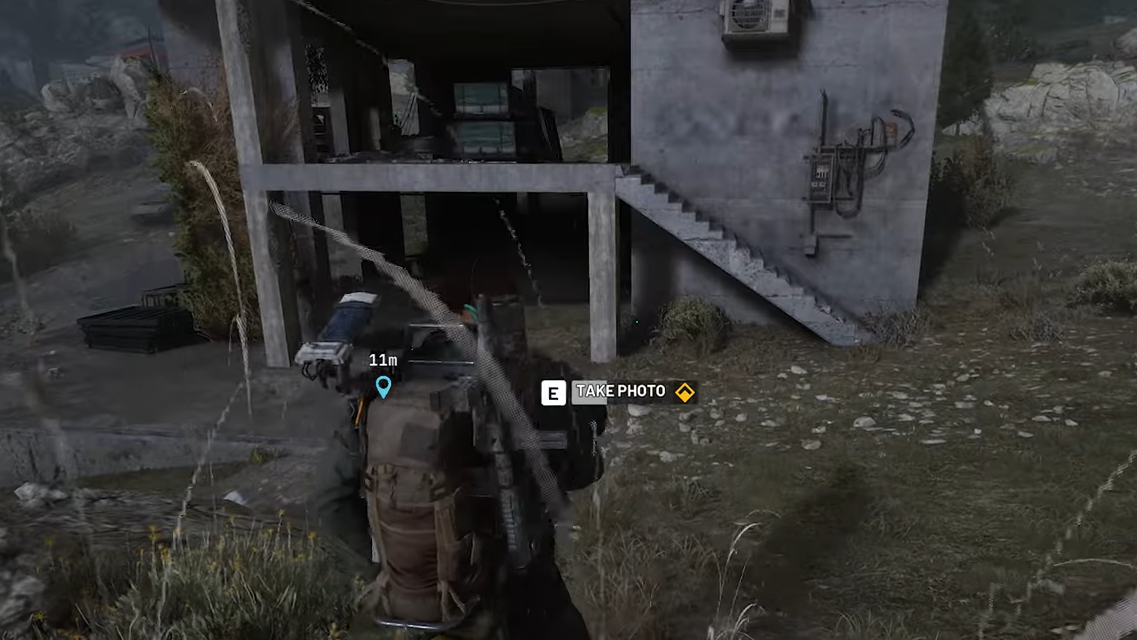
Step 1: Stand on the north side of the correct building, facing it so the full front of the unfinished structure is in view. Look for a yellow interaction icon or a circular prompt that appears a short distance away from the building—often up near the rocks or ledge before you fully descend to the house.
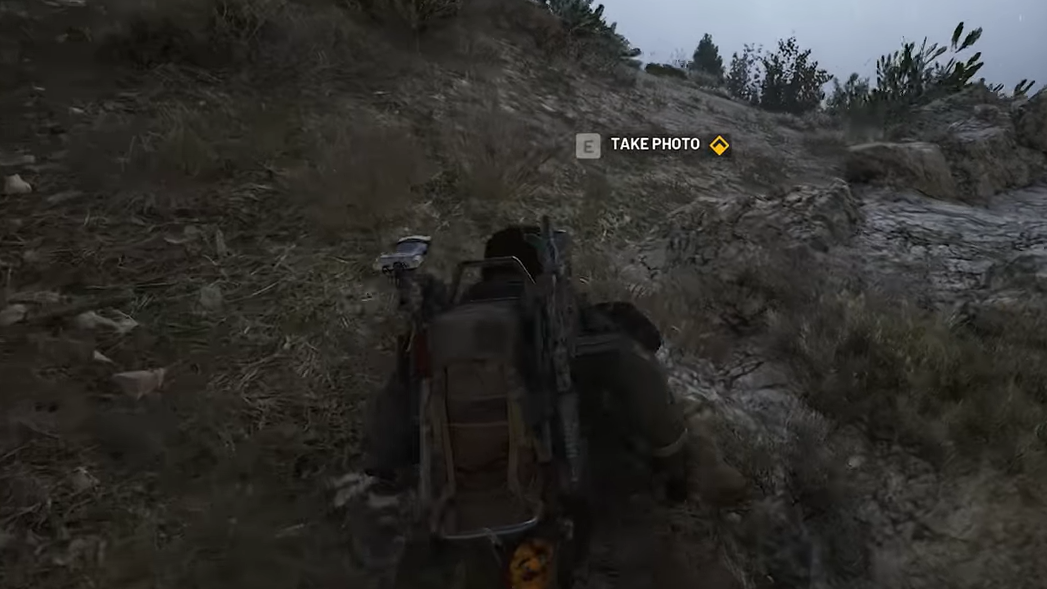
Step 2: Move into the marked circle and hold the interaction button to “Take photo” when the prompt appears. The exact spot is fairly strict; if you do not see the prompt, adjust slightly left or right along the slope or step forward and back until it appears. Multiple interaction spots can exist around this building, but any of them count as long as the prompt specifically refers to photographing the abandoned housing project.
Step 3: Once the photo animation completes, Groundbreaking is finished. The quest objectives will all be checked off, and you can return to Speranza through any extraction point to turn it in and unlock the new Warden outfit color.
With Groundbreaking complete, Apollo’s research into earthquake-resistant construction is safely logged, your Warden wardrobe grows, and you can move on to the next set of Cold Snap quests. On future Blue Gate runs, the Communication Tower room at Pilgrim’s Peak remains a reliable loot stop whenever you have a spare key.