
Highguard revolves around eight playable Wardens, each with a fixed role, a tactical ability, a passive, and an ultimate. Understanding what every Warden does makes team-building and in-match decision-making much easier.
Quick answer: The eight launch Wardens are Atticus, Scarlet, Slade, Redmane, Kai, Una, Condor, and Mara, spread across Assault, Destruction, Defensive, Recon, and Support classes.
Highguard Warden roles and classes
Wardens are grouped into five functional classes that define their job in a raid:
- Assault – Frontline damage dealers that excel at pushing and skirmishing.
- Defensive – Territory holders focused on protecting bases and chokepoints.
- Destruction – Structure breakers that open routes and shred fortifications.
- Recon – Information tools that reveal enemy movements and positions.
- Support – Enablers that shield, reposition, or respawn teammates.
Each Warden’s kit is built around that class identity. The table below gives a quick overview.
| Warden | Class | Role summary |
|---|---|---|
| Atticus | Assault | Lightning-spewing raid anchor with strong area control and objective pressure. |
| Scarlet | Assault | Stealth assassin that specializes in flanks and breaking defensive lines. |
| Slade | Assault | Fire-based brawler with high area damage and killstreak snowball potential. |
| Redmane | Destruction | Melee enforcer who smashes walls and punishes clustered enemies. |
| Kai | Defensive | Ice wall specialist that fortifies bases and transforms into a tanky frontline. |
| Una | Defensive | Spirit binder that disrupts pushes and generates extra loot. |
| Condor | Recon | Tracker whose bird constantly feeds intel about enemy locations. |
| Mara | Support | Shadow mage that shields allies and creates team spawn points. |
Atticus abilities and playstyle
Atticus is an Assault Warden built around lightning damage and objective pressure. He thrives in mid-range fights and base sieges.
| Type | Name | Effect |
|---|---|---|
| Tactical | Shockspear | Throws a charged spear that shocks nearby enemies; sustained damage charges his passive. |
| Passive | Supercharged Axe / Charged Axe* | Unleashes an electrical explosion that also damages nearby resource nodes. |
| Ultimate | Powerstorm / Supercell* | Lifts Atticus into the air to rain lightning spears that heavily damage players and structures. |
*Ability names may appear as either pair of labels, but the functionality is the same.
How to use Atticus effectively
- Open fights by tagging multiple enemies with Shockspear to start charging the passive.
- Detonate the axe explosion near clustered enemies or key nodes for both damage and resource pressure.
- Trigger the ultimate from relative safety where you can see enemy cover and base structures, then focus the barrage on choke points, repair hubs, and defensive walls.

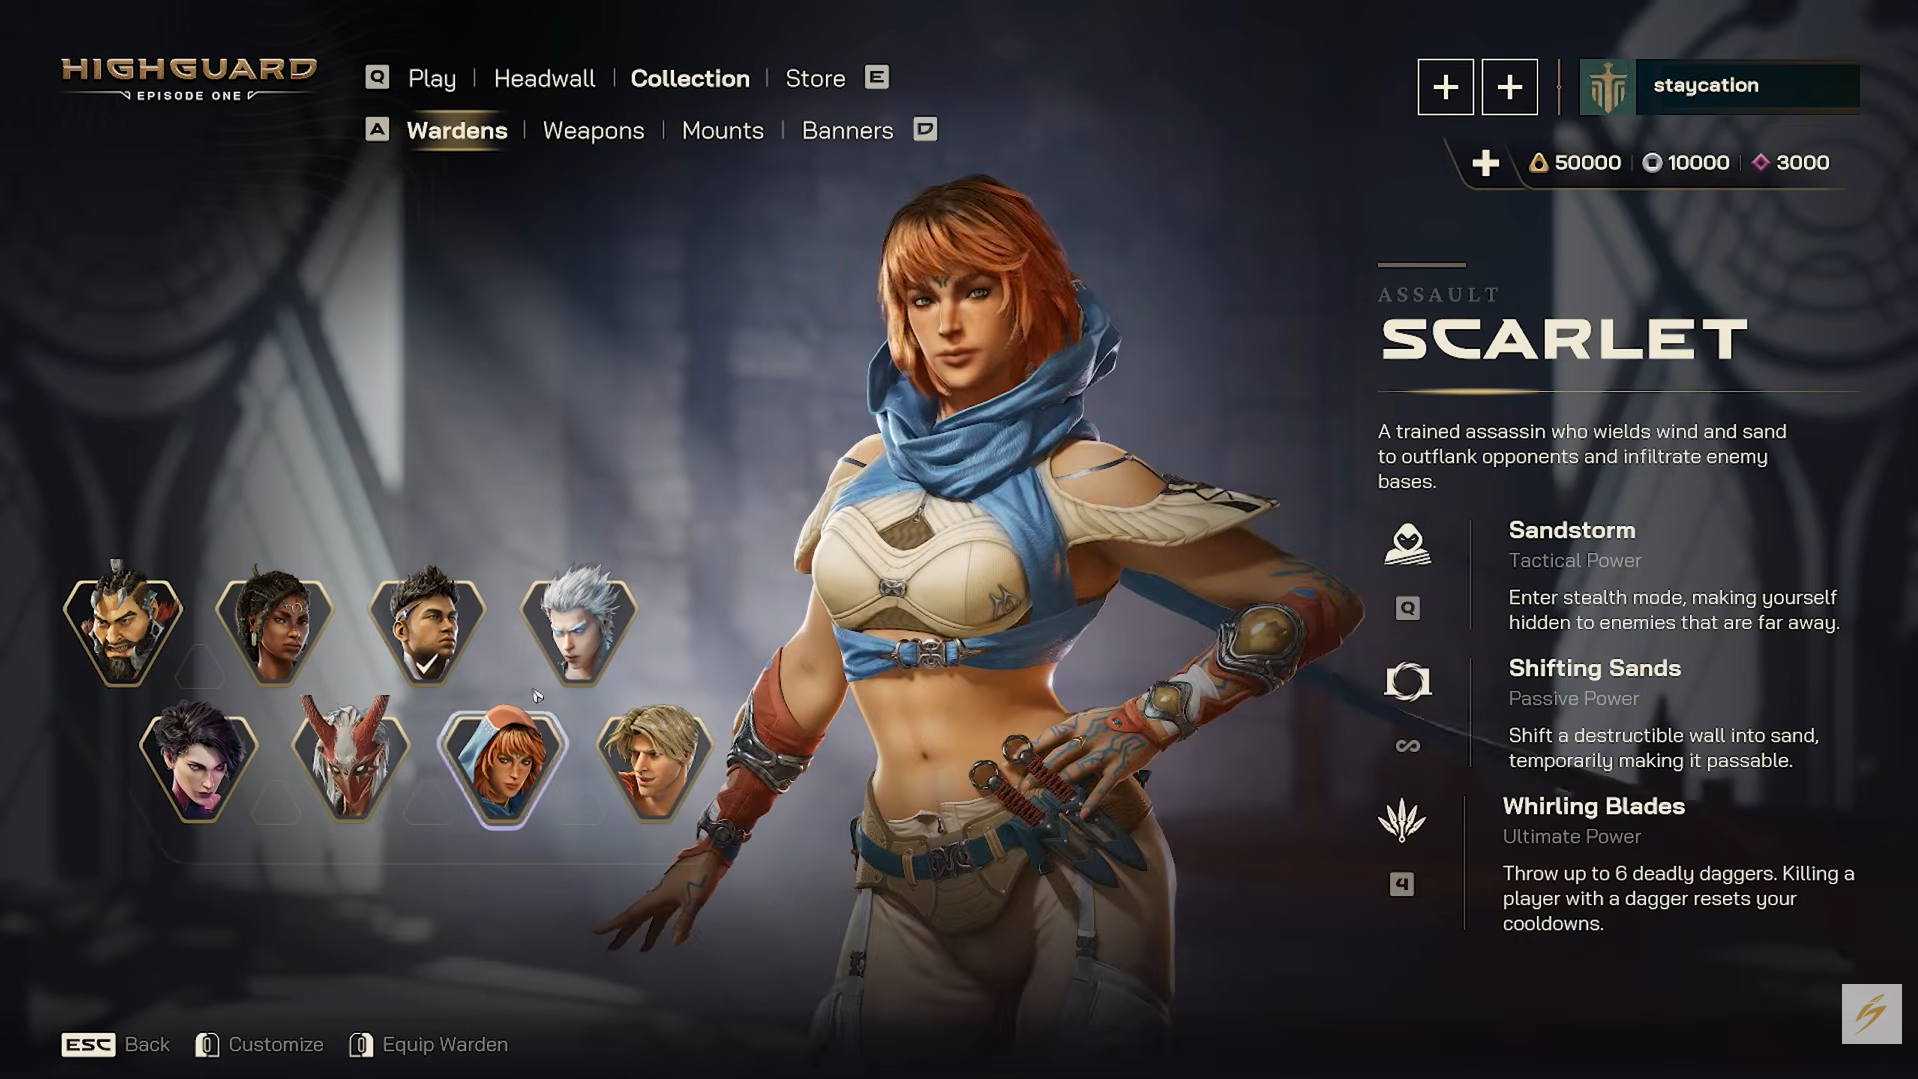
Scarlet abilities and playstyle
Scarlet is an Assault Warden that uses stealth and sand manipulation to bypass defenses and assassinate priority targets.
| Type | Name | Effect |
|---|---|---|
| Tactical | Sandstorm | Enters a stealth state that keeps her hidden from distant enemies. |
| Passive | Shifting Sands | Temporarily turns a destructible wall into sand so players can pass through. |
| Ultimate | Whirling Blades | Throws up to six daggers; killing with a dagger resets her cooldowns. |
How to use Scarlet effectively
- Use Sandstorm to set up crossfires or reach the backline without being tracked by long-range sightlines.
- Convert a key wall with Shifting Sands to create a surprise entry for your team or to disengage quickly.
- During Whirling Blades, prioritize low-health enemies first to chain cooldown resets and keep up the pressure.
Slade abilities and playstyle
Slade is an Assault Warden focused on fire and magma. He excels at zone denial and punishing grouped opponents, with extra power when he strings kills together.
| Type | Name | Effect |
|---|---|---|
| Tactical | Heatwave | Sends a cascading wave of molten fire along the ground. |
| Passive | Firebomb | Creates an explosion that spreads magma over an area. |
| Passive | Hot Streak | Reduces ability cooldowns and boosts firepower while on a kill streak. |
| Ultimate | Firestorm | Calls down a rain of fire on a targeted zone. |
How to use Slade effectively
- Cover narrow corridors and doorways with Heatwave to force enemies into disadvantageous routes.
- Layer Firebomb on objectives or revive locations to punish anyone that commits to standing there.
- Once Hot Streak is active, push aggressively while your damage and cooldowns are amplified.
- Drop Firestorm on key structures or clustered defenders as your team begins a coordinated push.

Redmane abilities and playstyle
Redmane is a Destruction Warden built around brute force. He breaks walls, creates openings, and pressures enemies with close-range power.
| Type | Name | Effect |
|---|---|---|
| Tactical | Pounce | Crashes through breakable walls and, when charged, leaps further with more impact. |
| Passive | Enraged / Speed Boost* | Grants bonus movement and reload speed after each kill. |
| Ultimate | Beast’s Roar | Emits a powerful roar that destroys walls and other breakable objects in front of him while damaging enemies. |
*Both names are used for the same effect.
How to use Redmane effectively
- Chain Pounce through multiple weak walls to forge new attack paths into enemy bases.
- Use the movement from his passive to chase down fleeing enemies or quickly reposition after a kill.
- Pop Beast’s Roar when you need to collapse an entrenched position, breaking cover and softening defenders simultaneously.
Kai abilities and playstyle
Kai is a Defensive Warden who uses ice to shape the battlefield. He fortifies positions and can transform into a powerful ice entity.
| Type | Name | Effect |
|---|---|---|
| Tactical | Ice Wall | Creates an ice wall to block sightlines, projectiles, and movement. |
| Passive | Frozen Repair | Restores broken walls in your base with ice. |
| Ultimate | Frost Giant | Transforms Kai into his inner ice demon form, Rime, gaining a massive presence on the battlefield. |

How to use Kai effectively
- Place Ice Wall perpendicular to enemy fire to cut off angles instead of simply mirroring existing walls.
- Continuously use Frozen Repair value by patching critical breaches in your base between engagements.
- Reserve Frost Giant for moments when your team commits to holding or contesting an important objective.
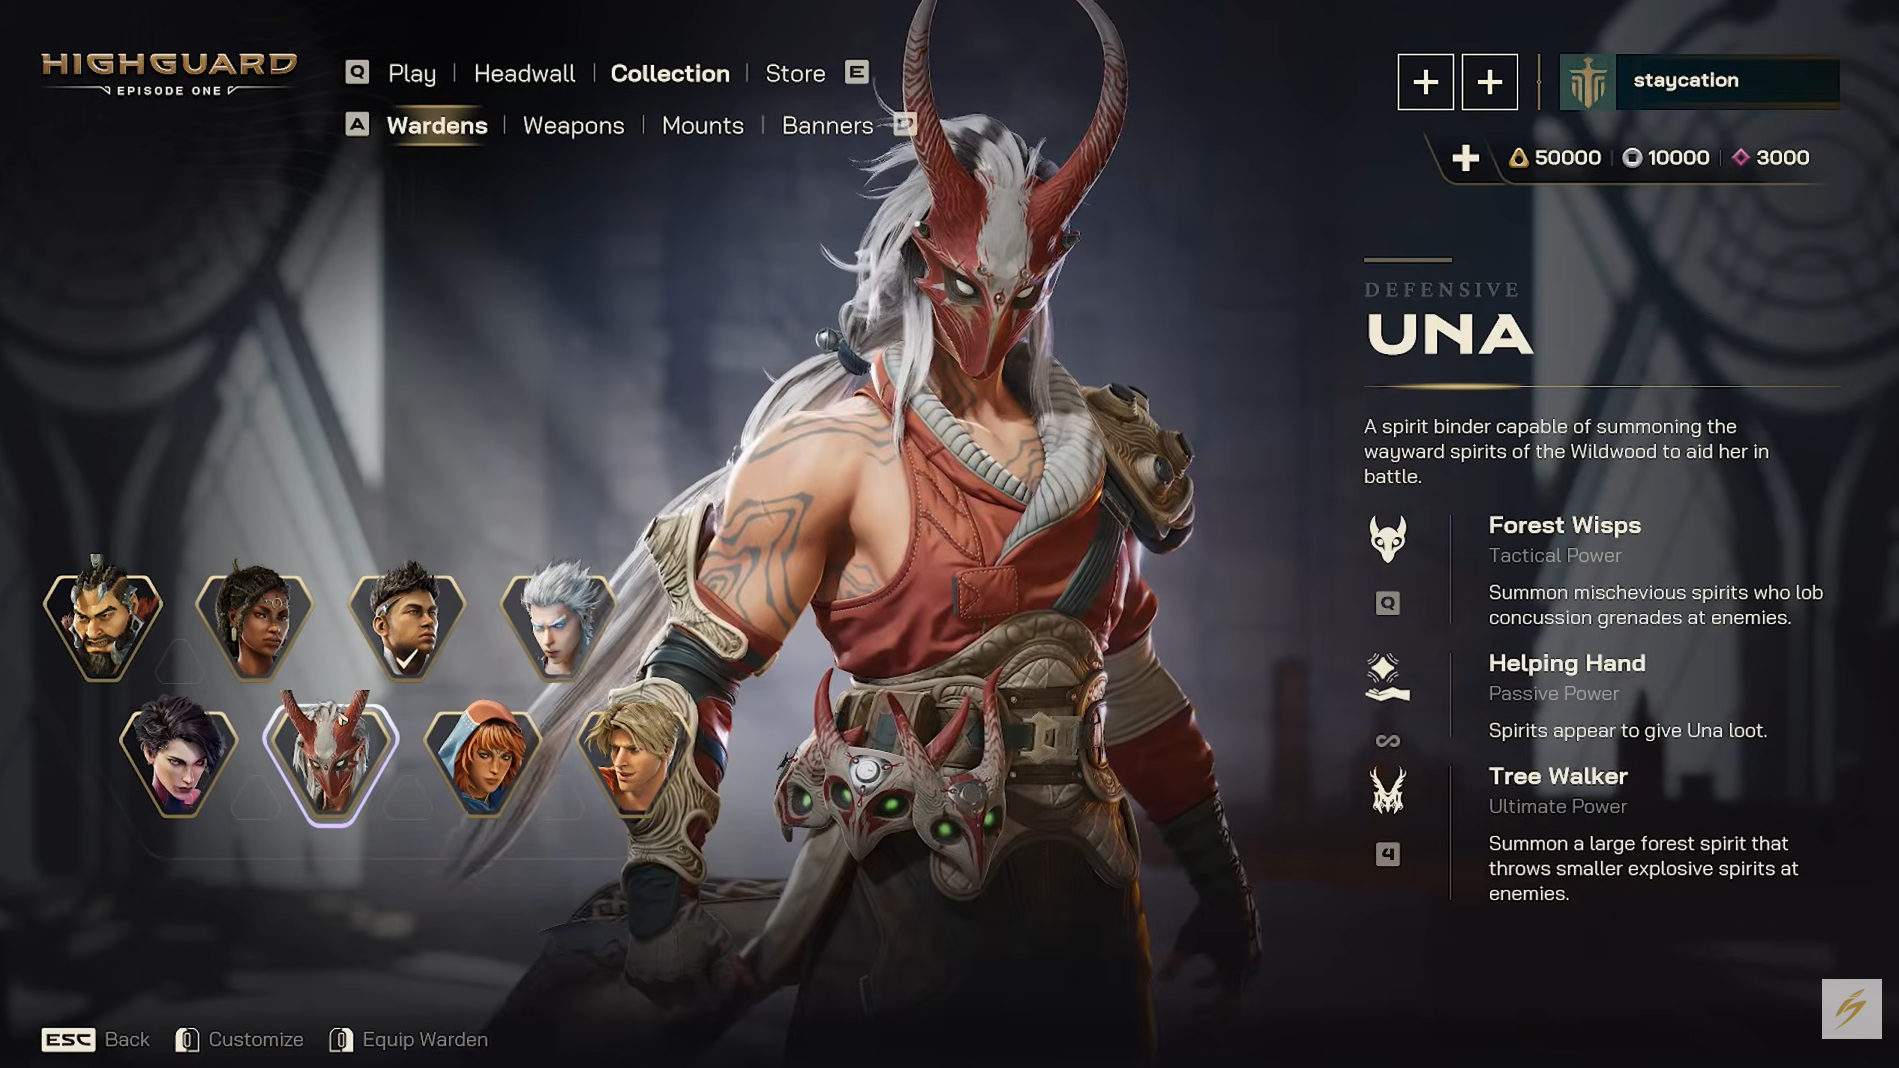
Una abilities and playstyle
Una is a Defensive Warden and spirit binder who mixes disruption, chip damage, and loot generation.
| Type | Name | Effect |
|---|---|---|
| Tactical | Forest Wisps | Calls mischievous spirits that toss concussion grenades at enemies. |
| Passive | Helping Hand | Summoned spirits periodically appear to hand Una loot. |
| Ultimate | Tree Walker | Summons a large forest spirit that hurls smaller explosive spirits at enemies. |
How to use Una effectively
- Throw Forest Wisps into enemy holds to knock opponents out of cover and interrupt pushes.
- Plan around Helping Hand by grabbing loot during low-pressure moments, then using it to strengthen your next offensive.
- Cast Tree Walker where enemies are forced to stand—on choke points, capture zones, or narrow ramps—to maximize its explosives.
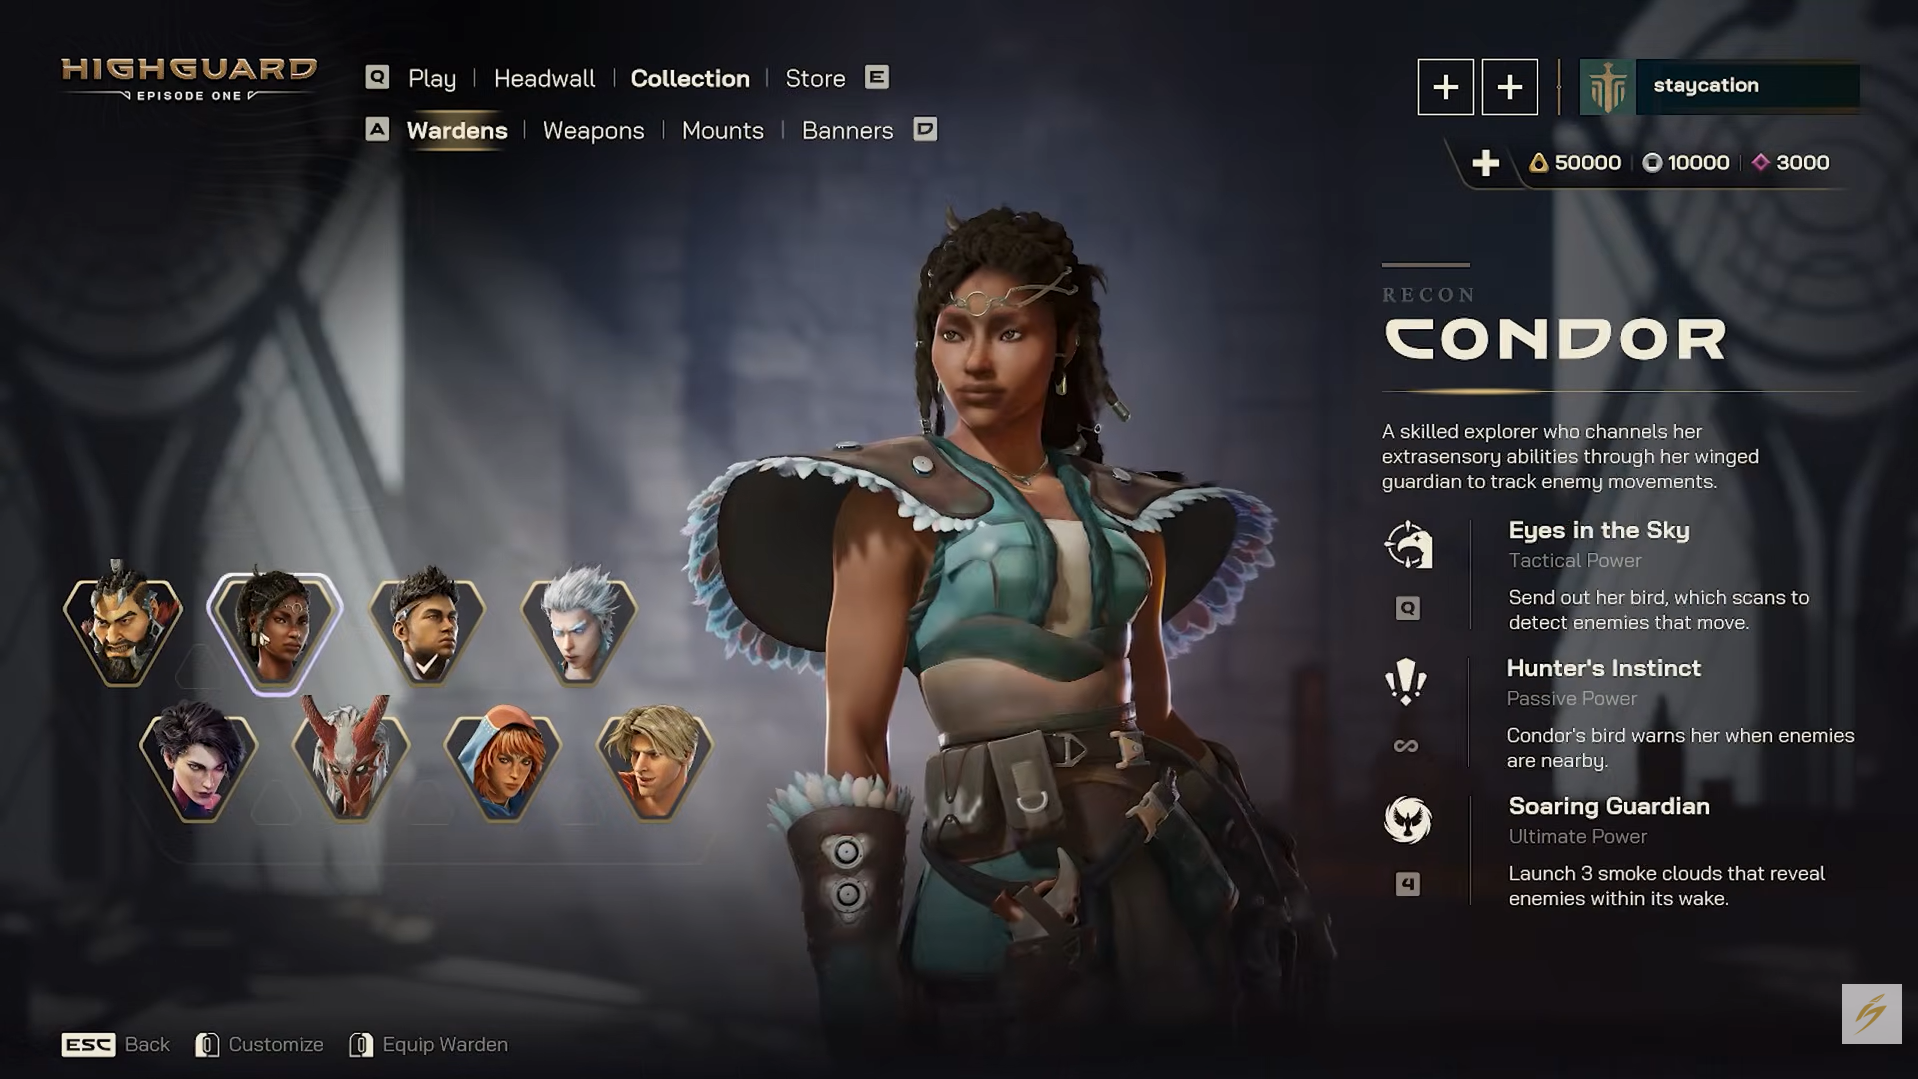
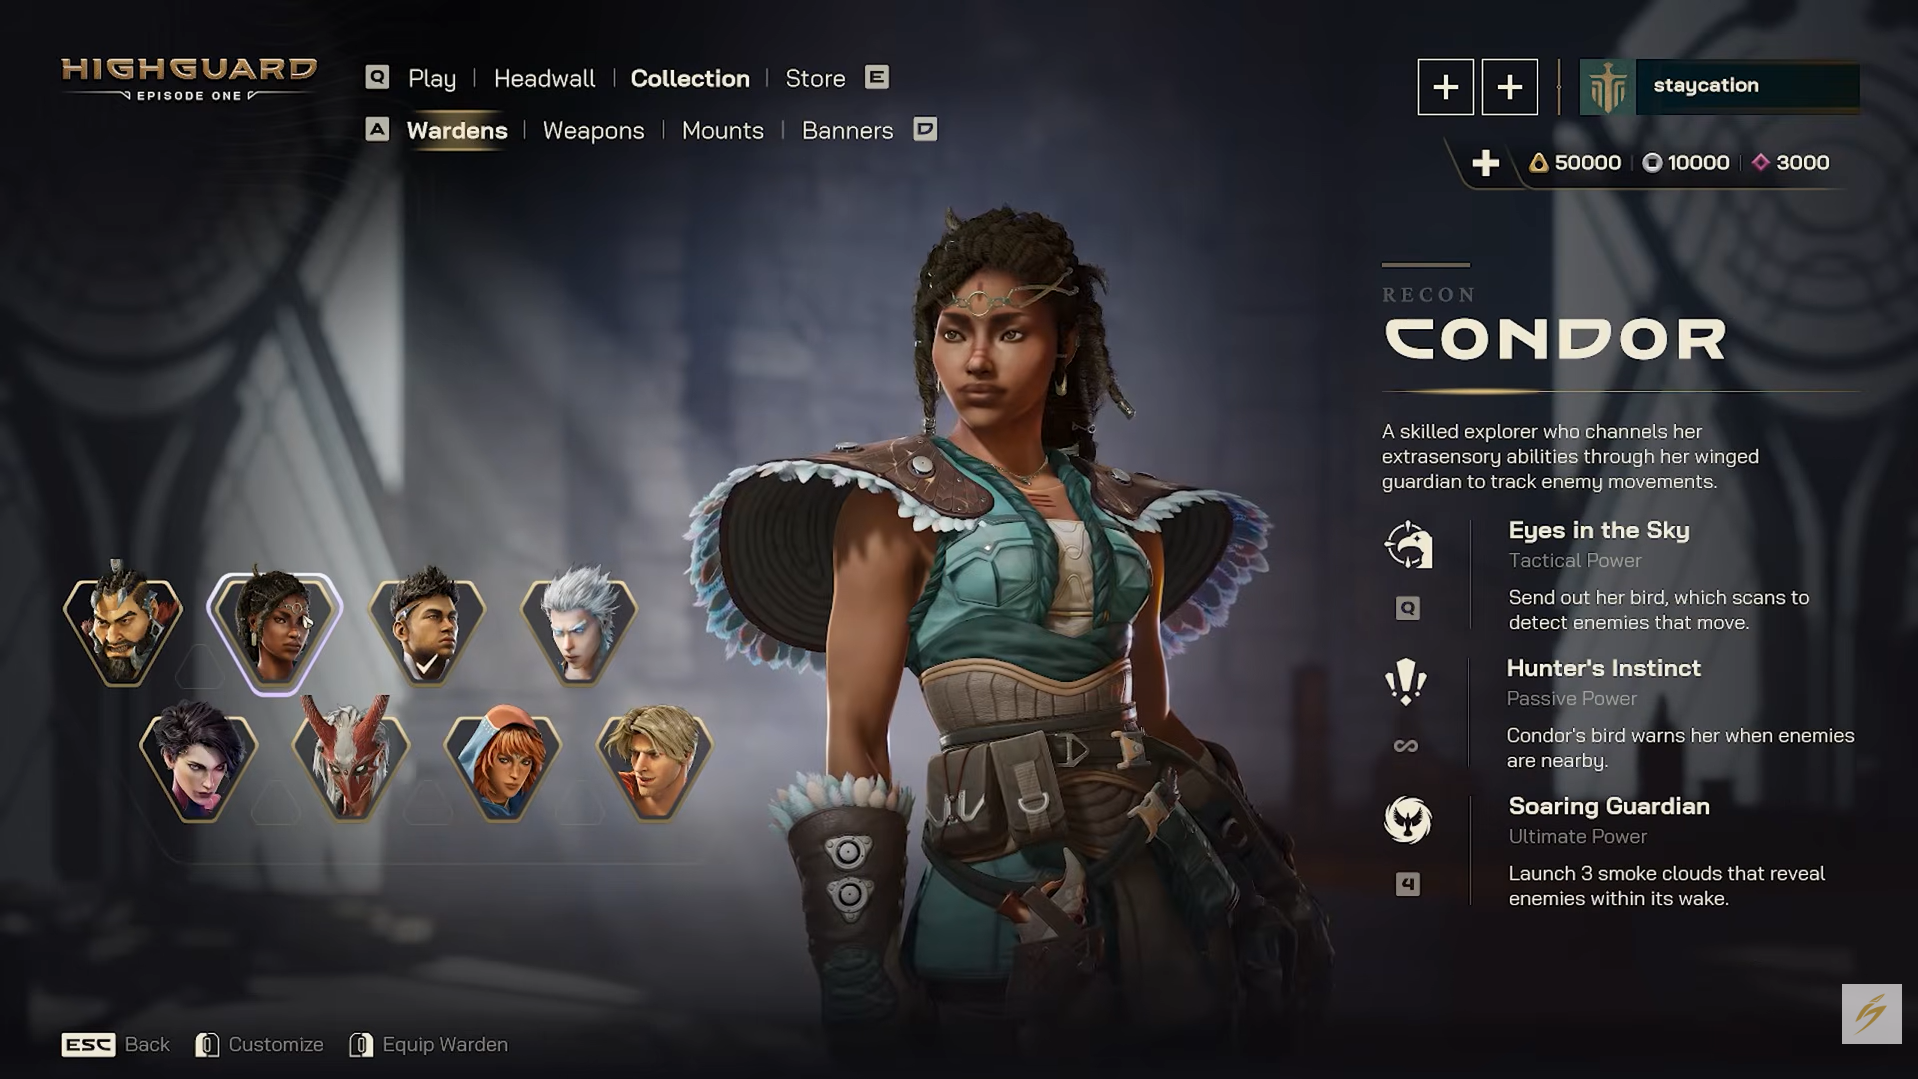
Condor abilities and playstyle
Condor is the sole Recon Warden at launch, focused almost entirely on vision and early warning rather than raw damage.
| Type | Name | Effect |
|---|---|---|
| Tactical | Eyes in the Sky | Sends her bird out to scan and detect moving enemies. |
| Passive | Hunter’s Instinct | The bird alerts Condor when enemies are nearby. |
| Ultimate | Soaring Guardian | Launches three smoke clouds that reveal enemies caught within their paths. |
How to use Condor effectively
- Cycle Eyes in the Sky before your team commits to a lane so you know which route is safest or weakest.
- Pay close attention to Hunter’s Instinct cues, especially when rotating alone or defending flanks.
- Use Soaring Guardian to both obscure sightlines and reveal enemy silhouettes inside the smoke as your team pushes.
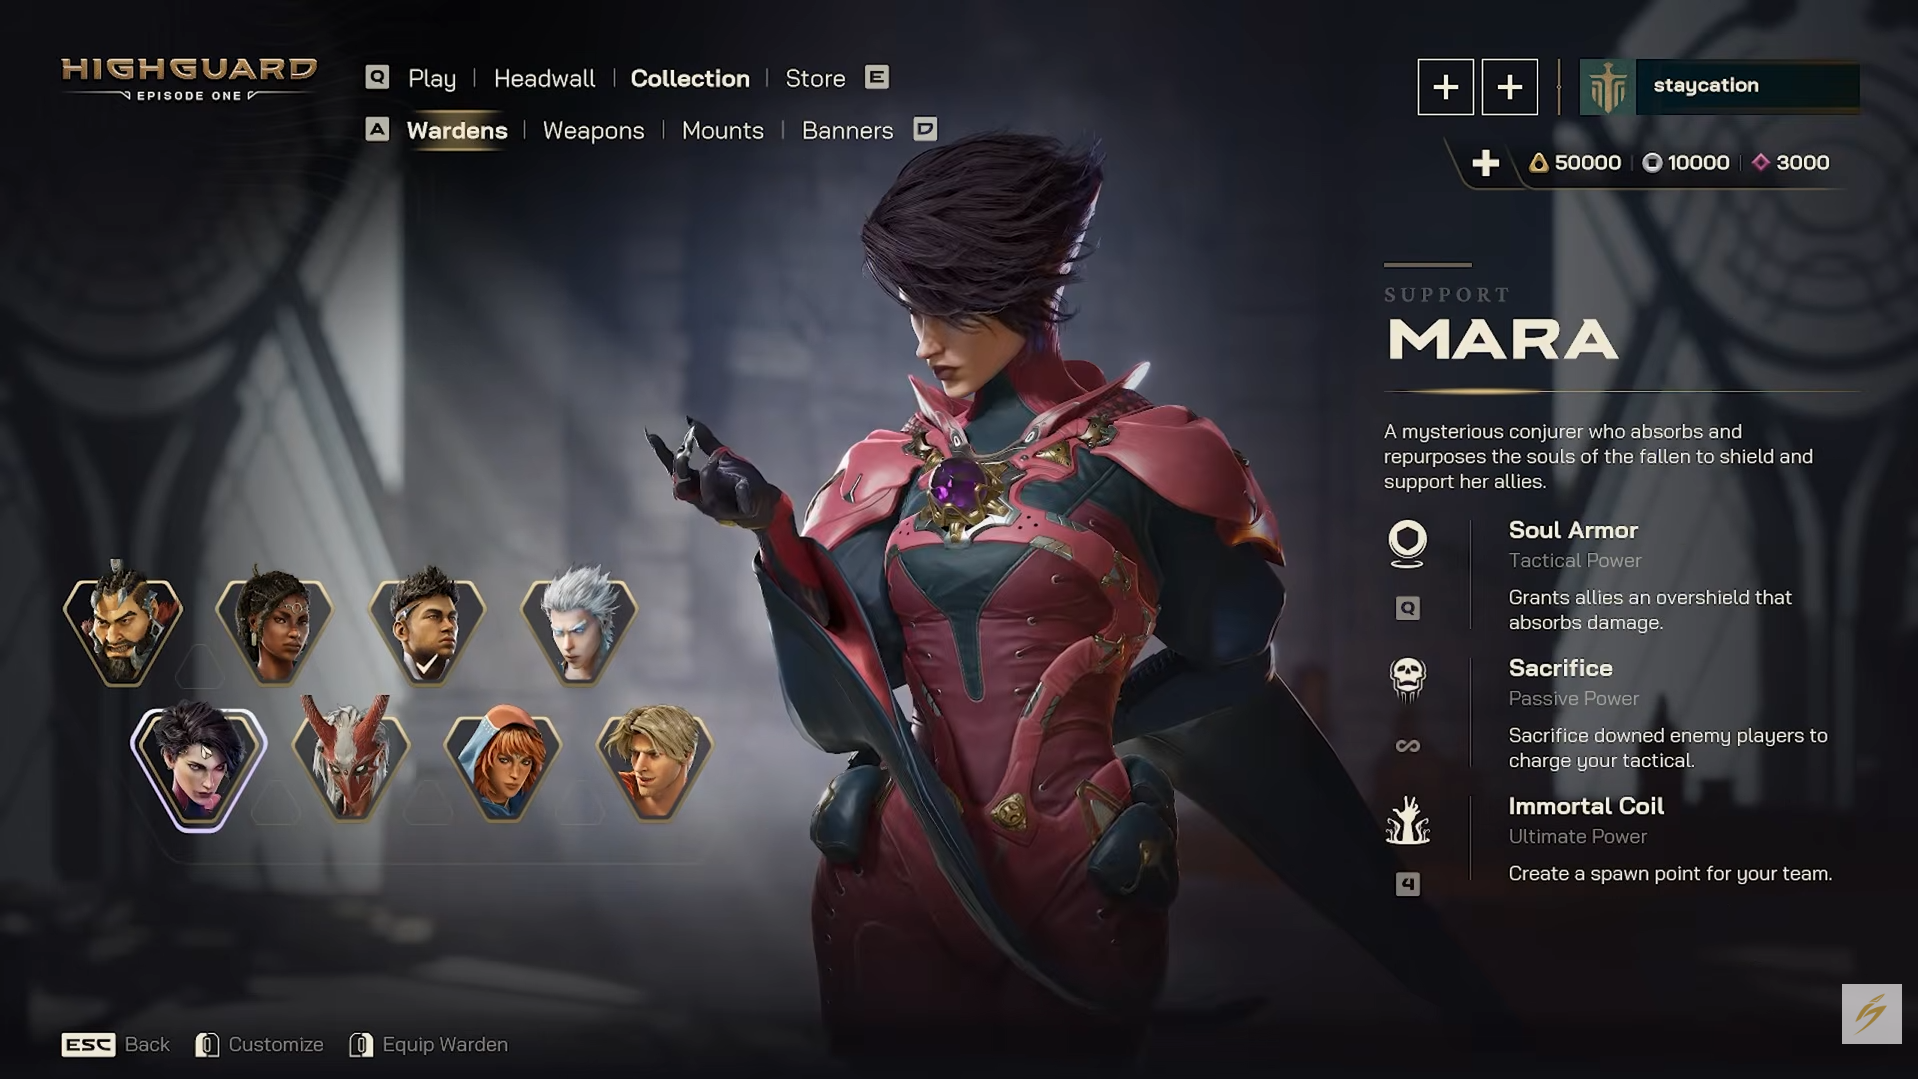
Mara abilities and playstyle
Mara is the only Support Warden at launch. Her kit revolves around shields, ability recharge, and creating forward respawn locations.
| Type | Name | Effect |
|---|---|---|
| Tactical | Soul Armor | Grants allies an overshield that soaks incoming damage. |
| Passive | Sacrifice | Consumes downed enemy players to recharge Mara’s tactical ability. |
| Ultimate | Immortal Core / Immortal Coil* | Creates a spawn point for the team. |
*Different sources use slightly different naming, but the function is the same.
How to use Mara effectively
- Cast Soul Armor right before your allies peek or dive, not after they are already low.
- Look for safe opportunities to trigger Sacrifice on downed enemies so your shields stay available for the next fight.
- Place Immortal Core in a protected but forward position to shorten respawn runs without making it trivial for the enemy to destroy.
How many Wardens are in Highguard and who to start with
Highguard currently has eight Wardens across five classes: three Assault, two Defensive, one Destruction, one Recon, and one Support.
For new players, Atticus, Scarlet, and Redmane are strong starting choices:
- Atticus – Familiar ranged gameplay with a very impactful ultimate for both raids and skirmishes.
- Scarlet – Rewarding flanker with clear outplay potential through stealth and wall manipulation.
- Redmane – Simple but powerful wall-breaking and close-range dominance that directly impacts objectives.
Pair one of these with a Defensive Warden (Kai or Una) and Mara as Support to form a well-rounded 3v3 squad that can attack, defend, and adapt to most map layouts.