
Highguard will not start on Windows PCs unless Secure Boot is enabled and a TPM 2.0 security chip is available. That combination is used by Easy Anti-Cheat to harden the game against cheats at a low level in the operating system.
On a modern Windows 10 or Windows 11 gaming rig this is usually just a configuration problem, not a hardware problem. The two key questions are:
- Does your motherboard and CPU platform actually support UEFI Secure Boot and TPM 2.0 (or firmware TPM)?
- If they do, are those features currently switched off in firmware and in Windows?
The steps below walk through checking support, then turning both features on with as little risk as possible.
Check whether TPM 2.0 is present in Windows
Before touching your BIOS, confirm what Windows can already see.
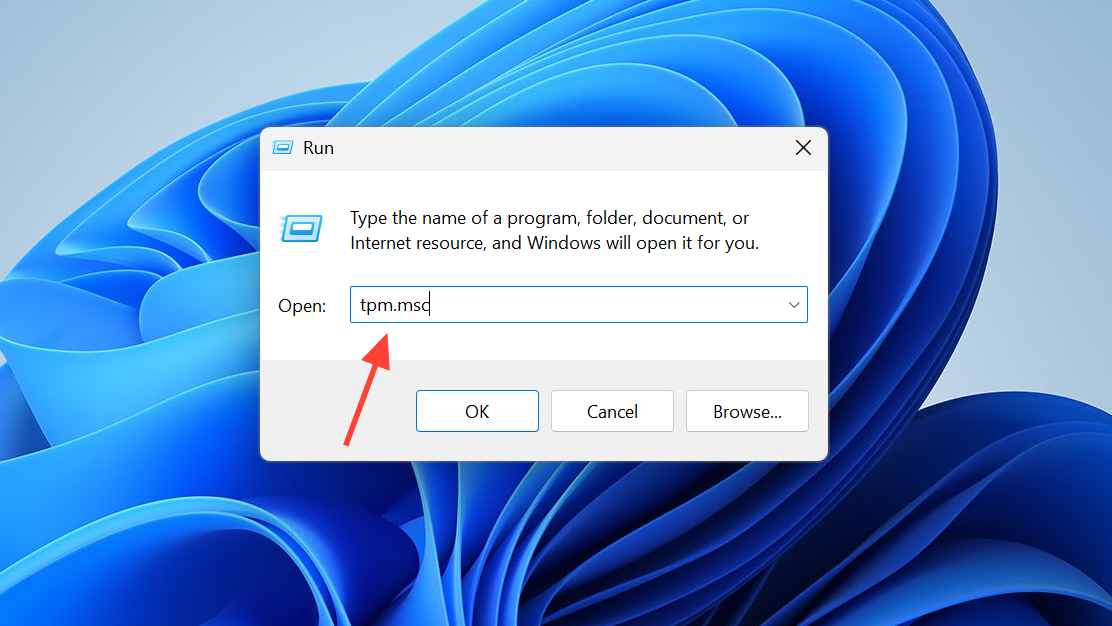
Step 1: Press Windows + R, type tpm.msc and press Enter. This opens the Trusted Platform Module management console.
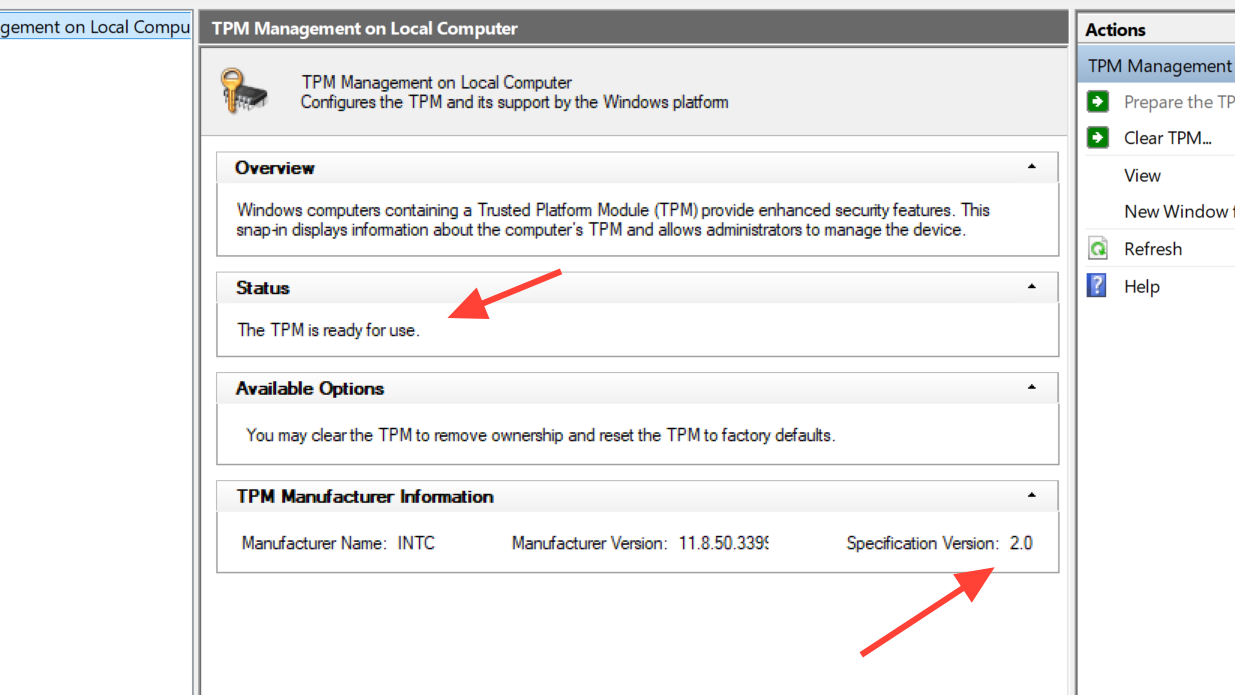
Step 2: Look at the Status field near the top. If it says the TPM is ready for use, Windows has detected a TPM.
Step 3: In the lower pane under “TPM Manufacturer Information”, check “Specification Version”.
- If it shows 2.0, your TPM requirement for Highguard is already satisfied.
- If it shows 1.2 or anything lower than 2.0, your hardware or firmware is too old for native TPM 2.0.
- If you see a message such as “Compatible TPM cannot be found”, TPM is either disabled in firmware or not present at all.
On many gaming boards, firmware TPM (Intel PTT or AMD fTPM) ships turned off and only appears as “missing” until you enable it.
Check TPM 2.0 support in Windows Security
Windows 10 and 11 also expose TPM details inside the Windows Security app.
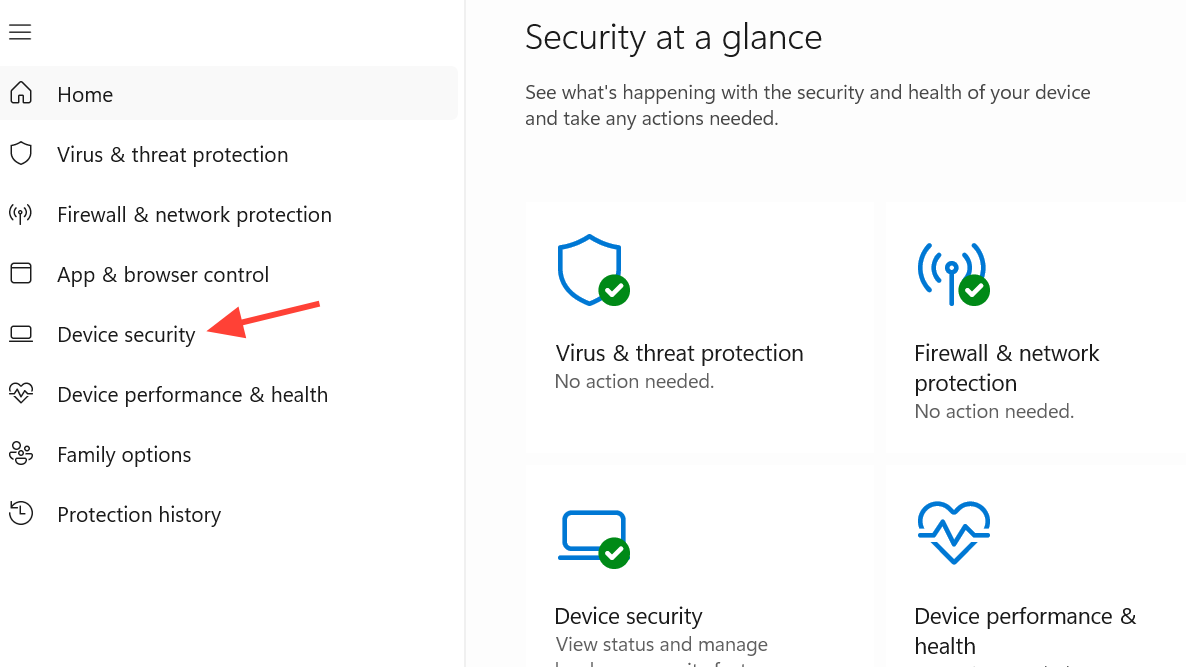
Step 1: Open Settings > Update & Security > Windows Security, then click “Device security”.
Step 2: If you see a “Security processor” card, select “Security processor details”. Confirm that the specification version is 2.0.
Step 3: If you do not see “Security processor” at all, Windows is not currently using a TPM. That usually means it is disabled in the firmware.
At this point, you know whether you are just toggling a setting on, or dealing with older hardware that may never meet Highguard’s requirement.
Enable firmware TPM (Intel PTT / AMD fTPM) in BIOS
If Windows cannot see any TPM, or only shows 1.2, the next step is your motherboard’s UEFI firmware.
Step 1: Restart your PC and repeatedly tap your manufacturer’s BIOS key as soon as it begins to boot. Common keys are Delete, F2, F10, or Esc; prebuilt gaming desktops often show a short “Press F10 for Setup” style hint on screen.
Step 2: In the BIOS interface, look for a tab named “Security”, “Advanced”, or “Trusted Computing”. Terminology differs by vendor, but you are looking for TPM-related entries.
Step 3: Find the setting that controls the TPM:
- On Intel platforms it is often called Intel Platform Trust Technology (PTT) or simply “Intel PTT”.
- On AMD platforms it is often called AMD fTPM, “AMD PSP fTPM”, or “Firmware TPM”.
- Some OEMs label it more generically as “Security Device”, “Security Device Support”, “TPM Device”, or “TPM State”.
Step 4: Set this option to Enabled. Do not change any other security options yet.
Step 5: Save changes (usually F10) and reboot into Windows.
Step 6: Run tpm.msc again and confirm that the status is ready and the specification version is now 2.0.
On many boards released in the last five years, this is all that is required to expose a TPM 2.0 to Windows. If you still only see 1.2 after enabling firmware TPM, some systems allow upgrading the TPM firmware through a BIOS update.
Update BIOS to unlock TPM 2.0 (OEM systems)
Some prebuilt desktops and laptops shipped with TPM 1.2 enabled initially and later gained TPM 2.0 through BIOS updates. This is common on OEM gaming towers such as HP Omen, Dell, Lenovo, and others.
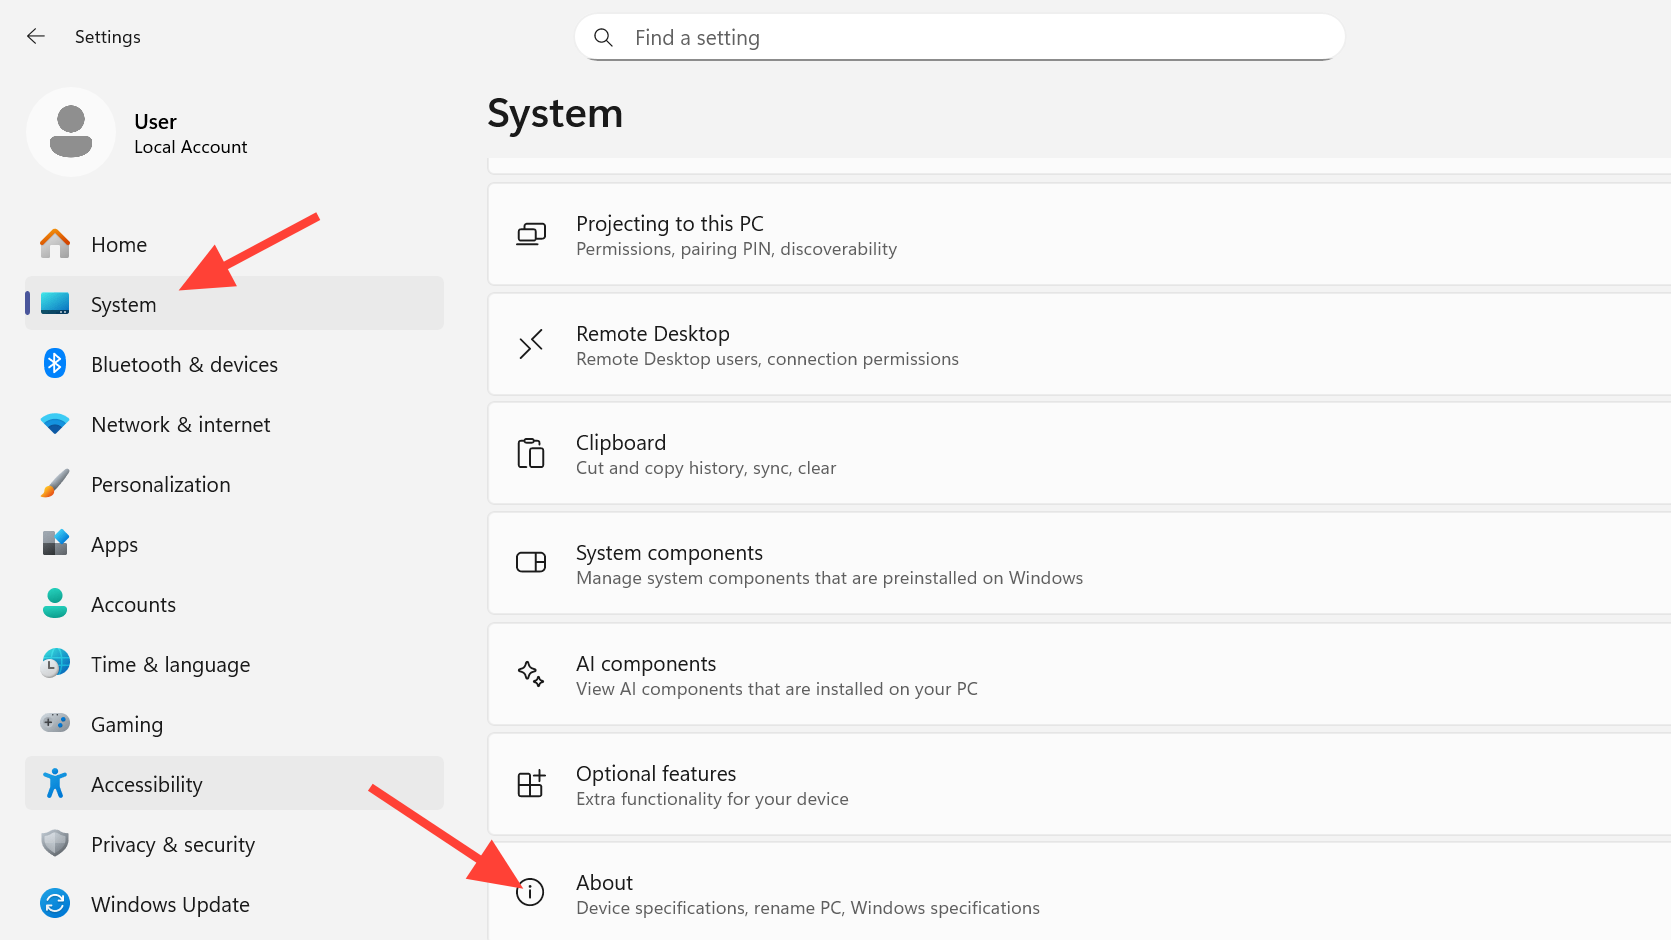
Step 1: Identify your exact system model from the OEM’s sticker or from Settings > System > About.
Step 2: Go to your manufacturer’s support page for that model and download the latest BIOS update package, for example, from HP’s driver pages for Omen desktops at support.hp.com.
Step 3: Close all running applications, plug in power on laptops, and run the BIOS update tool. Follow the on‑screen prompts carefully and do not interrupt the process.
Step 4: After the system reboots, re-enter BIOS, make sure firmware TPM is enabled as described earlier, then check tpm.msc again in Windows.
Where the platform supports it, this firmware path can upgrade TPM 1.2 to 2.0 without any hardware changes. If your board remains locked to 1.2, there is no supported way to reach 2.0 on that platform.
Turn on UEFI and Secure Boot for Highguard
With TPM 2.0 in place, Highguard also needs Secure Boot enabled under a UEFI boot mode. Many older or self-built machines still run in “Legacy” or “CSM” mode, which blocks Secure Boot entirely.
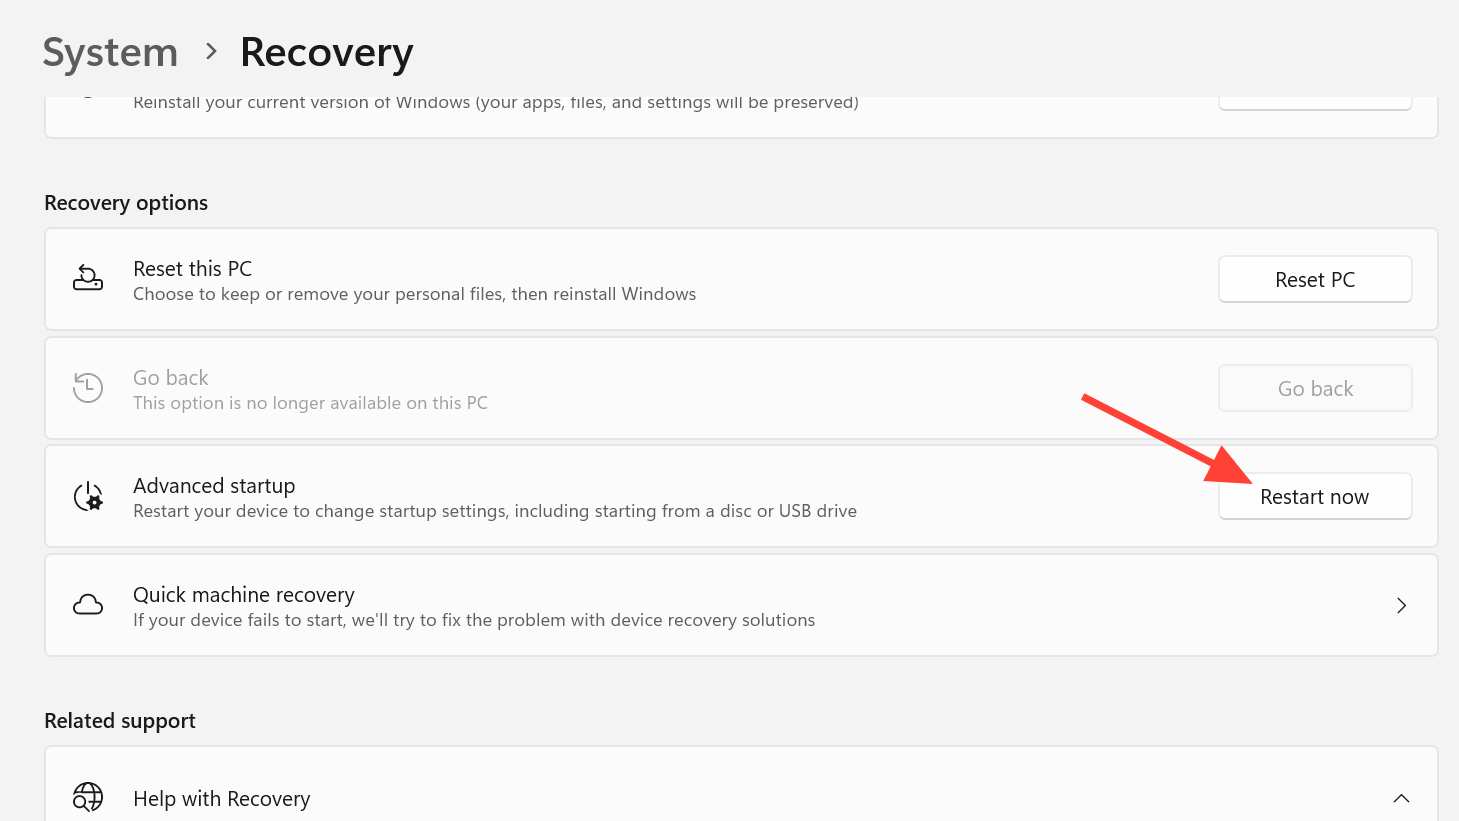
Step 1: In Windows, open Settings > Update & Security > Recovery and under “Advanced startup” click “Restart now”. This reboots into the Windows recovery menu.
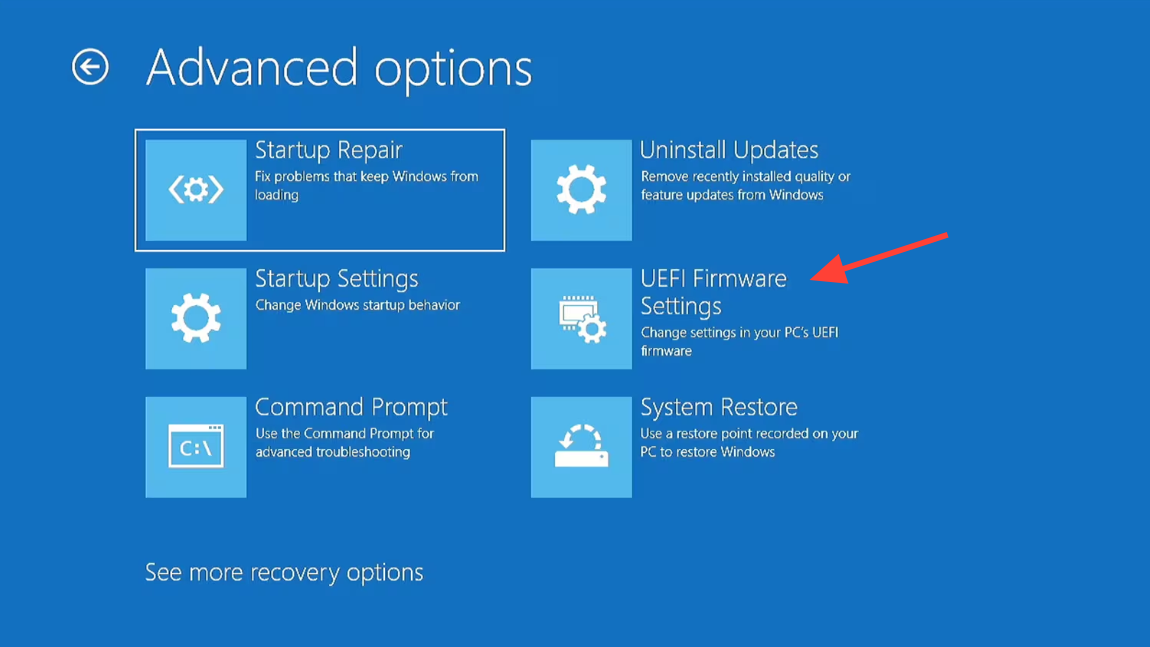
Step 2: Choose “Troubleshoot”, then “Advanced options”, then “UEFI Firmware Settings”, and click “Restart”. Your PC will boot straight into the BIOS setup.
Step 3: Locate the boot mode setting. It may be labeled “Boot Mode”, “CSM”, “Legacy Support”, or similar. Set the system to use UEFI only, or at minimum ensure UEFI is the first option.
Step 4: After switching to UEFI, find the Secure Boot entry, usually under a “Boot”, “Security”, or “Authentication” tab. Enable Secure Boot.
Step 5: Save changes and allow Windows to boot.
On a clean Windows 10 or 11 install created in UEFI mode, Secure Boot normally comes up cleanly. Systems migrated from old legacy installs or heavily modified bootloaders can run into problems when Secure Boot is enabled, which is why backups matter.
Double‑check Secure Boot status inside Windows
Once you have changed firmware settings, confirm the OS agrees.
Step 1: Open the Start menu, type System Information and press Enter.

Step 2: In the System Summary, find “BIOS Mode” and “Secure Boot State”.
- If BIOS Mode shows UEFI and Secure Boot State shows On, the requirement for Highguard is met.
- If BIOS Mode is Legacy, Secure Boot cannot be enabled on that current Windows installation. The disk would need to be converted to UEFI‑bootable and Windows reinstalled or repaired in UEFI mode.
- If BIOS Mode is UEFI but Secure Boot is Off, go back into BIOS and re‑enable it.
Windows 11 setup only installs on Secure Boot–capable systems, so if you are already on Windows 11 and did not bypass requirements, your hardware platform should support this configuration in principle.
What this means for Linux and Steam Deck players
Highguard’s Secure Boot and Easy Anti-Cheat setup targets Windows. While Linux distributions and SteamOS have their own Secure Boot implementations, the game’s anti‑cheat stack expects a Windows kernel and Windows boot chain.
That effectively excludes native Linux and Steam Deck players for now, unless they dual‑boot or stream the game from a Windows machine. There are technical ways to combine EAC and Secure Boot with Linux when developers explicitly support it, but Highguard is not configured that way.
When your hardware simply cannot meet the requirement
Some older boards, especially high‑end gaming models from the pre‑Windows 11 era, expose only TPM 1.2 and never received firmware enabling 2.0. Others ship with a physical TPM header that needs a separate module the manufacturer no longer sells, or support only legacy BIOS boot modes.
If the following are true even after a BIOS update and careful configuration, the platform cannot satisfy Highguard’s startup checks:
tpm.mscshows only TPM 1.2 with no firmware option to upgrade to 2.0.- BIOS offers no Intel PTT or AMD fTPM setting, only a reference to a discrete TPM header.
- BIOS cannot switch to pure UEFI mode without breaking your Windows boot, and there is no appetite to reinstall.
In that scenario, there is no supported way to run Highguard on that machine. Replacing the motherboard or moving to a newer platform is the only route to full compliance, which may not be worth it for a single free‑to‑play shooter.
Minimizing risk when enabling Secure Boot and TPM
The friction around Highguard’s requirements is not just inconvenience; kernel‑level anti‑cheat and boot security also make some players nervous about system stability and privacy. A few simple precautions help keep the process under control.
- Back up important data before changing boot mode or Secure Boot, especially if your Windows install is several years old or migrated between drives.
- Change one thing at a time. Enable firmware TPM first and confirm Windows sees TPM 2.0. Only then turn on UEFI and Secure Boot.
- Keep a note of any settings you change so you can manually revert them if something misbehaves.
- Do not clear the TPM unless you understand the impact on BitLocker or other disk encryption. On many gaming PCs, BitLocker is off, but on some OEM laptops, it is on by default.
If enabling Secure Boot leads to black screens or boot loops, re‑enter BIOS and disable Secure Boot or return boot mode to its previous state. As long as the firmware still opens its setup menu, you can undo the change.
Once Windows reports TPM 2.0 and Secure Boot as active, and you are on a supported version of Windows, Highguard’s launcher should stop complaining and move on to installing Easy Anti-Cheat. If the game continues to refuse to start after all of the checks above, the remaining variables are the Easy Anti-Cheat installation itself and any additional integrity checks the game performs, which sit beyond firmware configuration.