
Windows 11 treats touch screens as just another input device, which is great until you keep closing apps or clicking links by accident. There’s no simple toggle in the main Settings app to switch touch on and off, but you can still control it reliably once you know where to look.
This guide focuses on three things: the basic on/off switch in Device Manager, scriptable PowerShell options, and what to consider if your touch screen keeps turning itself back on after updates or reboots.
How touch screen control works in Windows 11
On a typical Windows 11 system, the touch panel shows up as one or more “HID-compliant touch screen” entries under Human Interface Devices. Disabling those devices immediately stops touch input at the OS level. There’s no separate global “touch” setting; if the driver is enabled, touch works, and if it’s disabled, it doesn’t.
That’s why all reliable methods revolve around enabling or disabling that HID device, either with a graphical tool (Device Manager) or with PowerShell.
| Method | Where you use it | Best for | Needs admin rights |
|---|---|---|---|
| Device Manager | Desktop GUI | One-off changes on a single PC | Yes |
| PowerShell (single device) | Elevated PowerShell window | Repeatable toggle on one device | Yes |
| PowerShell (multiple devices) | Elevated PowerShell, scripts, remote tools | Mixed fleets and automation | Yes |
Disable touch screen on Windows 11 using Device Manager
This is the fastest option for most people and works on both Windows 10 and Windows 11.
| Step | Action | What you should see |
|---|---|---|
| 1 | Right-click the Start button or press Windows + X. |
A menu opens near the Start icon. |
| 2 | Select Device Manager. | The Device Manager window appears. |
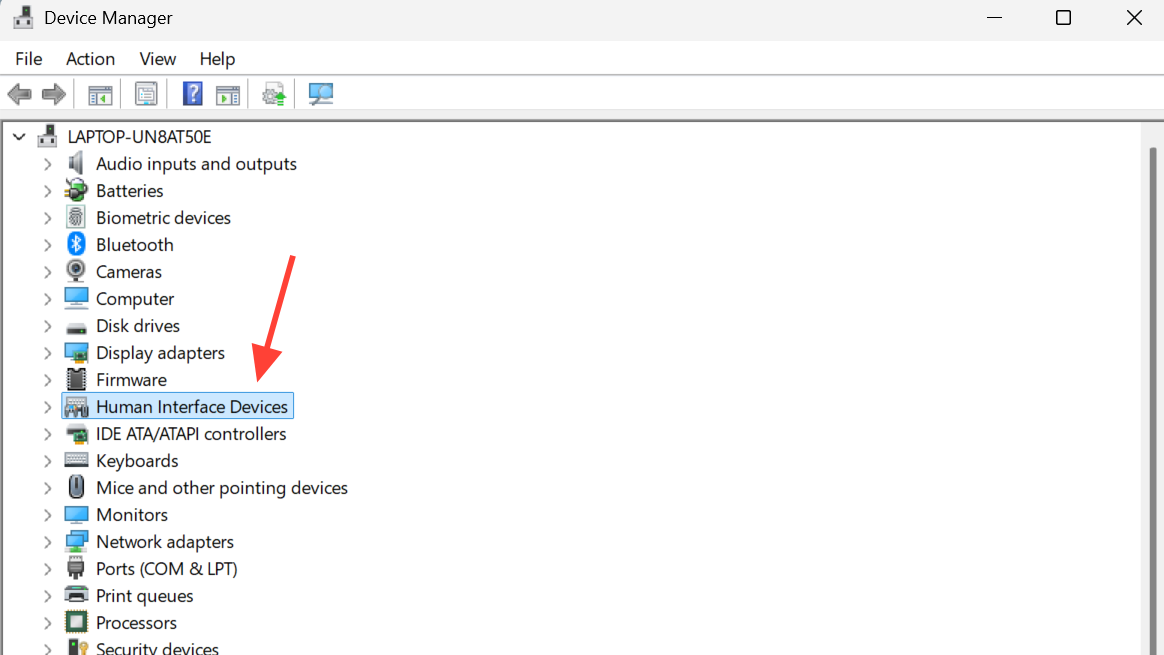
| 3 | In Device Manager, expand Human Interface Devices. | A list of HID-related devices is visible. |
| 4 | Right-click HID-compliant touch screen. | A context menu appears for that device. |
| 5 | Choose Disable device, then confirm when prompted. | Touch stops working right away. |
If you later want touch input back, repeat the same steps but choose Enable device in step 5.
On some systems, you’ll see more than one “HID-compliant touch screen” entry. In that case, you may need to disable each of them for touch to fully stop.
Microsoft documents this exact flow in its support page for enabling and disabling a touchscreen in Windows at support.microsoft.com.
Disable touch screen using PowerShell (single device)
If you prefer a command you can reuse, save, or script, PowerShell can toggle the same HID device directly. This is especially useful for IT admins or power users who want a repeatable action.
Windows 11 ships with a modern PowerShell version that supports the device cmdlets used here.
| Step | Command or action | Purpose |
|---|---|---|
| 1 | Press Windows + R, type powershell, then press Ctrl + Shift + Enter. |
Opens PowerShell with administrator rights. |
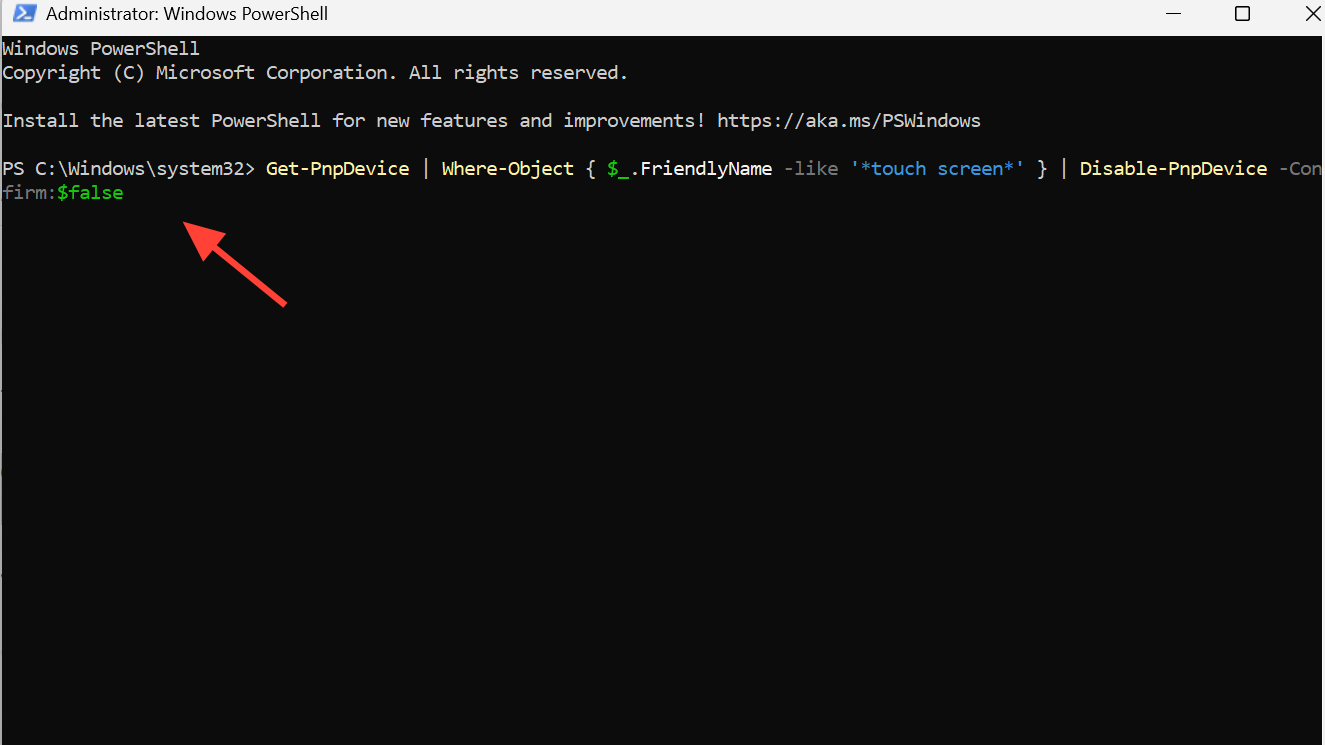
| 2 | In the PowerShell window, run:Get-PnpDevice -FriendlyName "HID-compliant touch screen" |
Lists the matching touch device so you can confirm it’s present. |
| 3 | To disable touch, run:Get-PnpDevice -FriendlyName "HID-compliant touch screen" | Disable-PnpDevice -Confirm:$false |
Turns off the identified touch device immediately. |
| 4 | To re-enable later, use:Get-PnpDevice -FriendlyName "HID-compliant touch screen" | Enable-PnpDevice -Confirm:$false |
Restores touch input when needed. |
These commands look for a device whose friendly name exactly matches HID-compliant touch screen. If your device uses a slightly different name, you can adjust the string to match what you see in Device Manager.
Disable touch screen when there are multiple HID devices
On some laptops and 2-in-1s, the touch stack can include more than one HID touch device, or its name might not be an exact match. In those cases, it’s safer to search for any device whose name includes “touch screen” and then decide which ones to disable.
Again, run PowerShell as an administrator first.
| Goal | PowerShell command | What it does |
|---|---|---|
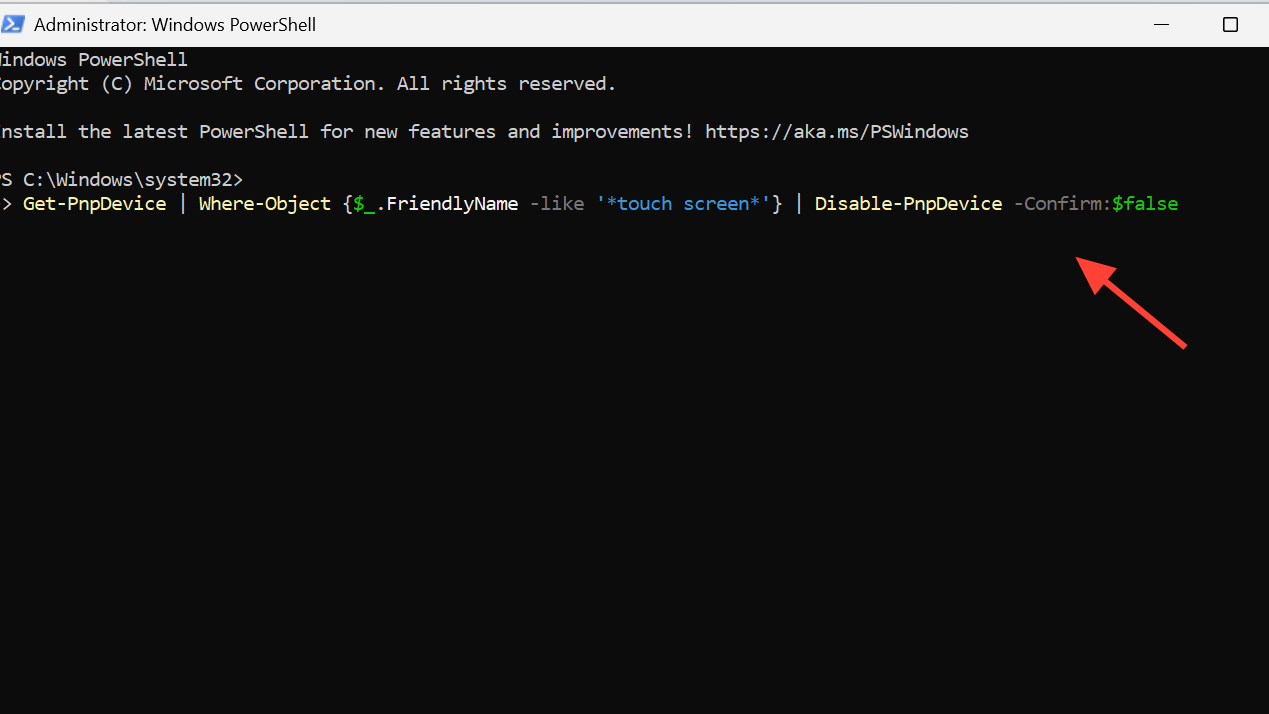
| List all touch-related devices by name | Get-PnpDevice | Where-Object { $_.FriendlyName -like "*touch screen*" } |
Shows every plug-and-play device that has “touch screen” in its friendly name. |
| Disable all listed touch devices | Get-PnpDevice | Where-Object { $_.FriendlyName -like "*touch screen*" } | Disable-PnpDevice -Confirm:$false |
Disables each of those devices in one shot. |
| Re-enable all listed touch devices | Get-PnpDevice | Where-Object { $_.FriendlyName -like "*touch screen*" } | Enable-PnpDevice -Confirm:$false |
Turns them all back on. |
It’s worth running the list command first and reading the output before you start disabling anything, especially in a production or shared environment. That helps you avoid accidentally toggling unrelated hardware that happens to use a similar name.
Why the touch screen might turn itself back on
Some users run into an annoying loop: they disable the touch device in Device Manager, and then the touch magically starts working again after a reboot or a driver update. A few things can trigger that:
- Windows Update or OEM tools reinstalling or updating the touch driver.
- Hardware configuration changes, such as docking, undocking, or firmware updates.
- Device reset actions from IT tools in managed environments.
If this keeps happening on your system, you have a couple of options:
| Approach | What it does | When to use it |
|---|---|---|
| Re-apply a PowerShell script at logon | Runs a disable command each time someone signs in. | When updates occasionally re-enable touch, but you control the device. |
| Use Group Policy / MDM with scripts | Pushes the same PowerShell commands to many machines. | In organizations with a central management platform. |
| Firmware (BIOS/UEFI) toggle | Disables the touch controller at the hardware level, if available. | When you want the OS to never see the touch device at all. |
Windows does not expose a dedicated Group Policy that simply says “disable touch screen,” but you can combine existing policy tools with scripts. You can also use device installation restriction policies to block installation of specific touch drivers if you know the IDs, though that is more advanced and affects how Windows handles that hardware across the board.
Some manufacturers expose a touch-screen toggle in their UEFI firmware under input or I/O port sections. On other systems, that option simply isn’t there. If your firmware does include it and you switch it off, the operating system will not see the touch screen at all until you turn it back on.
Disabling touch on shared, kiosk, or exam devices
On personal laptops, turning off touch is mostly about comfort — avoiding accidental taps while typing or cleaning the screen. In classrooms, exam labs, kiosks, and other controlled environments, it’s about predictability and reducing the ways users can interact with the system.
On those devices, disabling the touch screen is usually just one piece of a larger configuration that might also include:
- Locking down which apps can run with tools like AppLocker.
- Restricting Start menu and taskbar layouts.
- Limiting local account access or using assigned-access / kiosk mode.
Touch settings are global on the machine. If you turn touch off at the device level, it’s disabled for every user, not just one profile, so decisions should match how the device is actually used day to day.

Cleaning the screen without chaos
One very practical reason people go looking for a touch off switch: they just want to wipe the display without accidentally opening apps, moving windows, or closing browser tabs. You can use the methods above, but sometimes the simplest option is good enough:
- Shut the machine down briefly while you clean, or
- Use the manufacturer’s “quick clean” or similar utility if they provide one; some OEMs offer a timed lock that temporarily disables keyboard, touchpad, and touch screen for cleaning.
Those approaches avoid changing device-level settings at all, which can be useful if the laptop isn’t yours alone or is centrally managed.
Once you know that the touch screen lives behind the “HID-compliant touch screen” device, Windows 11’s behavior makes more sense. You don’t get a big on/off toggle in Settings, but you do get precise control through Device Manager and PowerShell. Pick the method that fits how you use your PC: quick Device Manager change for a single machine, or PowerShell if you want something you can repeat, script, or deploy at scale.