
Some recent PC games and Windows 11 features check that Secure Boot and TPM 2.0 are turned on. On many GIGABYTE AM4 motherboards, these options are available but disabled or not fully configured, which can cause messages such as “PC does not meet security requirements” or “Secure Boot not active” even when BIOS shows it as enabled.
This guide explains how to prepare your system, enable AMD fTPM (TPM 2.0), configure Secure Boot correctly, and what to do if Windows stops booting afterward. The focus is on GIGABYTE AM4 boards running Windows 10 or Windows 11.
Check basic requirements before enabling Secure Boot
Secure Boot only works in UEFI mode with a GPT system disk and can block systems that were installed in legacy mode. Before changing BIOS settings, check a few things inside Windows.
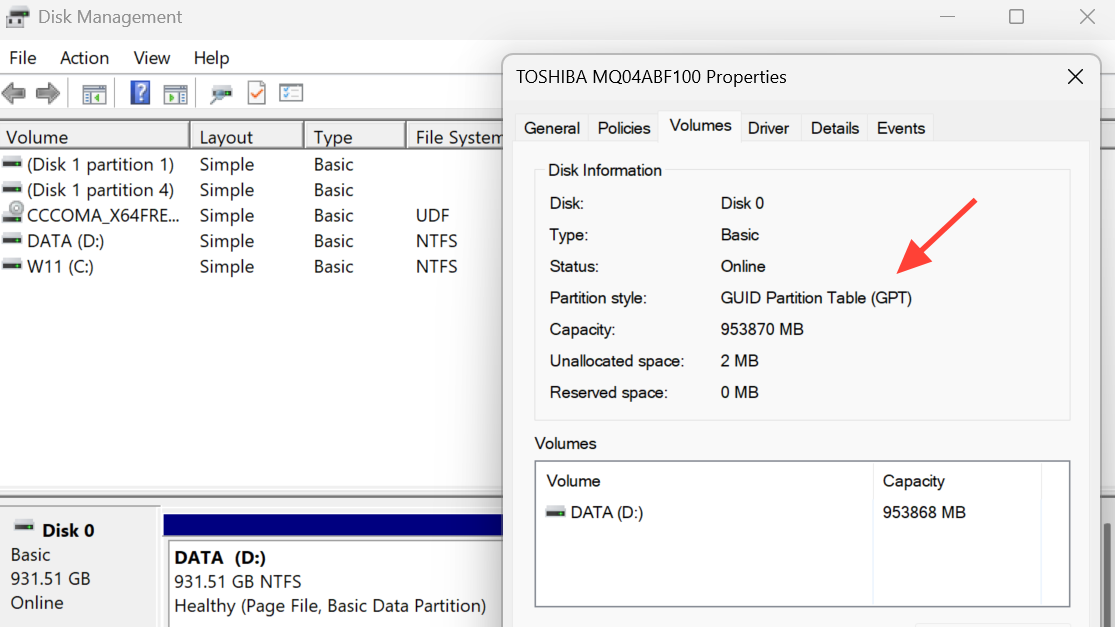
Step 1: Confirm your system disk uses GPT (GUID Partition Table). Open the Windows Disk Management tool (for example, via diskmgmt.msc in the Run dialog) and view the properties of the disk that holds Windows. Check the partition style field; it must show GPT, not MBR. If the disk is MBR, Secure Boot will not work correctly without converting the disk or reinstalling Windows in GPT mode.
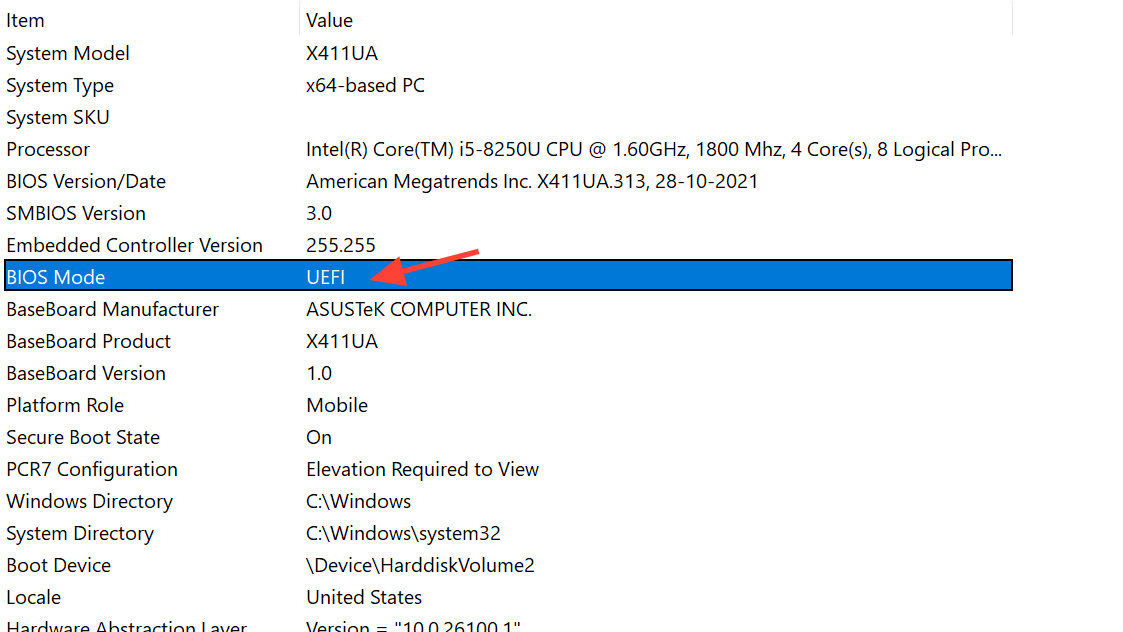
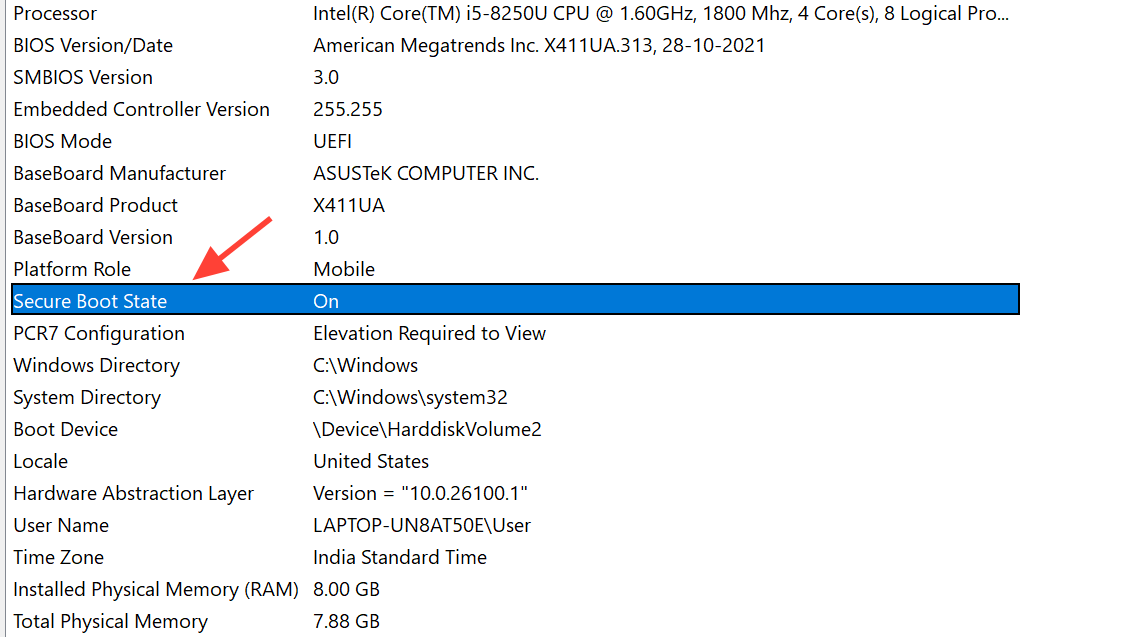
Step 2: Check that Windows boots in UEFI mode. Press Win + R, type msinfo32, and press Enter to open System Information. In the summary, find “BIOS Mode”. It must show UEFI. If it shows Legacy or BIOS, the system is running with Compatibility Support Module (CSM), and Secure Boot cannot be made active without switching to UEFI and using a GPT disk.
Step 3: Back up important data. Any change to boot settings carries some risk of Windows failing to start. Before you change TPM, CSM, or Secure Boot options, copy important files to another drive or cloud storage so you can recover data even if you later need to reinstall Windows.
Enable TPM 2.0 (AMD CPU fTPM) in GIGABYTE BIOS
TPM 2.0 is required by Windows 11 and many anti‑cheat systems. On GIGABYTE AM4 boards, TPM is provided by the processor as “AMD CPU fTPM”, and it is controlled from the BIOS.
Step 1: Enter the GIGABYTE UEFI/BIOS setup. Restart the PC and press the Delete key repeatedly as soon as the system powers on. This opens the BIOS menu. If you see a simplified “Easy Mode” screen, switch to Advanced Mode using the on‑screen option key (often F2).
Step 2: Open the fTPM setting. In Advanced Mode, go to the Settings section. Locate the option named AMD CPU fTPM. This controls the firmware TPM built into the CPU.
Step 3: Set AMD CPU fTPM to Enabled. Change the AMD CPU fTPM option from Disabled to Enabled. This makes TPM 2.0 available to Windows and to Secure Boot. Once set, do not change it again unless you are troubleshooting a specific issue.
Step 4: Save changes and reboot to Windows once. Use the Save & Exit option in BIOS to store your changes, then let Windows boot normally. This allows Windows to detect TPM 2.0 and initialize it before you move on to Secure Boot configuration.

Disable CSM so Secure Boot options appear
Compatibility Support Module (CSM) emulates old BIOS behavior. Secure Boot cannot run while CSM is enabled, and on some GIGABYTE boards, the Secure Boot menu does not even show until CSM is off.
Step 1: Re‑enter BIOS Advanced Mode. Restart again and press Delete to return to the BIOS Advanced Mode. Ensure you are not in Easy Mode, because some options are hidden there.
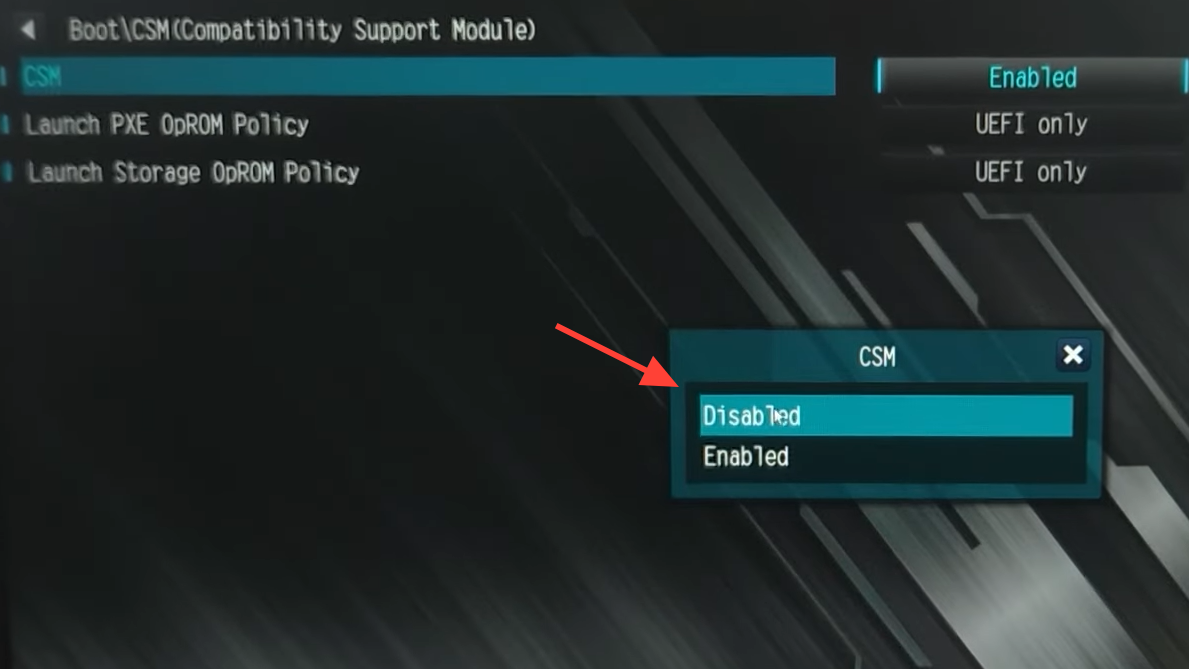
Step 2: Open the Boot settings and locate CSM Support. Go to the Boot tab. Find the setting named CSM Support. This controls whether the system allows legacy boot along with UEFI.
Step 3: Disable CSM Support. Change CSM Support to Disabled. This forces pure UEFI booting. On many GIGABYTE boards, disabling CSM will cause the Secure Boot section to appear in the same Boot menu after saving and rebooting.
Step 4: Save and let Windows boot once with CSM disabled. Save changes and allow the PC to boot into Windows normally. Confirm Windows starts without errors. This step is important: if Windows does not start with CSM disabled, you must fix the boot configuration (for example, by switching back to Enabled) before touching Secure Boot.
Enable Secure Boot and load factory keys
Once TPM 2.0 is active and CSM is disabled, you can turn on Secure Boot. On GIGABYTE boards, Secure Boot only becomes “Active” after trusted keys are loaded into firmware.
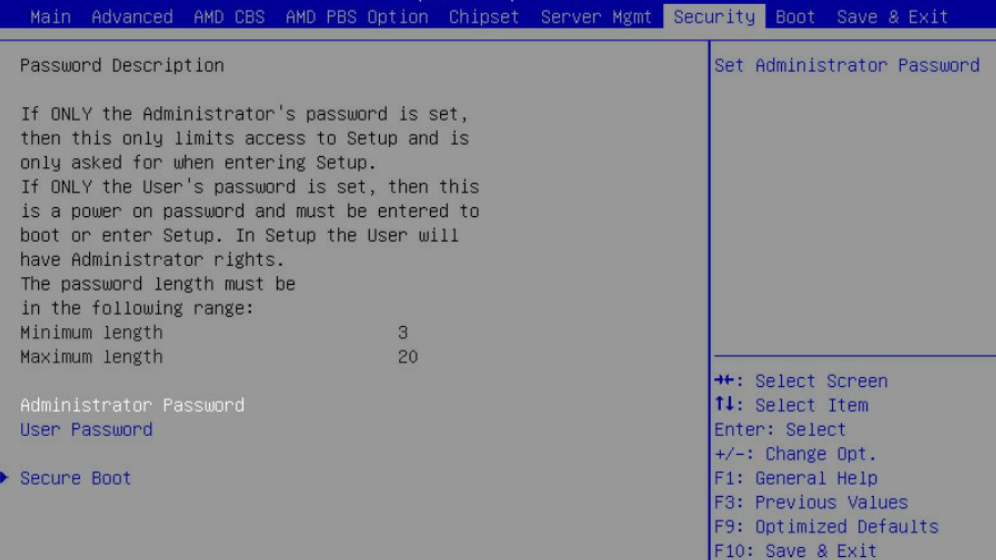
Step 1: Open the Secure Boot menu in BIOS. Restart the PC, press Delete, and go back into BIOS Advanced Mode. Under the Boot tab, you should now see a Secure Boot option. Select it to open the Secure Boot submenu.
Step 2: Set CSM Support status if needed. In the same Boot tab, verify that CSM Support is still Disabled. If it was re‑enabled or reverted during a BIOS update, disable it again and save before working with Secure Boot.
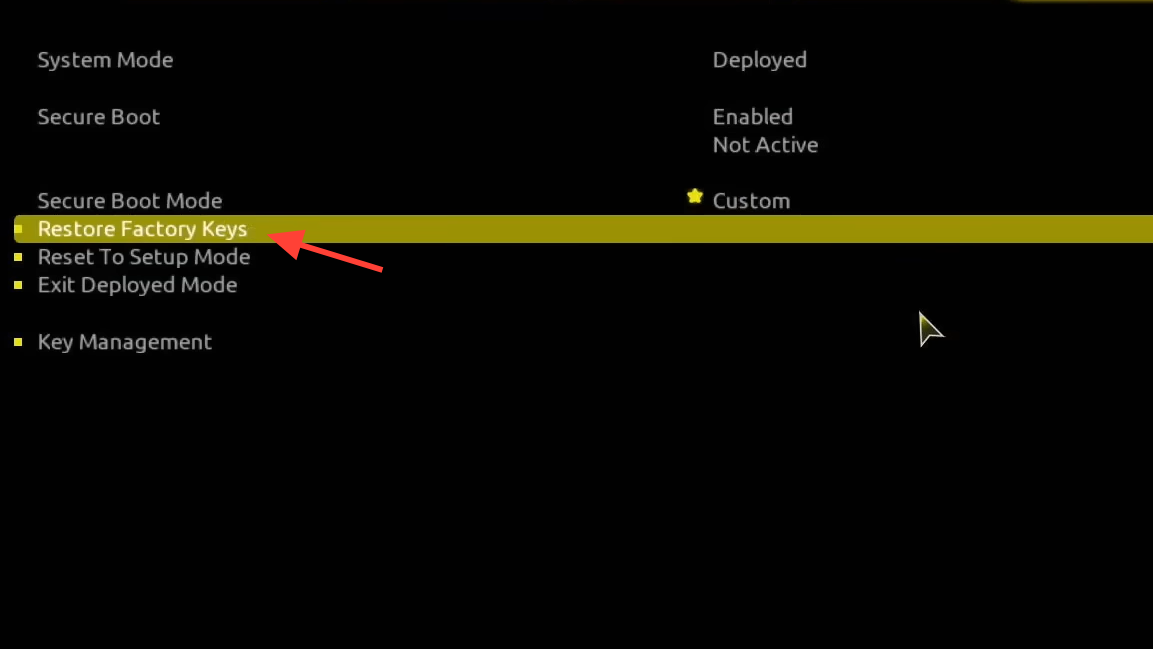
Step 3: Switch Secure Boot Mode to Custom. Inside the Secure Boot submenu, find Secure Boot Mode. Change it from Standard (or a similar default) to Custom. This exposes options to manage keys, including restoring factory keys.
Step 4: Run Restore Factory Keys and accept defaults. After switching to Custom mode, select the Restore Factory Keys option. When the prompt “Install Factory Defaults” appears, choose Yes. This loads the standard platform, key exchange, and OS vendor keys that Secure Boot uses to validate bootloaders.
Step 5: Confirm the reset/reboot prompt. A second prompt, such as “Reset Without Saving,” can appear. Choose Yes to allow the firmware to process the key restore and reboot automatically. This step switches the Secure Boot system mode from Setup/Audit to User/Deployed, which is required for Secure Boot to show as active.
Step 6: Re‑enter BIOS and check Secure Boot status. After the automatic reboot, enter BIOS again and open the Secure Boot menu. Set Secure Boot itself to Enabled if it is not already. Below that, confirm that the status line indicates Active, which means Secure Boot is now actually enforcing checks, not just enabled in name.
More general Secure Boot instructions for GIGABYTE products are also provided in GIGABYTE’s security notice about UEFI rootkit protection at https://www.gigabyte.com/Support/Security/2020.
Verify Secure Boot and TPM 2.0 in Windows
Once BIOS configuration is complete, confirm in Windows that Secure Boot and TPM 2.0 are visible and working. This helps avoid surprises when a game or Windows feature checks system security.
Step 1: Check Secure Boot status in System Information. Press Win + R, type msinfo32, and press Enter. In the System Summary window, look for the line labeled “Secure Boot State”. It should say “On”. If it says “Off” or “Unsupported”, go back through the BIOS steps to confirm CSM is disabled and Secure Boot shows as Active.
Step 2: Confirm TPM 2.0 is available. In Windows, open the TPM management console (for example, using tpm.msc in the Run dialog) or check Windows Security > Device security. Make sure a TPM is present, and the specification version is 2.0. If TPM is missing, verify that AMD CPU fTPM is still enabled in BIOS.

Step 3: Launch the game or application that required Secure Boot. Start the game or program that previously showed an error about Secure Boot or TPM. It should now pass its security checks and run without complaining about missing Secure Boot or TPM 2.0.
Troubleshoot Secure Boot and boot problems on GIGABYTE
If Secure Boot still shows as “not active” in Windows, does not appear in BIOS, or causes boot issues, use the following troubleshooting paths. The most reliable fixes are listed first.
Fix Secure Boot “enabled but not active” by restoring keys
Some GIGABYTE boards show Secure Boot as Enabled in BIOS while Windows reports it as Off. This usually happens when the system is stuck in Setup or Audit mode without user keys loaded.
Step 1: Disable Secure Boot in BIOS. Enter BIOS, open the Secure Boot menu, and temporarily set Secure Boot to Disabled. This clears the current enforcement state so you can reconfigure it cleanly.
Step 2: Change Secure Boot Mode from Standard to Custom. Still in the Secure Boot menu, switch Secure Boot Mode to Custom. This exposes the key management options needed to move the system out of Setup mode.
Step 3: Run Restore Factory Keys again. Select Restore Factory Keys, confirm installing factory defaults, and approve any reset prompt. This step is critical: it loads the vendor keys that allow Secure Boot to transition into User/Deployed mode.
Step 4: Set Secure Boot Mode back to Standard. After keys are restored and the system has rebooted, return to the Secure Boot menu and change Secure Boot Mode from Custom back to Standard. This tells the firmware to use the default key set instead of expecting manual key management.
Step 5: Re‑enable Secure Boot. Finally, set Secure Boot to Enabled again and save changes. Boot into Windows and recheck “Secure Boot State” in msinfo32. It should now report as On.
Secure Boot option missing from BIOS
If the BIOS Boot tab does not show any Secure Boot option, either CSM is still on, or the BIOS/CPU combination does not currently provide the feature.
Step 1: Save CSM disabled and reboot once. In BIOS, make sure CSM Support is Disabled, then explicitly Save & Exit. Let the PC reboot fully. On some boards, Secure Boot only appears after the firmware has gone through one full reboot with CSM disabled.
Step 2: Confirm the operating system mode in BIOS. Some GIGABYTE BIOS versions have a setting related to Windows features in the same Boot section, such as an option named for Windows 10 features. Make sure this is set to use Windows boot features rather than a legacy or “Other OS” mode, then save and restart and check for Secure Boot again.
Step 3: Update BIOS to a newer version. If Secure Boot still does not appear, update the motherboard BIOS to the latest release from the GIGABYTE support page for your exact model at https://www.gigabyte.com/Support/Consumer. After updating, re‑enter BIOS, disable CSM, enable TPM again if necessary, and look for the Secure Boot options.
Windows will not boot after turning Secure Boot on
Enabling Secure Boot can cause startup failures if Windows was installed in legacy mode or uses unsigned boot components.
Step 1: Turn Secure Boot off again. If the system loops back into BIOS or shows no bootable device, go to the Secure Boot menu and set Secure Boot to Disabled. Save and restart. This stops Secure Boot from blocking the current bootloader.
Step 2: Re‑enable CSM Support if needed. If disabling Secure Boot alone does not restore boot, go back to the Boot tab and set CSM Support to Enabled. Save changes and restart. This returns the board to its previous legacy‑compatible state so the old boot method can work again.
Step 3: Re‑check GPT and UEFI status in Windows. Once Windows starts, repeat the earlier checks: confirm the system disk is GPT and the BIOS Mode in msinfo32 is UEFI. If either condition is not met, plan a conversion or reinstall path before attempting Secure Boot again.
Secure Boot or TPM reset after BIOS update
On some GIGABYTE boards, a BIOS update can reset security settings back to defaults, turning Secure Boot and TPM off again.
Step 1: Revisit TPM, CSM, and Secure Boot settings after each update. Any time you flash a new BIOS version, go straight into BIOS after the first reboot. Check that AMD CPU fTPM is Enabled, CSM Support is Disabled, and Secure Boot is still configured with keys restored and status Active.
Step 2: Repeat the enablement steps if the status changed. If any of these options reverted, follow the earlier sections in this guide to re‑enable TPM, disable CSM, restore factory keys, and switch Secure Boot back on. Once finished, verify Secure Boot State in Windows again.
Once you have TPM 2.0 enabled, CSM disabled, and Secure Boot active, your GIGABYTE AM4 system is better aligned with current Windows security requirements and game anti‑cheat checks, and you should only need to revisit these settings after major BIOS changes.