
Call of Duty: Black Ops 7 on PC will not run unless Secure Boot and TPM 2.0 are enabled and correctly configured. The game’s RICOCHET anti‑cheat hooks into Windows’ low‑level security, so if any part of that chain is missing—Legacy BIOS, MBR disk, disabled TPM, or Secure Boot off—you’ll see warnings like “Your PC does not meet security requirements” or fail to get into matches.
This walkthrough keeps things linear: first, you confirm what your system is already doing, then you fix each missing requirement in order, and finally, you turn on Secure Boot in firmware.
Black Ops 7 Secure Boot and TPM 2.0 requirements
Black Ops 7 enforces a specific security stack for PC players:
| Component | Requirement for BO7 | Where to check |
|---|---|---|
| Windows version | Windows 10 22H2+ or Windows 11 | Settings > System > About |
| Boot mode | UEFI (not Legacy / CSM) | msinfo32 > BIOS Mode |
| Disk partition style | GPT (not MBR) | Disk Management > OS disk > Volumes |
| Secure Boot | Enabled and reported as “On” | msinfo32 > Secure Boot State |
| TPM | TPM 2.0 present and “ready to use” | tpm.msc > Status |
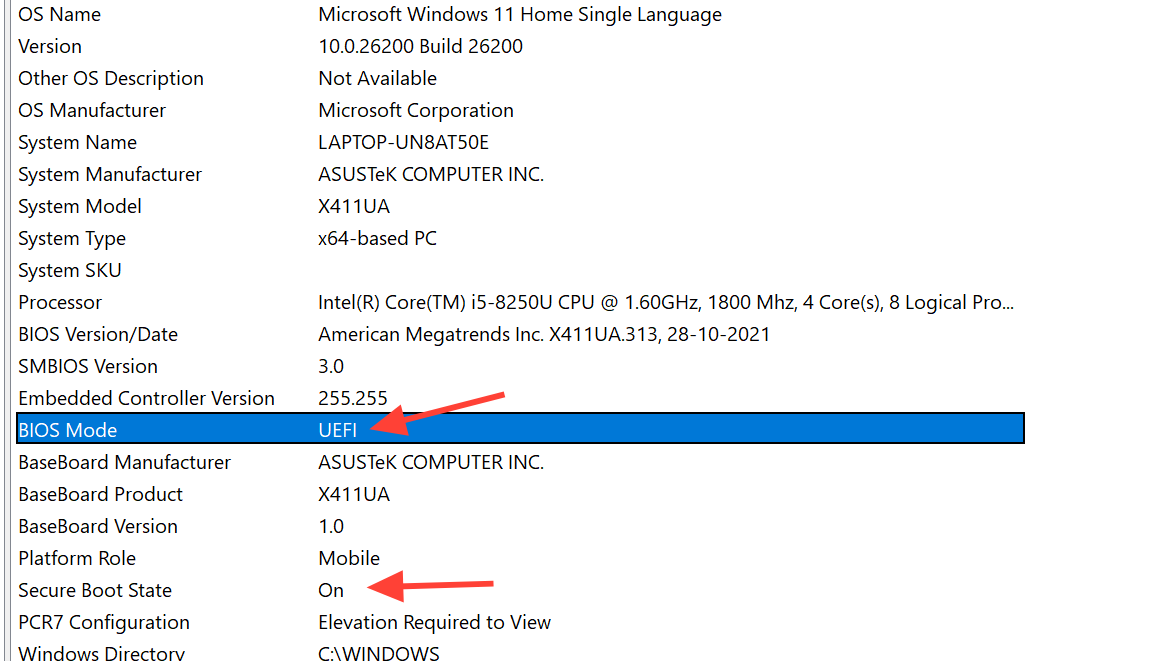
Step 1 – Check Secure Boot state and BIOS mode in Windows
Start by confirming whether your PC already has what the game needs.
- Press Windows key + R to open the Run dialog.
- Type
msinfo32and press Enter. - In the System Information window, make sure “System Summary” is selected on the left.
| Setting | What you want | What it means |
|---|---|---|
| BIOS Mode | UEFI | Your firmware is using UEFI and can support Secure Boot. |
| Secure Boot State | On | Secure Boot is active and Black Ops 7 should be allowed to run. |
| Secure Boot State | Off | Secure Boot is available but disabled; you’ll need to enable it in BIOS/UEFI. |
| Secure Boot State | Unsupported | Your hardware or firmware does not support Secure Boot. |
If BIOS Mode already says UEFI and Secure Boot State is On, you’re done with Secure Boot. If the game is still complaining, focus on TPM and general firmware issues described later, or use the official Activision TPM and Secure Boot support flow at support.activision.com.
If BIOS Mode is Legacy or Secure Boot State is Off, keep going.
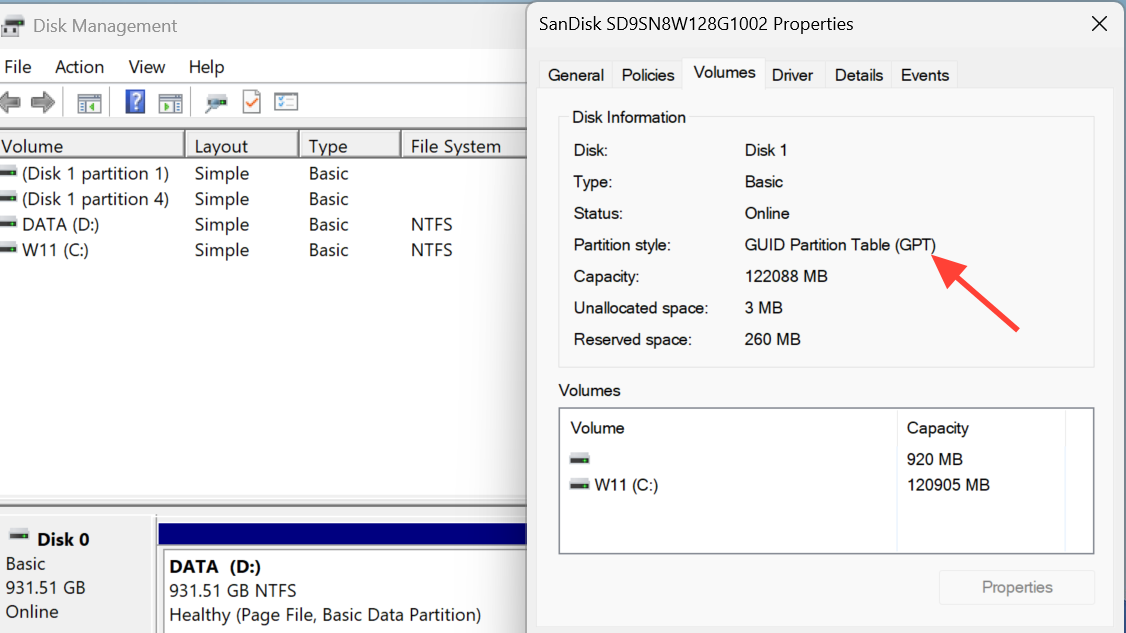
Step 2 – Confirm your Windows disk is GPT (not MBR)
Secure Boot requires UEFI firmware. In practice, that also means your Windows installation disk has to be formatted as GPT instead of MBR.
- Press Windows key + X and choose Disk Management.
- In the bottom pane, find the disk that contains your Windows partition (usually “Disk 0” with your C: drive on it).
- Right‑click the disk label on the far left (for example, “Disk 0”) and choose Properties.
- Open the Volumes tab and look at Partition style.
| Partition style | Impact on Secure Boot |
|---|---|
| GUID Partition Table (GPT) | Good. You can run UEFI and enable Secure Boot. |
| Master Boot Record (MBR) | Problem. You must convert this disk to GPT before switching fully to UEFI and Secure Boot. |
If your OS disk is already GPT, skip ahead to the section on enabling Secure Boot in firmware.
Step 3 – Convert an MBR system disk to GPT with MBR2GPT
On Windows 10 or 11, you can usually convert an existing system disk from MBR to GPT without reinstalling Windows by using the built‑in mbr2gpt tool. This still carries some risk; back up anything important first.
To validate the disk:
- Open the Start menu, type cmd, right‑click Command Prompt, and choose Run as administrator.
- Run the validation command, replacing
Xwith the disk number that holds Windows (often 0):
mbr2gpt /validate /disk:X /allowFullOS
- If validation succeeds, run the conversion command using the same disk number:
mbr2gpt /convert /disk:X /allowFullOS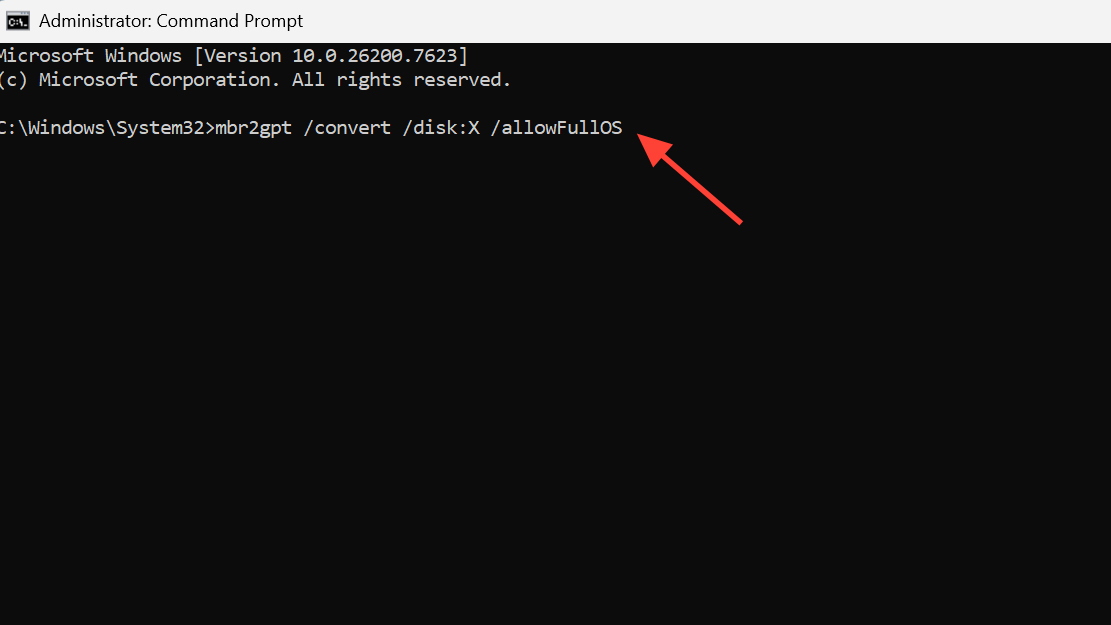
When this finishes, go back into Disk Management, reopen the disk properties, and confirm the partition style now shows GUID Partition Table (GPT).
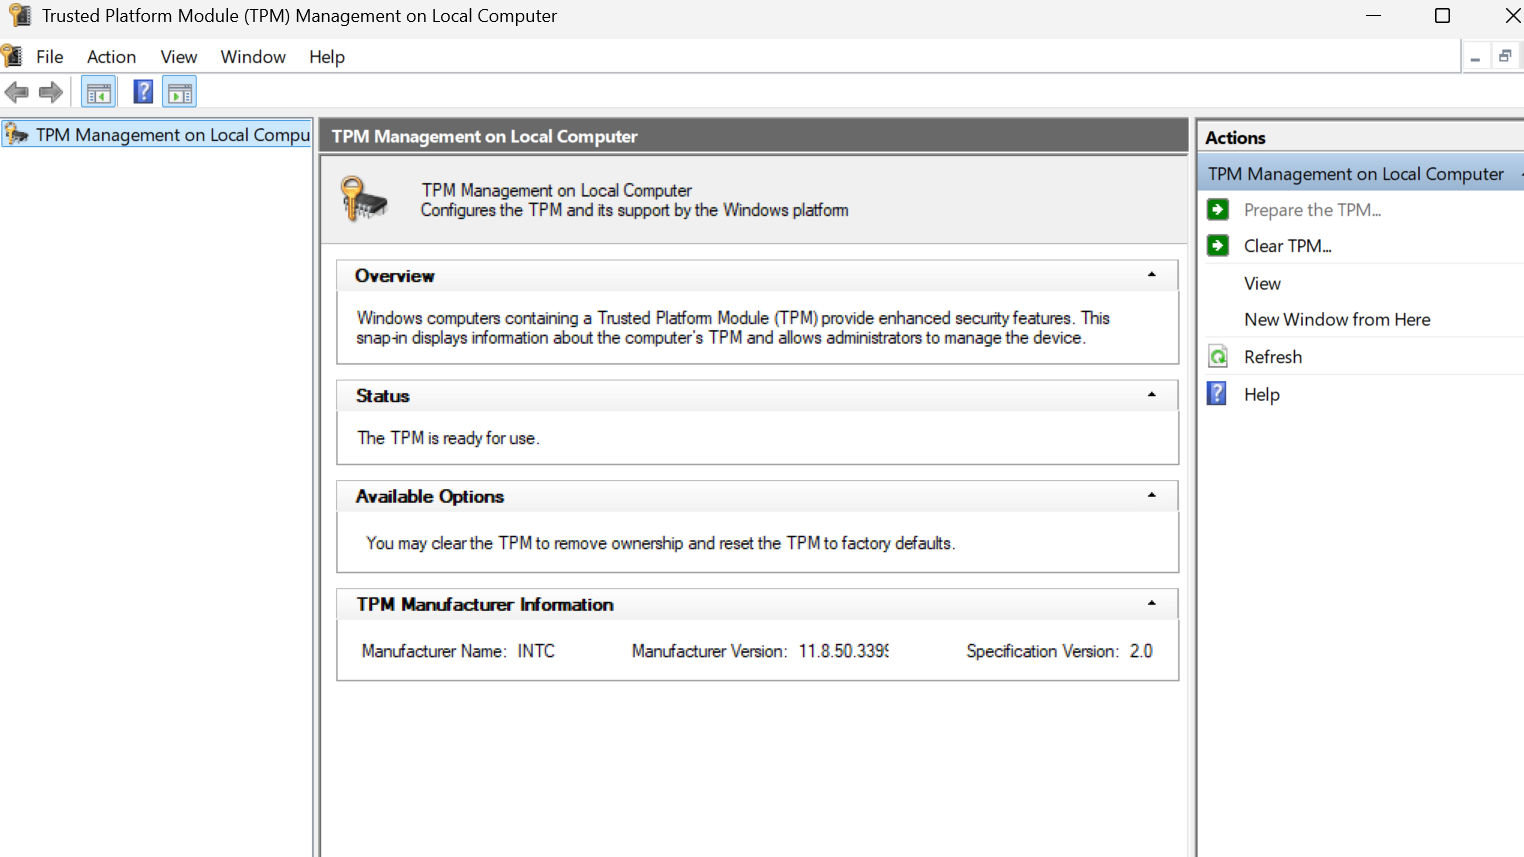
Step 4 – Verify TPM 2.0 is present and ready
Black Ops 7 also expects a TPM 2.0 device to be present and active. This is a hardware module on your motherboard (or firmware TPM in the CPU) that stores encryption keys and helps with system integrity checks.
- Press Windows key + R, type
tpm.msc, and press Enter.
| TPM status | Meaning for BO7 |
|---|---|
| “The TPM is ready for use” with Specification Version 2.0 | Ideal. TPM 2.0 is detected and active. |
| “Compatible TPM cannot be found” | TPM might be disabled in BIOS or unsupported by your hardware. |
| TPM present but version 1.x | Legacy TPM; firmware settings or hardware may need an update for TPM 2.0. |
If TPM is missing or not ready, you must enable it in your system’s firmware (UEFI/BIOS). The label for TPM can vary—on AMD boards, it often appears as fTPM; on Intel, as PTT or “Intel Platform Trust Technology.” For exact menus and naming, follow your motherboard manufacturer’s manual or use the links and warnings provided through the Activision support route above.
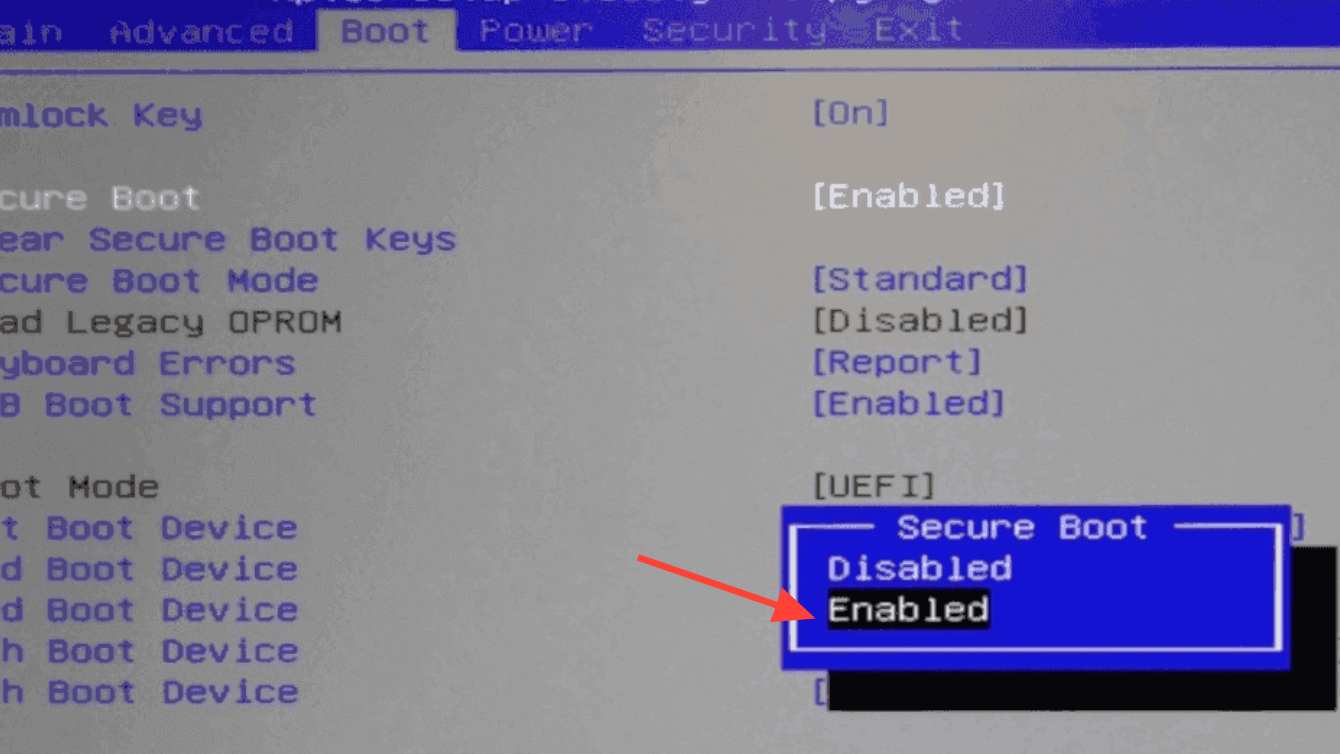
Step 5 – Enter UEFI/BIOS to turn on Secure Boot
Once you’ve confirmed UEFI boot support, GPT on the OS disk, and TPM 2.0, you’re ready to actually enable Secure Boot in firmware.
There are two common ways to reach your firmware setup:
| Method | How it works |
|---|---|
| Boot‑key method | Restart and press a key like Del, F2, F10, or F12 repeatedly as soon as the PC powers on. |
| Advanced startup | In Windows, search for “Change advanced startup options”, click Restart now under Advanced startup, then pick UEFI Firmware Settings from the menu. |
Firmware interfaces differ a lot between vendors, but Secure Boot is nearly always under a Boot, Security, or Advanced section.
- In UEFI, switch to “Advanced” or “Expert” mode if your board supports it.
- Locate the Boot tab or equivalent.
- Confirm that Boot Mode or similar is set to UEFI or “UEFI only,” and that any “Legacy” or “CSM” mode is disabled.
- Find the Secure Boot option and change its status to Enabled.
Some boards show both an “Enabled/Disabled” toggle and a separate “Active/Inactive” state that only flips after a reboot. Others may keep Secure Boot greyed out until you switch to UEFI mode or initialize keys.
- If Secure Boot is enabled but still listed as not active, save changes, reboot back into UEFI, and check it again.
- If Secure Boot is locked or greyed out, look for an option like Restore Factory Keys or “Install default Secure Boot keys.” Triggering that often re‑initializes the system keys and unlocks the toggle.
When you’re done, go to your firmware’s save/exit screen, choose Save Changes and Exit (often F10), and let the system restart.
Step 6 – Confirm Secure Boot is now active in Windows
Back in Windows, repeat the original checks:
- Press Windows key + R, run
msinfo32again. - Verify that:
- BIOS Mode now shows UEFI.
- Secure Boot State shows On.
If both values look right and your TPM status previously showed “ready for use” with version 2.0, Black Ops 7’s security checks should pass, and the game should stop flagging Secure Boot issues.
Black Ops 7 “OS FIRMWARE: UPDATE REQUIRED” message
Some players see a brief “OS FIRMWARE: UPDATE REQUIRED” message when launching Black Ops 7, even after enabling Secure Boot. It tends to disappear quickly and doesn’t open a settings window when clicked.
In practice, that message is often tied to an out‑of‑date motherboard BIOS. Updating your motherboard’s firmware through the vendor’s official tools typically clears it. On some systems, a BIOS update can silently reset options such as Secure Boot and XMP/EXPO, so be prepared to:
- Revisit UEFI after the update.
- Turn Secure Boot back to Enabled.
- Re‑enable your memory profile if you were using XMP or EXPO.
For BIOS update procedures, use the specific steps provided by your motherboard brand (ASUS, MSI, Gigabyte, etc.), usually available on their support pages.
How Secure Boot, TPM 2.0, and RICOCHET tie together
Secure Boot and TPM 2.0 work together to give Black Ops 7 a trusted baseline when your PC starts:
- Secure Boot only allows bootloaders and OS components signed with trusted keys to run, making it harder for cheat drivers or low‑level malware to hook into Windows before the game and anti‑cheat load.
- TPM 2.0 stores cryptographic data and helps measure boot components so the system can detect tampering from startup through user login.
- RICOCHET relies on that foundation to decide whether your environment is trustworthy enough to let you queue into matches.
Skip any part of that chain—Legacy boot, MBR disks, disabled TPM, or Secure Boot turned off—and Black Ops 7 enforces the rule by blocking you from playing.
Once Secure Boot is on, TPM 2.0 is ready, and your firmware is reasonably up to date, you should be able to launch Black Ops 7 on PC without seeing security requirement errors. If something still fails or your firmware menus don’t match any of the descriptions here, the safest next step is to lean on your motherboard or system vendor’s documentation and support channels—they know the exact layout and quirks of your board.