It is a common practice nowadays, especially for advanced users and software developers, to configure their computer with a dual boot system; usually, one being a Microsoft Windows operating system and the other being a GNU/Linux based operating system.
Many Bootloader programs (programs which start an operating system after we power on the computer) detect commonly known operating systems like Windows, Mac OS, GNU/Linux installed on the Hard Drive, and display a menu to let the user choose which operating system to boot into. The Grub bootloader in GNU/Linux is most commonly used as it detects the widest range of operating systems.
However, the dual boot setup is not foolproof and can cause either of the operating system to get corrupted. This is due to multiple reasons like removal of a partition from the disk’s partition table, change in file system table, change in bootable flag on a partition, etc. which can occur during the installation of the operating system.
In case of Windows and Ubuntu dual boot, one such problem which has been widely reported is that of the Windows bootable NTFS partition (C: drive) getting corrupted. This leads to the Ubuntu bootloader (Grub) detect only one operating system, viz. Ubuntu, and no Windows partition is detected, hence preventing the user to boot into Windows. Let us see how to fix such a partition.
User should boot into Ubuntu and try the following methods to fix the partition.
Using Gparted
Gparted is a graphical frontend for the GNU/Linux utility GNU Parted. It is a drive partitioning utility used to create, delete, resize partitions. It comes with an option to scan the drive for existing partitions which are either corrupted or not present in the drive’s partition table.
Installation
To install gparted on Ubuntu, run:
sudo apt install gparted gpartNote: For Ubuntu versions < 14.04, use apt-get instead of apt.
gpart is another tool which is required for some features of gparted, hence we install it as well along with gparted in the command above.
Usage
To open gparted, open your terminal from the dock or with the default key combination Ctrl + Alt + T, type command gparted, and press Enter. You can also open it by searching it from Dash in the top left corner.
It will ask for a password to be entered, as the program requires superuser privileges to run. Note that you must be a sudo user to run gparted.
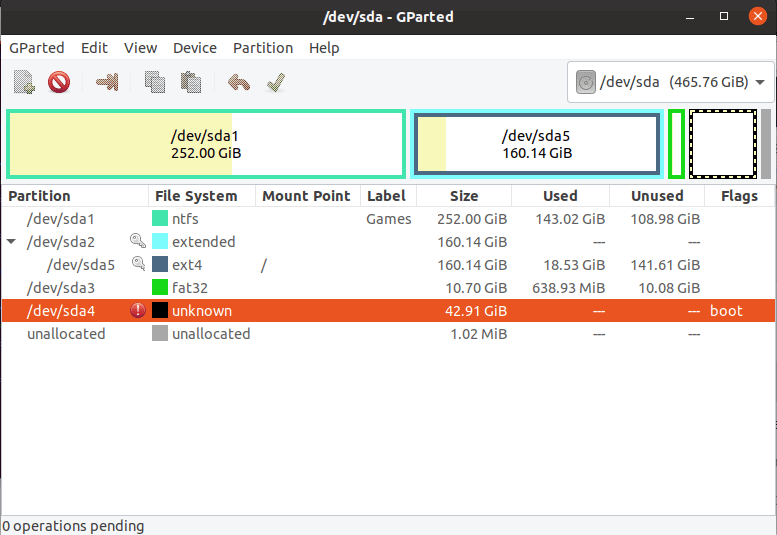
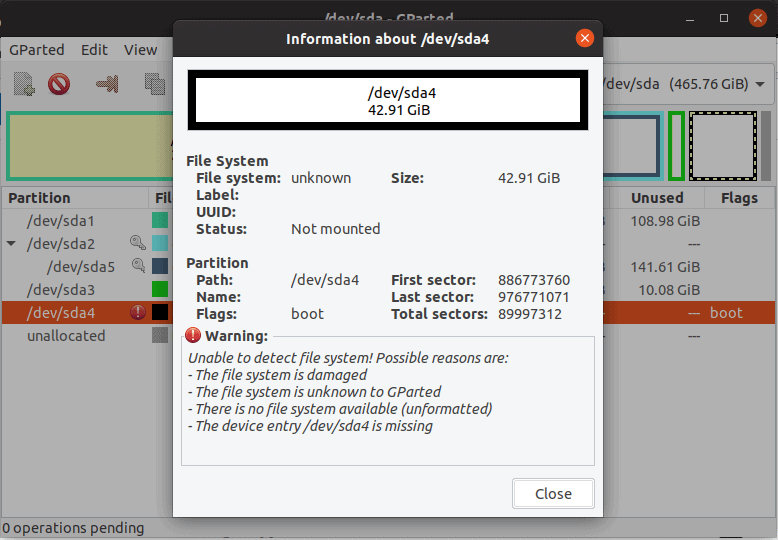
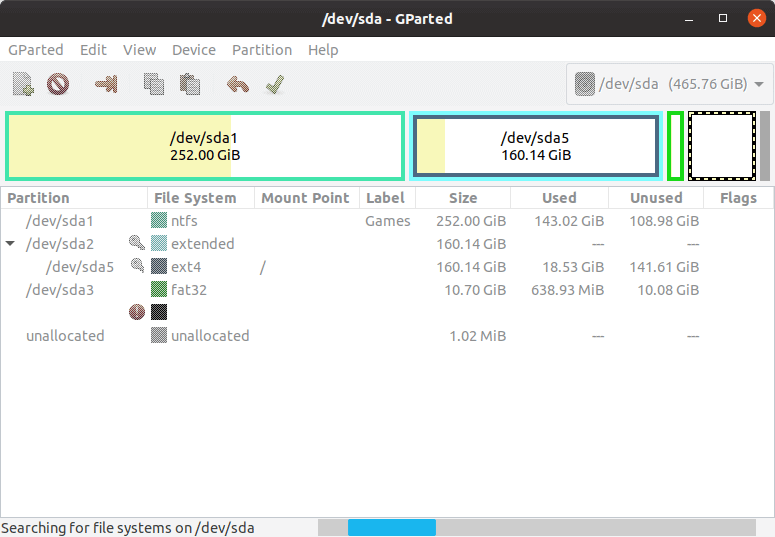
As we can see in the above image, the partition /dev/sda4 is the erroneous NTFS partition, and its file system is unknown to Gparted. The warning sign indicates that there is some issue with this partition. Double click on this row to see details of the warning.
We will now run the ‘Attempt Data Rescue’ utility, based on gpart to try and fix the error.
Close the information dialogue box. Keep the row with /dev/sda4 marked. Go to Device » Attempt Data Rescue.
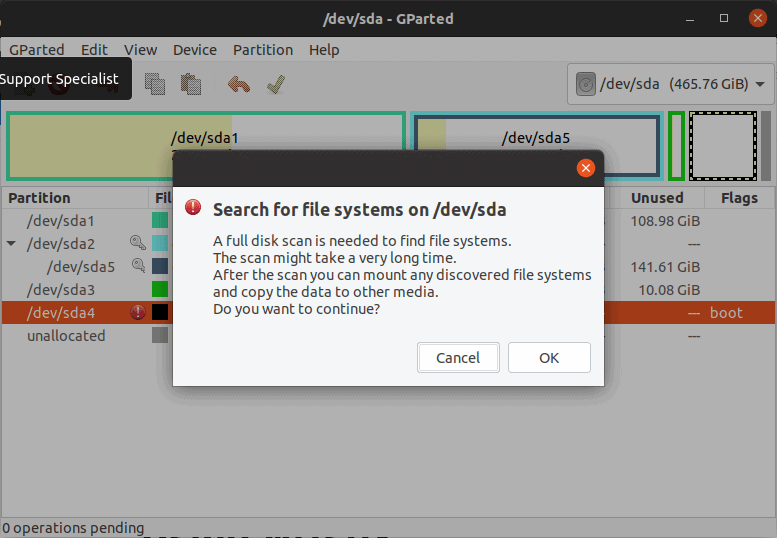
As mentioned in the confirmation dialogue box, it scans the full disk for potentially corrupt partitions and file systems and hence might take a long time to run, depending on the size of your hard drive.
Press OK to continue. It will then start a disk scanning process.
If our required NTFS file system on /dev/sda4 is successfully retrieved by the process, we can mount it by running the following:
sudo mount /dev/sda4 /media/abhi/winHere /media/abhi/win is the directory location where the NTFS partition has been mounted. Finally, we update the grub, so that it detects the bootable Windows operating system on the recovered partition.
sudo update-grub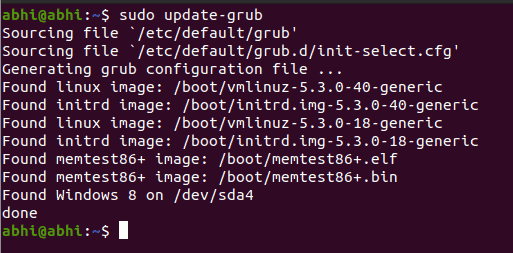
Note that it has successfully detected Windows 8 on /dev/sda4.
After this, user should be able to find an entry for the Windows OS in the Grub menu while booting.
Using Ntfsfix
The utility ntfsfix fixes some commonly found problems in NTFS partitions. It also resets the NTFS file system journal, and also forces a consistency check on the partition.
To install ntfsfix on Ubuntu, run:
sudo apt install ntfs-3gntfs-3g is a package containing ntfsfix and other NTFS related Linux utilities.
We will run the program on our corrupted partition, /dev/sda4.
sudo ntfsfix /dev/sda4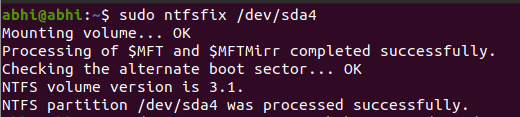
However, this utility fails to fix the errors if in the last login, Windows went into hibernation and not a complete shutdown. Hibernation means, the current state of a system is saved by Windows during shut down, and the same state is restored after the restart.
In case of a hibernated Windows partition, there is no write privilege for ntfsfix on that partition. Hence, we make use of ntfs-3g program to remove the hibernation file.
sudo ntfs-3g -o remove_hiberfile /dev/sda4 /media/abhi/winThis will remove the hibernation file from the Windows partition and attempt to mount the partition on the location /media/abhi/win.
Note: Since the program removes the hibernation file, all the session data saved during hibernation, Eg. browser tabs, will be gone.
After this, the user can run ntfsfix again to fix the issues. Finally, we update the grub so that it detects the Windows OS on this partition.
sudo update-grubNote that it has successfully detected Windows 8 on /dev/sda4.
Conclusion
In this article, we learnt about two methods to try and rescue a broken NTFS partition during dual boot. In case the NTFS partition has more severe issues which cannot be solved by these methods, there are some advanced options in the ntfs-3g program which can prove useful (check man ntfs-3g). An advanced disk recovery program or a bootable disk repair utility can also be used in such a case.