
If you're trying to change the display resolution on your Windows 11 computer but find the setting to be greyed out, the problem may be caused by a corrupted or out-of-date graphics driver. However, sometimes it can also be because of corrupt system files, buggy Windows updates, and missing Visual C++ libraries. Whatever the reason, you can easily fix the problem using the solutions shared here.
Fix 1: Update the graphics driver and switch to the Microsoft Basic Display Adapter
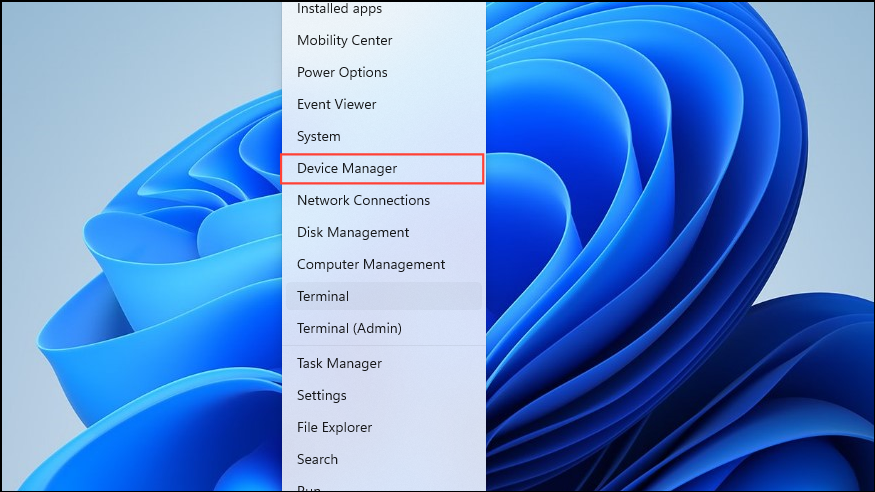
- Right-click on the Start button and click on 'Device Manager'.
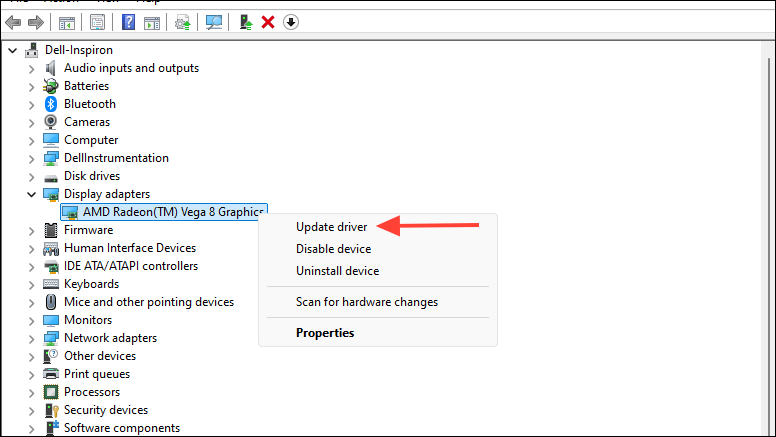
- Click on the 'Display adapters' category to expand it when the Device Manager opens.

- Right-click on the driver and click on 'Update driver'.
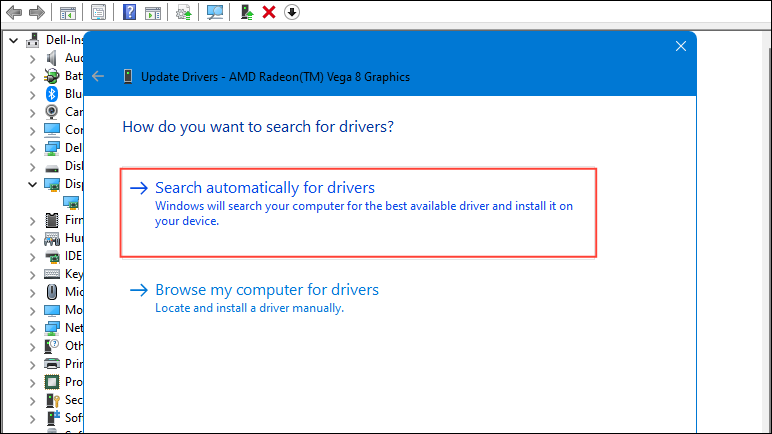
- Now click on 'Search automatically for drivers' and Windows will look for the best drivers for your system and download and install them.
- Alternatively, you can click on the 'Browse my computer for drivers' option and then on 'Let me pick from a list of available drivers on my computer'.
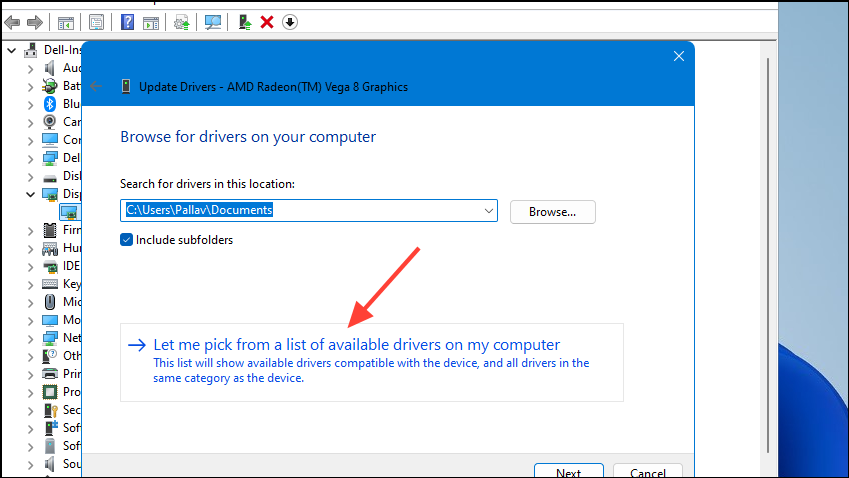
- Then select 'Microsoft Basic Display Adapter' from the list and then click on the 'Next' button.
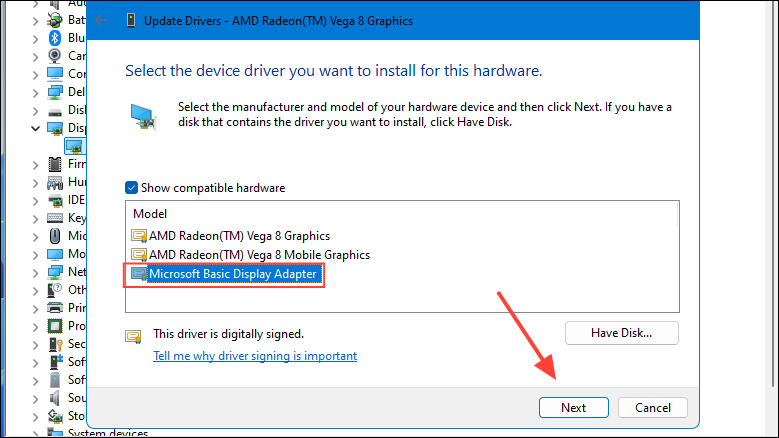
- Wait for the drivers to be installed and then restart your system and check whether you can change the display resolution on your PC now.
Fix 2: Change the display scale
A wrong display scale is another reason you may not be able to change the display resolution on your Windows 11 computer. To fix this, you will need to set the correct display scale before you can adjust the display resolution.
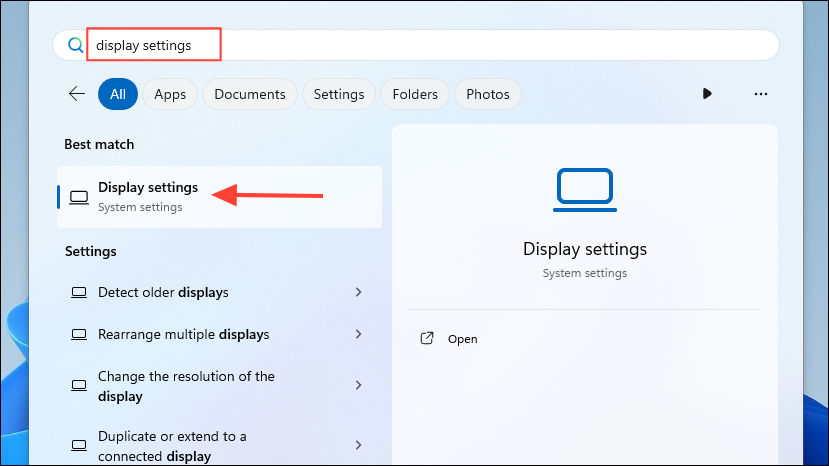
- Open the Start menu, type
display settingsand click on it when it appears in the search results.
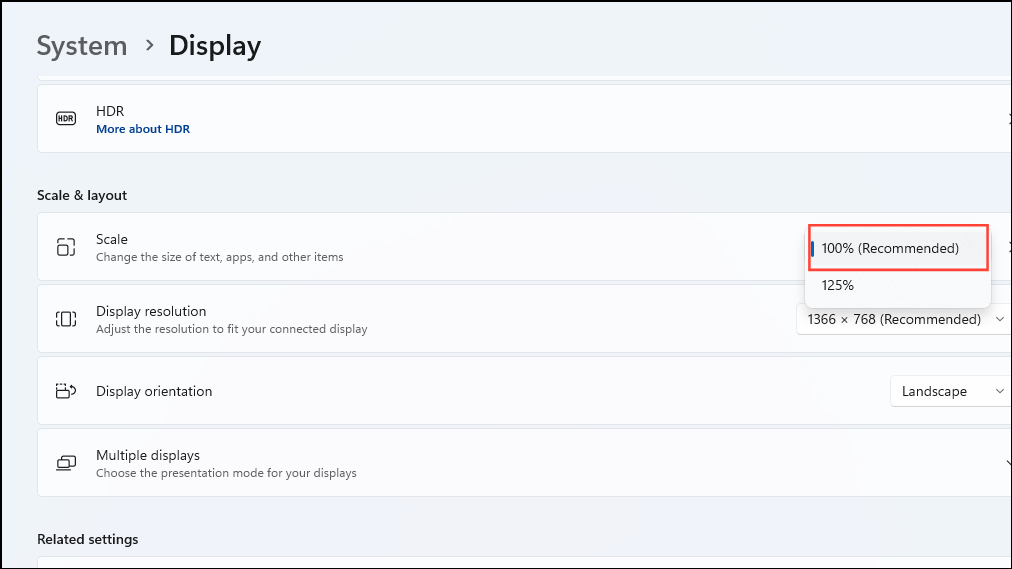
- When the Display Settings page opens, click on the dropdown menu next to the 'Scale' option in the 'Scale & layout' section and select any of the recommended options.
- After changing the display scale, try changing the display resolution and see if it is working now.
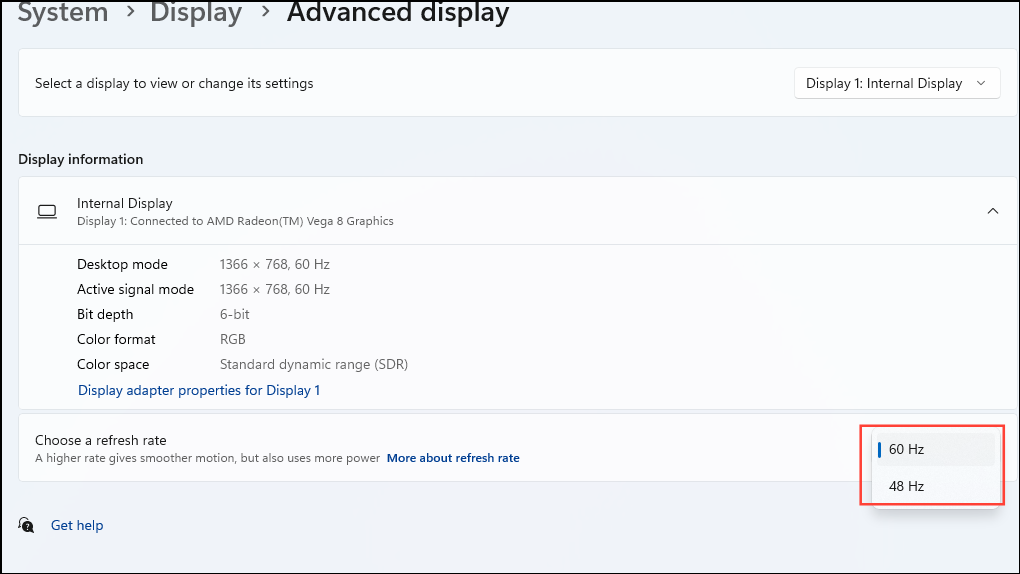
Fix 3: Change the display refresh rate
Compatibility issues that may be preventing you from changing the display resolution might be fixed if you change the refresh rate of your display.
- Open the Settings app using the
Win + Ishortcut and click on 'System' on the left.
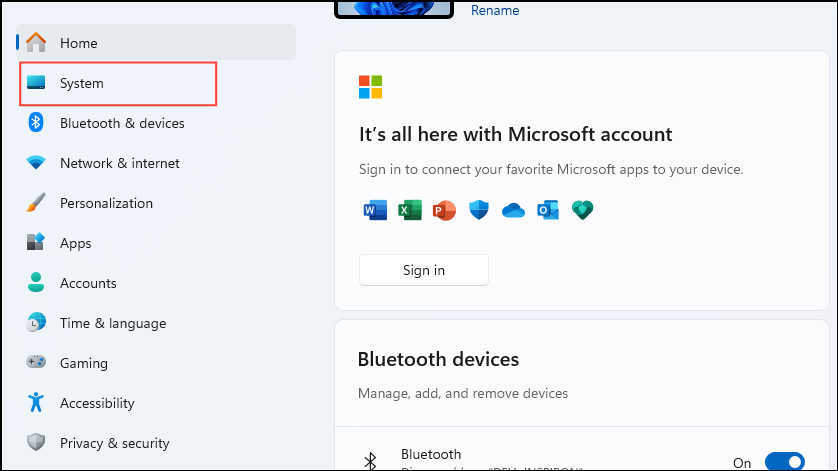
- On the System page, click on 'Display'.
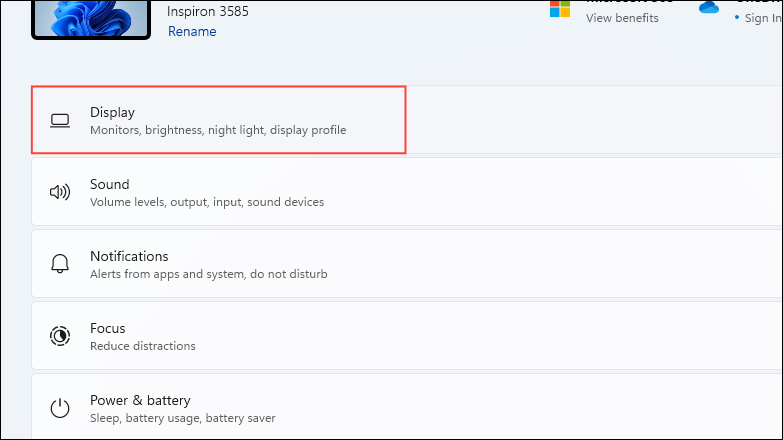
- Next, click on 'Advanced Display'.
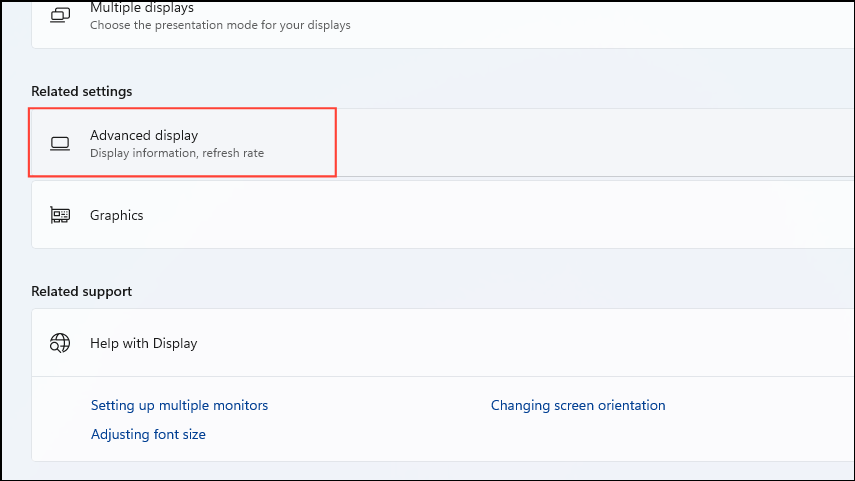
- Now you can select a different refresh rate from the dropdown menu.
Fix 4: Run the System Maintenance Troubleshooter
You can run the System Maintenance Troubleshooter to scan for various problems and fix them, including those related to the display resolution.
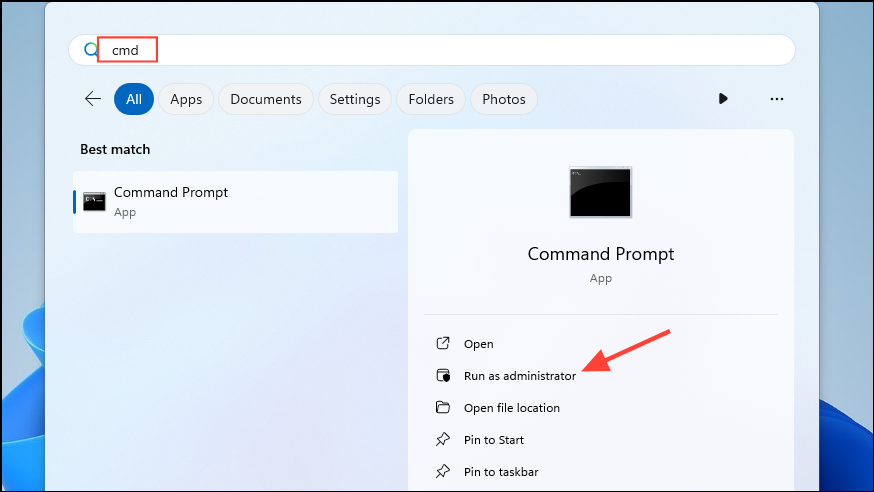
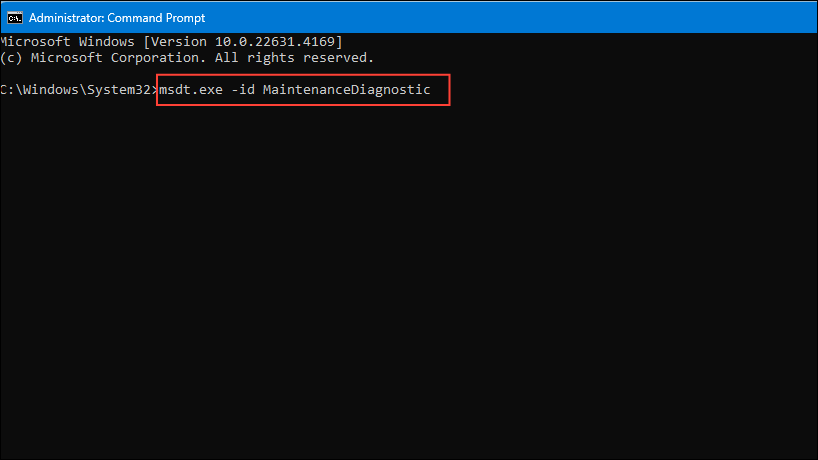
- Open the Start menu, type
cmdand click on 'Run as administrator'.
- When the command prompt window opens, type
msdt.exe -id MaintenanceDiagnosticand press Enter.
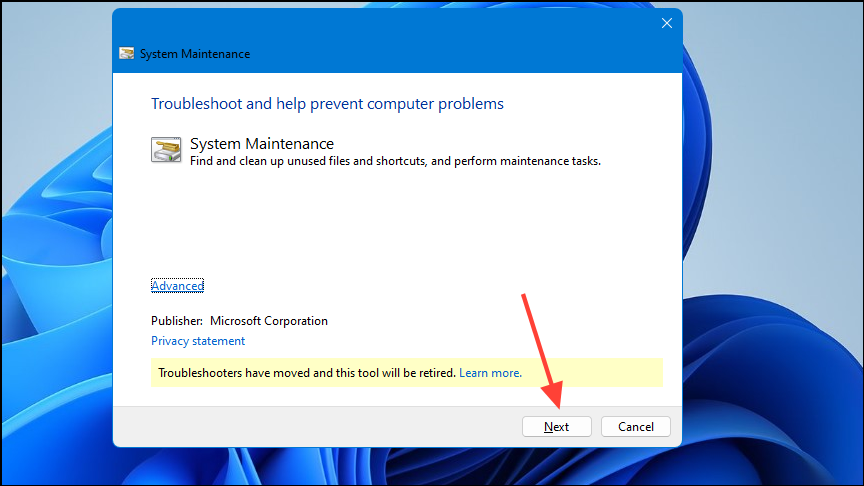
- The System Maintenance Troubleshooter will appear. Click on the 'Next' button.
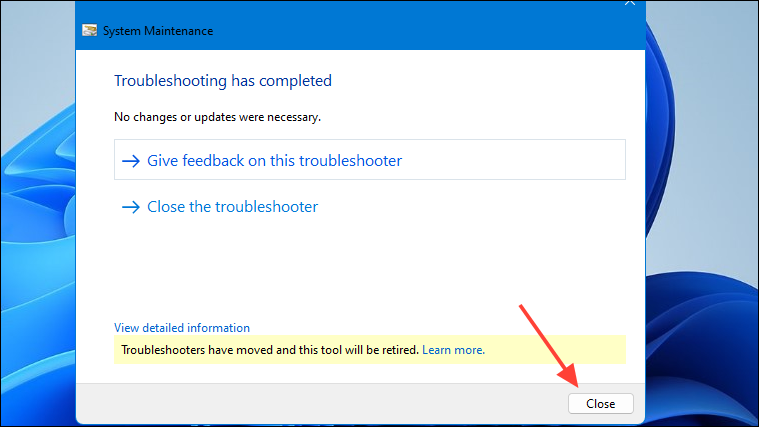
- Wait for the troubleshooter to run and then click on the 'Close' button.
Fix 5: Perform an SFC scan
Windows has a System File Checker utility built in that can detect and fix issues with the OS. It can help you fix any issues with your display resolution setting.
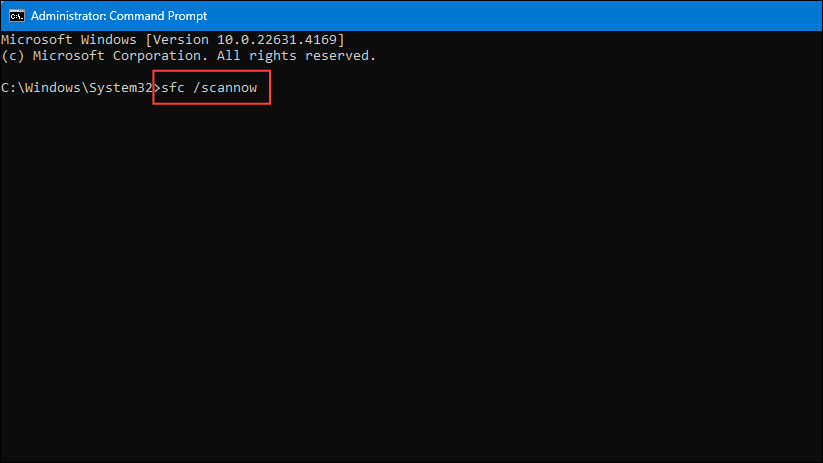
- Open a Command Prompt window with Admin privileges as explained above.
- Type
sfc /scannowin the Command Prompt window and press Enter.
- Wait until the scan is complete and then restart your computer.
Fix 6: Uninstall recent Windows updates
Sometimes Windows Updates contain bugs, which can result in issues like your display resolution setting being greyed out. In such a situation, you may be able to resolve the problem by removing the most recent Windows updates.
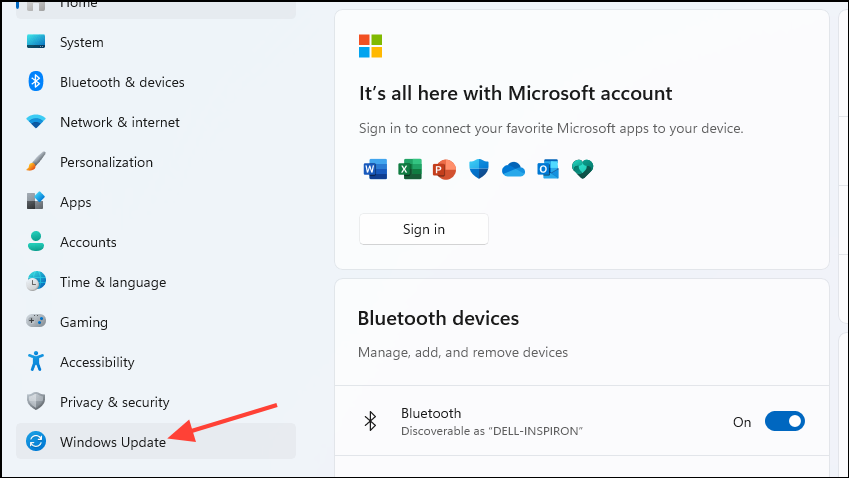
- Open the Settings app and click on 'Windows Update' on the left.
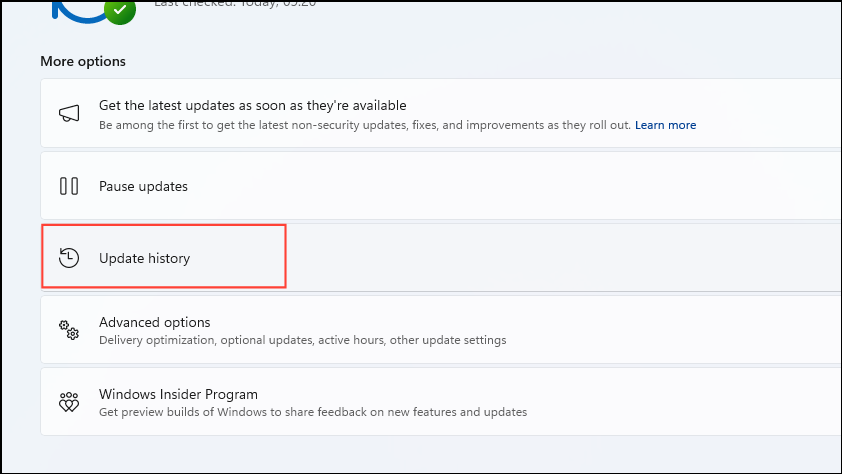
- On the Windows Update page, click on 'Update history'.
- Now you will be able to see all recently installed updates on the page that opens. Click on the 'Uninstall updates' option.
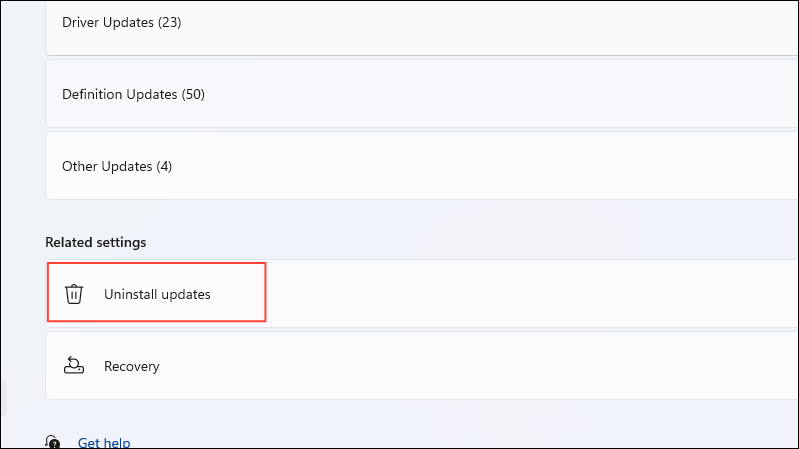
- Finally, click on 'Uninstall' on the right for the updates you want to remove.

Fix 7: Set a custom resolution on Intel
If your PC has Intel graphics onboard, you can use the Intel Graphics Command Center to set a custom resolution.
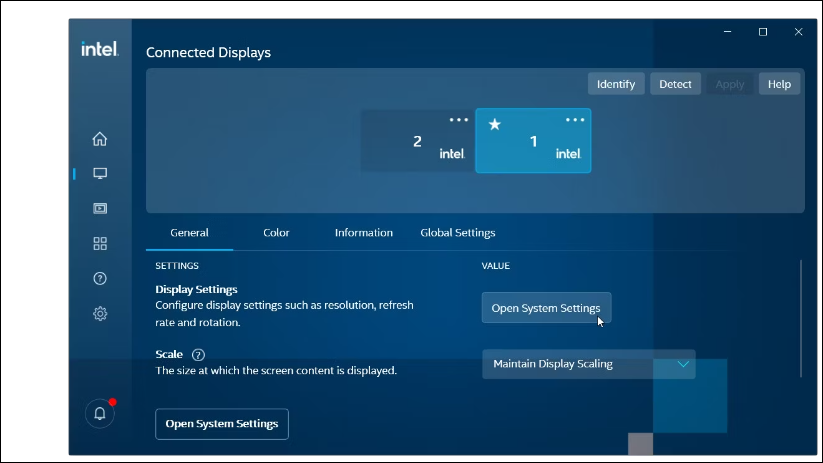
- Open the Intel Graphics Command Center from the Start menu or by clicking on the taskbar overflow icon shaped like an arrow and then on the Intel icon.
- When the Command Center opens, click on the 'Display' tab and go to the Display General Settings section.
- Click on the 'Custom' button next to the Resolution dropdown menu and set your custom resolution before clicking on OK.
Fix 8: Repair or reinstall the Microsoft Visual C++ programs
Windows requires Microsoft Visual C++ runtime libraries to function properly. If they get corrupted or are missing, you can encounter various problems. Fixing issues with these libraries may even help you sort out the display resolution problem.
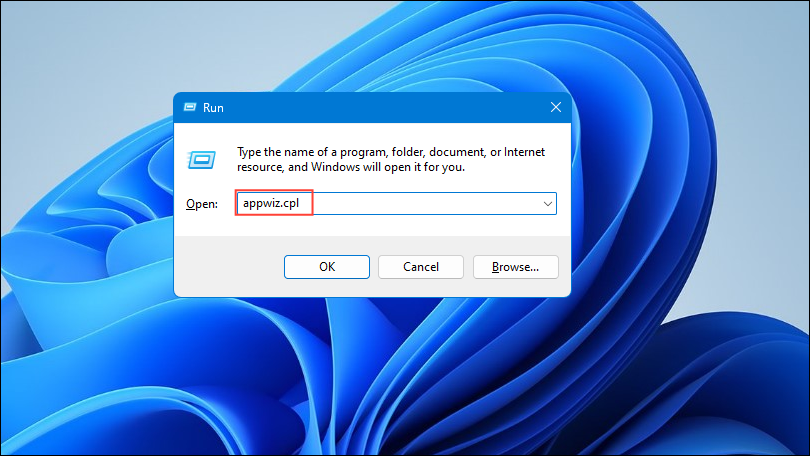
- Open the 'Run' dialog using the
Win + Rshortcut and typeappwiz.cplinside it before pressing Enter.
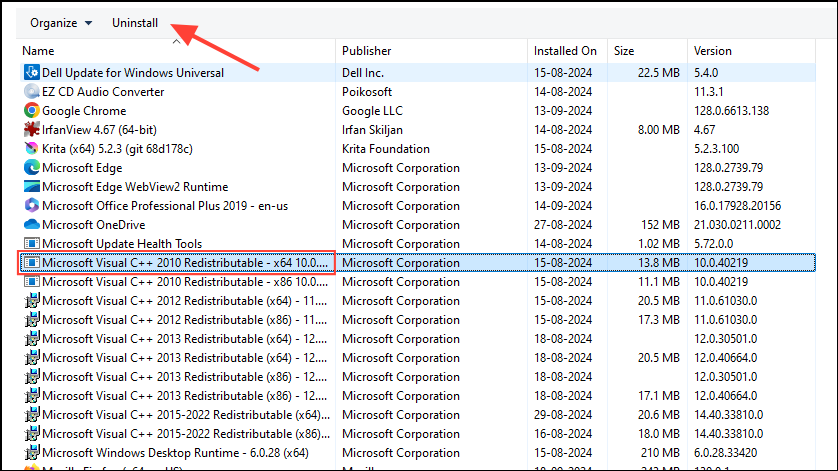
- When the Programs and Features window opens, right-click on all Microsoft Visual C++ programs one by one and click on 'Uninstall' at the top.
- Then go to Microsoft's C++ website and download the libraries from there.
- Install the libraries after downloading them and then restart your PC and check the display resolution setting.
Fix 9: Perform a clean boot
A clean boot disables all third-party services and only keeps the services required for the basic functioning of the OS active. This can help you identify which service or application is causing the display resolution problem.
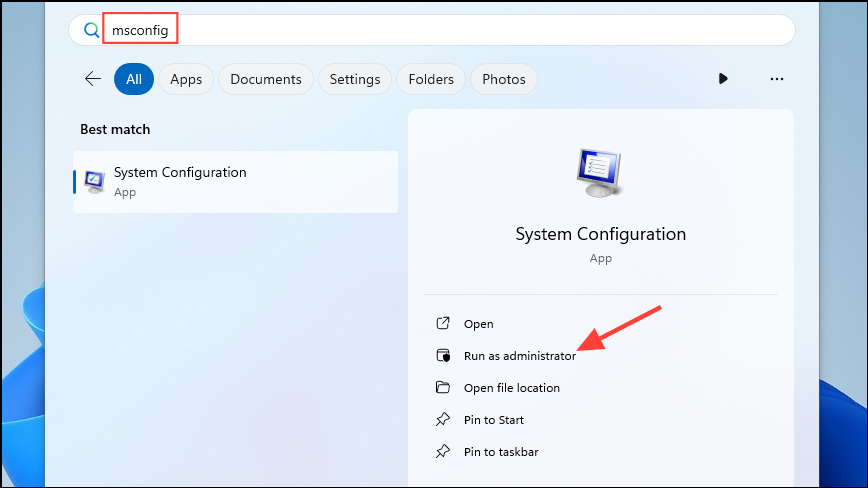
- Open the Start menu, type
msconfig.mscand click on 'Run as administrator'.
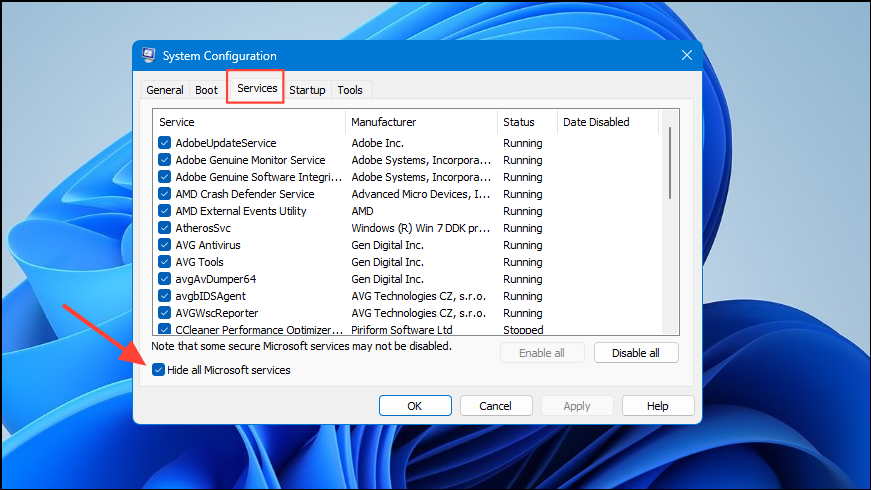
- When the System Configuration utility opens, click on the 'Services' tab at the top and then on the 'Hide all Microsoft services' checkbox at the bottom.
- Next, click on the 'Startup' tab at the top and then on 'Open Task Manager'.

- When the Task Manager opens, right-click on each application on the right side and click on 'Disable' to prevent it from starting when Windows boots.
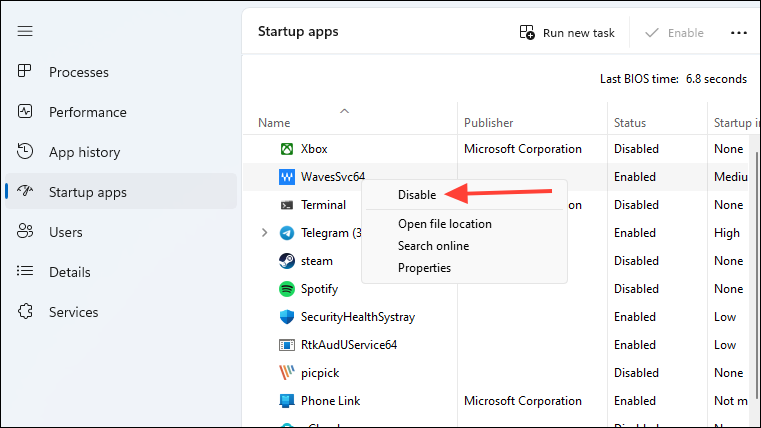
- Close the Task Manager and the System Configuration utility and then reboot your computer. It will boot into a clean state and you can now enable the programs you disabled one by one to find out which one is causing the problem.
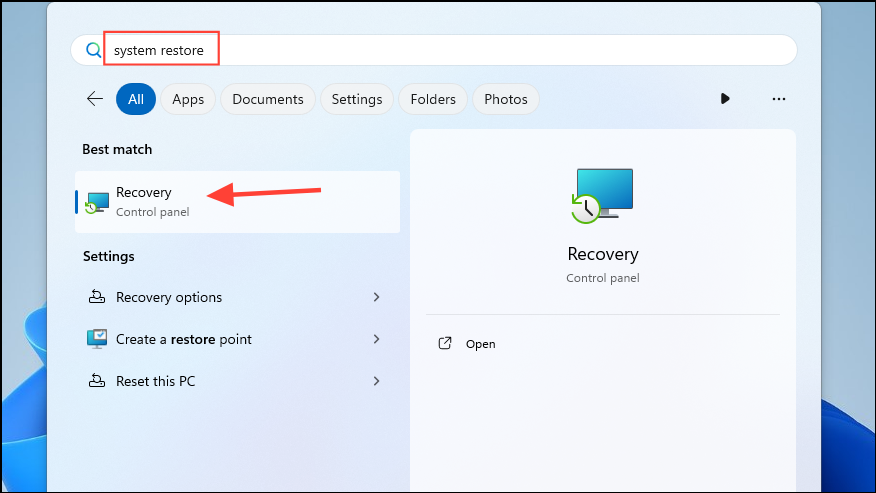
Fix 10: Use system restore
System Restore lets you restore your PC to an earlier time, provided you had set up a restore point earlier. You can use it to revert it to a state when the problem with the display resolution setting was not present.
- Open the Start menu, type
system restoreand click on 'Recovery'.
- Next, click on 'Open System Restore' in the page that opens.
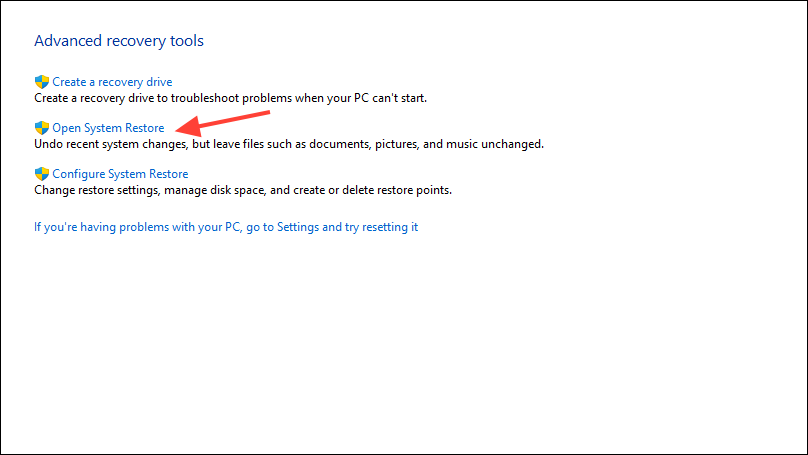
- Now click on the 'Next' button when the System Restore utility opens.

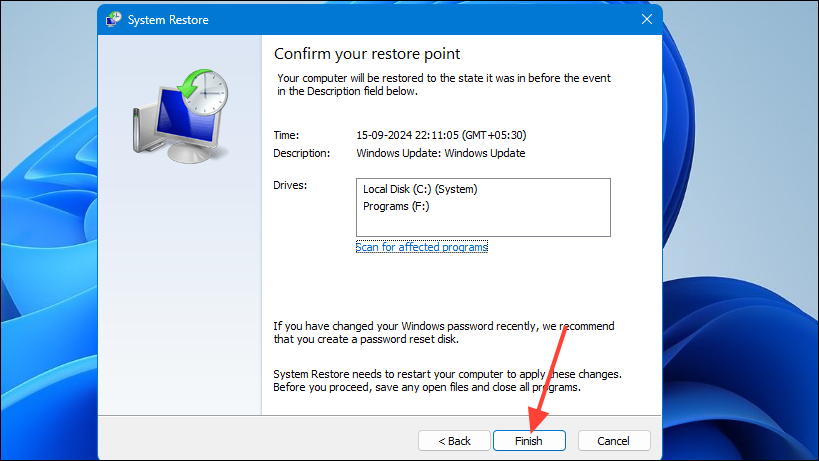
- You will see a list of available restore points. Click on the one you want to select and then click on the 'Next' button.

- Finally, click on the 'Finish' button and your computer will reboot as it restores itself to the restore point you selected. You can then change your display resolution as you like.
Fix 11: Reset your PC
When you reset your PC, it reverts to its default state, removing all your applications and settings. In other words, it is similar to a fresh Windows install, where you will not have any issues related to the display resolution.
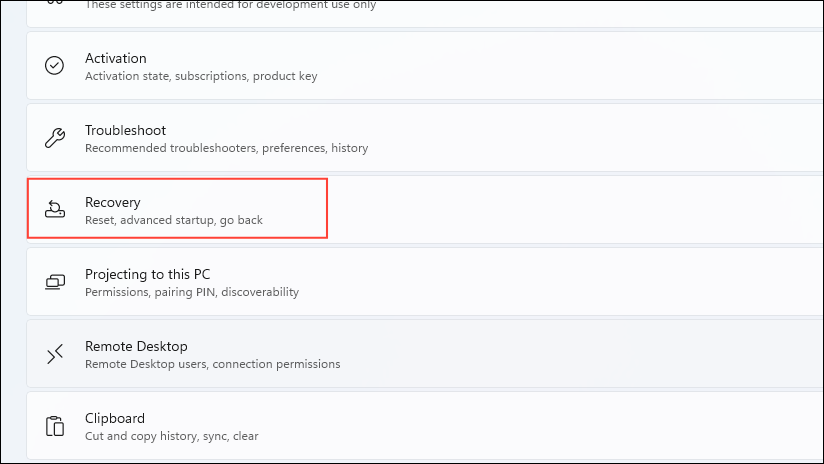
- Open the System page in the Settings app and click on 'Recovery'.
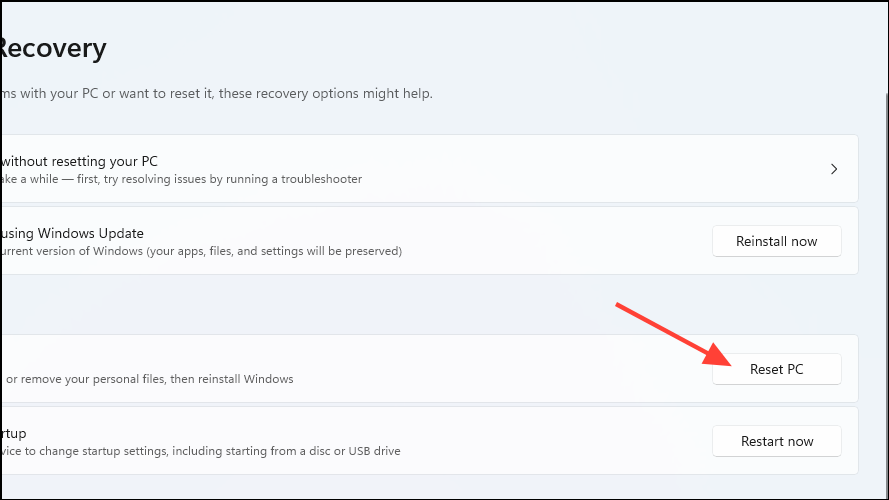
- Then click on the 'Reset PC' button.
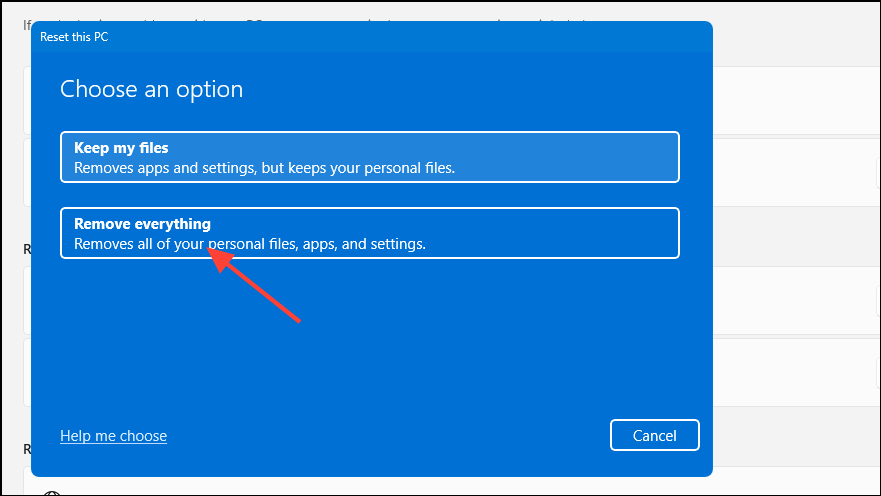
- Click on 'Remove everything' in the pop-up that appears. This will ensure the process goes smoothly without any problems.
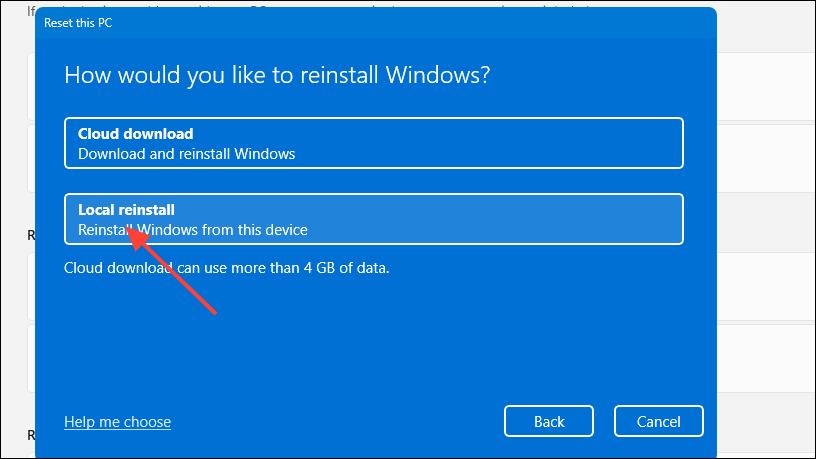
- Then click on 'Local reinstall' to reinstall the OS using the files on your system. If you have a fast and stable internet connection, you can choose the 'Cloud download' option also, which will install the latest updates.
- Wait for the process to complete, which can take some time. Now, you can change the display resolution on your computer.
Things to know
- If your system is missing important updates, it can lead to various issues, such as the display resolution setting being greyed out. You can run Windows Update to check for the latest updates and install them as another possible solution to the problem.
- Another fix is to visit the website of your PC and search for the latest graphics drivers. This can help you in situations when the Device Manager fails to install the correct drivers on your system.
- Sometimes compatibility issues can prevent your graphics driver from being installed correctly. You can right-click on the installer and run it in compatibility mode for an older version of the OS.
- Viruses and malware can cause a variety of issues, so perform a virus scan using Windows Defender or any other third-party antivirus program to check for those. You can then take the necessary steps to remove the viruses from your system.
- Certain programs can also interfere with Windows settings and prevent you from changing them. If you came across the error after installing a program, removing it might help get rid of the error.