The '0x00000709 Operation could not be completed' error usually occurs when you're trying to set a default printer on your Windows computer. It can prevent you from setting up or configuring a printer and you may come across it if a default printer is already set or configured. There are several possible solutions you can try out to get rid of this error.
Fix 1: Check other connected printers
Windows can display the 'Operation could not be completed' error message if you have multiple printers connected to your computer and try to change the default printer. To avoid this, you should first disconnect all the printers except the one you want to set as the default one. Once you've set it as the default printer, you can then reconnect the other printers if you need to.
Fix 2: Try running the printer troubleshooter
If you're getting printer-related errors, you can try running the printer troubleshooter built into Windows to try to resolve them. The troubleshooter will search for issues that are causing the 'Operation could not be completed' error and try to fix them.
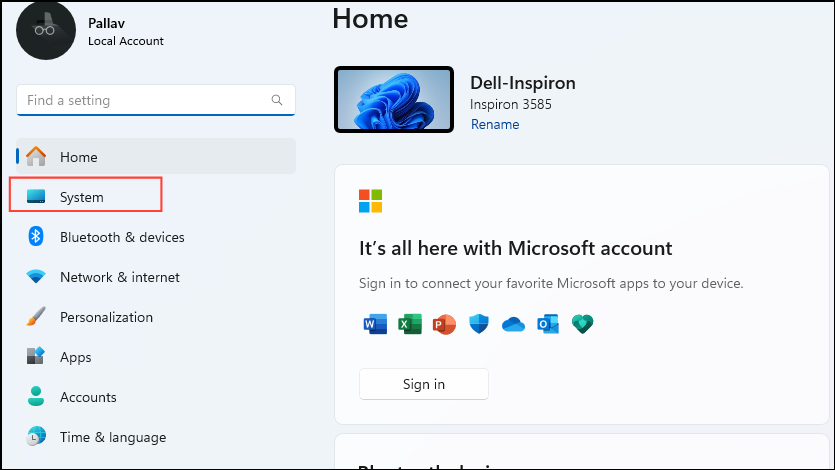
- Open the Settings app from the Start menu or with the
Win + Ishortcut and click on 'System' on the left.
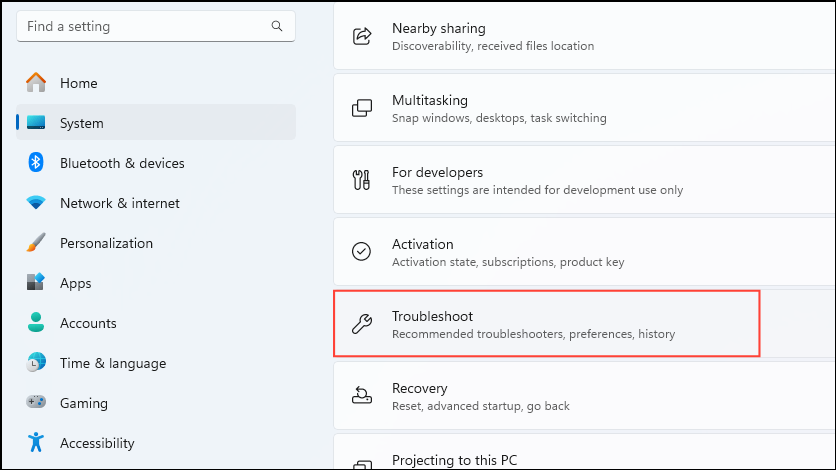
- Scroll down and click on 'Troubleshoot' on the right.
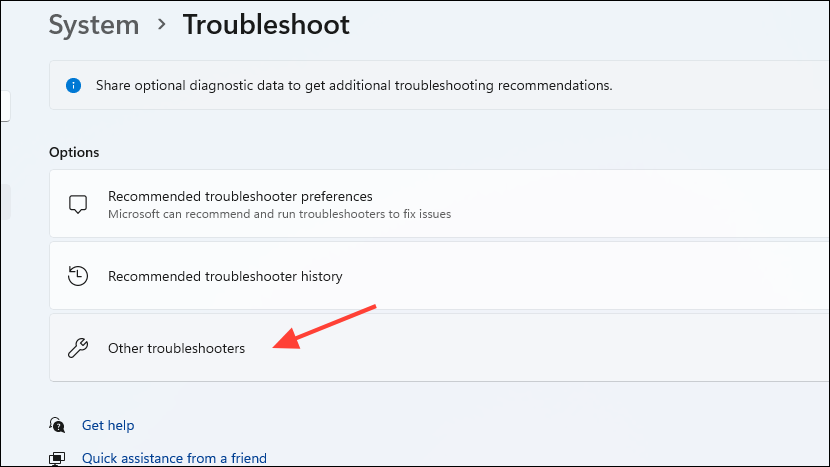
- Then click on 'Other troubleshooters' on the next page.
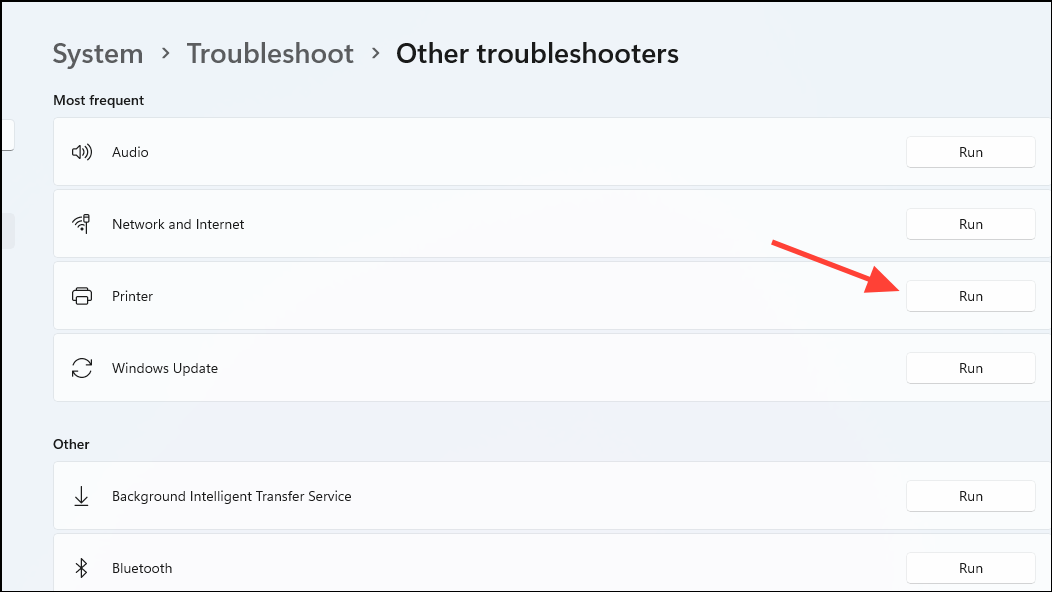
- Click the 'Run' button on the right of the 'Printer' option to run the Printer Troubleshooter.
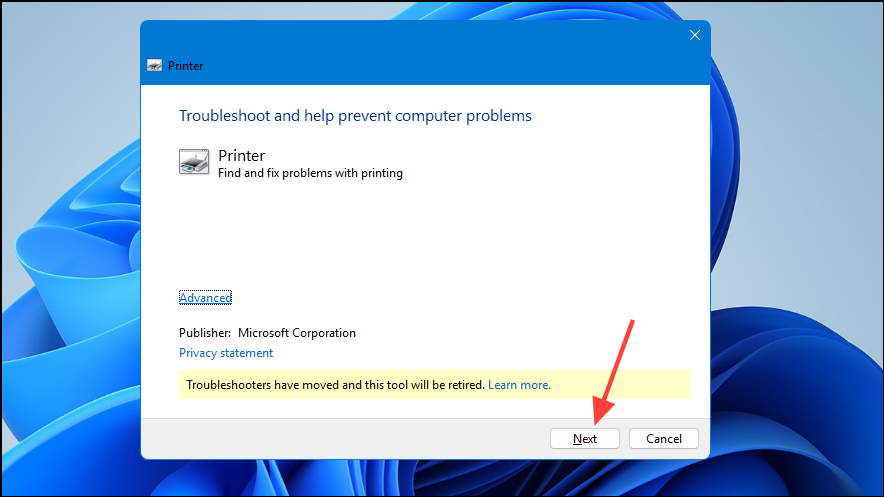
- When the Printer Troubleshooter opens, click the 'Next' button and let it run. Then try to connect and configure your printer again.
Fix 3: Update printer drivers
Outdated drivers can also cause problems when you try to configure the default printer on Windows. Updating the drivers using the Device Manager may help fix them.
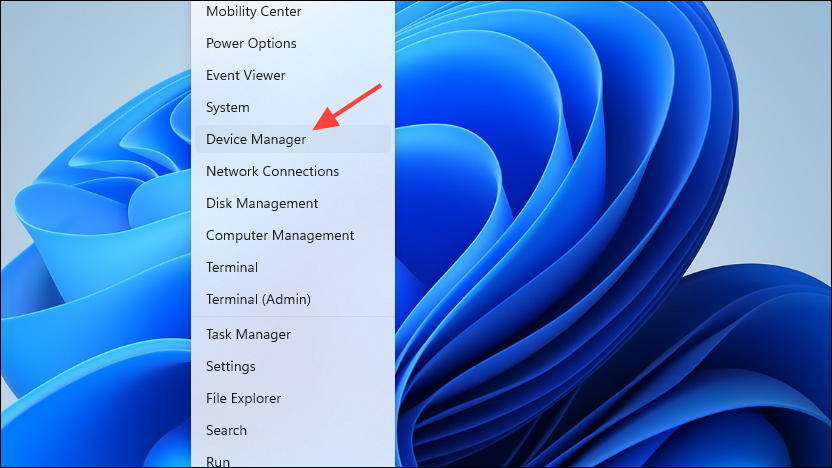
- Right-click on the Start button and click on 'Device Manager' in the menu that shows up.
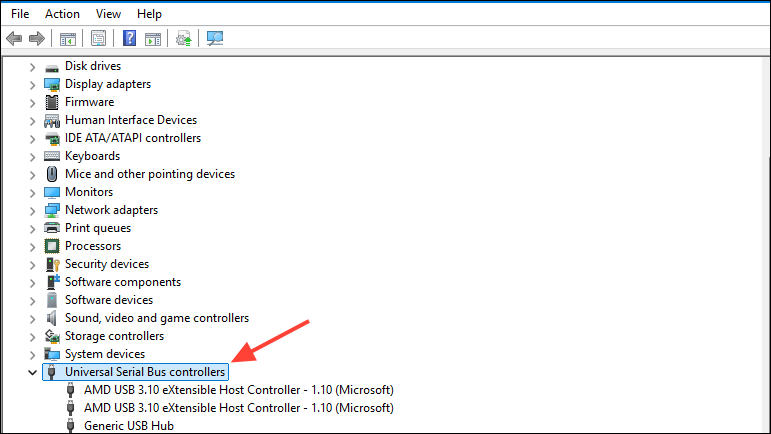
- When the Device Manager opens, click on 'Universal Serial Bus Controllers' at the bottom to expand it.
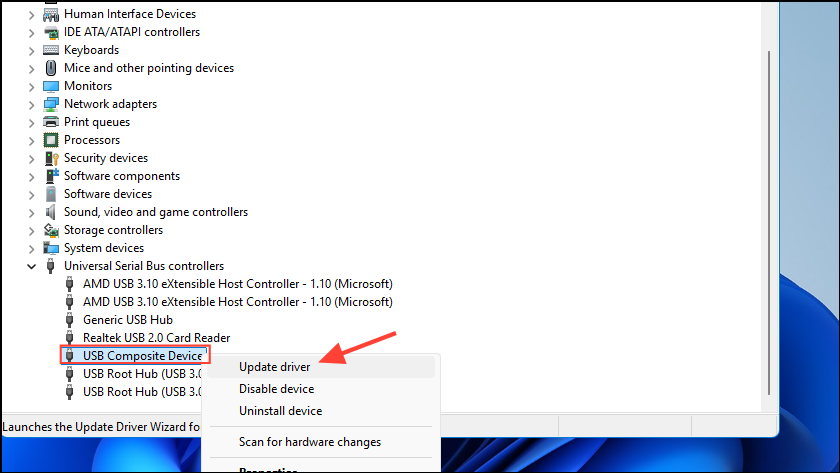
- Right-click on 'USB Composite Device' and click on 'Update driver' in the menu.
- Click on 'Search automatically for drivers' in the dialog box that appears on your screen.
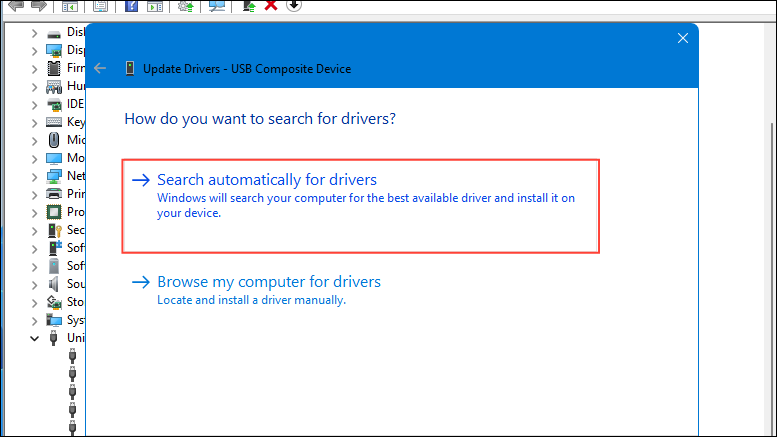
- If Windows finds a new driver, it will download and install it. Reboot your PC and then try setting up your printer again.
Fix 4: Stop Windows from automatically managing the default printer
Windows manages the printer you set as the default one automatically by default. Sometimes this can cause issues like the 'Operation could not be completed' error. In such a case, disabling this option might help sort out the problem.
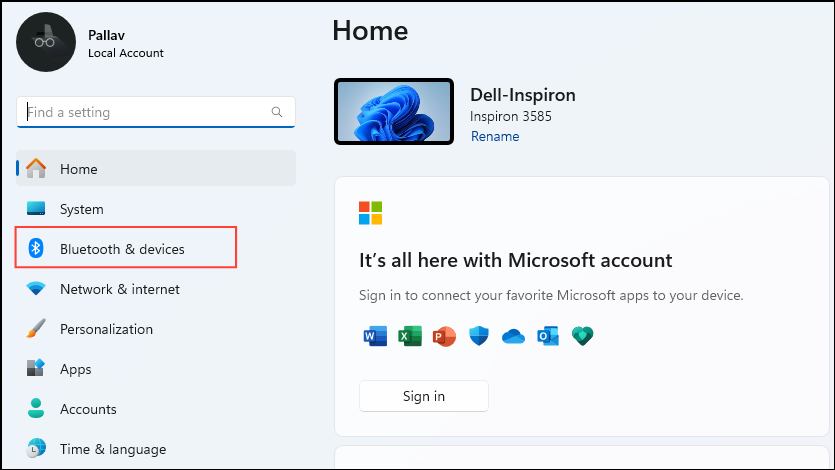
- Open the Settings app and click on 'Bluetooth and Devices' on the left.
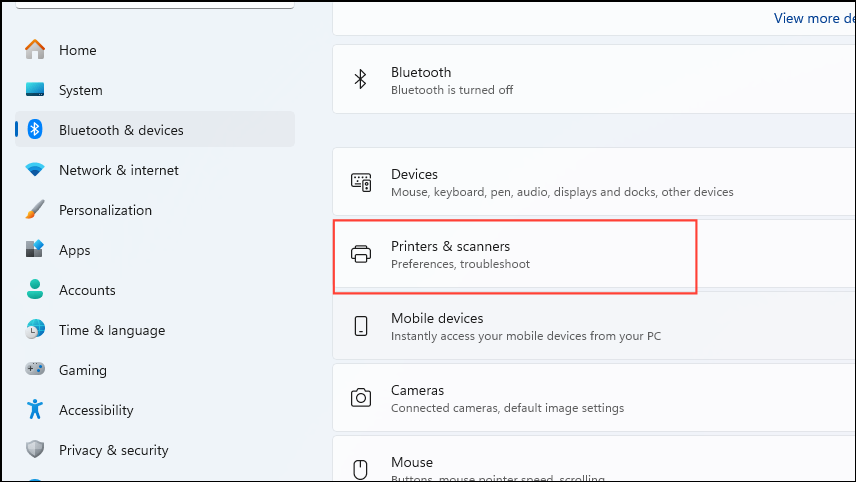
- Then click on 'Printers and Scanners' on the right.
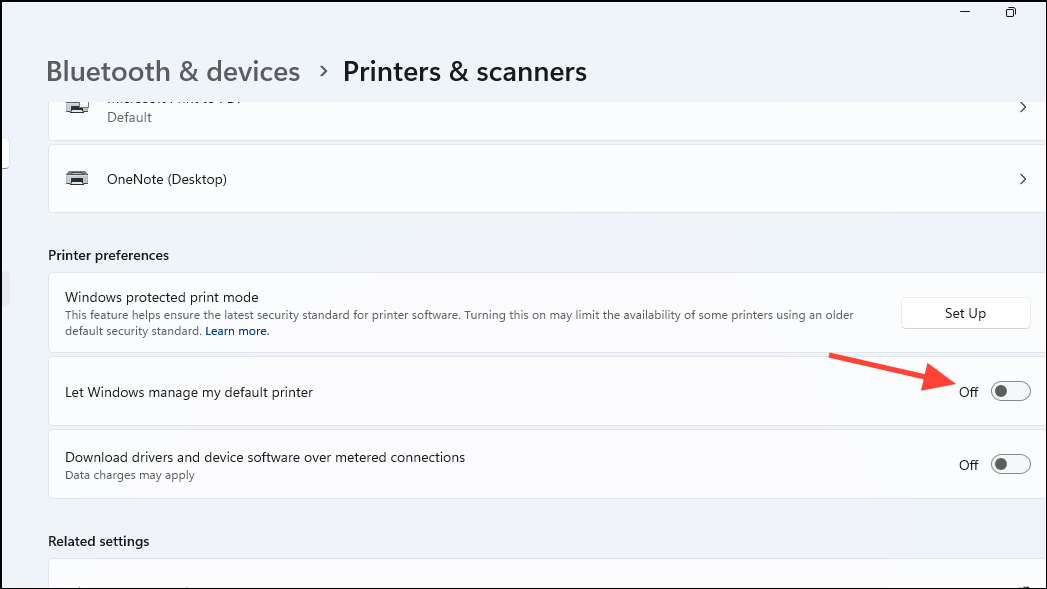
- On the next page, under the 'Printer preferences' section, click on the 'Let Windows manage my default printer' toggle and turn it off.
Fix 5: Restart Print Spooler service
Restarting the Print Spooler service can sometimes clear up bugs that are causing the 'Operation could not be completed' error.
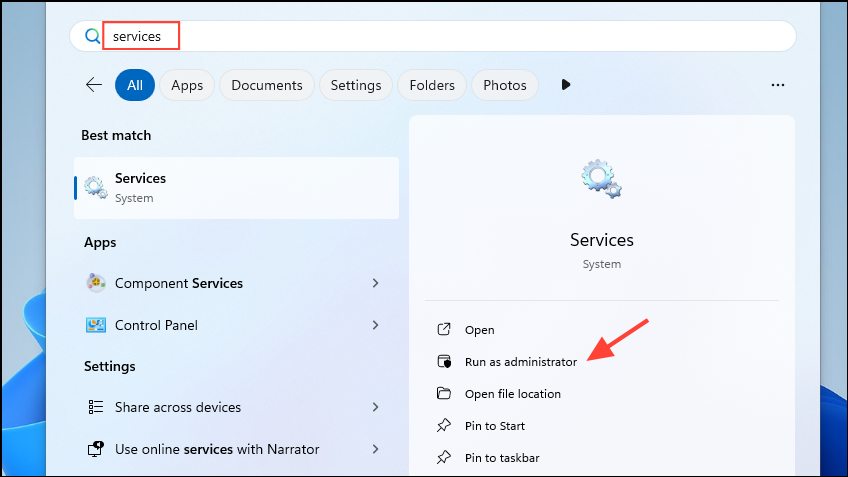
- Open the Start menu, type
servicesand click on 'Run as administrator' to launch the Services utility.
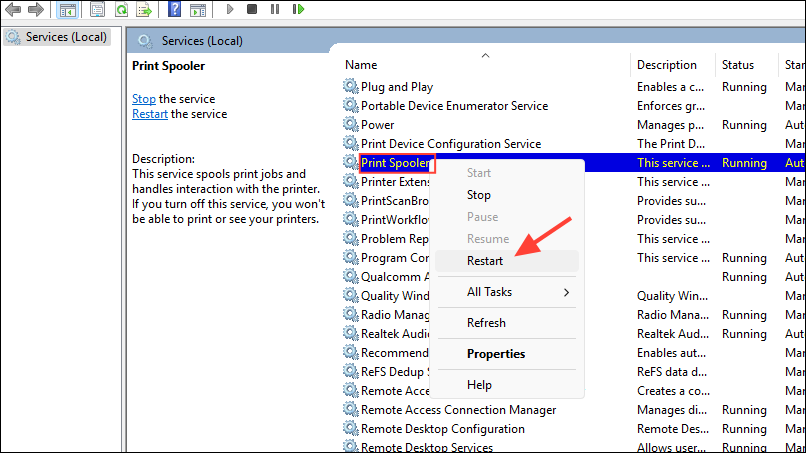
- Scroll down to the 'Print Spooler' service, right-click on it, and select 'Restart'.
- Reconnect your printer and try configuring it after the Print Spooler service has restarted.
Fix 6: Use the Registry Editor to rename the printer
Another solution you can try is to rename your printer in the Registry Editor to fix the 'Operation could not be completed' error.
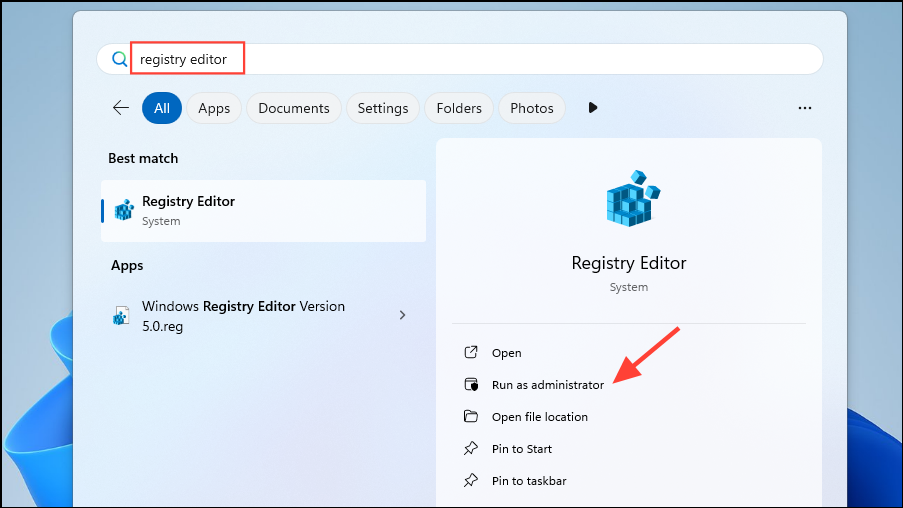
- Open the Start menu, type
registry editorand click on 'Run as administrator'.
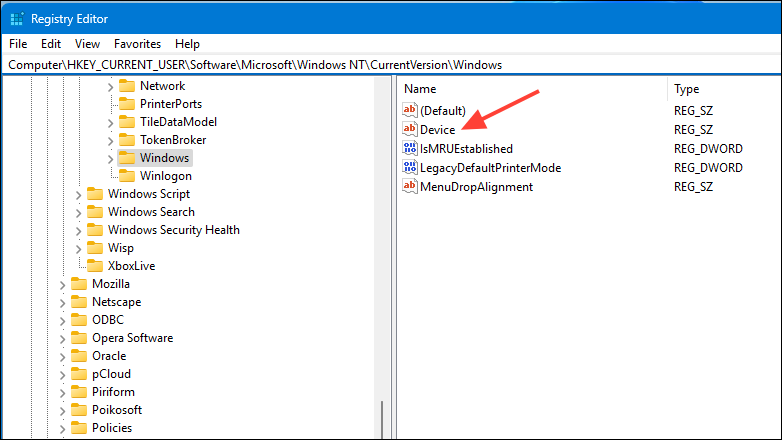
- When the Registry Editor opens, navigate to the following directory:
Computer\HKEY_CURRENT_USER\Software\Microsoft\Windows NT\CurrentVersion\Windows.
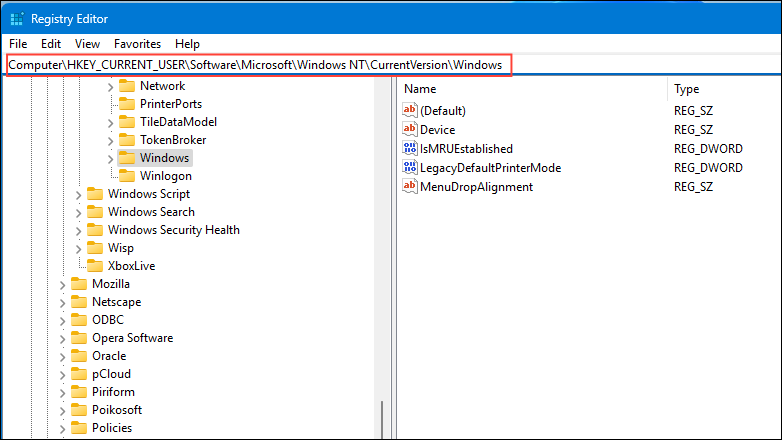
- Double-click on 'Device' on the right side to open it.
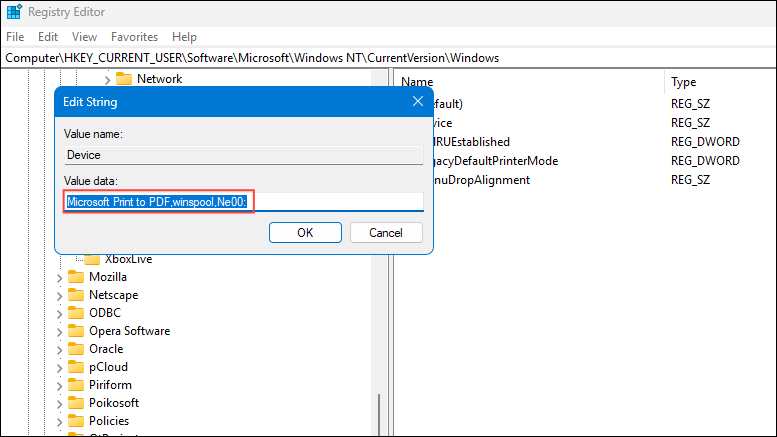
- Enter the name of your printer in the 'Value data' field and then click on the 'OK' button. Then restart your PC before trying to set up your default printer again.
Fix 7: Grant the necessary user permissions
Your user account may not have the required permissions to set up or configure the printer. So, you need to grant those permissions before you can do so.
- Open the Registry Editor and navigate to the following directory:
HKEY_CURRENT_USER\ Software\Microsoft\Windows NT\CurrentVersion\Windows.

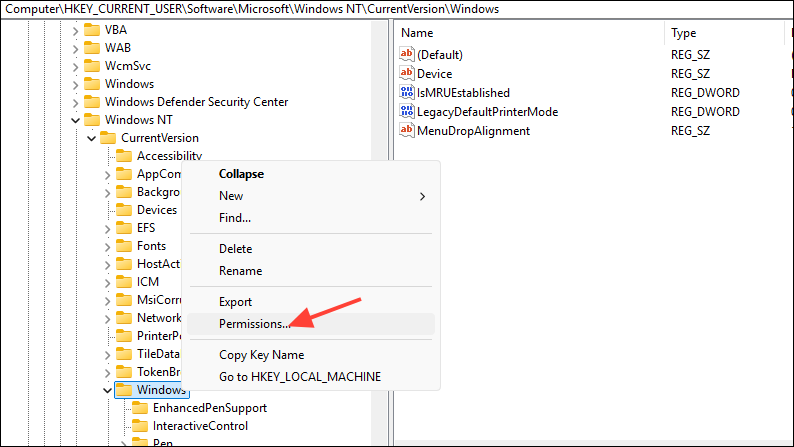
- Right-click on the 'Windows' directory on the left and click on 'Permissions'.
- In the Permissions dialog box, check that the SYSTEM and Administrator accounts have full access. If they don't, click on the 'Allow' checkboxes for Full Control for both accounts. You may have to manually add the accounts if they are not present.
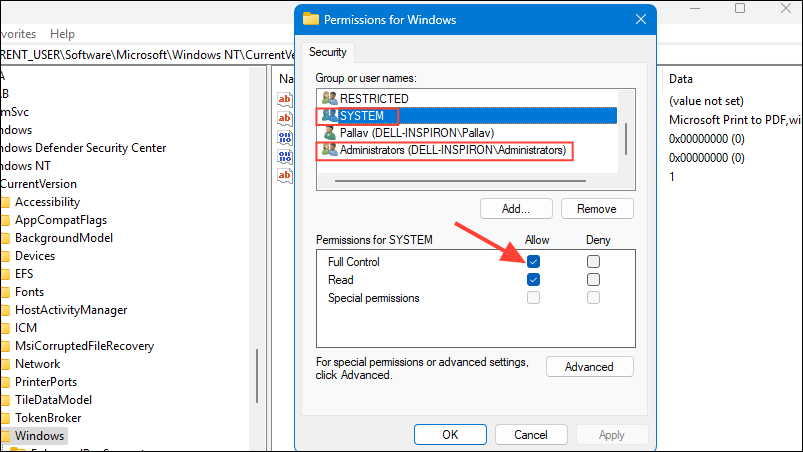
- Save your changes and close the Registry Editor before trying to add your printer again. If the error persists, grant the 'Full Control' permission to the 'Everyone' user account as well and then try again.
Fix 8: Modify the Remote Procedure Call connection settings
After changing the name of your printer, check that it is connected to the network. If it is connected but the error remains, you may have to use the Group Policy Editor to change the Remote Procedure Call or RPC connection settings. However, the Group Policy Editor is not available on the Home editions of Windows, so if you're using that, you will have to rely on other fixes.
- Open the Start menu, type
group policy editorand open the utility when it appears in the search results.
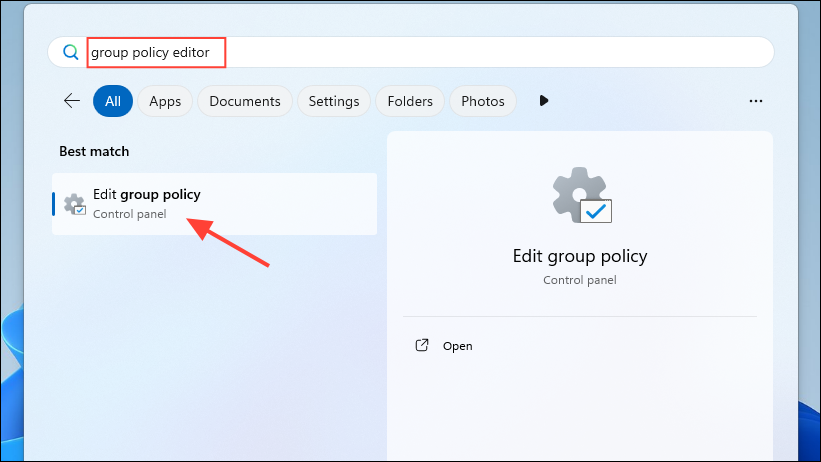
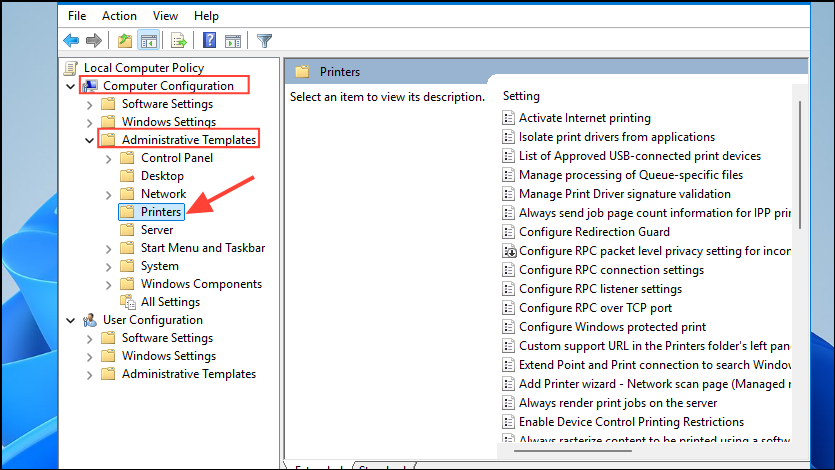
- When the Group Policy Editor opens, click on 'Computer Configuration' on the left and then go to 'Administrative Templates' before clicking on 'Printers'.
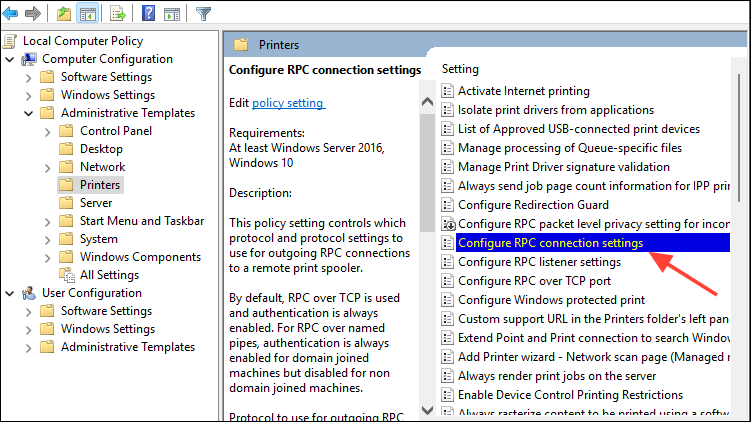
- Double-click on 'Configure RPC connection settings' on the right.
- To turn on the setting, click on the 'Enabled' radio button on the top left.
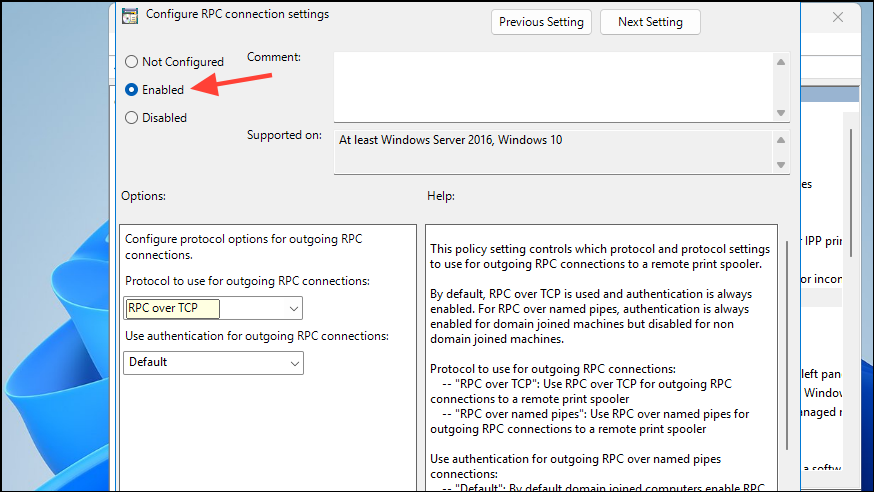
- Then click the 'Protocol to use for outgoing RPC connections' dropdown menu and select 'RPC over named pipes'.
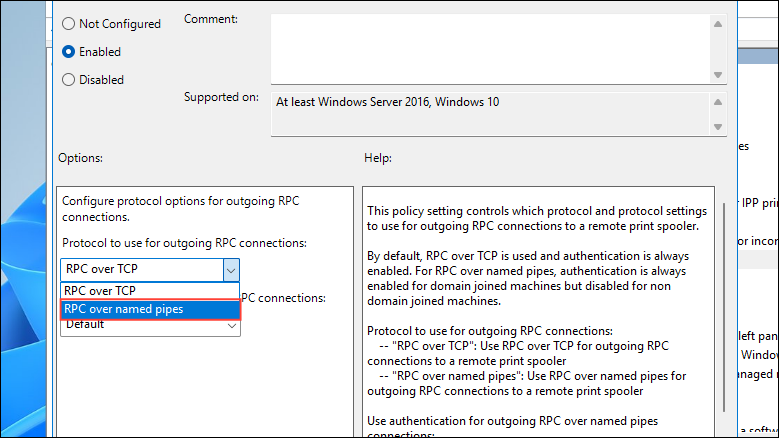
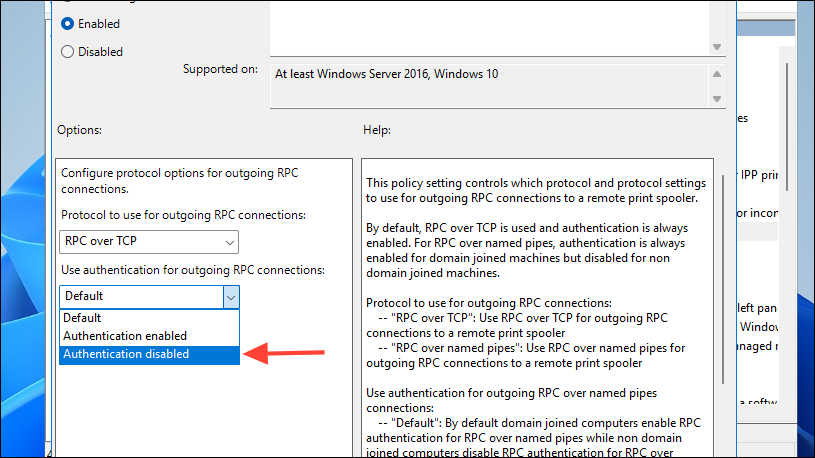
- Click the 'Apply' button and then the 'OK' button before restarting your computer. If this does not solve the problem, open the Group Policy Editor and select 'RCP over TCP'. You can also try disabling authentication from the 'Use authentication for outgoing RPC connections' dropdown menu on the left.
Fix 9: Modify the PointandPrint registry key
The PointandPrint registry key may sometimes cause the 'Operation could not be completed' error. Here is how to configure it properly to avoid this from happening.
- Open the Start menu, type
command promptand click on 'Run as administrator'.
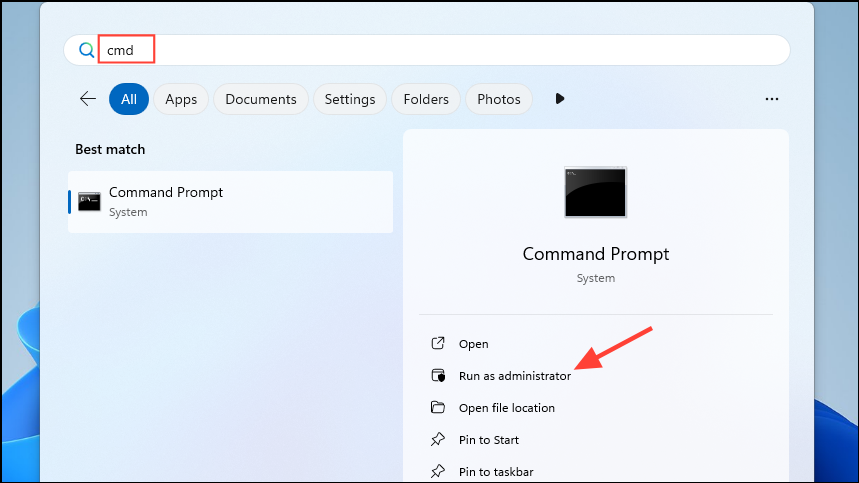
- Paste the following command in the command prompt window and hit Enter:
reg add "HKEY_LOCAL_MACHINE\Software\Policies\Microsoft\Windows NT\Printers\PointAndPrint" /v RestrictDriverInstallationToAdministrators /t REG_DWORD /d 1 /f.
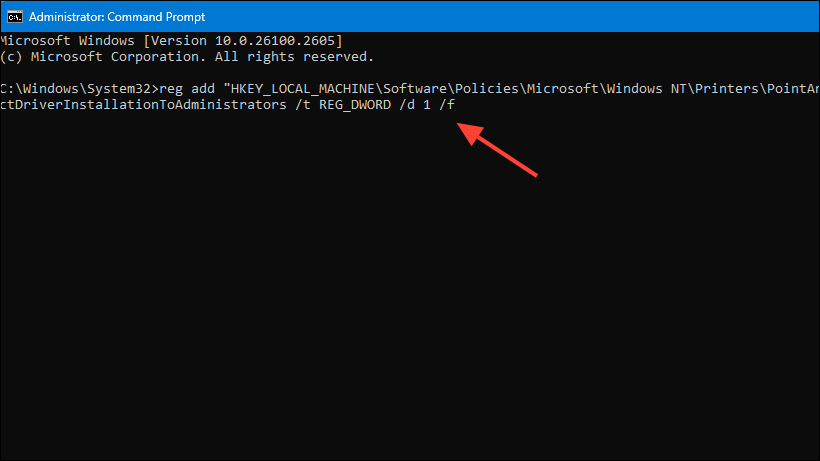
- If the command runs successfully, reboot your PC and then try configuring your printer again.
Fix 10: Uninstall Windows Updates
The 'Operation could not be completed' error may have started appearing after you installed a Windows Update. In that case, uninstalling that update might help fix the problem.
- Open the Settings app and click on 'Windows Update' on the bottom left.
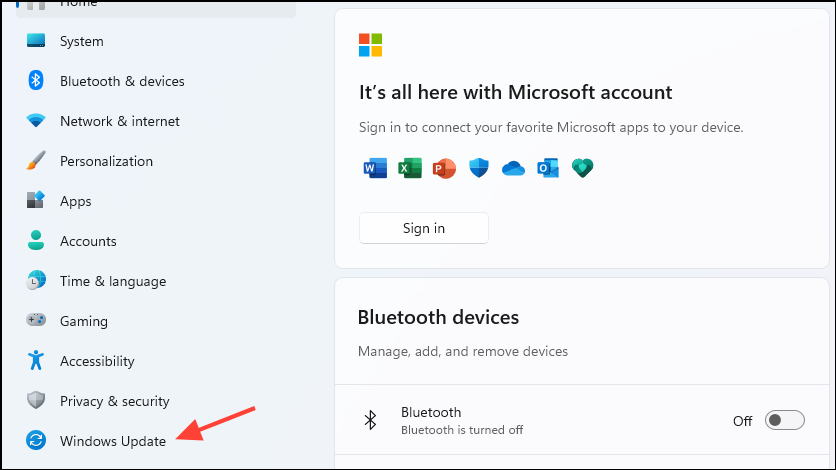
- Next, click on 'Update History' on the Windows Update page.
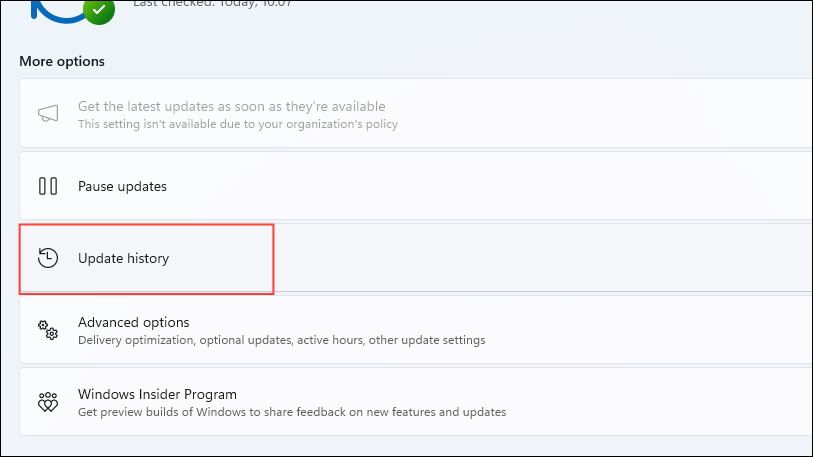
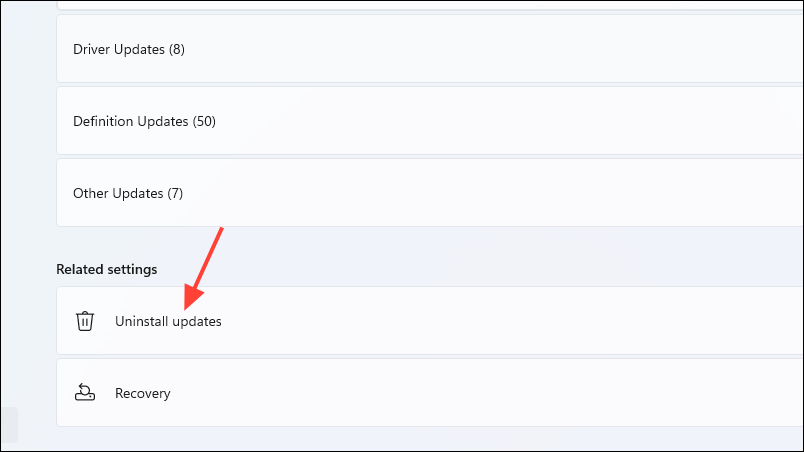
- Scroll down to the 'Related settings' section on the next page and click on 'Uninstall updates'.
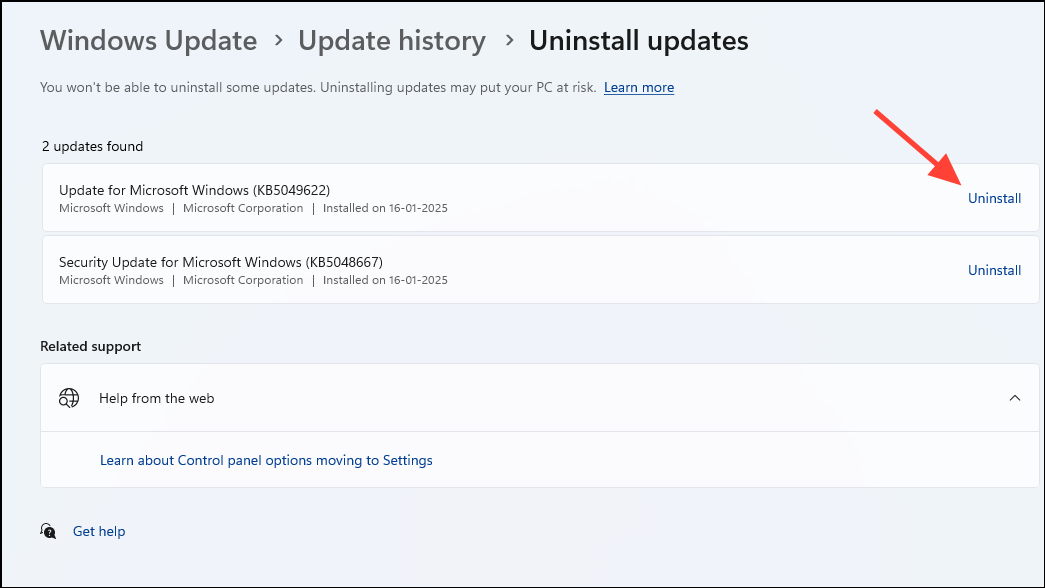
- You will see the updates that you can uninstall. To remove an update, click on 'Uninstall' on the right. Restart your computer and then try configuring your default printer again.
Things to know
- When trying to fix the 'Operation could not be completed error', first check your printer name and make sure it is connected to the network. Also, make sure that the printer cord and other wires connect properly to your computer and are not damaged.
- Sometimes a hard reset can help solve printer issues. Turn off your computer and unplug the printer cord and any other wired connections from it. Wait for around two minutes before reconnecting your printer and other wires to your PC. If you have a wireless printer, check that it is on the same network as your computer. Then restart the Print Spooler service as explained above.
- It is a good idea to disconnect all additional devices and peripherals when troubleshooting your printer. These can sometimes cause interference and prevent Windows from identifying the correct device you want to set up.


