- There are lots of ways by which you can speed up Windows 11 on older hardware, such as disabling animations, turning off startup apps, and getting rid of bloatware and adware, among others.
- You can also use built-in features like the Efficiency Mode, automatic maintenance, and Storage Sense to keep your system running optimally.
- While tweaking and adjusting Windows 11 settings can help speed up your system, upgrading your hardware like adding more RAM and moving from an HDD to an SSD is often more impactful.
- With new features constantly being added to the OS that will require more resources, you may have to eventually upgrade to a new PC that can run Windows 11 properly.
1. Disable animation effects
Windows 11 comes with a lot of new animation effects which help enhance the user experience. Unfortunately, these effects can also slow it down on older systems, so if you're running the OS on older hardware, it is best to turn these effects off.
- Use the
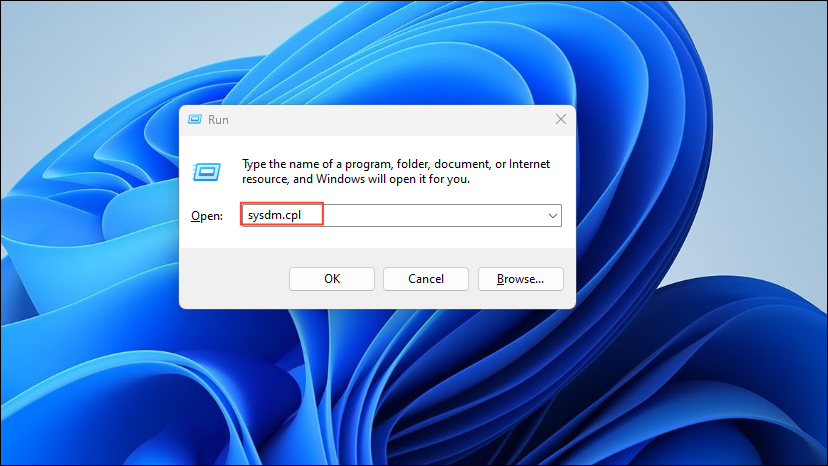
Win + Rshortcut to open the 'Run' dialog, then typesysdm.cplin it and press Enter.
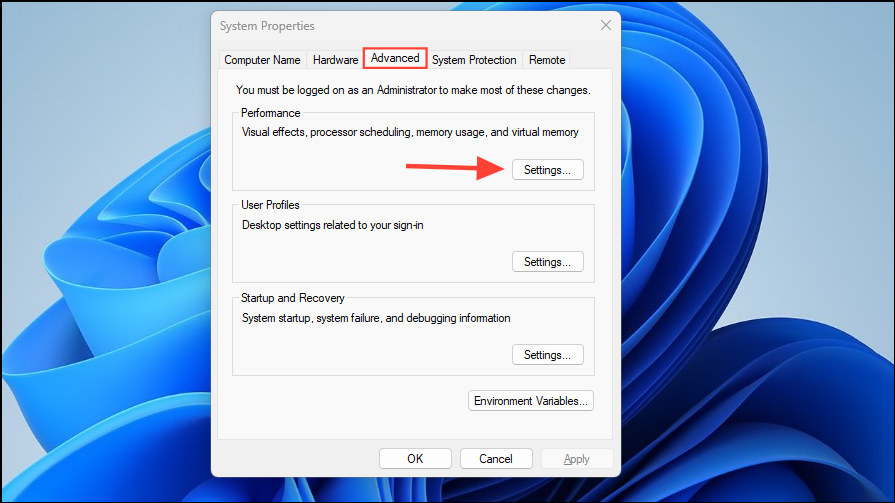
- When the System Properties dialog box appears, click on the 'Advanced' tab and then on the 'Settings' button in the Performance section.
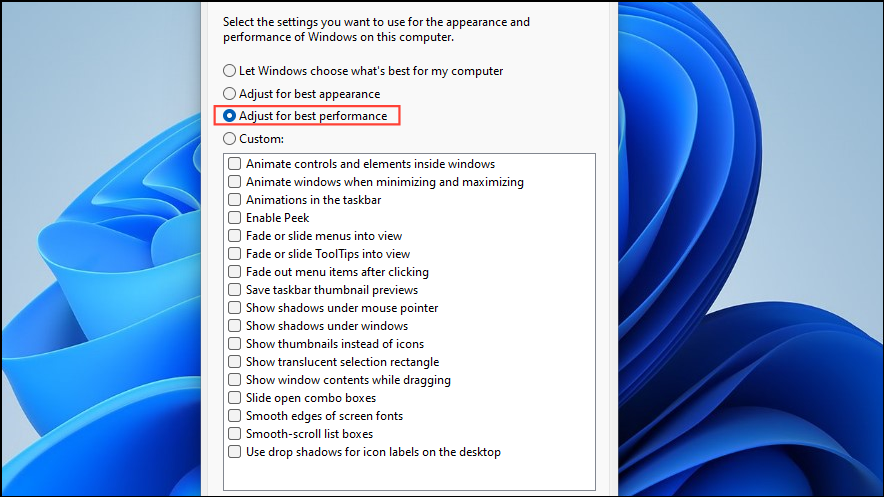
- Now you will see a list of different animation effects. Click on the checkboxes for the effects you want to disable.
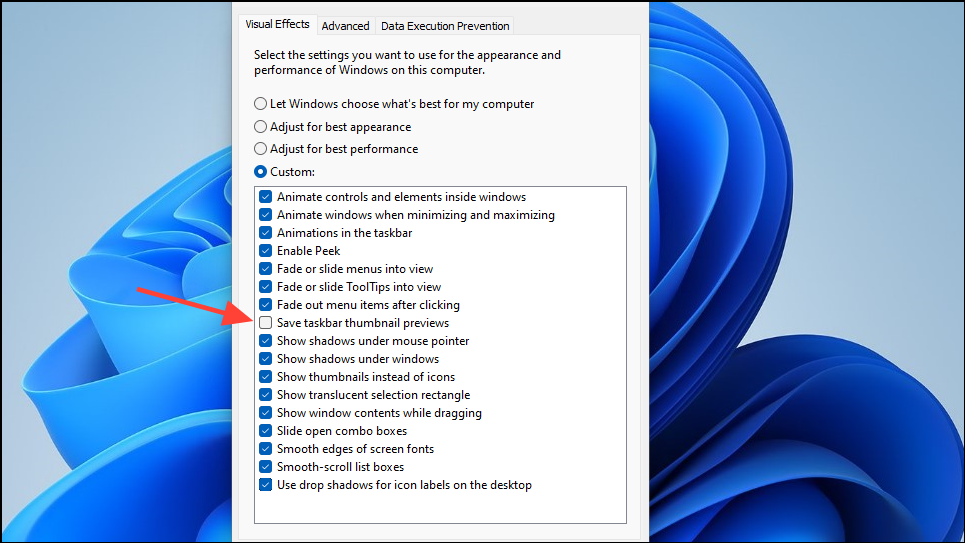
- If you want to disable all animation effects, simply select the 'Adjust for best performance' option. Then click on the OK button.
2. Turn off animation and transparency effects
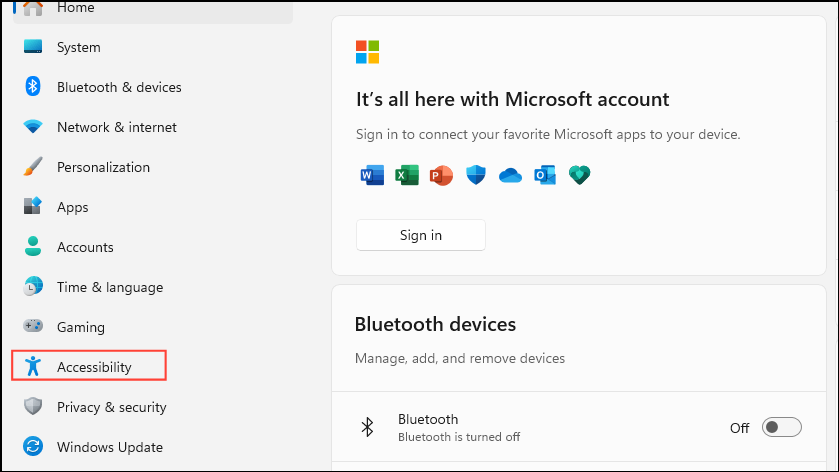
- Open the Settings page using the
Win + Ishortcut and then click on 'Accessibility' on the left.
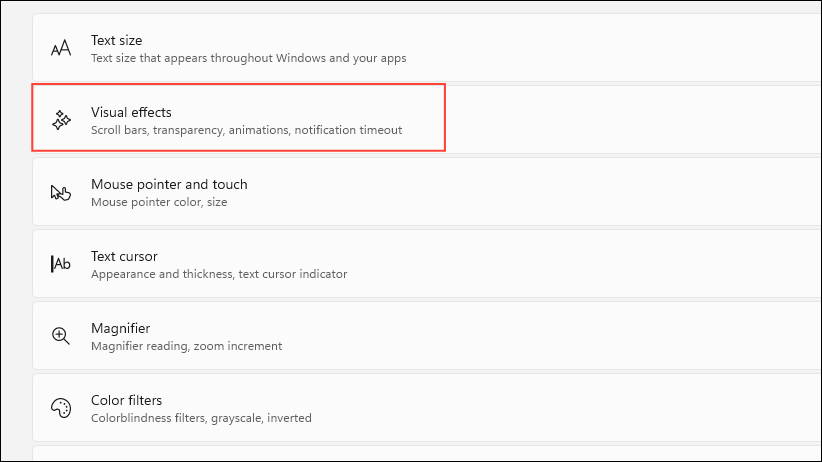
- On the Accessibility page, click on 'Visual Effects'.
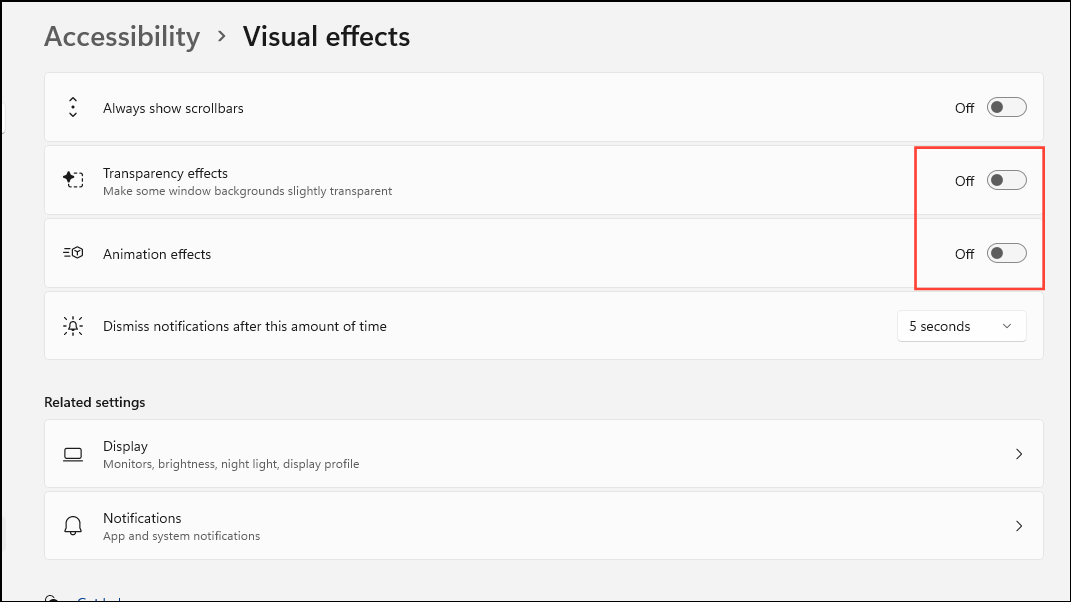
- Now click on the toggles for 'Transparency Effects' and 'Animation Effects' and turn them off.
3. Disable Startup apps
Startup apps can slow your device when it boots up, so disabling them can help improve performance, especially on older hardware.
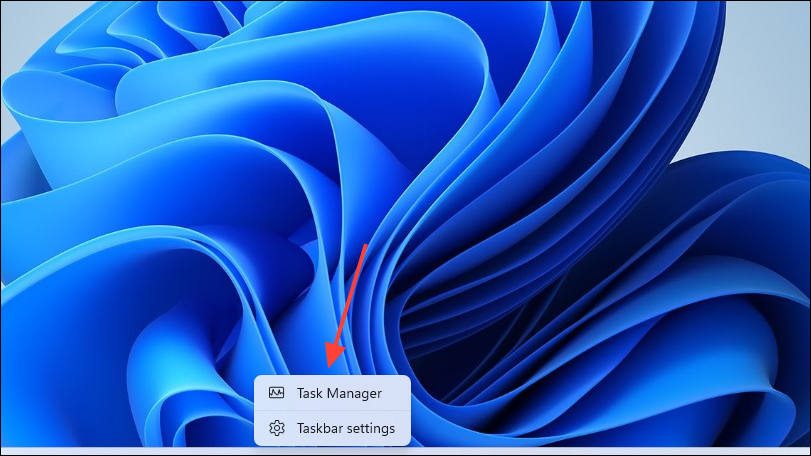
- Right-click on the taskbar and click on 'Task Manager'.
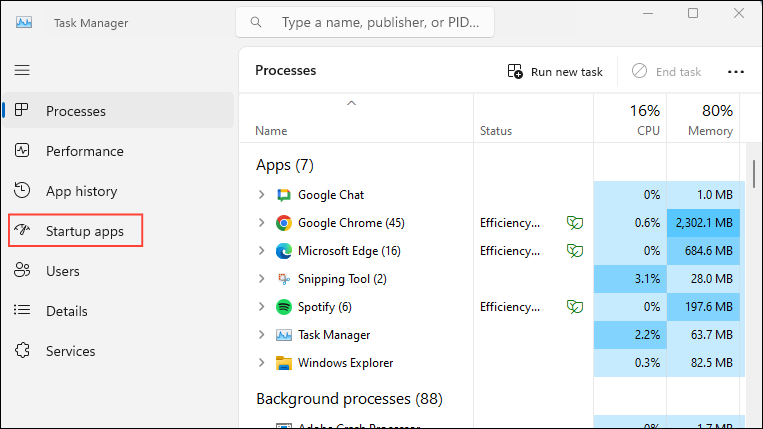
- When the Task Manager launches, click on the 'Startup apps' tab on the left.
- All startup apps will appear on the right. Right-click on an app that has a high impact on performance and click on 'Disable'.
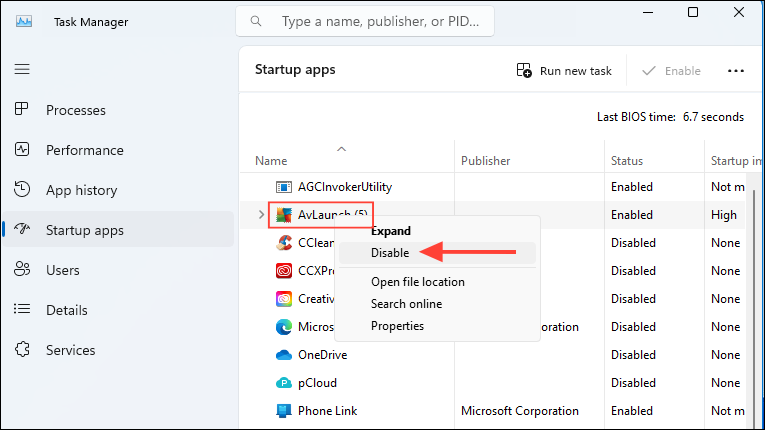
- Repeat the steps for other high-impact startup apps but avoid disabling system apps as those are required for your computer to function normally.
4. Bring the classic context menu back
The new right-click menu in Windows 11 is a bit slower than the classic one, so you can revert to it to speed up your PC.
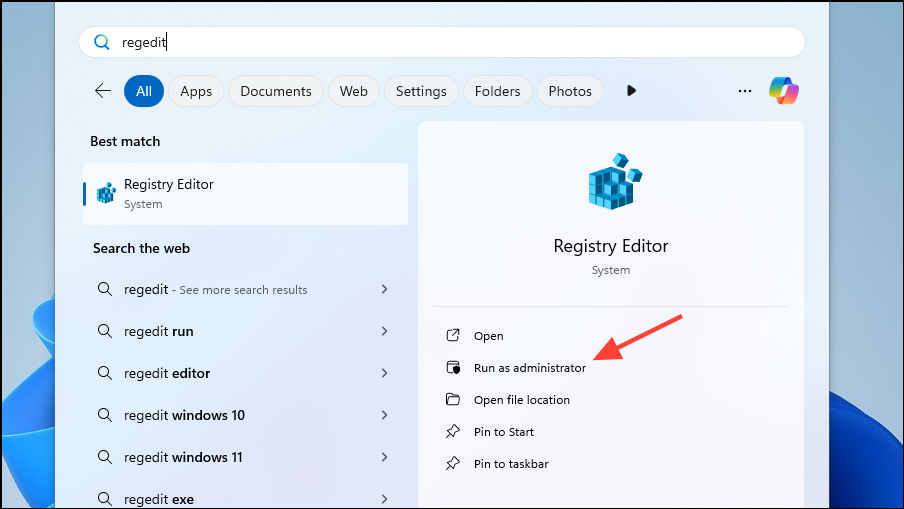
- Open the Start menu, type
regeditand click on 'Run as administrator'.
- Once the Registry Editor opens, navigate to the following directory:
Computer\HKEY_CURRENT_USER\SOFTWARE\CLASSES\CLSID\
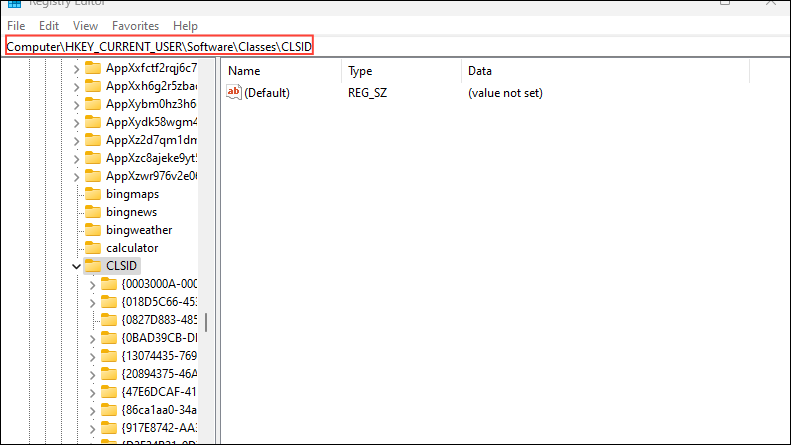
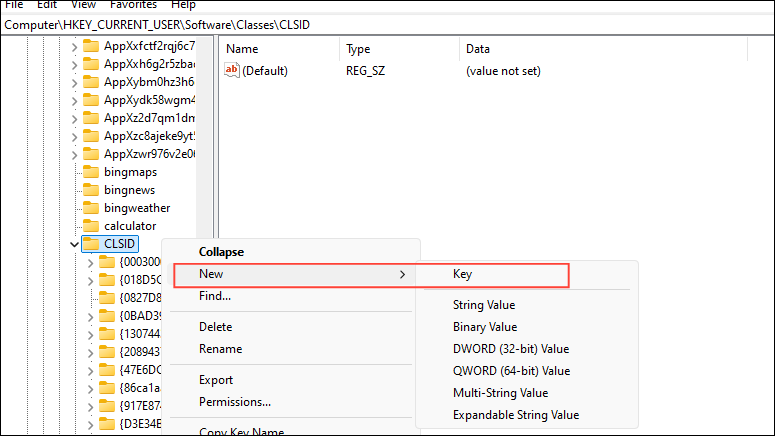
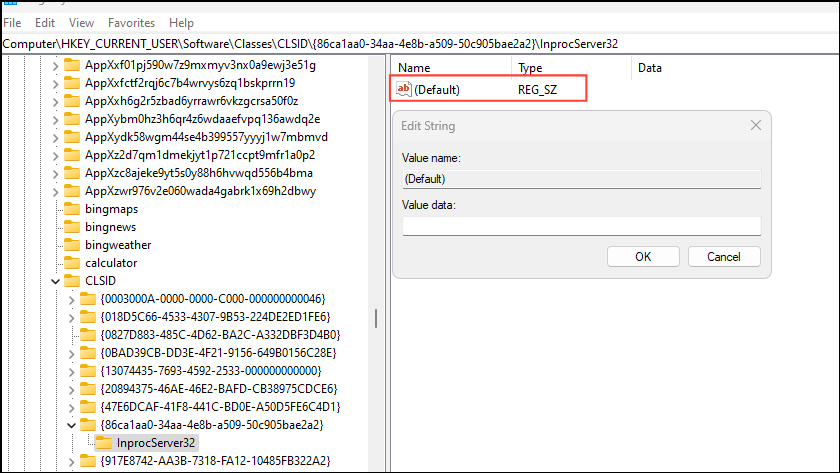
- Now, right-click in an empty area on the left and click on 'New' and then 'Key'.
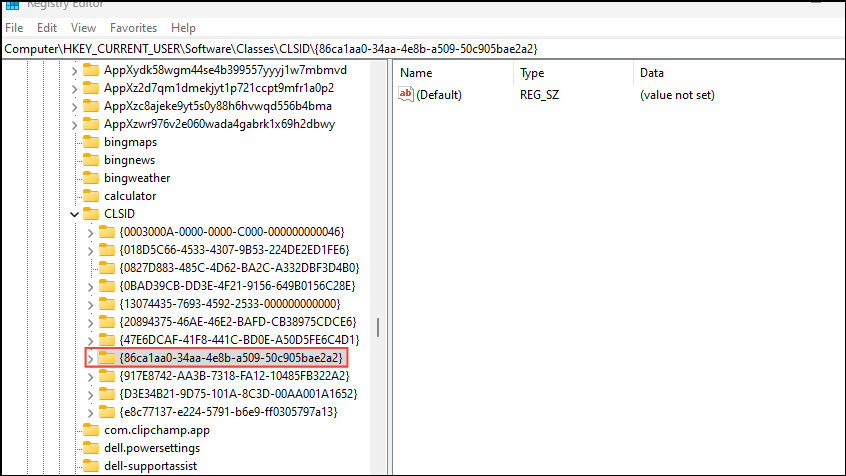
- Name the newly created key:
{86ca1aa0-34aa-4e8b-a509-50c905bae2a2}.
- Now, right-click on the new key and again create a new key. Name this key
InprocServer32.
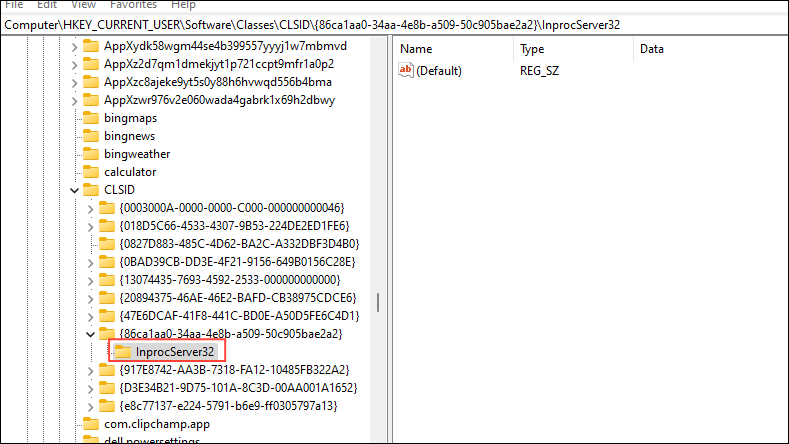
- Double-click on the 'Default' string on the right but do not input any value and just leave the Value data field blank. Then close the Registry Editor and restart your PC.
5. Turn on Efficiency Mode
Windows 11 22H2 introduced Efficiency Mode, which can not only improve your PC's performance but also its battery life. You can use it to enhance certain apps and processes.
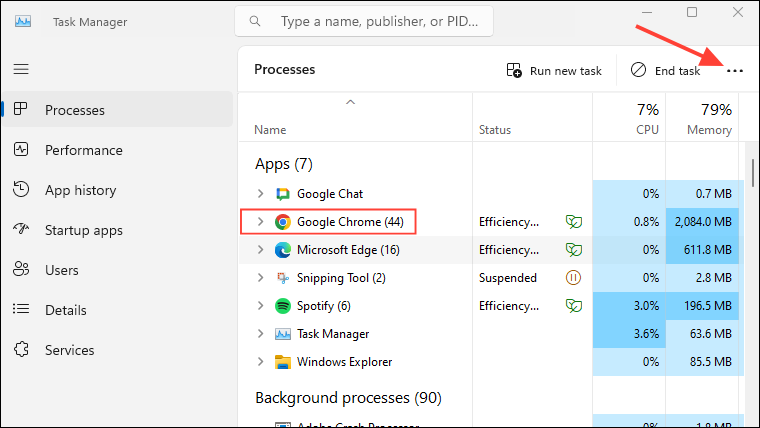
- Open the Task Manager to see all the active processes and applications on your computer.
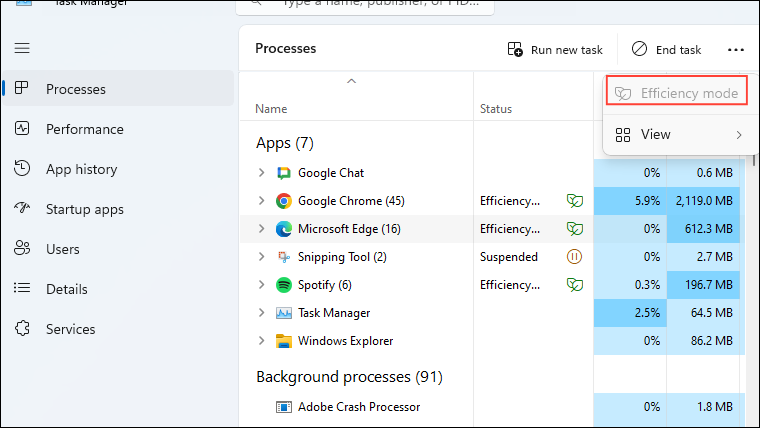
- Click on the application you want to put into Efficiency Mode and then on the three dots on the right.
- If Efficiency Mode is available, click on it to turn it on. If the option is grayed out, you will not be able to use it for that app.
6. Enable automatic Windows maintenance
Windows automatically performs maintenance tasks that help your PC function optimally. However, if you shut your computer down or have accidentally turned automatic maintenance off, it can cause your PC to become slow. You can turn the feature back on to solve the problem.
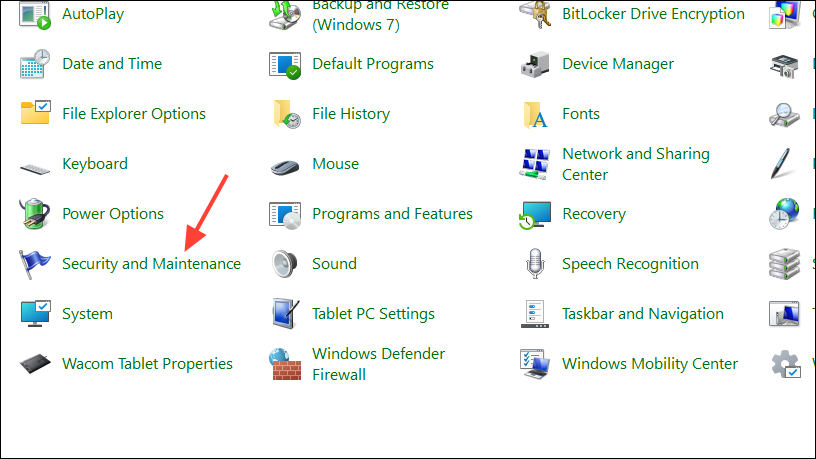
- Open the Control Panel and click on 'Security and Maintenance'.
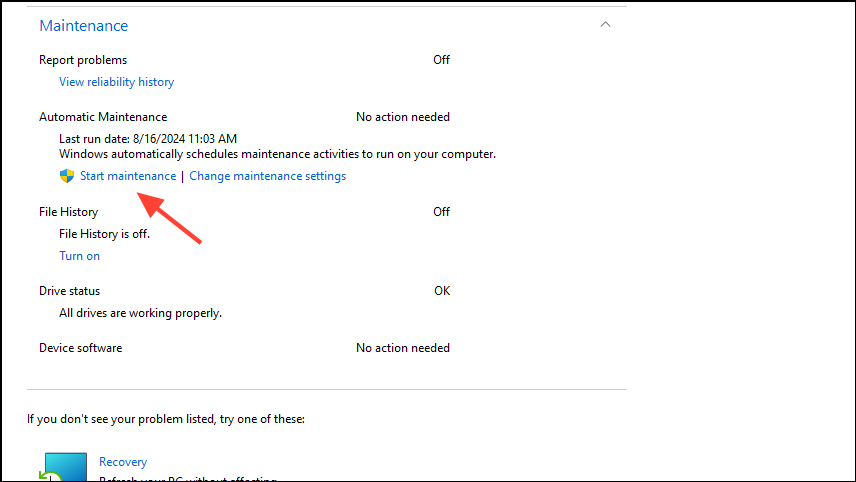
- Now click on the 'Maintenance' section to expand it. If you want to run automatic maintenance immediately, click on 'Start Maintenance'.
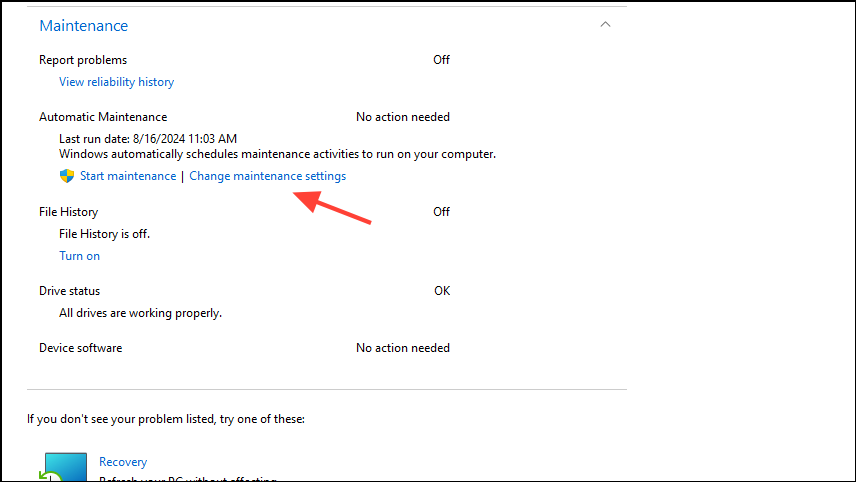
- To ensure it runs daily, click on 'Change maintenance settings'.
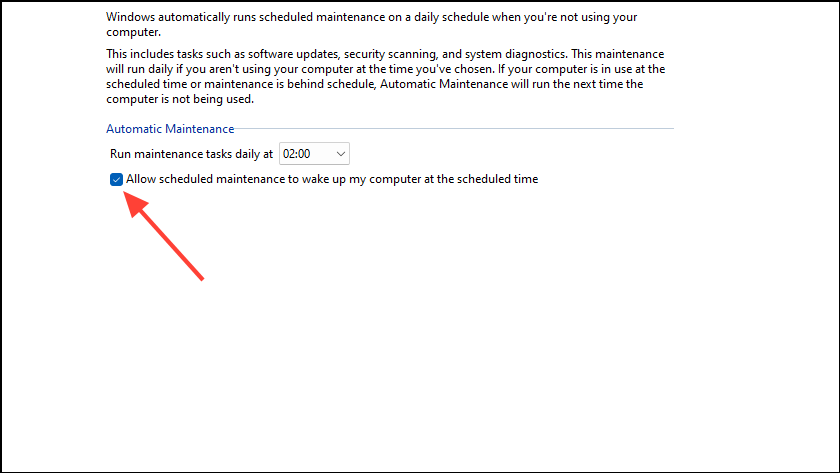
- Click on the checkbox for the 'Allow scheduled maintenance to wake up my computer at the scheduled time'. Then click on the OK button.
7. Get rid of bloatware, adware, and malware
Your Windows 11 PC may be slowing down because of adware and bloatware, and the effects will be most apparent when running the OS on older hardware. Additionally, it may be infected with malware that can also impact performance. To speed up your PC and keep it safe, you need to scan your system and get rid of such software.
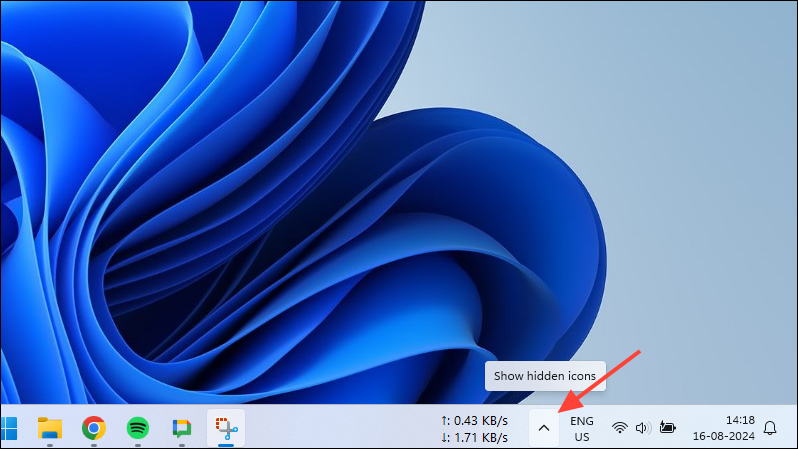
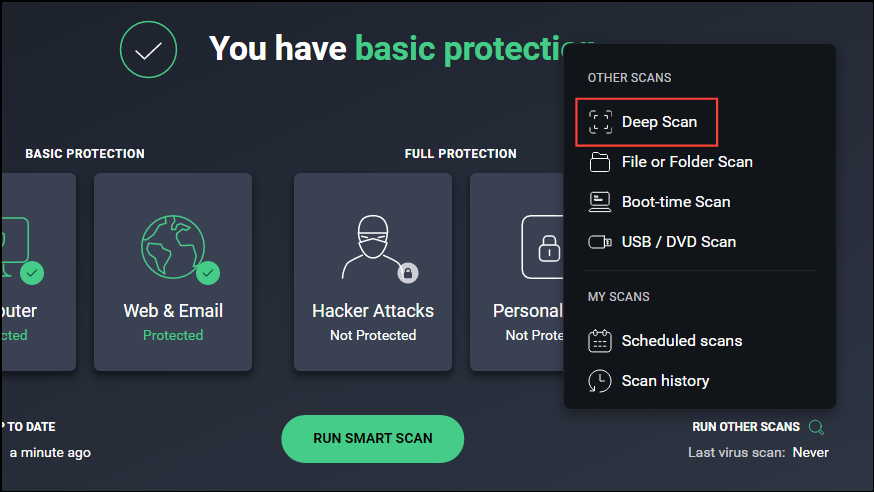
- You can use Windows Defender or a third-party antivirus tool to scan for malware. Open your antivirus from the Start menu or by clicking on the taskbar overflow icon.
- When the antivirus program opens, click on 'Complete scan' or 'Deep scan' whichever is present, and let it scan your system. If it finds any malware, perform the suggested actions to get rid of it.
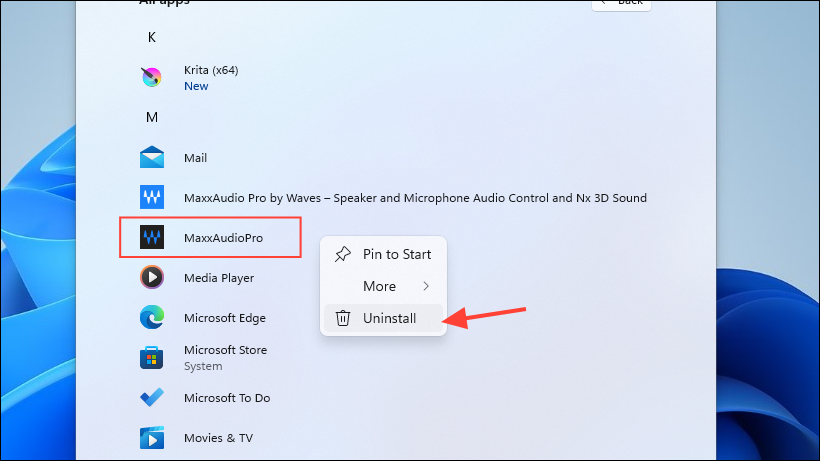
- To remove bloatware, you can manually search for it in the Start menu, then right-click and click on 'Uninstall' to remove it.
- Alternatively, you can use third-party tools like Bulk Crap Uninstaller to remove bloatware and adware from your PC.
8. Disable search indexing
Search indexing allows Windows to provide search results quickly, but can negatively affect the performance of your computer. If you're using an older PC, consider turning the feature off.
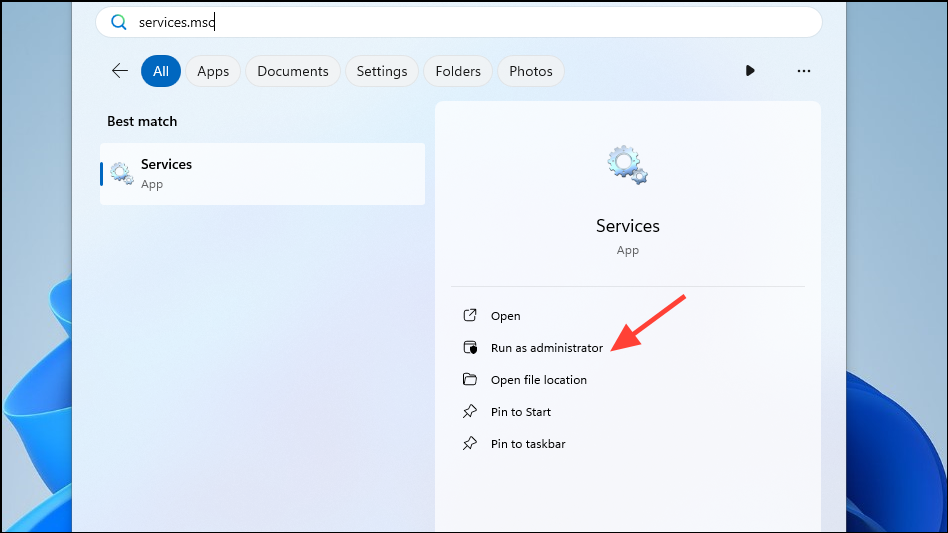
- Open the Start menu, type
services.mscand click on 'Run as administrator'.
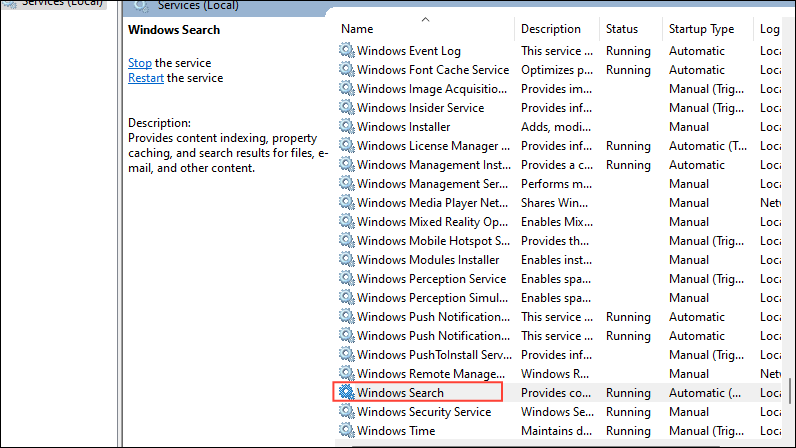
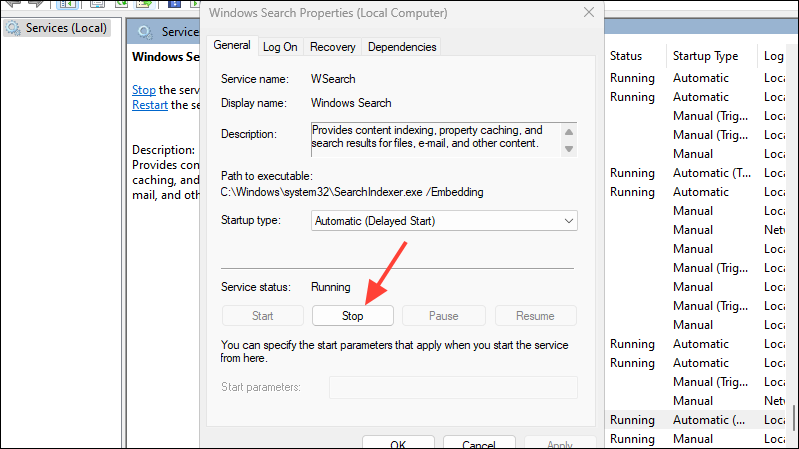
- When the Services utility opens, scroll down to 'Windows Search' or 'Indexing Service' and double-click on it.
- Click on the 'Stop' button in the dialog box that appears and then restart your computer.
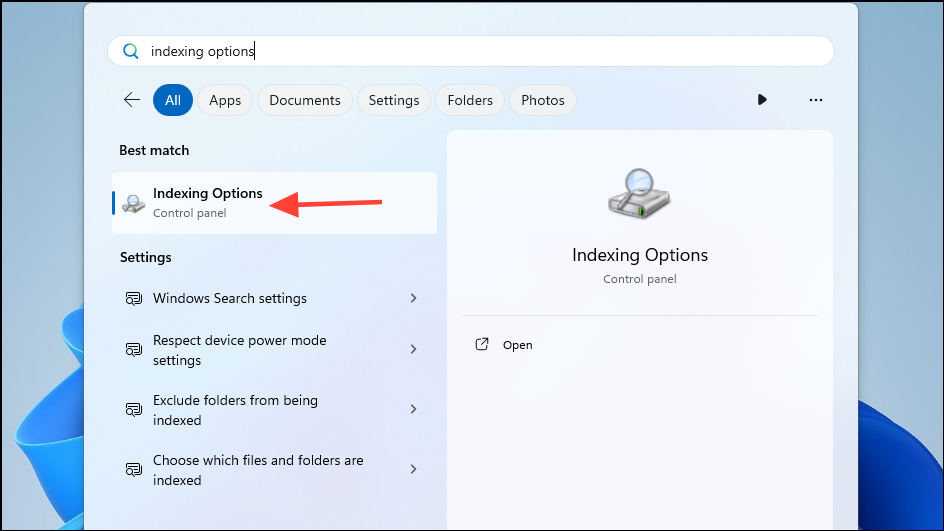
- If you want to disable indexing only in certain locations, open the Start menu, type
Indexing Optionsand click on it when it appears in the search results.
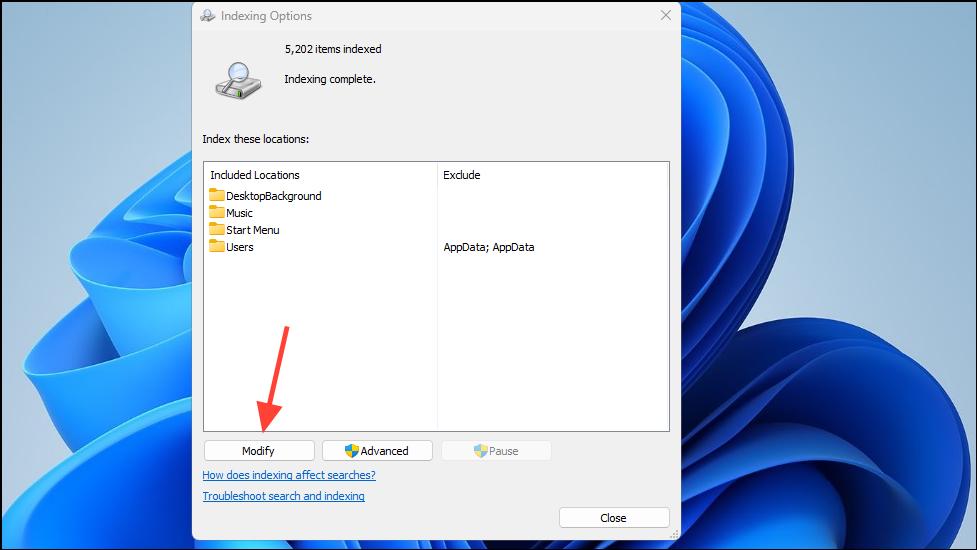
- When the Indexing Options window opens, click on the 'Modify' button.
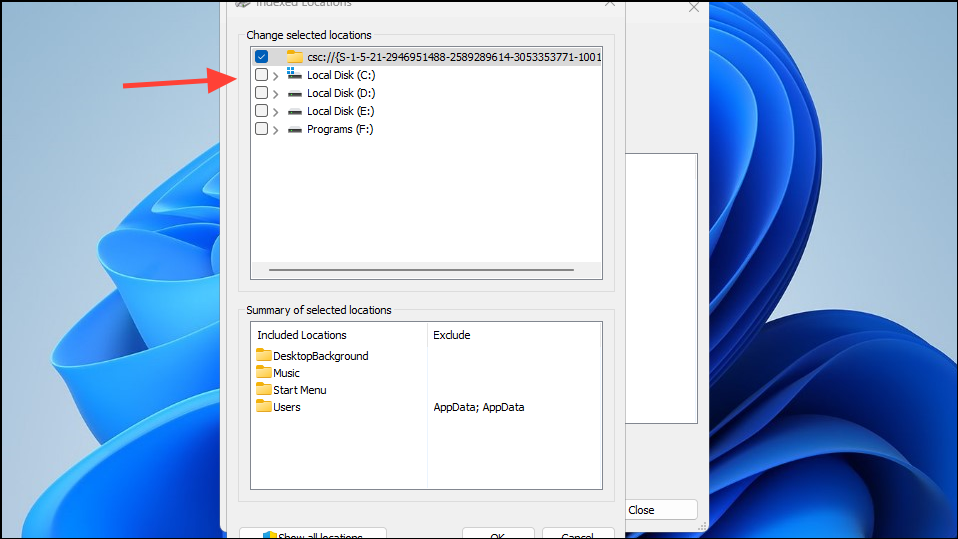
- Now you will see the various locations that are being indexed. You can click on the checkboxes to disable the locations you do not want Windows to index.
9. Turn on Storage Sense
The hard disk or SSD on which your PC is running usually contains a lot of files, many of which you do not need. Despite that, they take up storage space and can cause your computer to slow down. While you can manually find and delete the files, Windows has a built-in feature called Storage Sense that makes things easier by automatically keeping your system clean.
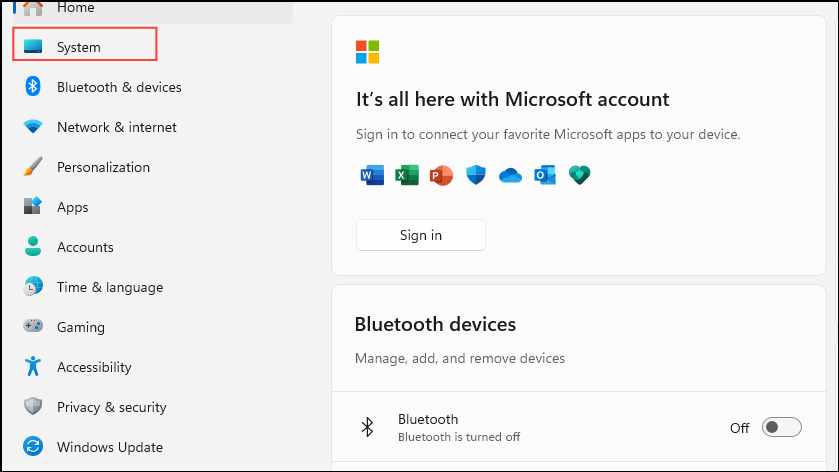
- Open the Settings app and click on 'System' on the left.
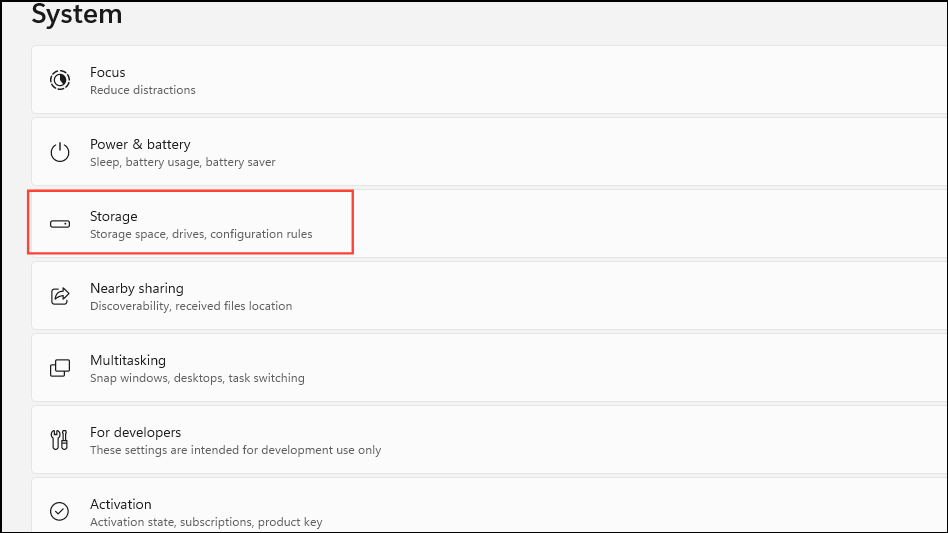
- On the System page, click on 'Storage'.
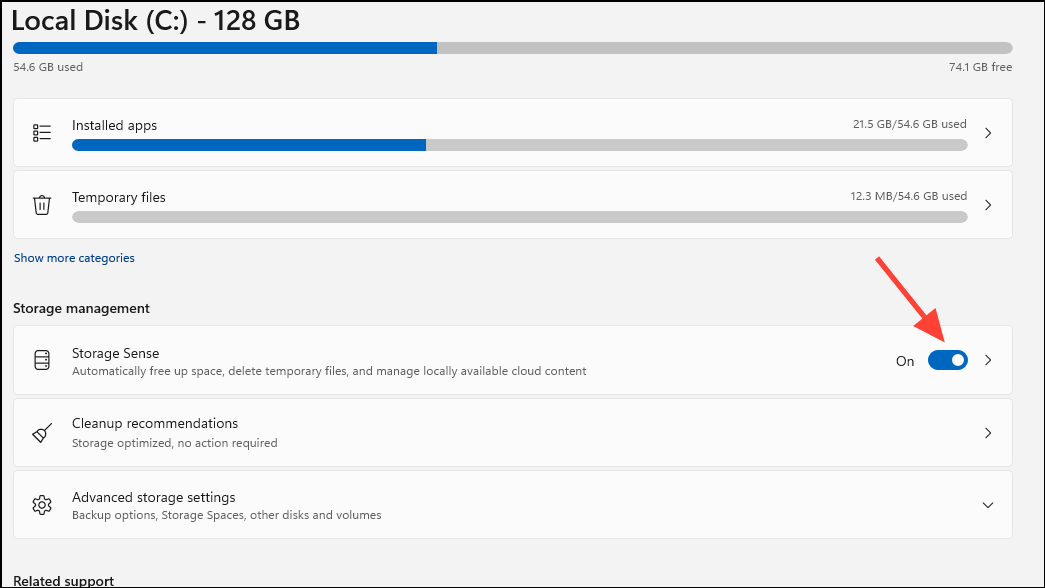
- Then click on the toggle for Storage Sense to turn it on. Windows will automatically scan for unneeded files and delete them from your PC.
10. Use Disk Cleanup to get rid of unneeded files
Disk Cleanup is a built-in utility that lets you get rid of files that you do not need. Removing these files can help clear up storage space allowing your computer to run faster.
- Open the Run dialog box with the
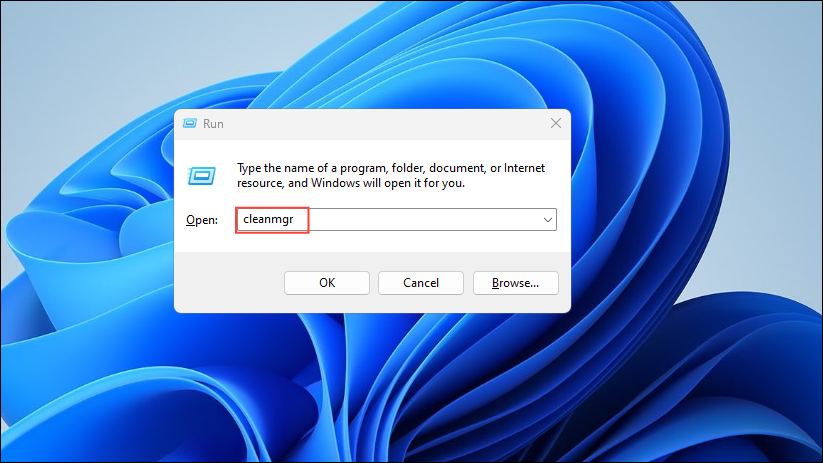
Win + Rshortcut, typecleanmgrand press Enter.
- A pop-up will appear asking you to select the drive for which you want to run Disk Cleanup. Use the dropdown menu to select the drive and then click on OK.
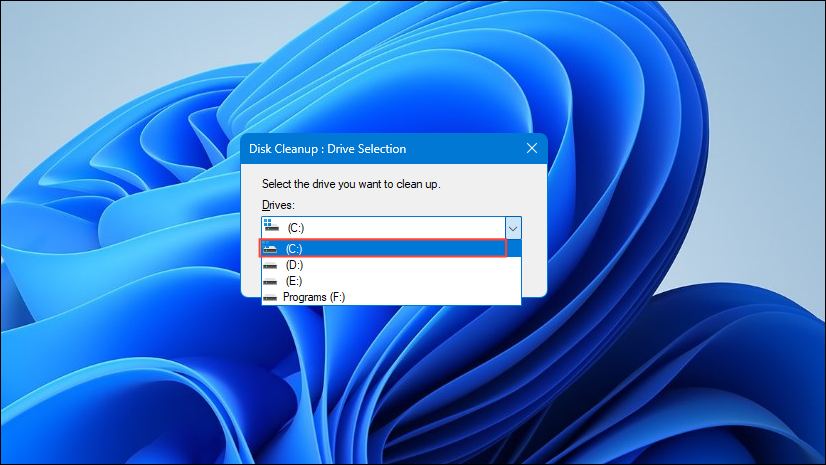
- You can then select the files you want to remove by clicking on the checkbox next to them in the dialog box that appears. Then click on OK.
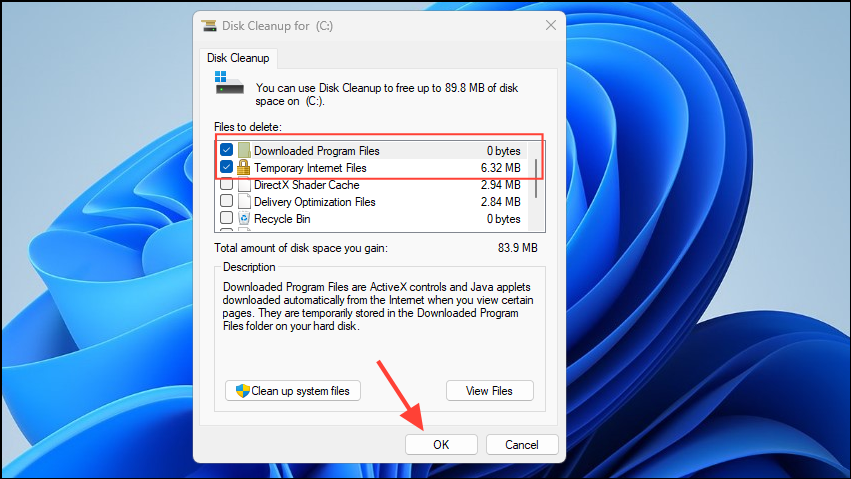
- Disk Cleanup will then remove the files you selected. In the same manner, you can clean up system files by clicking on the respective button.
11. Change power settings
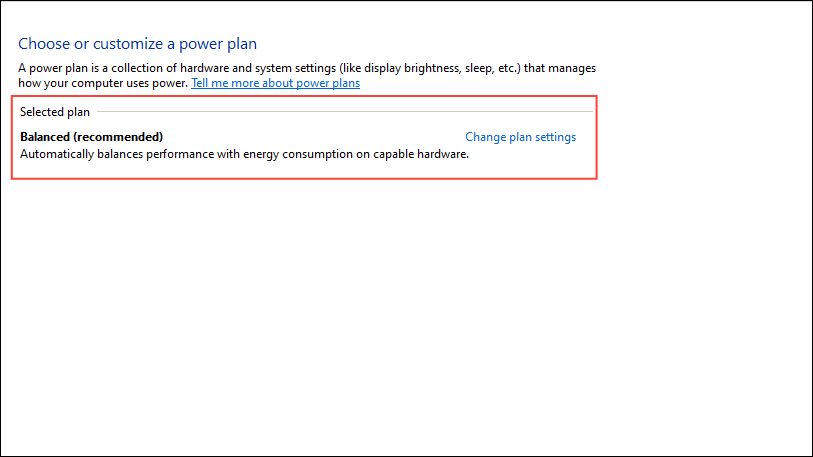
Check whether your Windows 11 computer is not using the 'Power Saver' plan, which reduces performance. You can change the plan to 'Balanced' or if you want 'High Performance'.
- Open the Control Panel and click on 'Power Options'.
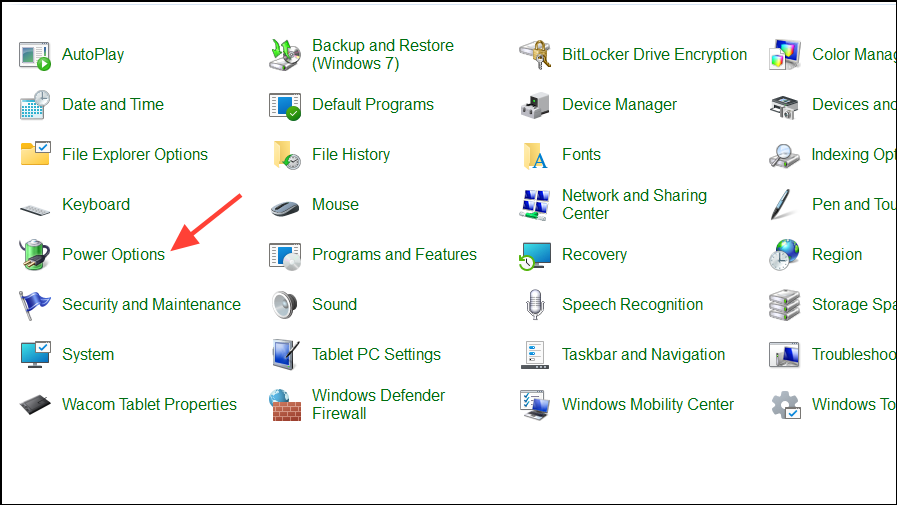
- Check whether the select plan is not the 'Power Saver' plan. If it is, click on a different plan to select it, such as 'Balanced' or 'High Performance'.
12. Disable Windows tips and tricks
Another solution that can help you speed up Windows 11 on an older PC is turning off Windows tips.
- Open the Settings page and click on 'System'.
- On the System page, click on 'Notifications'.
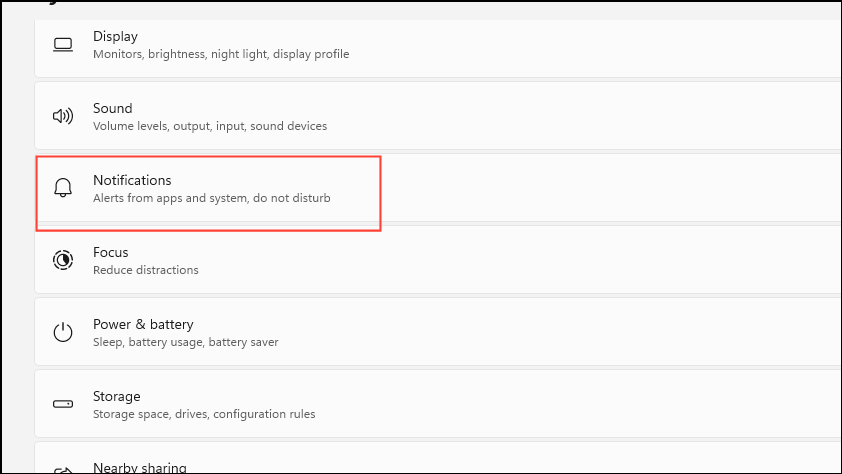
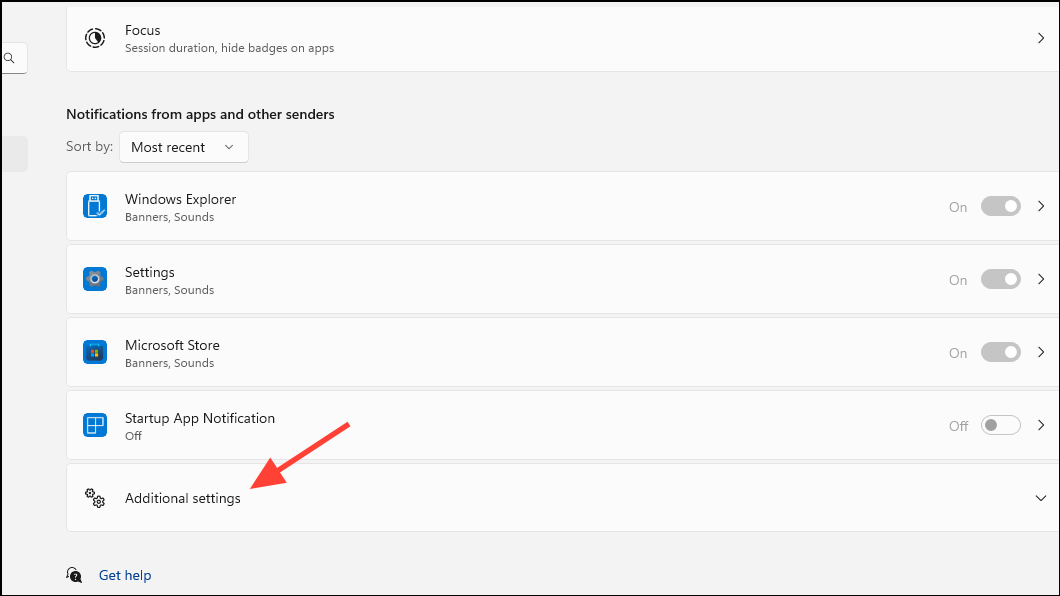
- Scroll down and click on 'Additional settings'.
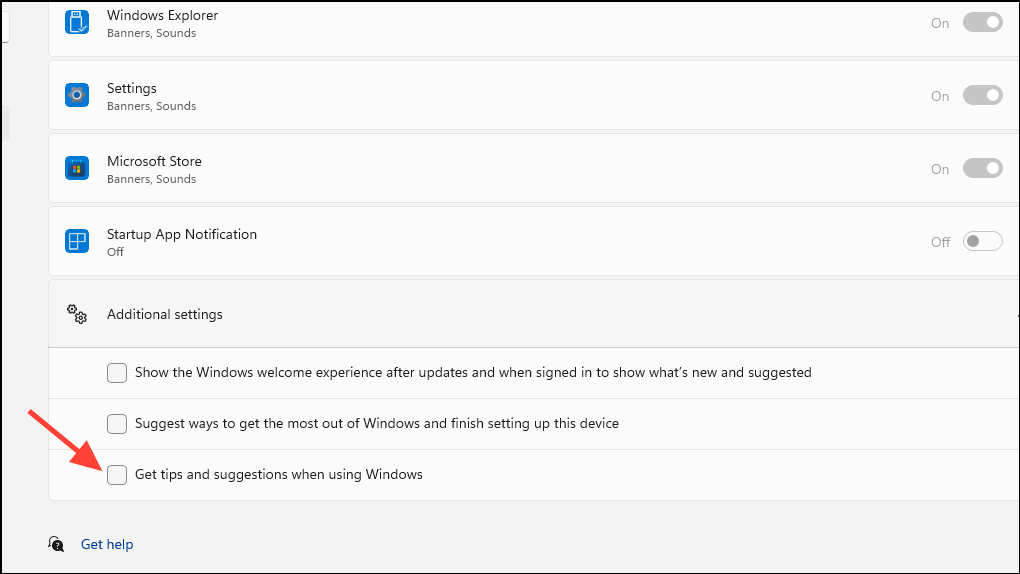
- Click on the 'Get tips and suggestions when using Windows' checkbox to disable it. If you want, you can also disable the other two options.
13. Turn off Game Mode
The Game Mode in Windows 11 is enabled by default and diverts system resources to maximize performance when you play games. However, it also keeps some of these resources in reserve when you're not playing games, which can not only slow down your computer but even cause stability problems. The best thing to do in such a case is to turn off Game Mode.
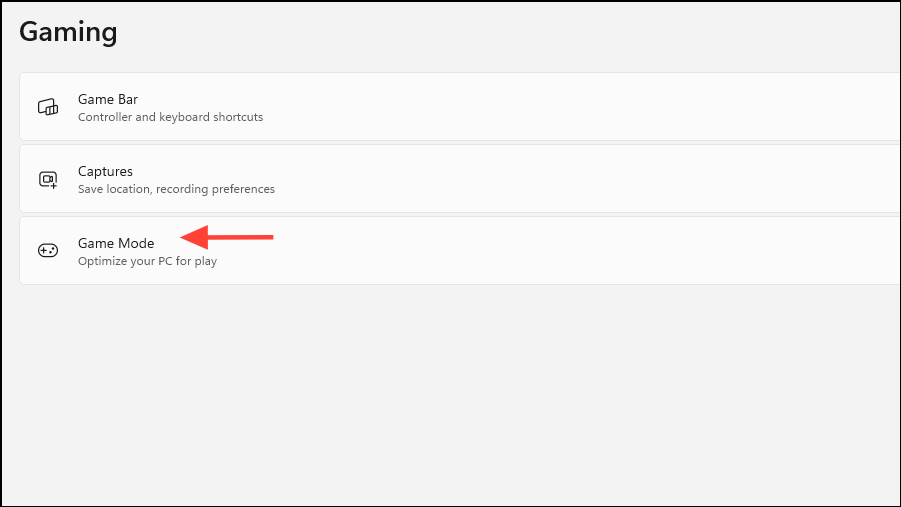
- Open the Settings app and click on 'Gaming' on the left.
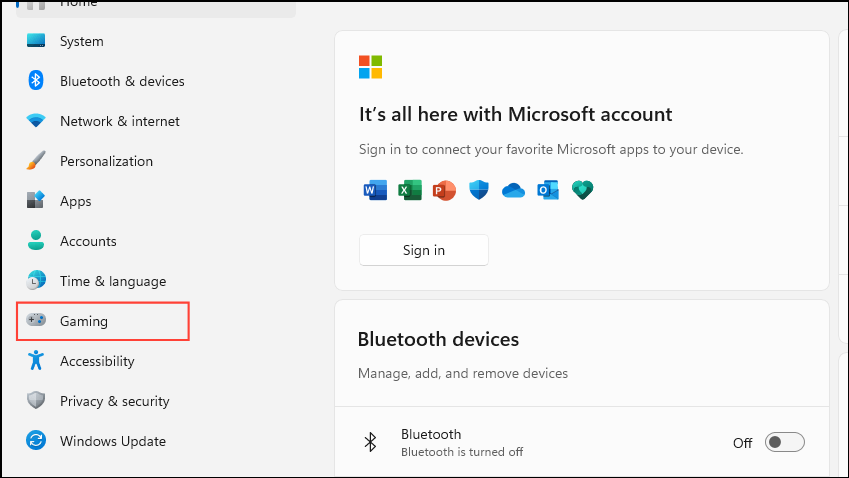
- Next, click on 'Game Mode' on the Gaming page.
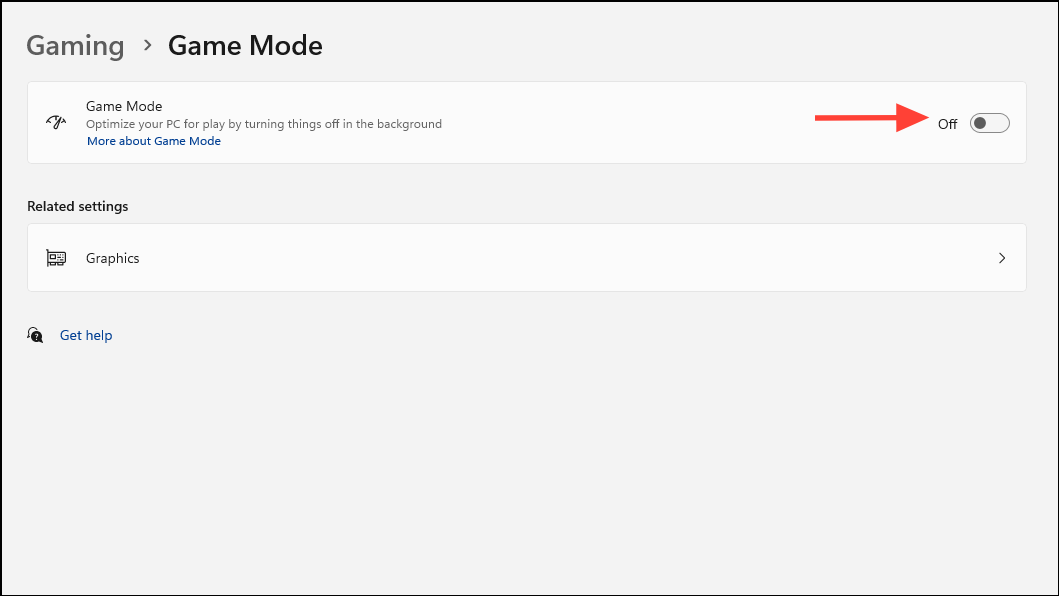
- Finally, click on the toggle next to the Game Mode option to turn it off.
14. Keep your drivers updated
Outdated drivers can adversely affect system performance, and it is strongly recommended that you keep your device drivers updated to the latest version. You can update your device drivers using the Device Manager.
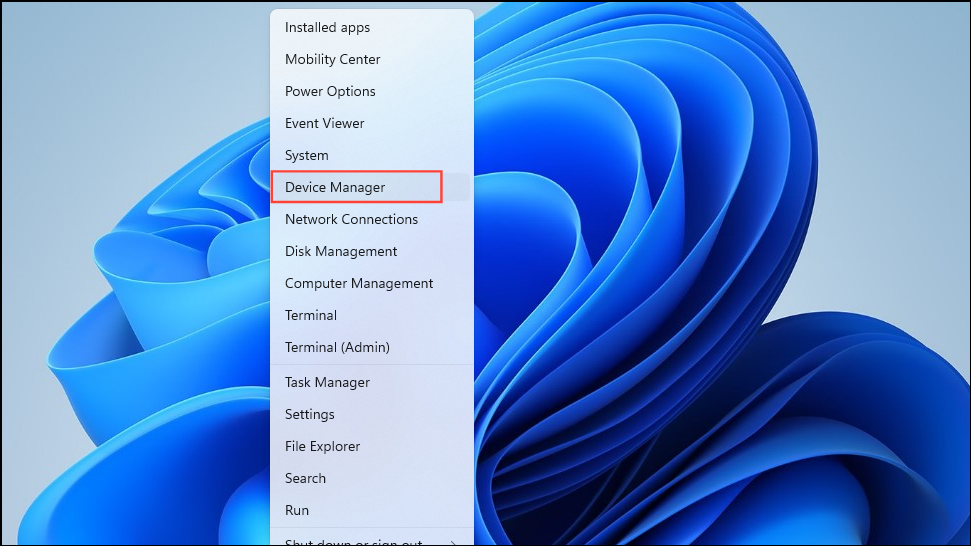
- Right-click on the Start button and then click on 'Device Manager'.
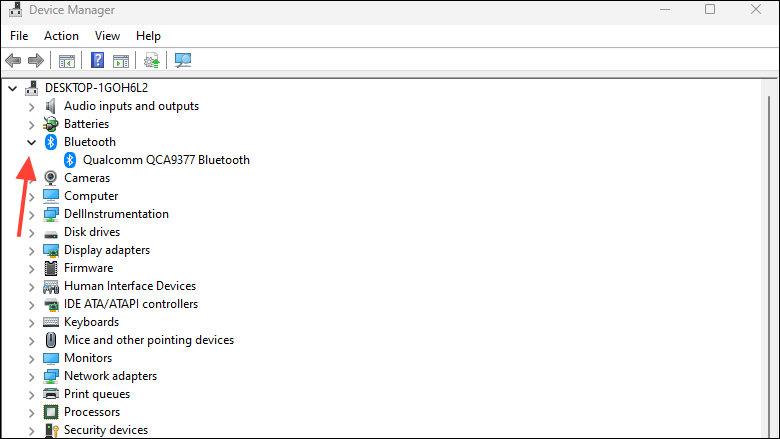
- When the Device Manager appears, click on the arrow next to the device whose driver you want to update to expand it and view its driver.
- Then, right-click on the driver and click on 'Update device'.
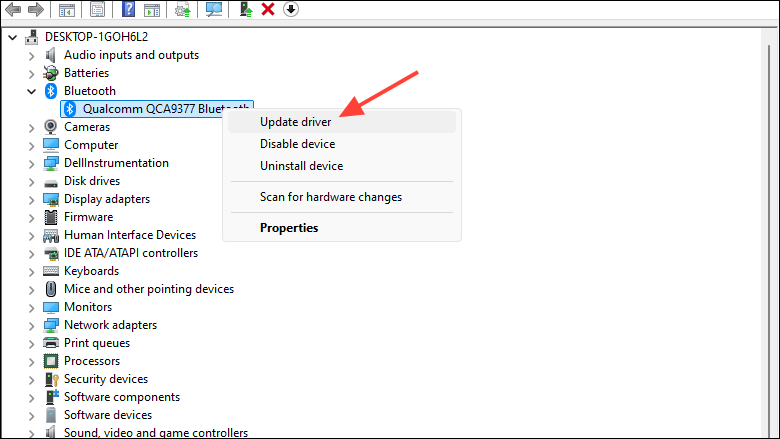
- Then click on 'Search automatically for drivers' and wait until Windows searches online for a new driver for the device.
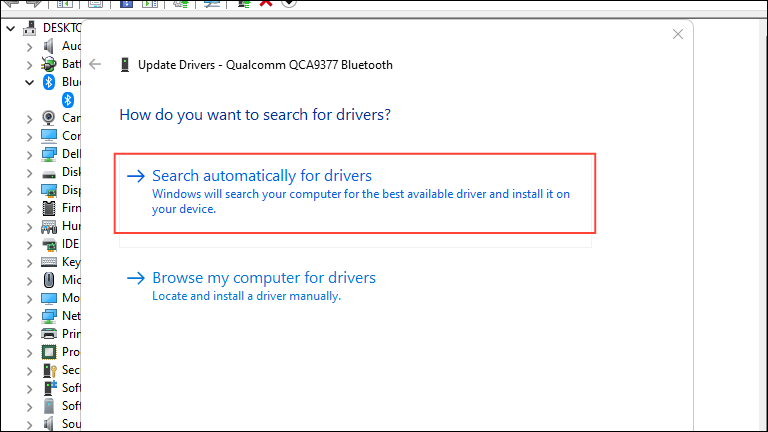
- If Windows finds a newer driver, it will install it and you may need to reboot your PC.
15. Allow Windows to automatically manage page file size
Windows uses the paging file on your disk as memory, and for best performance, you should let it manage the page file size automatically.
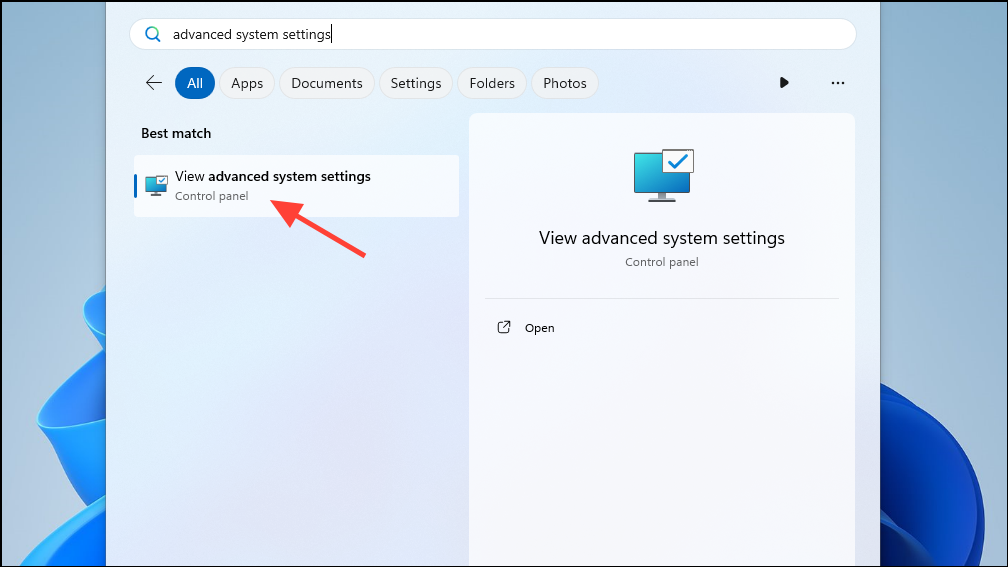
- Open the Start menu, type
advanced systemand then click on 'View advanced system settings'.
- When the System Properties dialog box appears, check that you are on the 'Advanced' tab and then on the 'Settings' button in the Performance section.
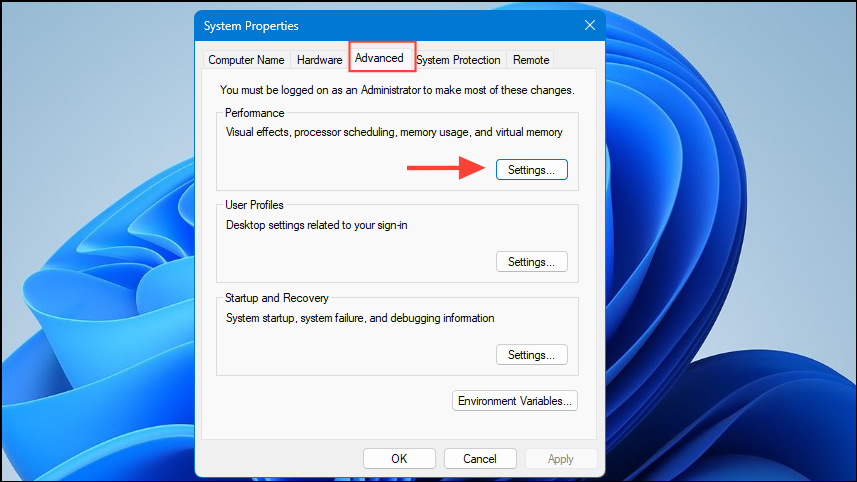
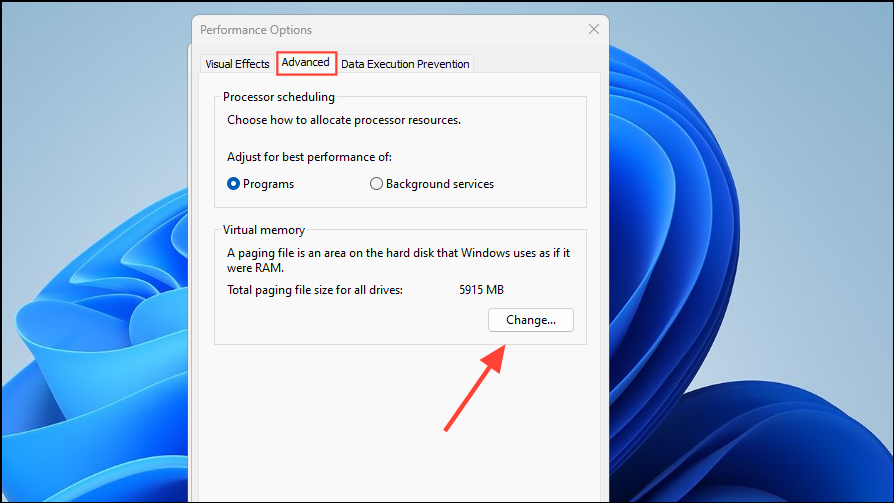
- Now, click on the 'Advanced' tab at the top and then on the 'Change' button in the Virtual Memory section.
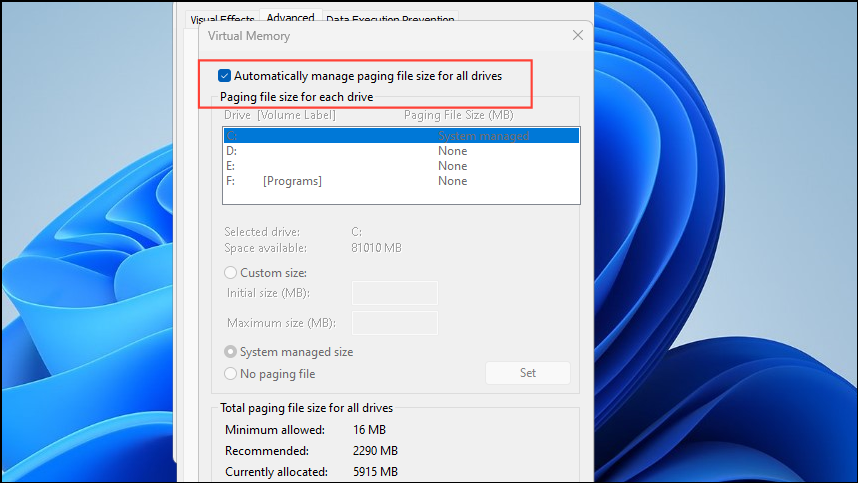
- Check that the 'Automatically manage paging file size for all drives' is enabled. If it is not, click on the checkbox to turn it on and then reboot your PC.
16. Defragment hard drive
Over time as you continue using your PC, your files get scattered and fragmented, slowing down Windows. While Windows 11 automatically defragments them, you can also try doing so manually to speed up your PC.
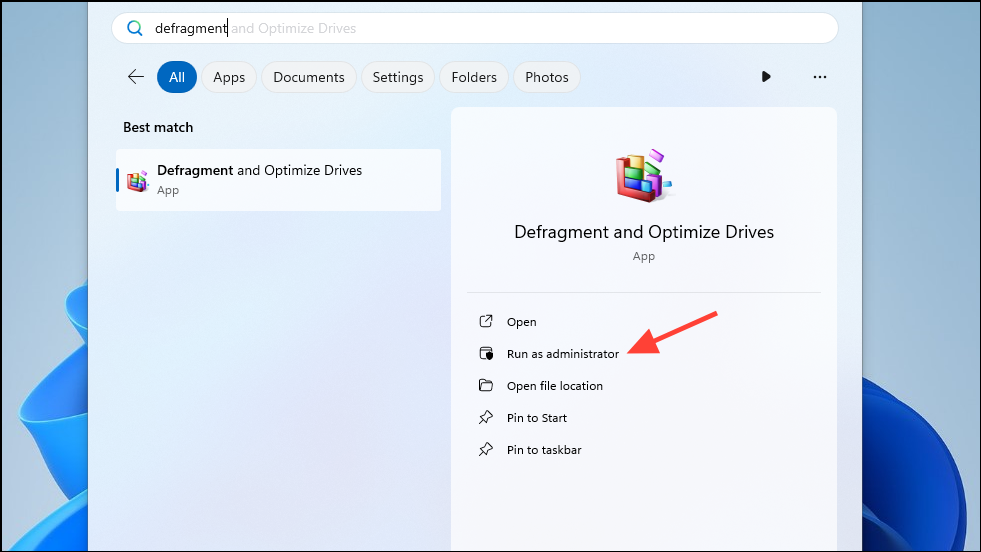
- Open the Start menu, type
defragment, and click on 'Run as administrator'.
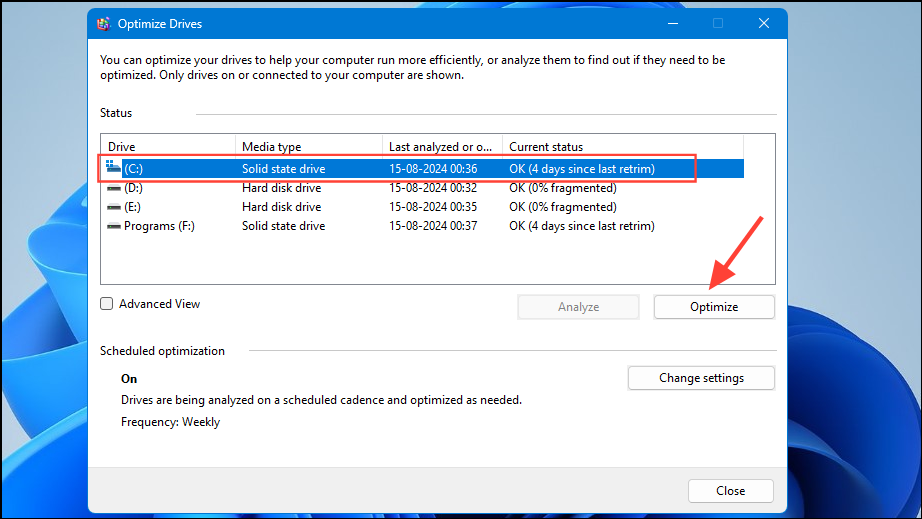
- When the disk defragmentation utility opens, click on the drive you want to defragment and then on the 'Optimize' button.
17. Turn off restartable applications
By default, Windows automatically restarts applications when you log in. Disabling this feature can help improve performance on older hardware.
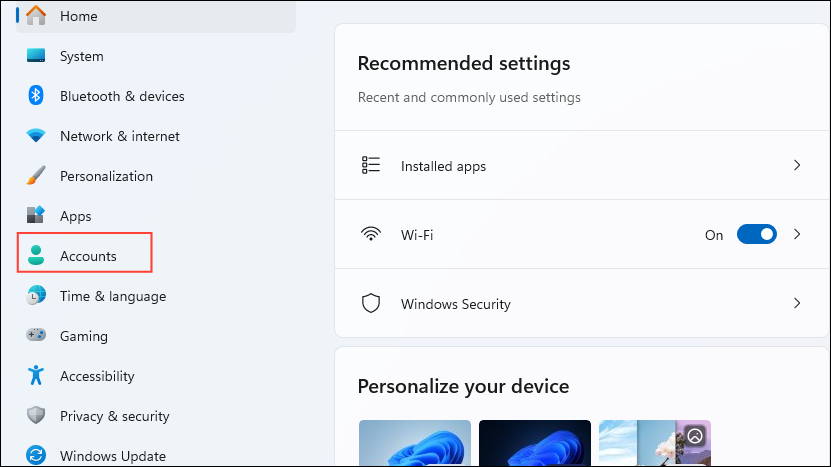
- Open the Settings app and click on the 'Accounts' section on the left.
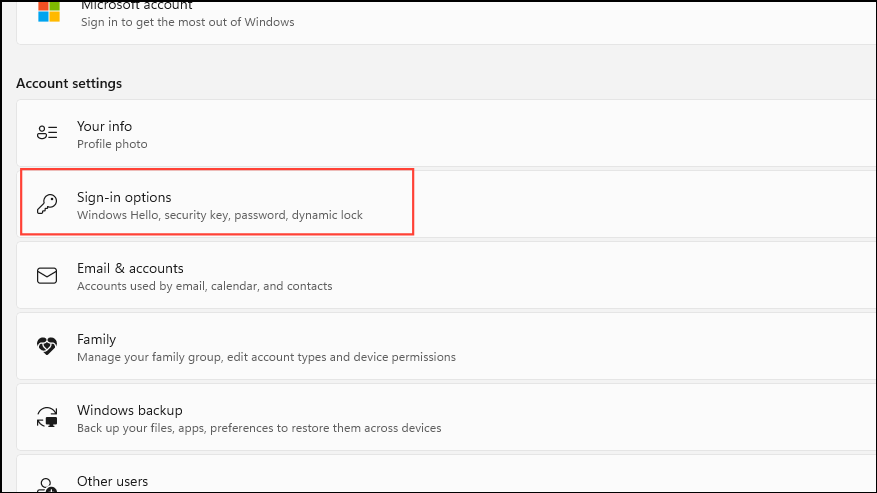
- Click on the 'Sign-in Options'.
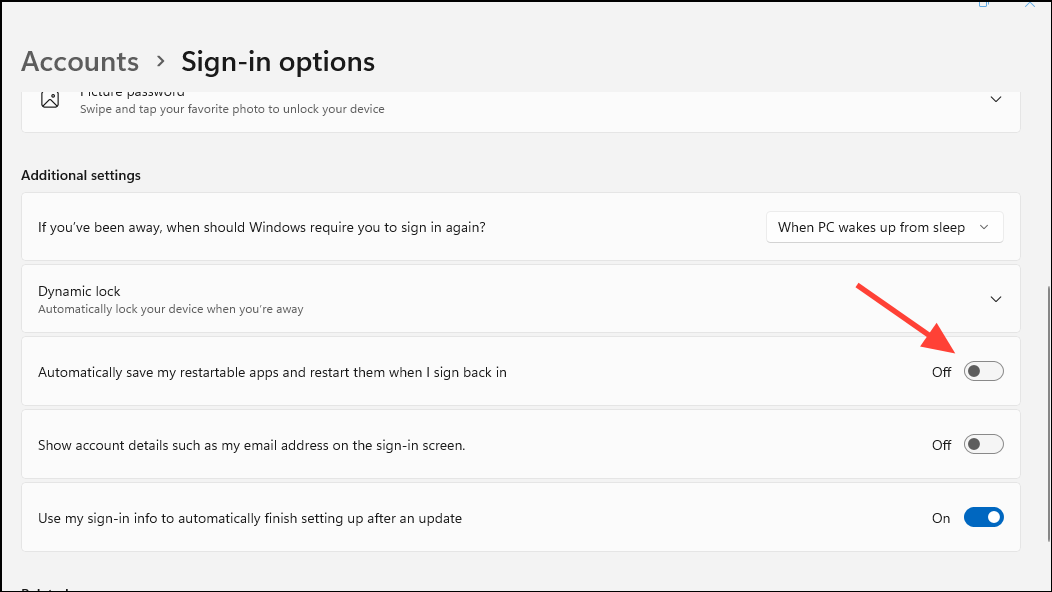
- Now, click on the 'Automatically save my restartable apps and restart them when I sign back in' and turn it off.
18. Clear temporary files
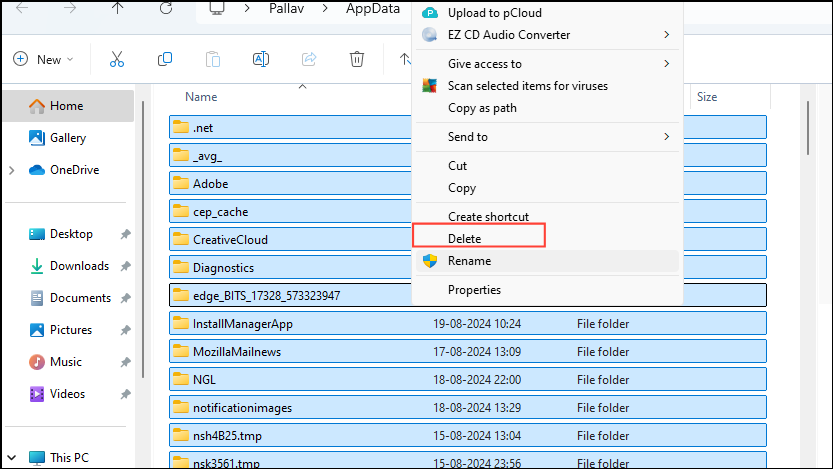
Clearing temporary files is another solution you can try out to speed up Windows 11 on an older PC.
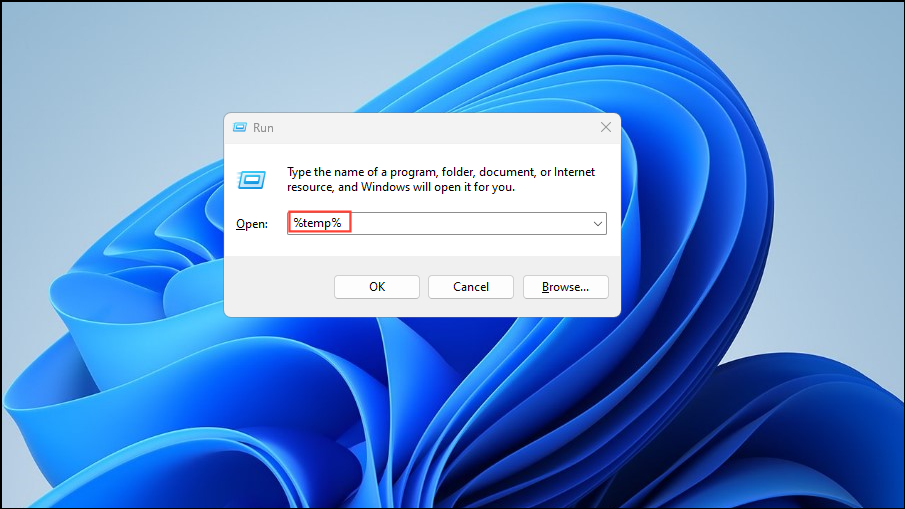
- Use the
Win + Rshortcut to open the run dialog, then type%temp%and press Enter.
- A new folder will open up containing all temporary files. You can select and delete all of them.
19. Turn off background applications
Unnecessary system programs that run in the background can affect the performance of your computer adversely, but you can easily turn them off.
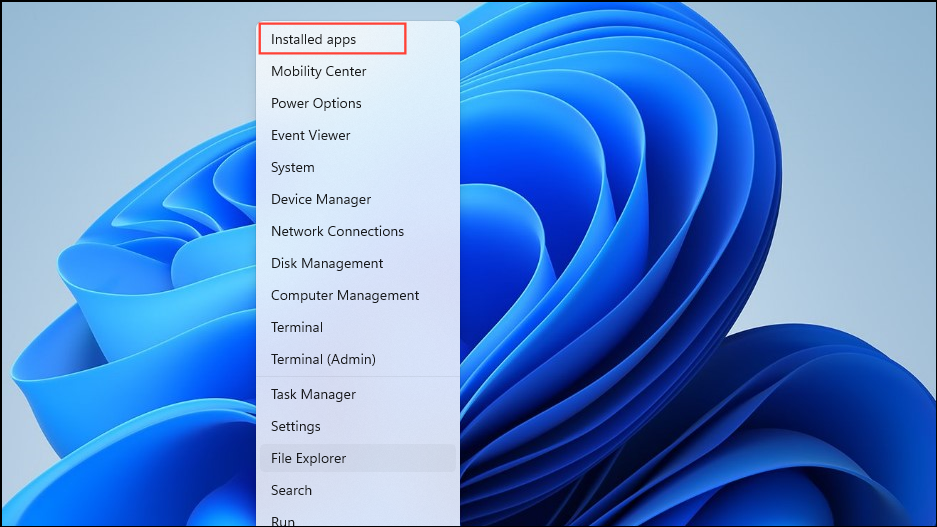
- Right-click on the Start button and then on the 'Installed Apps' option in the pop-up menu.
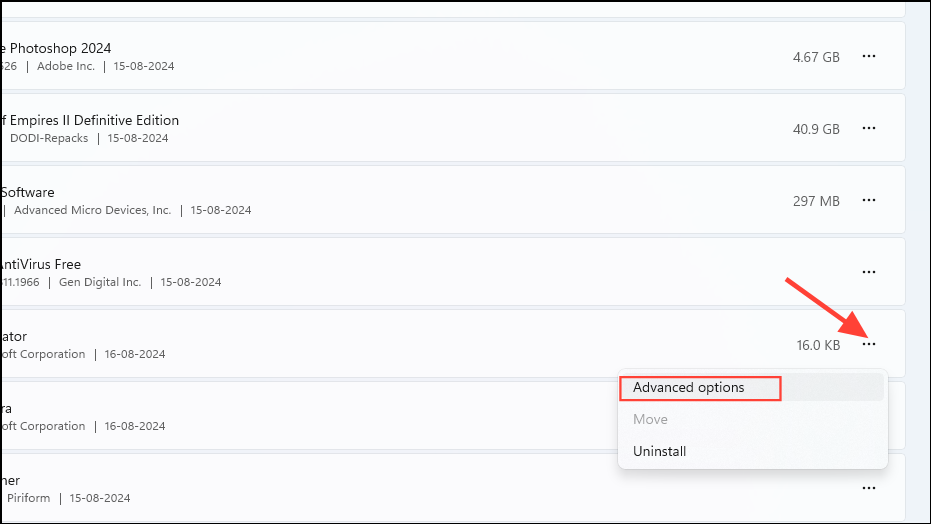
- A page will open showing all your installed apps in one location. To prevent a system application from running in the background, click on the three dots on its right and then on 'Advanced Options'.
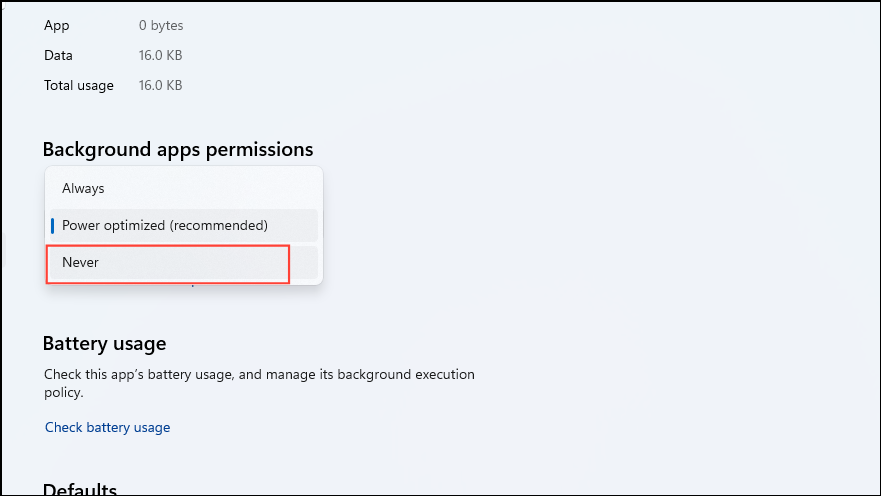
- On the next page, click on the dropdown menu for the 'Background apps permissions' and select 'Never'.
20. Disable boot menu timeout
When your computer boots up, it may show a boot menu, especially if you have multiple operating systems installed. Usually, the boot menu appears for 30 seconds, but you can turn it off and log in to Windows quickly.
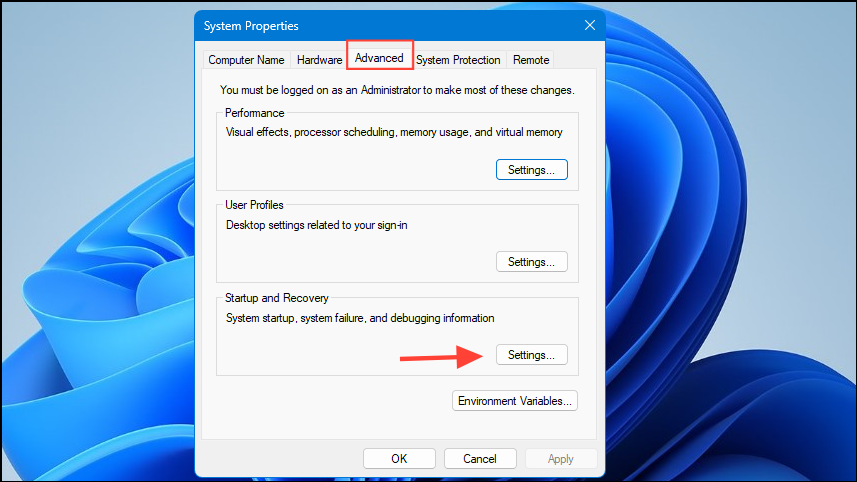
- Open the Advanced System Settings dialog box as explained above and click on the 'Advanced' tab at the top.
- Then click on the Settings button under the 'Startup and Recovery' section.
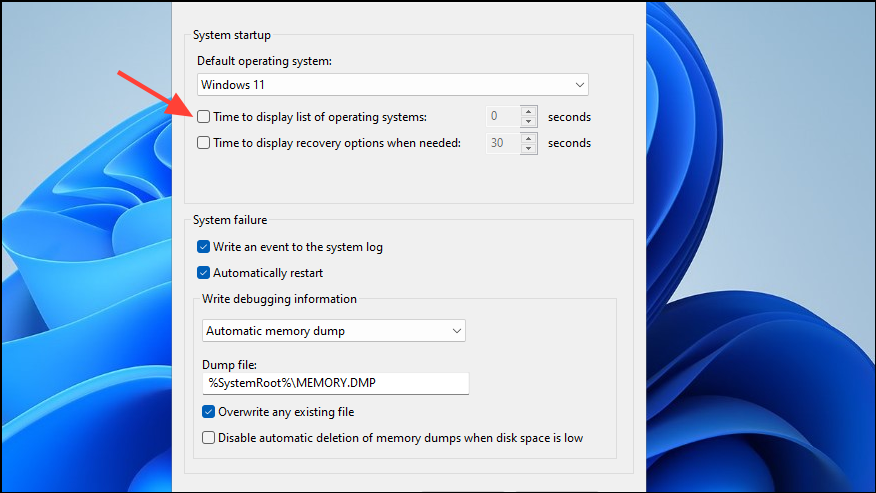
- Click on the checkbox next to the 'Time to display list of operating systems' option to disable it. Then click on OK.
Things to know
- If you're running Windows 11 on older hardware, you can try adding more RAM and replacing your traditional hard disk with an SSD to speed up your PC. Having at least 8 GB of RAM will allow you to run Windows 11 without any lag.
- If you have a BIOS update available for your computer, make sure to install it. BIOS updates often contain important fixes that can help your computer run smoothly.
- If you've been running Windows 11 for some time on your older PC and it has only become slow recently, you can consider resetting it or using a restore point to go back to when it was working fine.
- Lastly, since Microsoft will be ending support for Windows 10 soon, downgrading to the older OS is no longer a viable option. If you can, consider upgrading to a newer computer that is designed to run Windows 11.

