
Wi‑Fi problems on a Windows 11 PC are often solved faster once you can see the exact status, IP details, and configuration of the wireless adapter. Windows 11 exposes this information in several places, from the modern Settings app to the classic Control Panel view.
View Wi‑Fi adapter status in Windows 11 Settings
Windows 11 shows real‑time information for your Wi‑Fi adapter directly in the Settings app, including connection state, link speed, and data counters.
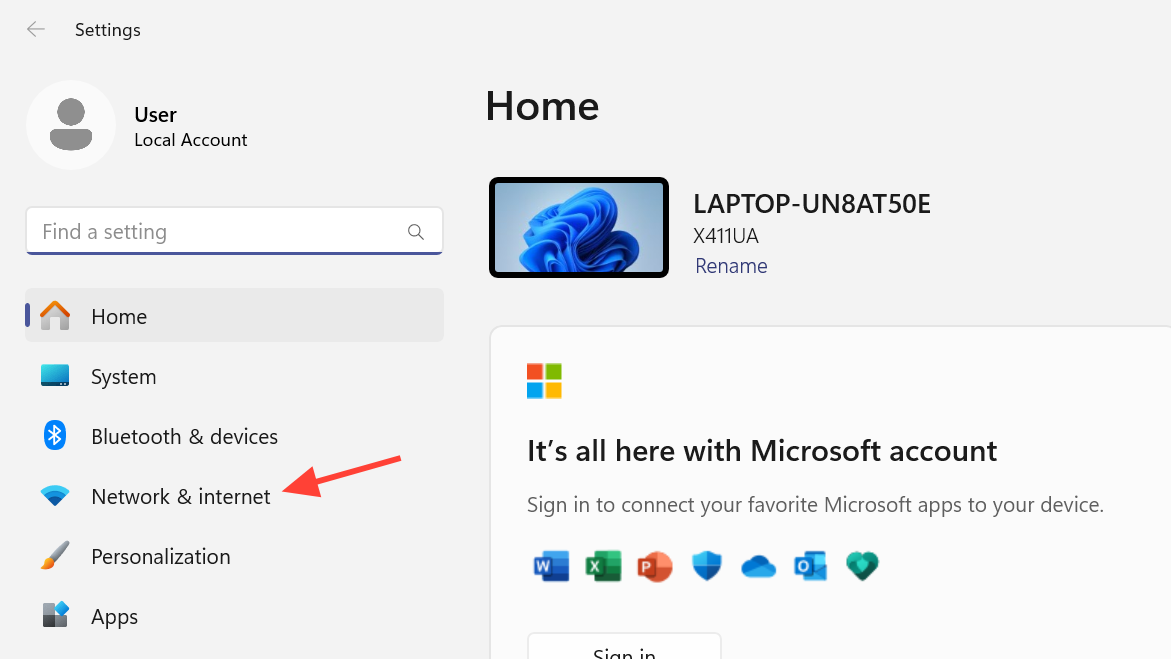
Step 1: Open the Settings app with Win + I. This is the central place for most network options in Windows 11.
Step 2: In the left pane, select Network & Internet. This section lists all network‑related pages, including Wi‑Fi, Ethernet, VPN, and more.
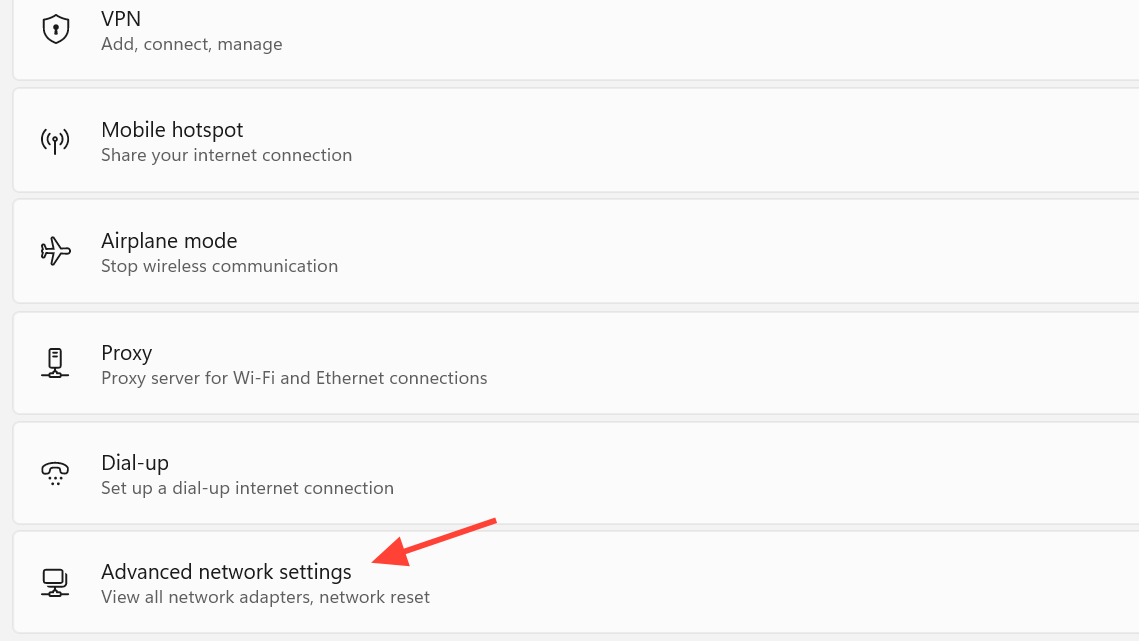
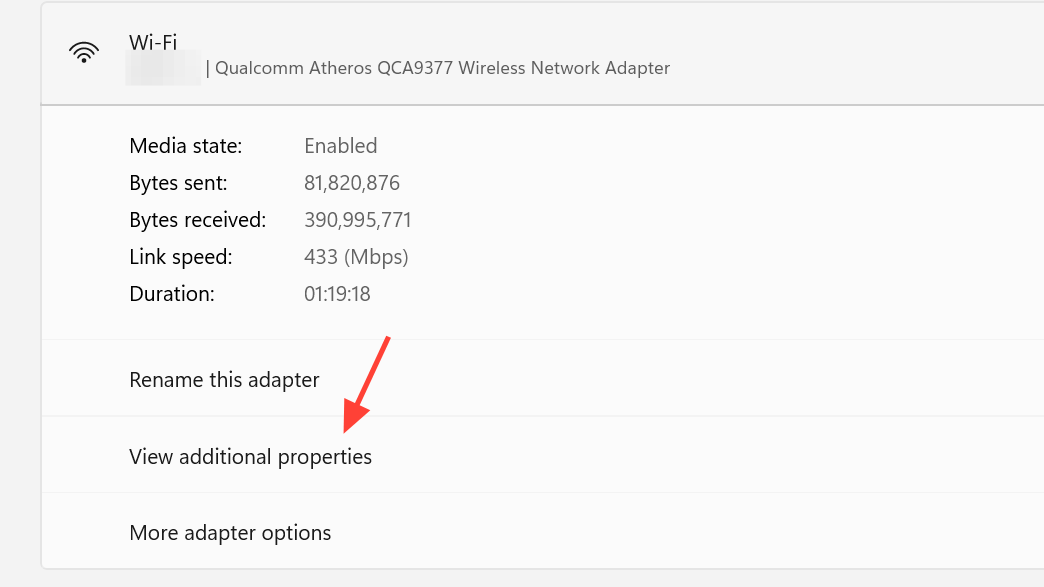
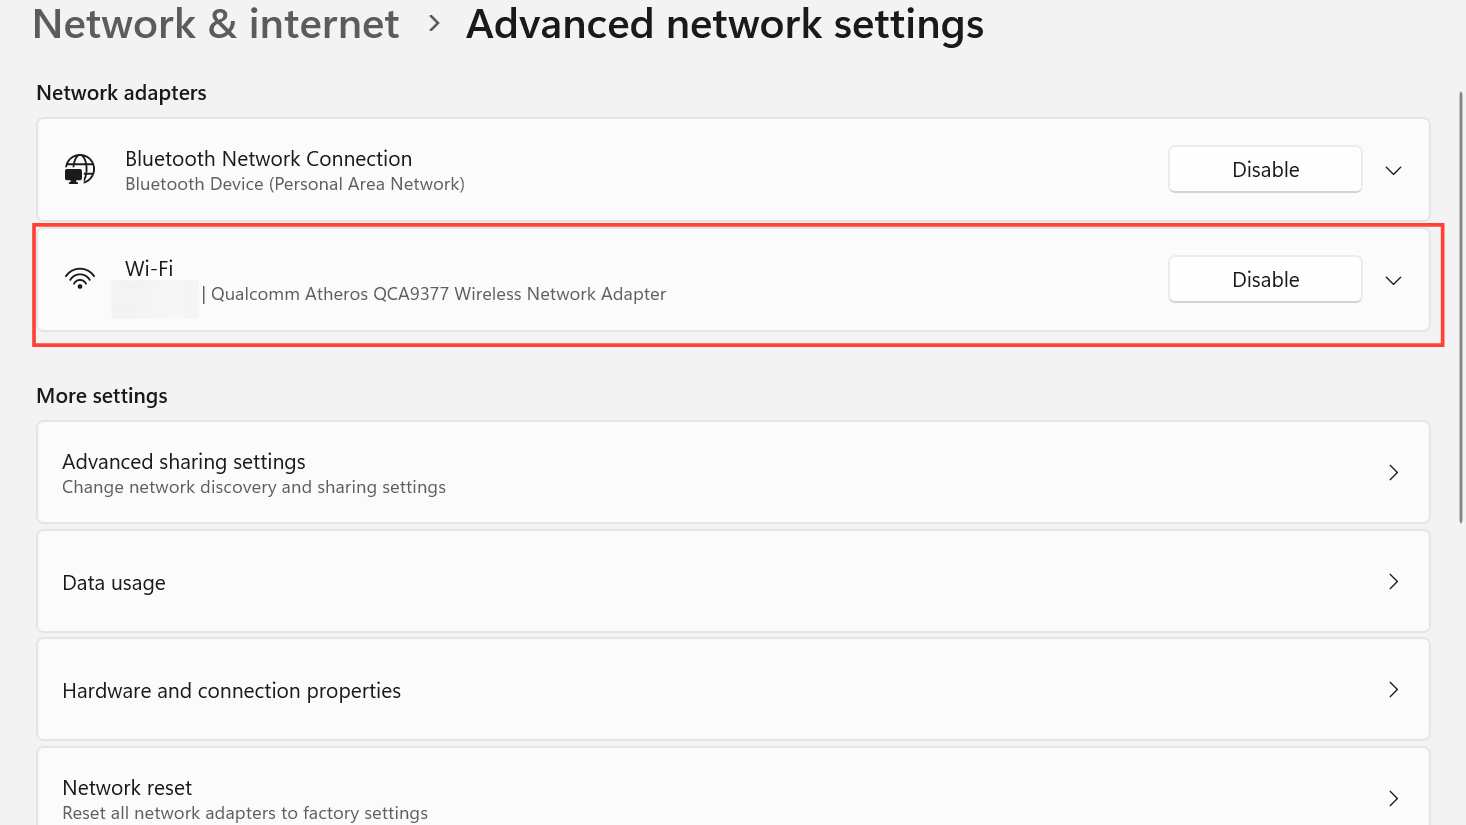
Step 3: Click Advanced network settings on the right side. This page shows every physical and virtual network adapter installed on the system.
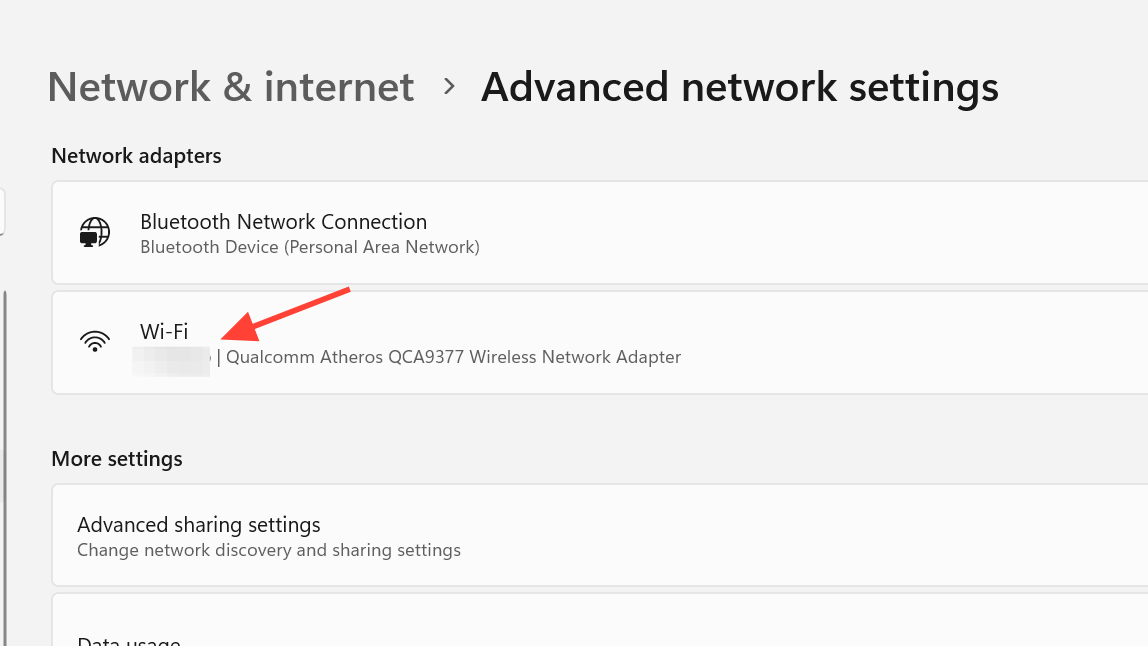
Step 4: Under the Network adapters section, click your Wi‑Fi adapter. The name often includes “Wi‑Fi” or the adapter brand.
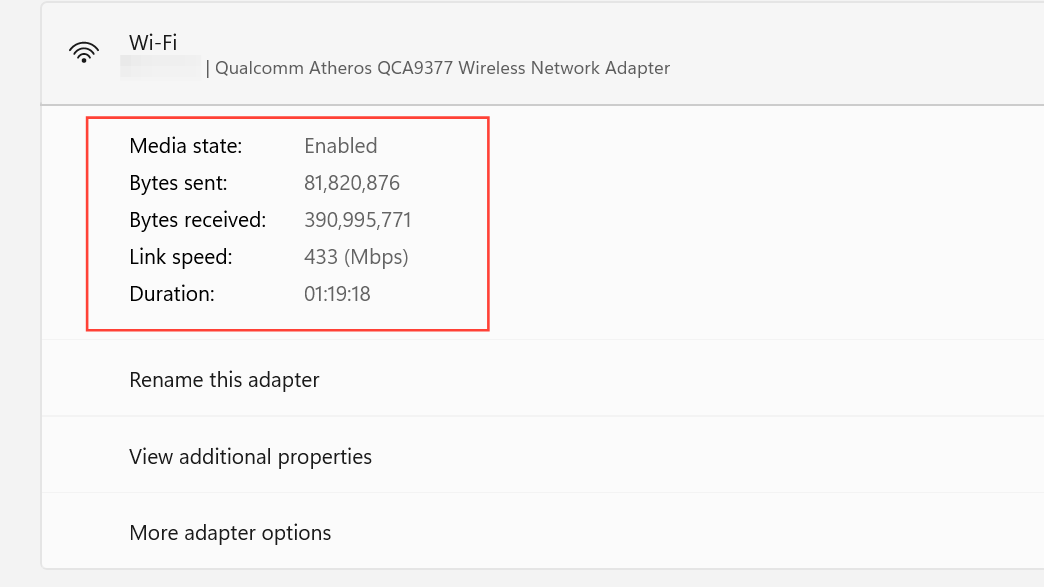
Step 5: Review the adapter’s status information shown at the top. You can see whether it is connected or disconnected, the link speed, and how long the connection has been active.
Step 6: Scroll down to see counters such as Bytes sent and Bytes received. These values help you understand how much traffic is currently flowing through the Wi‑Fi adapter.
View detailed Wi‑Fi adapter properties (IP, DNS, MAC)
Windows 11 also exposes full TCP/IP details for the Wi‑Fi adapter, including IP addresses, DNS servers, and the MAC (physical) address.
Step 1: With your Wi‑Fi adapter still selected in Advanced network settings, click View additional properties or a similarly named link under the adapter details. This opens the full properties view for that adapter.
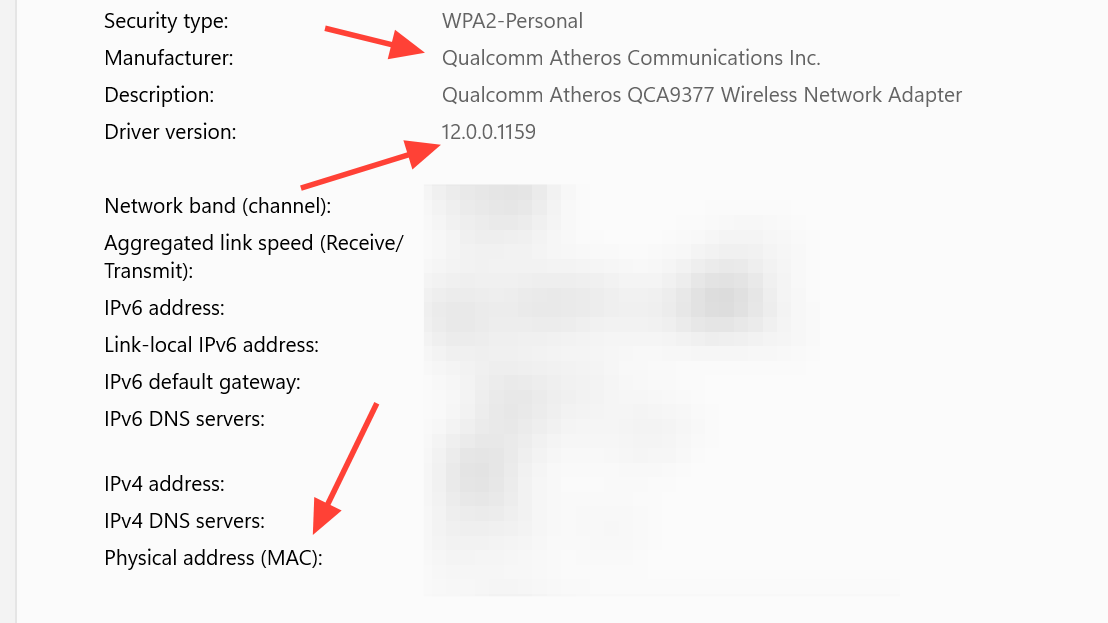
Step 2: Look for the IPv4 address and IPv6 address entries. These show the current network addresses assigned to your Wi‑Fi adapter.
Step 3: Find the Default gateway entry to see the router address your PC is using to reach the internet. This is useful for ping tests and router login.
Step 4: Check the DNS servers fields to see which servers the adapter uses to resolve domain names. The status may also indicate if DNS over HTTPS is encrypted.
Step 5: Locate the Physical address (MAC), Manufacturer, and Driver version lines. These values help when updating drivers or identifying the adapter during troubleshooting.
Step 6: Use the copy option (if shown) to copy these details when you need to share configuration data with support staff or store it in documentation.
Check Wi‑Fi connection properties and profile type
The Wi‑Fi page in Settings shows properties of the current wireless network, including whether the profile is public or private and whether the connection is metered.
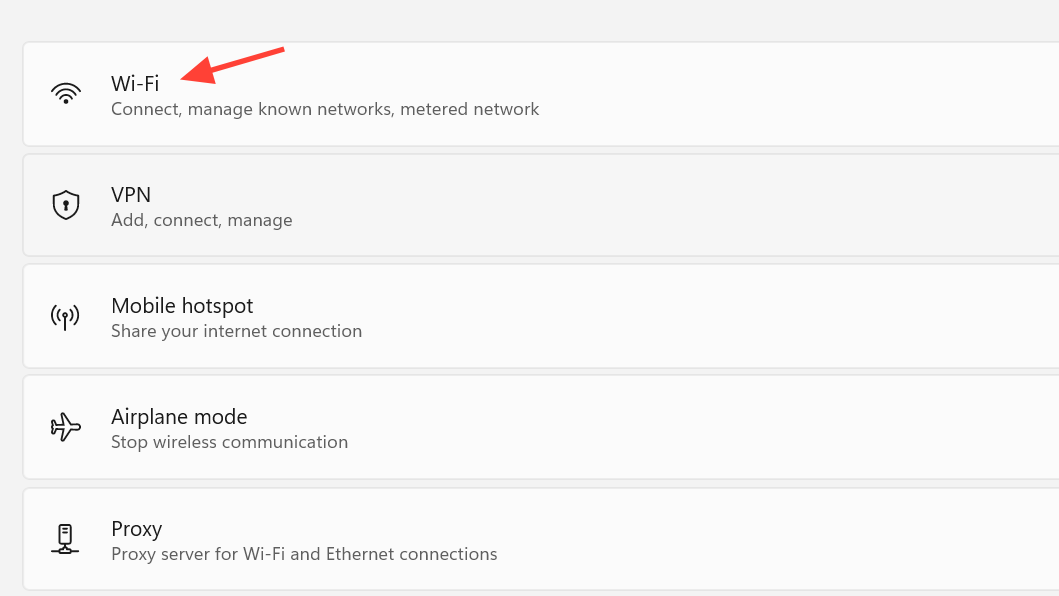
Step 1: Open Settings with Win + I and select Network & internet in the left pane.

Step 2: Click Wi‑Fi on the right. This page controls Wi‑Fi radios and network‑specific options.
Step 3: If you are already connected to a network, click the line that shows the current Wi‑Fi network name and the word Connected. This opens the network’s properties.
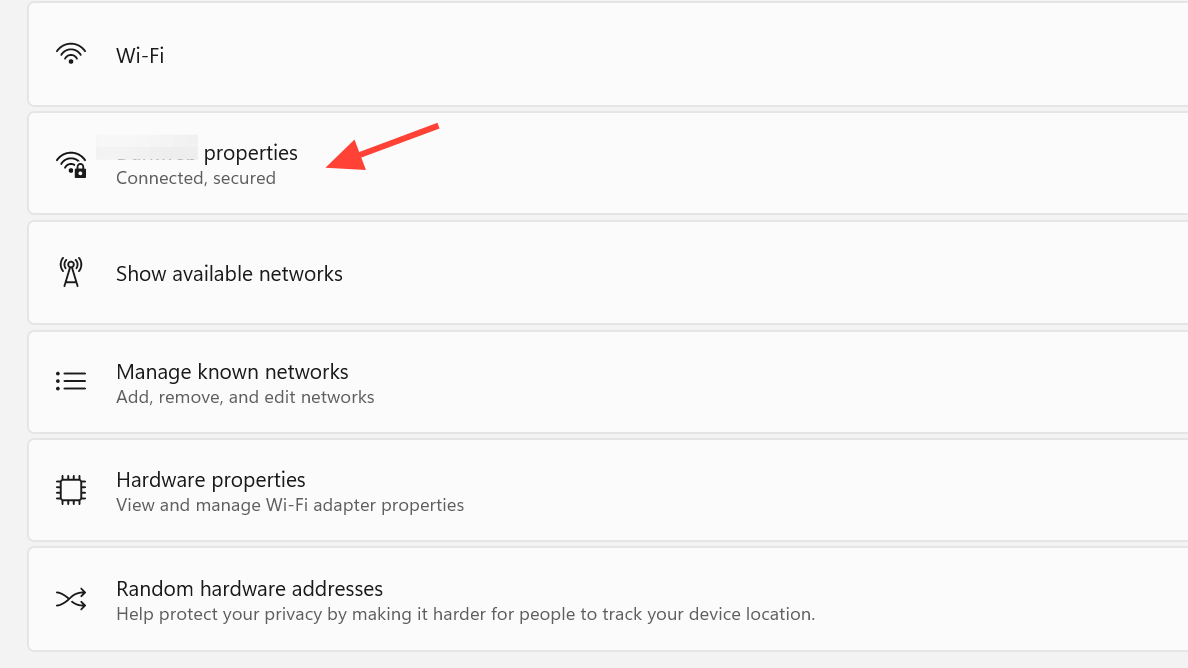
Step 4: Under Network profile type, choose Public or Private. Private makes your PC discoverable on trusted networks (such as home), while Public hides it on shared networks such as cafés or airports.
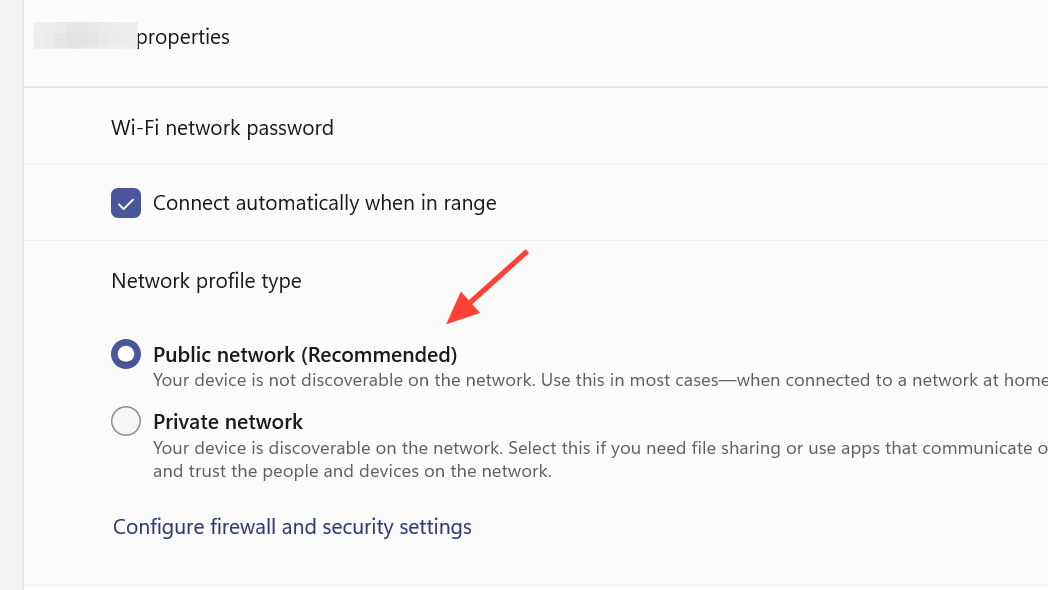
Step 5: Find the Metered connection setting and decide whether to turn it on. Metered mode tells Windows to reduce background data usage, which is helpful on limited data plans.

Step 6: Review other properties such as the currently assigned IP address, protocol information, and security type to understand exactly how the network is configured.
View hardware and connection properties for Wi‑Fi
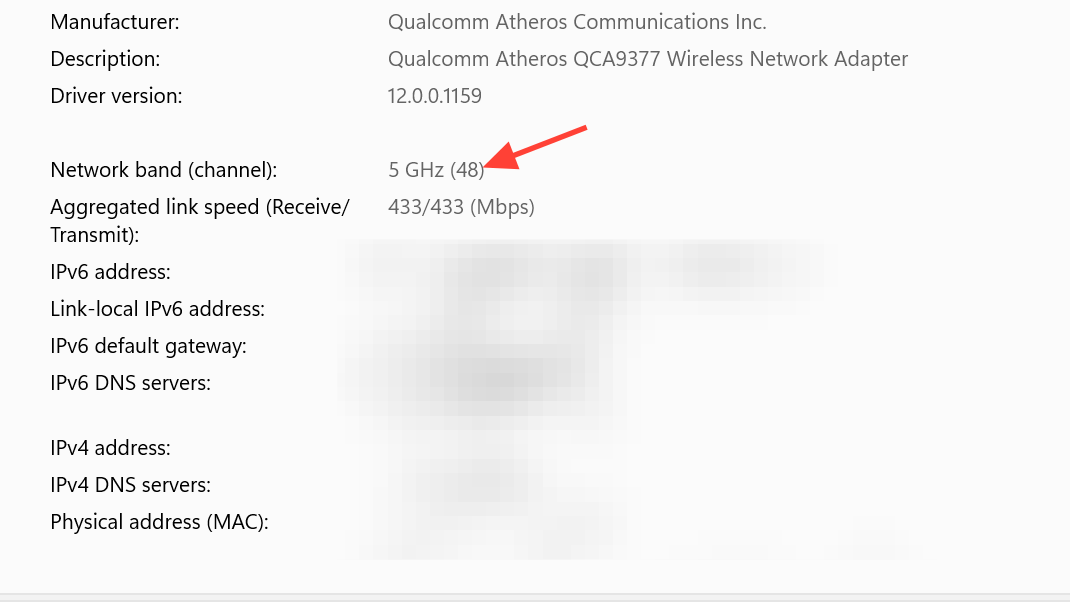
Hardware properties give a combined view of connection details for Wi‑Fi and can show whether DNS queries are encrypted.
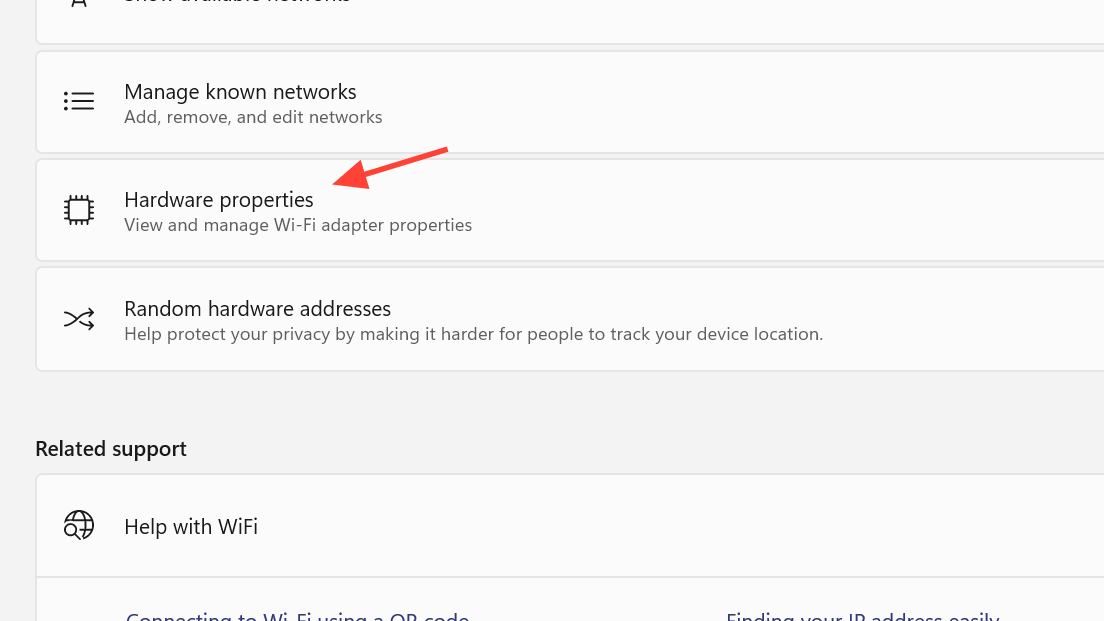
Step 1: Open Settings and go to Network & Internet, then select Wi‑Fi.
Step 2: Click Hardware properties. This view summarizes technical information for the wireless adapter and the current connection.
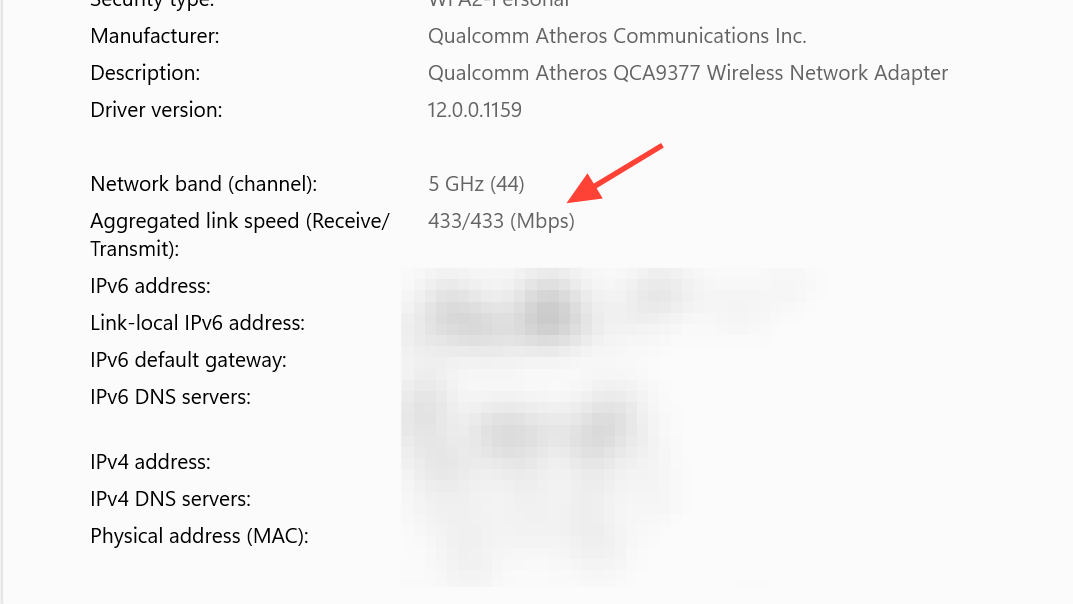
Step 3: Look at the Link speed (receive/transmit) to see the negotiated speed between your PC and the Wi‑Fi router. Lower than expected speeds can explain slow transfers.
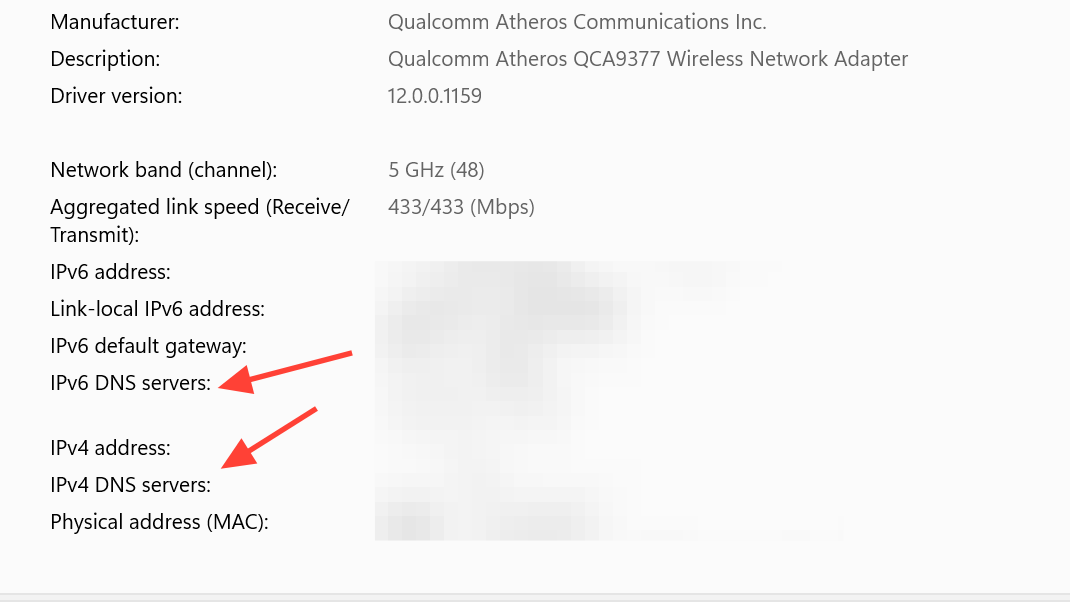
Step 4: Check IPv4 DNS servers and IPv6 DNS servers entries. If they show an Encrypted status, the adapter is using DNS over HTTPS for those servers.
Step 5: Review other fields such as Network band, Channel, and Security type when available. These details help diagnose interference or compatibility issues.
View all adapter hardware and connection properties at once
Advanced network settings can list detailed properties for all network adapters, including Wi‑Fi and Ethernet, in a single place.
Step 1: Open Settings with Win + I and select Network & internet.

Step 2: Click Advanced network settings on the right side of the window.

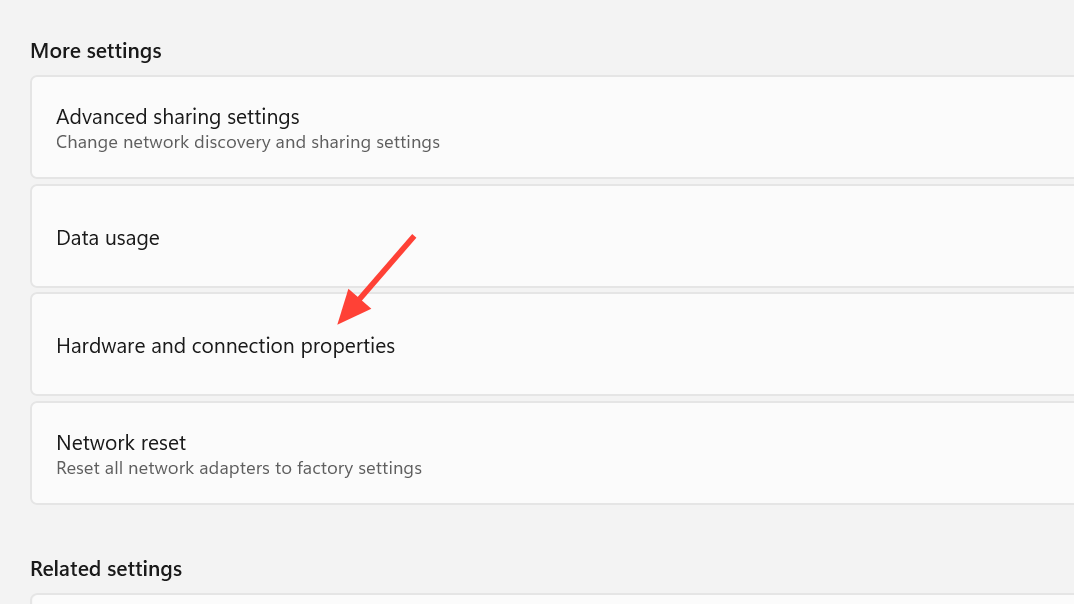
Step 3: Under More settings, choose Hardware and connection properties. This opens a consolidated list of all adapters.
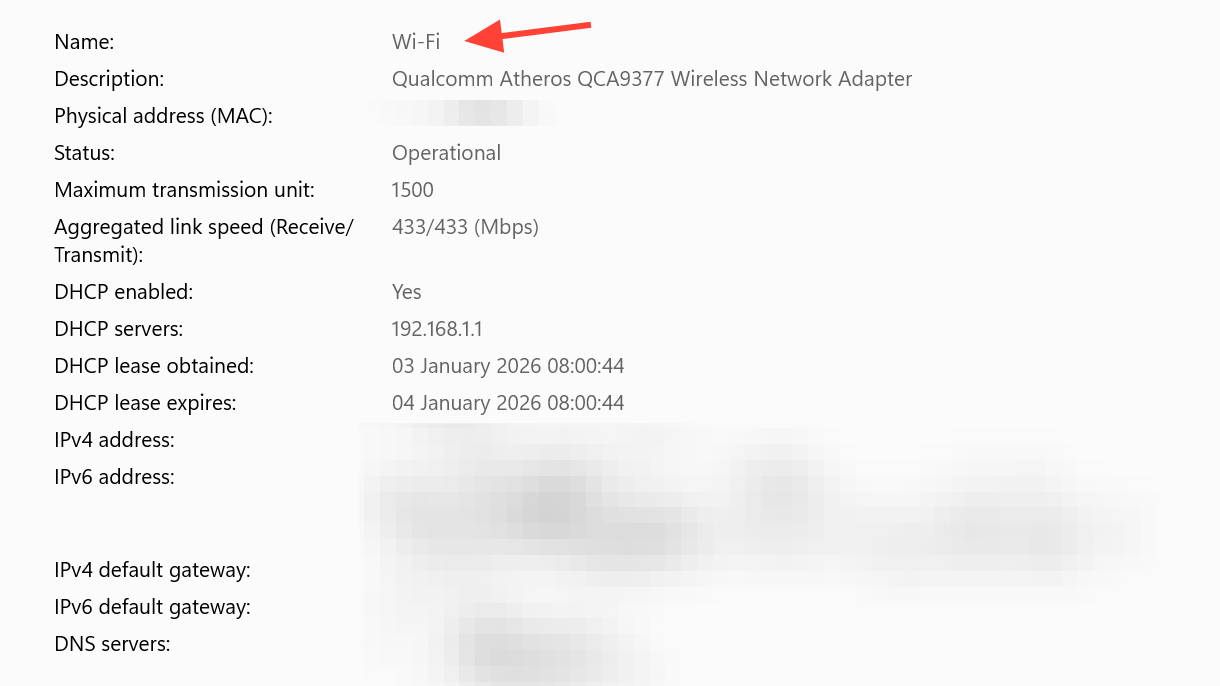
Step 4: Scroll to find the Wi‑Fi adapter entry. Each adapter shows IP information, DNS servers, MAC address, and driver details.
Step 5: Compare values between adapters if your device has both Wi‑Fi and Ethernet. For example, you can confirm which adapter is getting which IP range and DNS servers.
Quick reference: key Wi‑Fi adapter settings locations
The table below summarizes where to find the most common Wi‑Fi adapter settings and information in Windows 11.
| What you want to see or change. | Where to open it. | Key actions or data. |
|---|---|---|
| Wi‑Fi adapter connection status and live counters. | Settings > Network & internet > Advanced network settings > select Wi‑Fi adapter. | Check media state, link speed, bytes sent and received, and connection duration. |
| Full IP, DNS, and MAC address for Wi‑Fi. | From Wi‑Fi adapter in Advanced network settings, click View additional properties. | Review IPv4 and IPv6 addresses, default gateway, DNS servers, and physical address. |
| Network profile type and metered setting. | Settings > Network & internet > Wi‑Fi > click connected network. | Switch between Public and Private, and turn metered connection on or off. |
| Hardware properties for Wi‑Fi connection. | Settings > Network & internet > Wi‑Fi > Hardware properties. | See band, channel, link speed, DNS encryption status, and other technical details. |
| Properties for all adapters (Wi‑Fi and Ethernet). | Settings > Network & internet > Advanced network settings > Hardware and connection properties. | Compare configuration across all network adapters in one list. |
Access classic Wi‑Fi adapter settings via Control Panel
Some advanced options still live in the classic Network Connections window, which you can reach through Control Panel or directly by command.
Open Wi‑Fi adapter settings from Control Panel
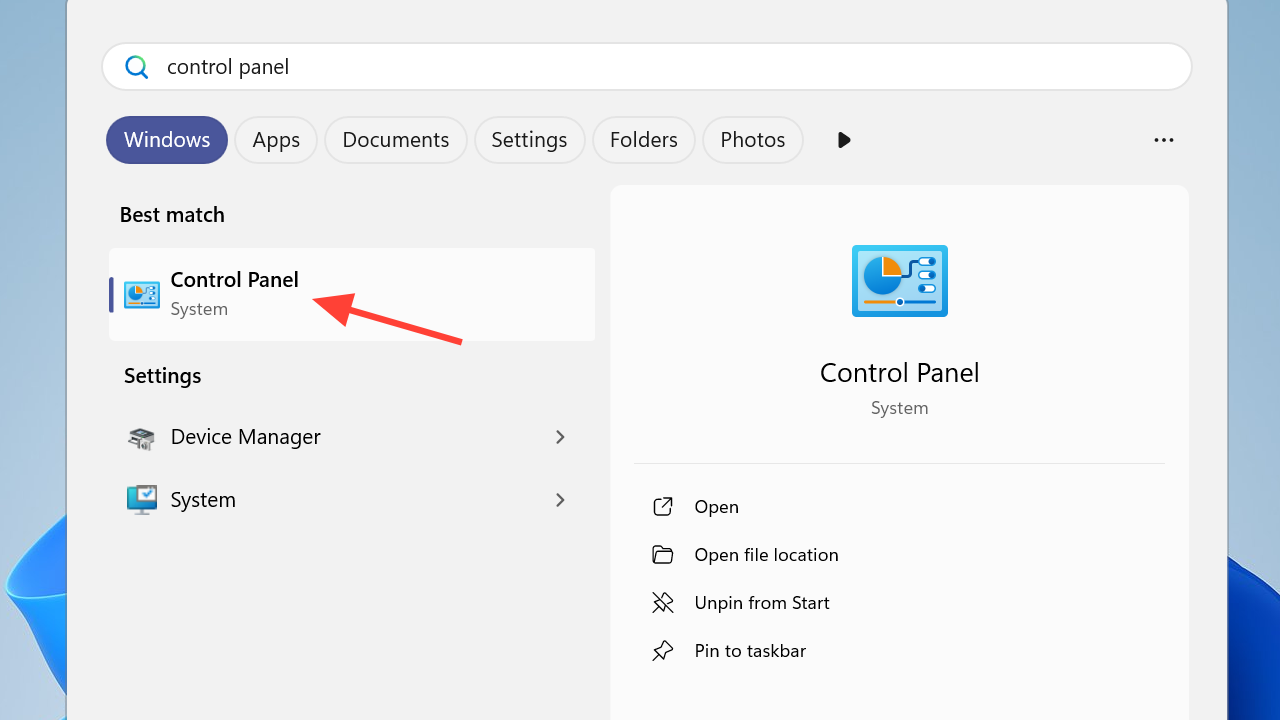
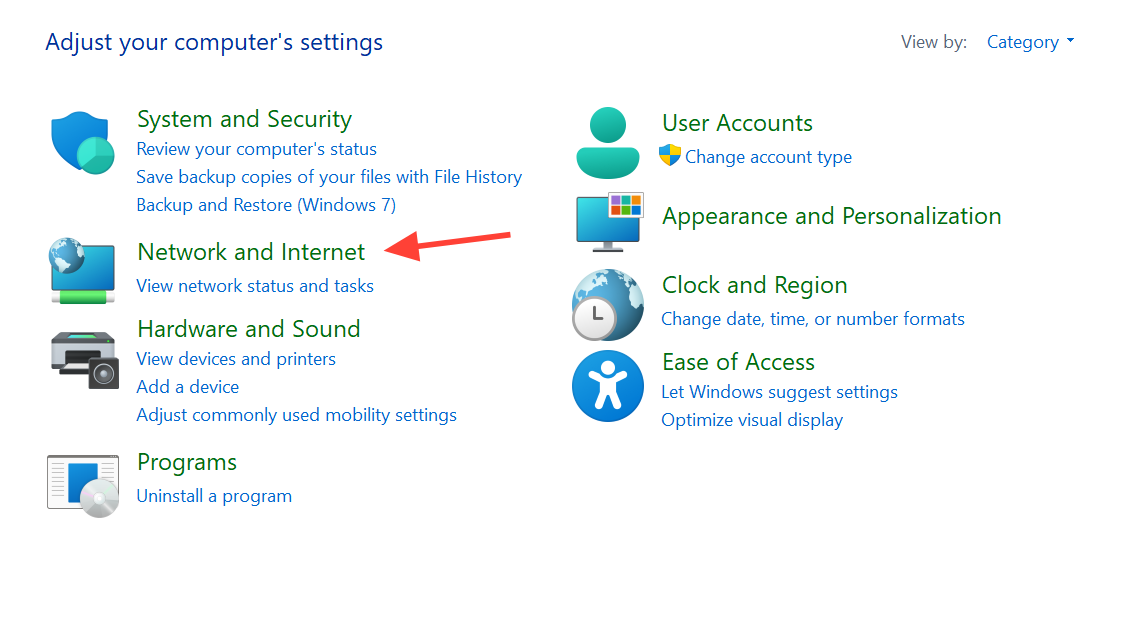
Step 1: Open the Start menu and type control panel, then select the Control Panel desktop app. This opens the legacy configuration environment.
Step 2: Click the Network and Internet category. This groups together network‑related classic tools.
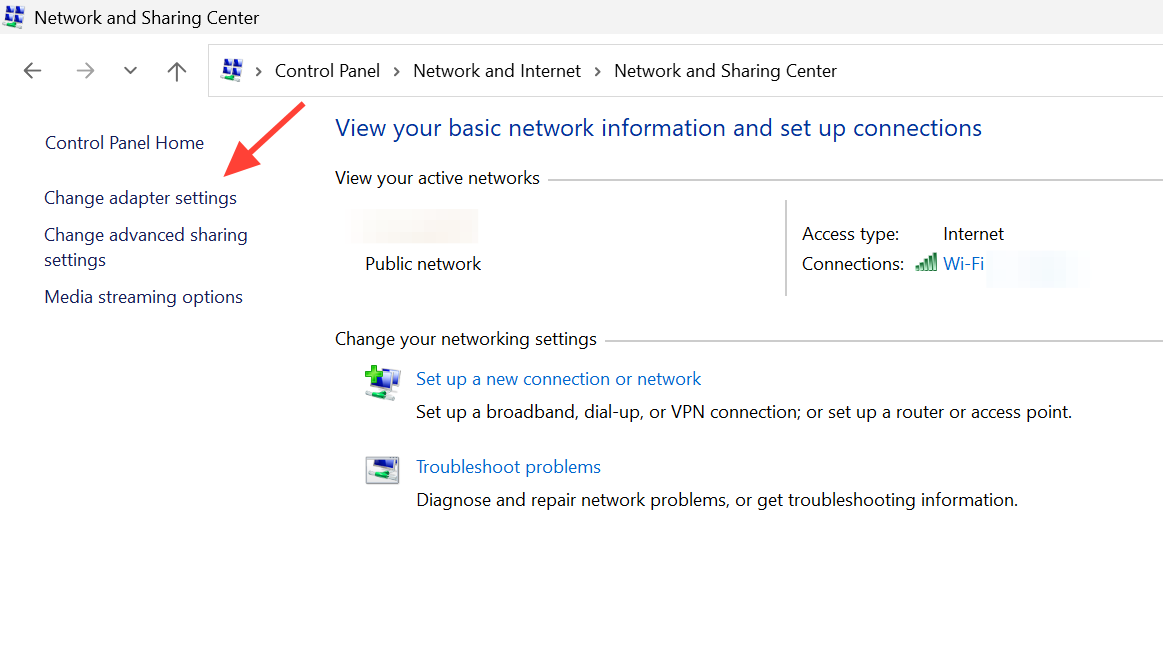
Step 3: Select Network and Sharing Center. This page summarizes current connections and gives access to adapter settings.

Step 4: In the left pane, click Change adapter settings. This opens the Network Connections window.
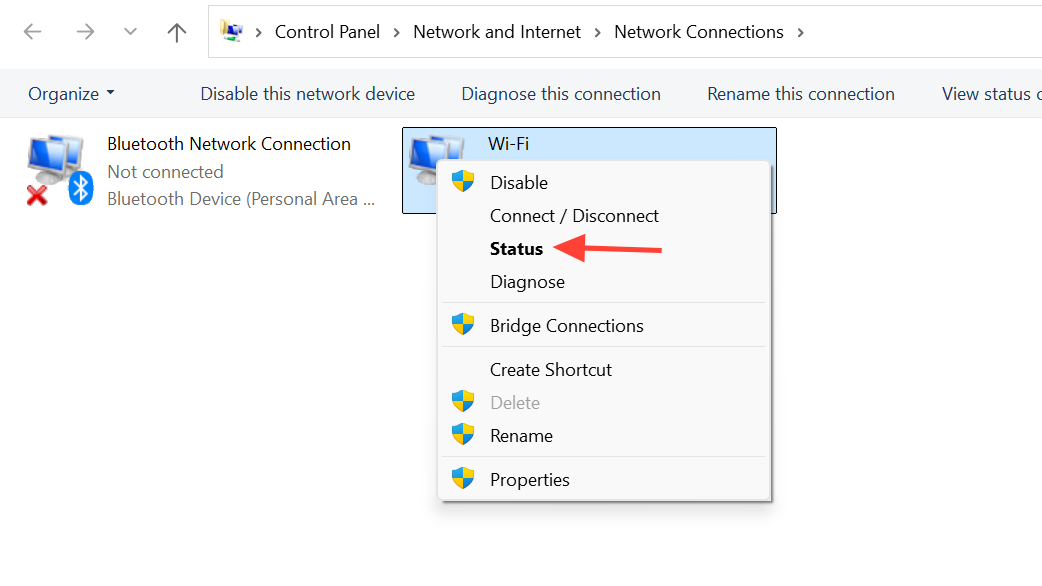
Step 5: Locate your Wi‑Fi adapter in the list. It typically shows the Wi‑Fi icon and may display the current network name beneath it.
Step 6: Right‑click the Wi‑Fi adapter and choose Status to see connection duration, speed, and activity, or click Properties to manage protocols and advanced options.
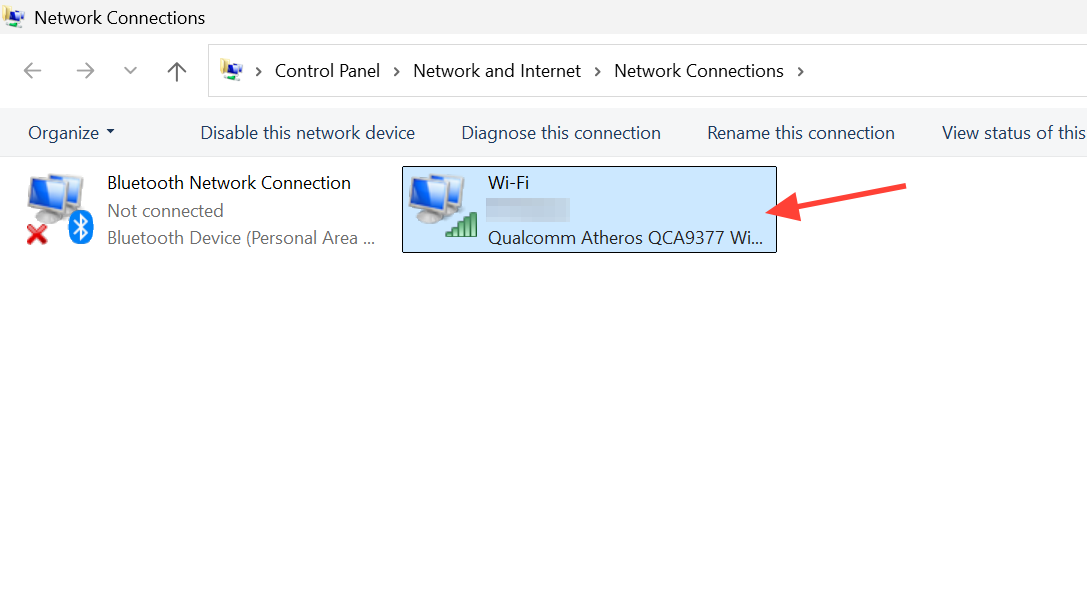
Open the Network Connections page directly
You can jump straight to the Network Connections window without going through Control Panel menus.
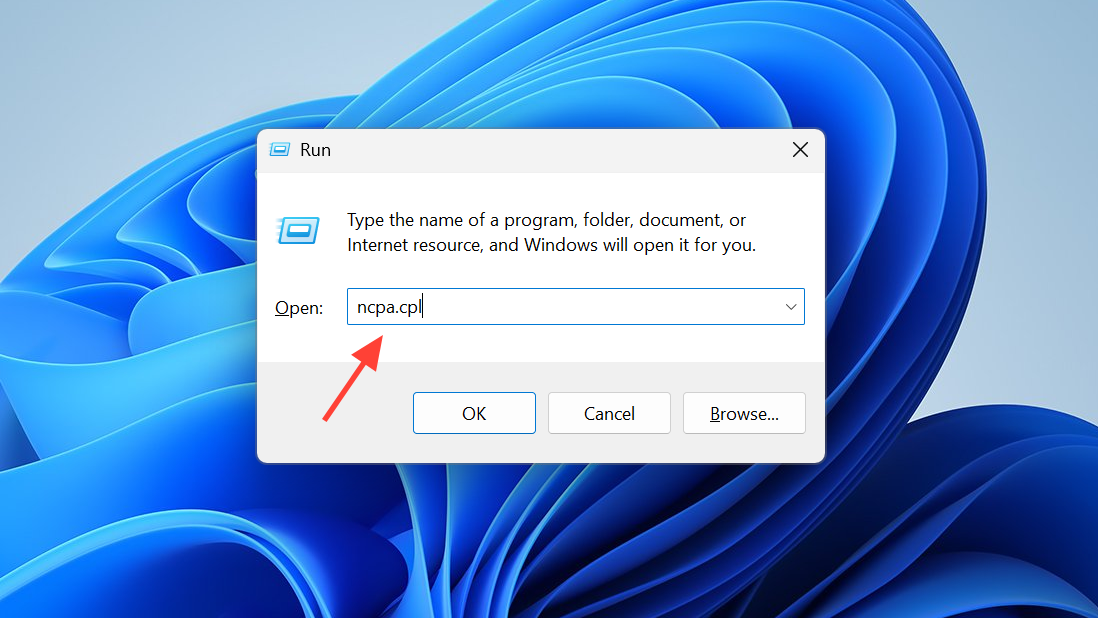
Step 1: Press Win + R to open the Run dialog. This lets you run system commands quickly.
Step 2: Type ncpa.cpl and press Enter. Windows opens the Network Connections window directly.
Step 3: Find your Wi‑Fi adapter, then use Status or Properties as needed to view or configure advanced items such as IPv4, IPv6, or sharing.
Check whether the Wi‑Fi adapter is enabled or disabled
Disabled Wi‑Fi adapters will not show any networks and cannot connect until they are turned back on. Windows allows checking this from multiple tools.
Check Wi‑Fi adapter state in Settings
Step 1: Open Settings, then go to Network & internet and click Advanced network settings.
Step 2: Look at the list under Network adapters. Each adapter shows a short status label, such as Enabled or Disabled.
Step 3: If the Wi‑Fi adapter shows Disabled, click it and use the Enable button to turn it back on. If it is already enabled, the status will indicate it is ready to use.
Check Wi‑Fi adapter state in Control Panel
Step 1: Open the Network Connections window with Win + R and ncpa.cpl, or through the route described earlier.
Step 2: Review the Wi‑Fi adapter icon. If it appears greyed out and labeled Disabled, it is turned off.
Step 3: Right‑click the Wi‑Fi adapter and choose Enable to bring it back online. A normal colored icon with no “Disabled” label indicates it is active.
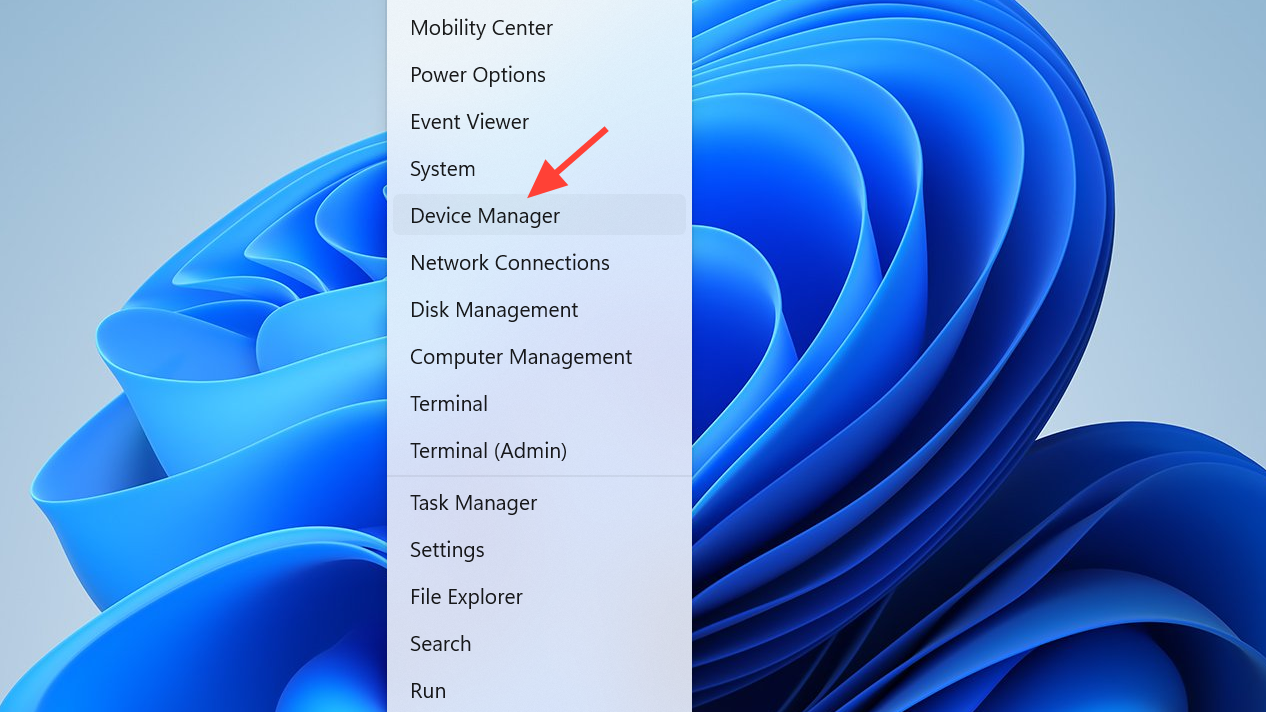
Check Wi‑Fi adapter state in Device Manager
Step 1: Open the Start menu, type device manager, and select Device Manager. This tool lists all hardware devices on the system. Alternatively, right-click the Start menu and select Device Manager.
Step 2: Expand the Network adapters section. Look for entries that contain Wireless or Wi‑Fi in their names.
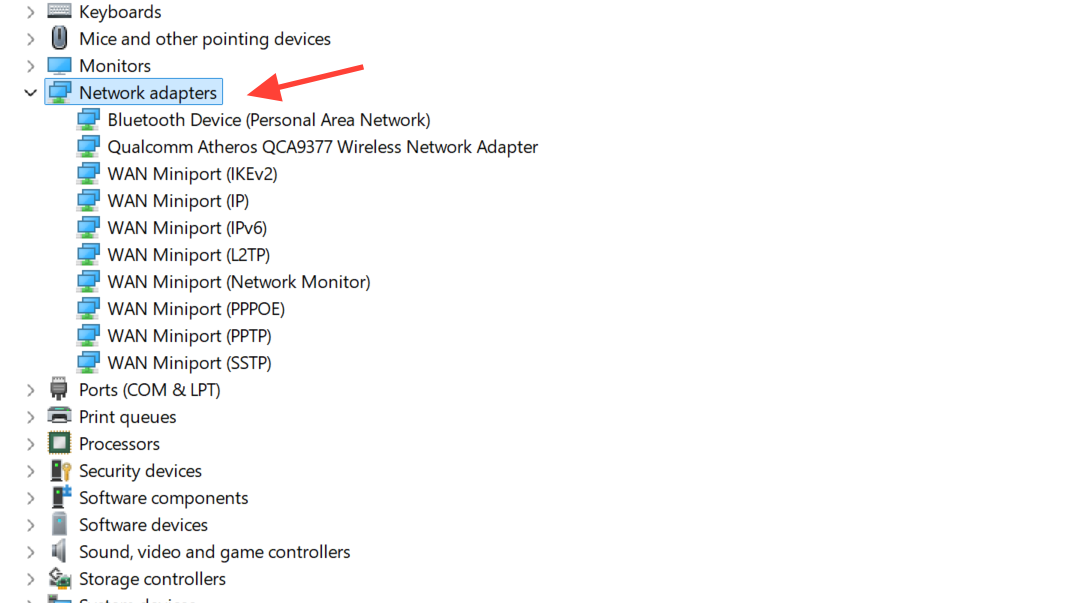
Step 3: Right‑click the Wi‑Fi adapter. If the menu shows Enable device, the adapter is currently disabled. If the menu shows Disable device, it is enabled.
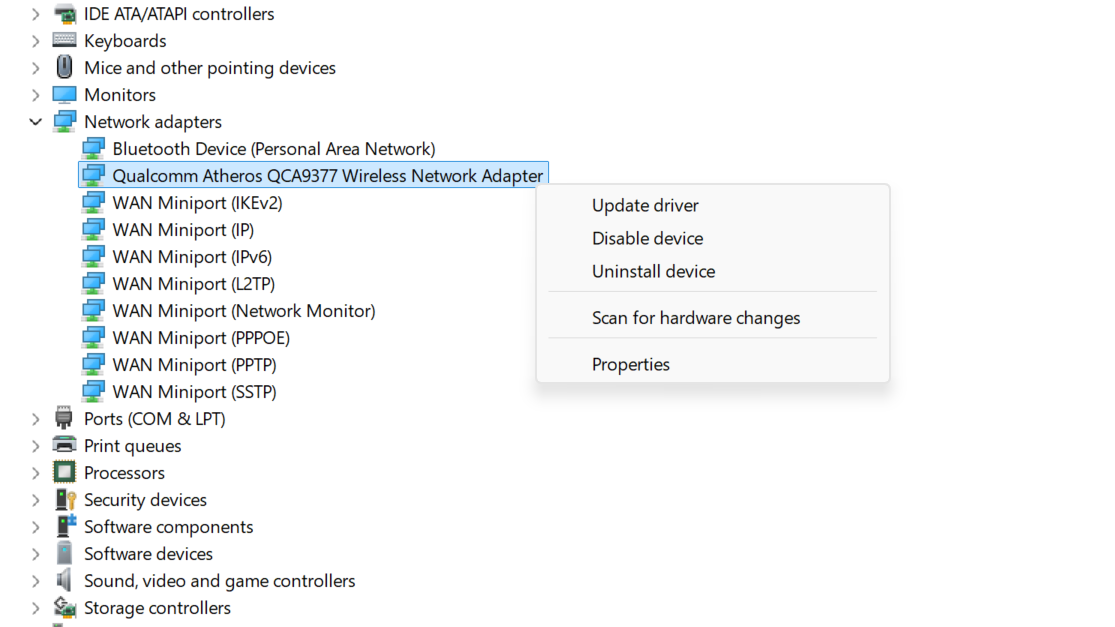
Step 4: Select Enable device if you need to turn the Wi‑Fi adapter back on. After enabling, the adapter should appear active in Settings and Control Panel.
Use Wi‑Fi adapter details when troubleshooting
Viewing Wi‑Fi adapter settings is most useful when you know what problems you are checking for. The properties you saw earlier help in several situations.
Step 1: Use the IPv4 address and Default gateway from the adapter properties when you need to run ping tests or confirm that your router is reachable. A missing or unusual IP can point to DHCP or configuration issues.
Step 2: Check the DNS servers if websites do not load even though the adapter is connected. If needed, adjust DNS values through the same properties area or through the DNS assignment editor in the adapter settings.
Step 3: Verify the Network profile type if file sharing or device discovery does not work inside your network. A Public profile blocks discovery, while a Private profile allows it on trusted networks.
Step 4: Inspect the Link speed and Band in hardware properties if Wi‑Fi speed is much lower than expected. A low link speed or a congested band can explain slow downloads.
Step 5: Use the MAC address and Driver version information when updating drivers or configuring router access control lists that filter by device.
Once you know where to find Wi‑Fi adapter status and properties in Windows 11, diagnosing connection problems becomes far more straightforward and faster to do.