
Inventory fills up quickly in Hytale. Stone, wood, ore, food, tools, quest items — it all piles into the same grid. The backpack system is the main way to push back against that limit, and it’s built around a series of upgrades rather than a single craftable bag.
How the backpack works in Hytale
By default, your character only has the main inventory grid plus the hotbar. That base inventory holds up to 36 distinct stacks, not counting the hotbar, which can feel tight once you start mining and looting aggressively.
The backpack is a separate storage pane you unlock with a consumable upgrade item. Once unlocked, a backpack icon appears next to your character portrait in the inventory screen. Clicking that icon opens a smaller, secondary stash: your backpack.
Accessing the backpack is slightly slower than grabbing something from the main grid, so it is best used as overflow storage for materials you do not need in combat or during quick tool swaps. Think spare tools, building blocks, or extra ores, while your main inventory carries healing items, weapons, and key tools.
After the first unlock, you can craft further upgrades that increase this extra space and give you more total slots to work with as you explore.
Prerequisite: upgrade your Workbench to Tier 2
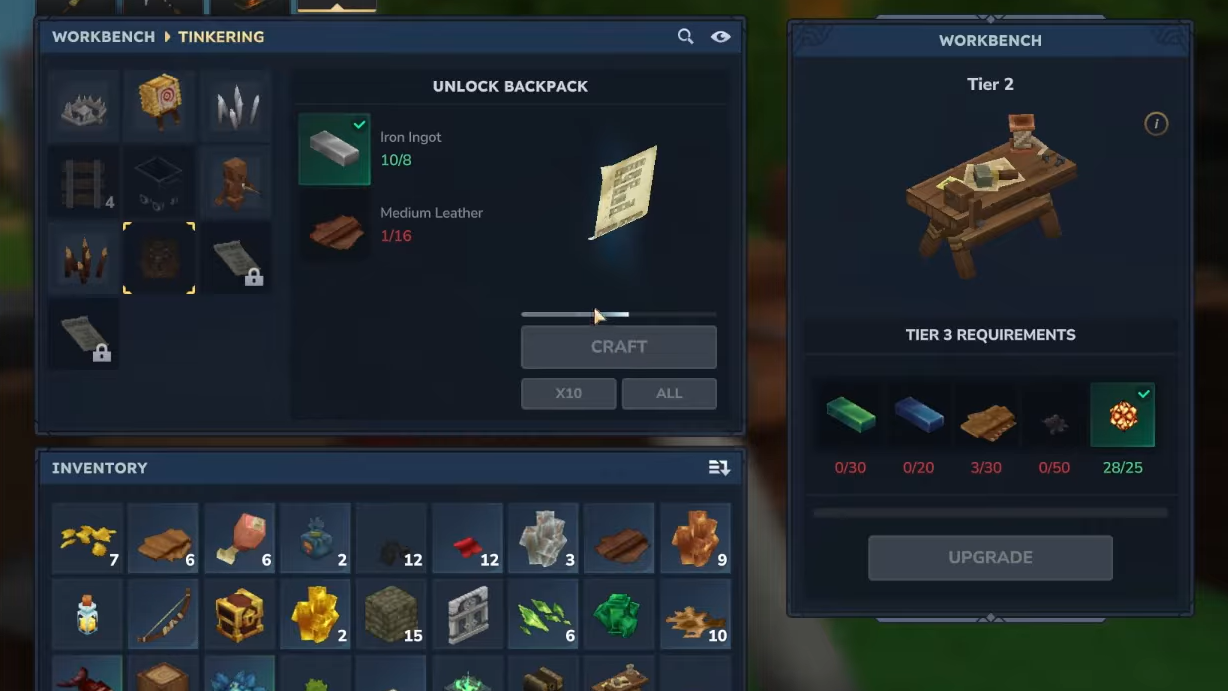
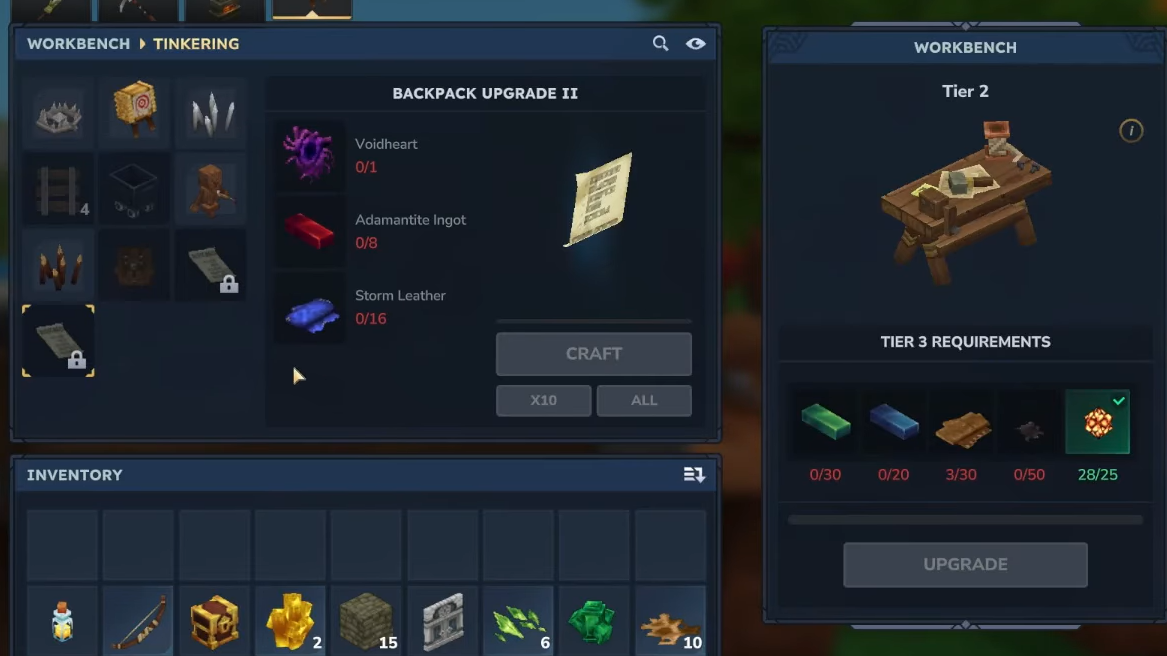
You cannot craft the initial backpack unlock until your Workbench reaches Tier 2. Upgrading the bench itself requires three kinds of resources: copper, iron, and linen scraps.
| Workbench Tier 2 requirement | Amount |
|---|---|
| Copper Ingot | 30 |
| Iron Ingot | 20 |
| Linen Scraps | 20 |
Copper and iron ingots come from ore veins in caves and mineshafts. Copper appears in relatively shallow tunnels, while iron is more common in deeper cave systems across biomes, including the Emerald Wilds starting area.
Linen Scraps are not mined. They drop from humanoid enemies in the overworld or underground. Farming bandits or other humanoid mobs is a consistent way to gather what you need.
Step 1: Explore nearby caves and mineshafts to mine copper and iron ore, then smelt them into ingots at your furnace. Keep going until you hit the 30 copper and 20 iron thresholds.
Step 2: Hunt humanoid enemies on the surface and in underground structures. Pick up Linen Scraps from their drops until you have at least 20.
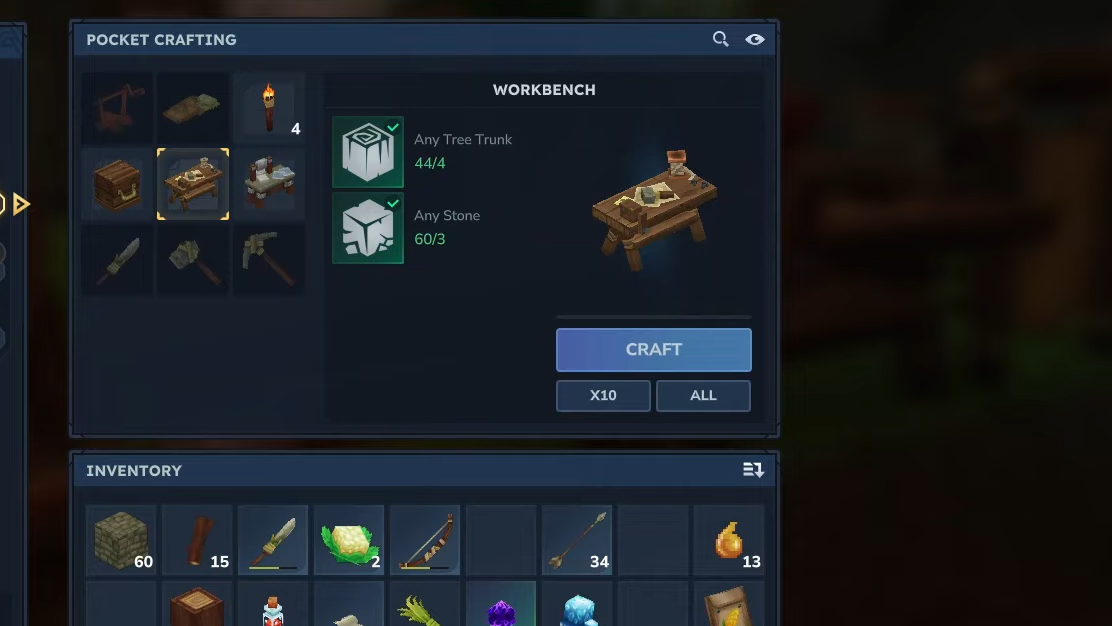
Step 3: Return to your Workbench, open its interface, and use the Upgrade option to convert these materials into a Tier 2 Workbench.
Unlocking the first Backpack at the Workbench
With a Tier 2 Workbench in place, the Backpack unlock recipe becomes available. This does not craft a physical bag you equip. Instead, it creates an upgrade item that permanently adds the backpack to your character when consumed.
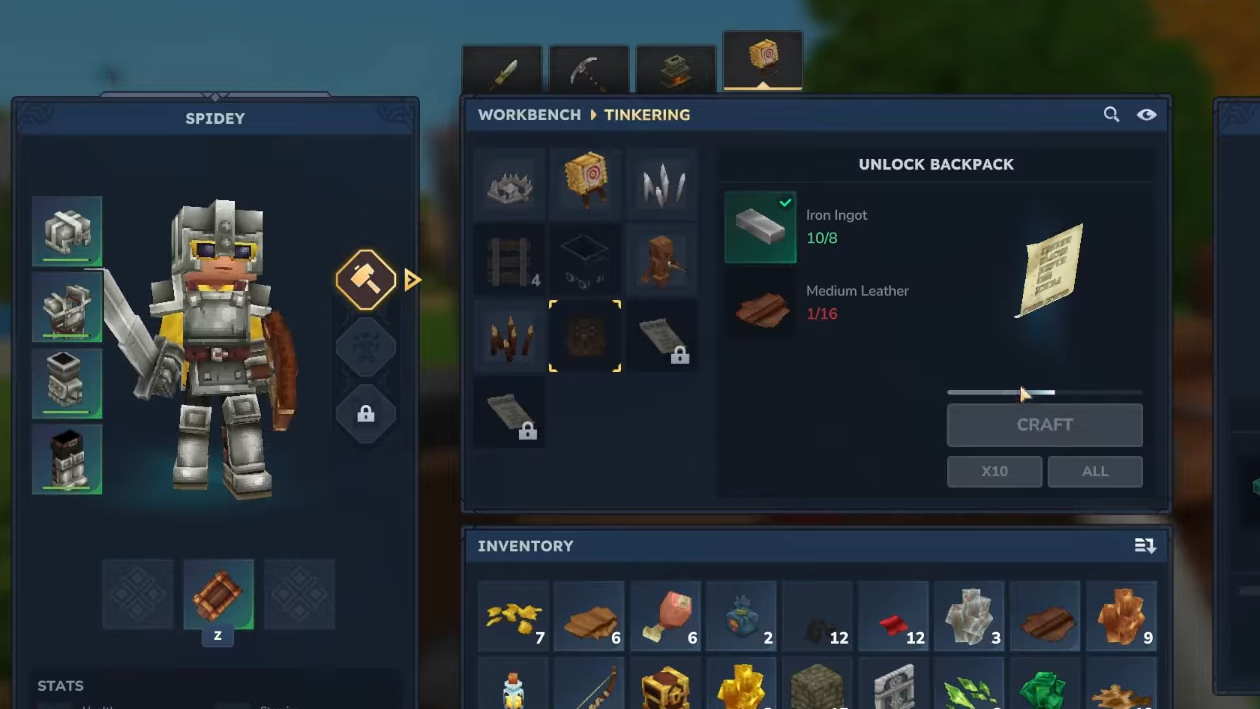
The Backpack unlock itself is crafted from iron and leather in the Tinkering section of the Workbench UI.
| Backpack unlock requirement | Amount |
|---|---|
| Iron Ingot | 8 |
| Medium Leather | 16 |
Medium Leather starts as medium hide, which drops from predators such as wolves. Process the hides at a Tanning Rack to turn them into usable leather. Iron ingots come from smelting iron ore, as with the Workbench upgrade.
Step 1: Hunt predators like wolves until you collect enough medium hides to cover 16 Medium Leather once tanned.
Step 2: Use a Tanning Rack to convert your medium hides into Medium Leather, then smelt extra iron ore until you have 8 iron ingots spare.
Step 3: Interact with your Tier 2 Workbench, switch to the Tinkering tab, and scroll to the Backpack unlock recipe. Craft it using the 8 iron ingots and 16 Medium Leather.
The crafted item appears as a piece of paper-like upgrade in your inventory rather than a wearable bag.
How to consume the Backpack upgrade and use the new space
Crafting the Backpack unlock only prepares the upgrade; it does not increase your storage until you consume it.
Step 1: Drag the Unlock Backpack upgrade item from your inventory onto your hotbar.
Step 2: Select that hotbar slot so your character is “holding” the upgrade in their hand.
Step 3: Use the Right Mouse Button while it is selected. The upgrade is consumed, and a message appears confirming that your backpack capacity has increased.
After this, open your inventory. A small backpack icon should now sit next to your character model. Selecting it opens a second grid that functions as your backpack storage. At this stage, you gain a modest set of extra slots, bringing your total capacity to at least 45 item stacks when combined with the main inventory.
Because accessing the backpack takes an extra click, it is efficient to treat it like a traveling stash. Place bulky items, building blocks, and backups there, while keeping immediate-use items in the main grid and on the hotbar.
Upgrading to Backpack Upgrade 1 (Workbench Tier 3)
Once the base backpack is unlocked, the next step is Backpack Upgrade 1. This further increases your inventory capacity and is tied to a higher-tier Workbench and more advanced materials.
First, your Workbench must reach Tier 3. That upgrade uses its own set of resources, but the important part for the backpack path is that Tier 3 enables the next Tinkering recipe.
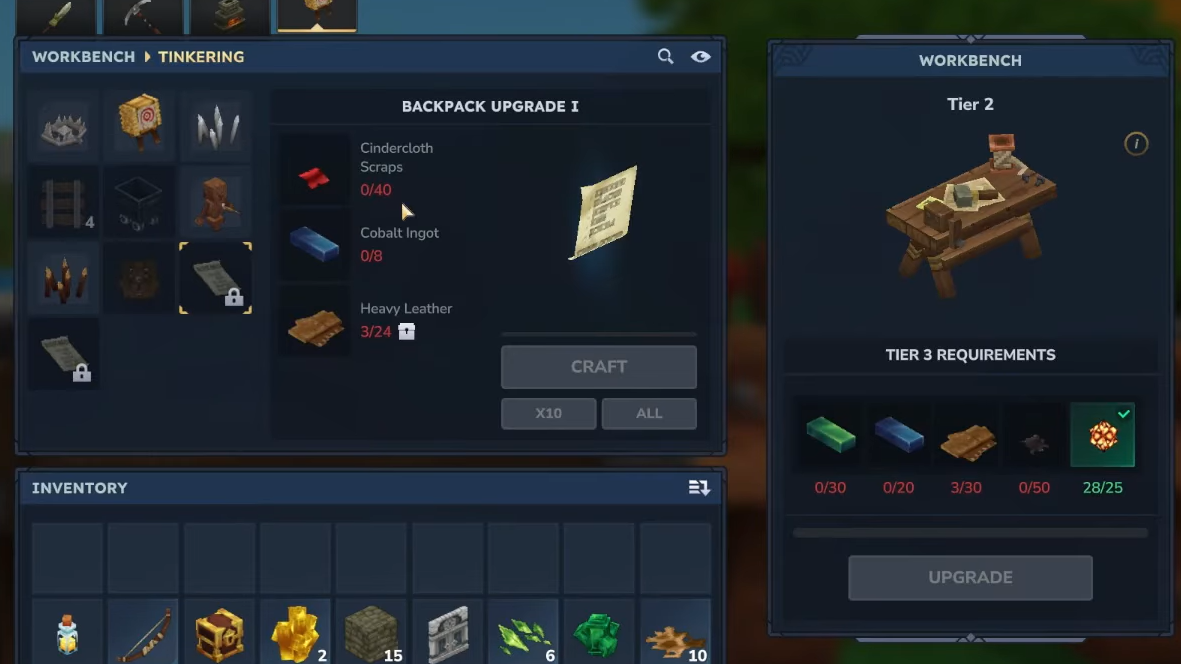
Backpack Upgrade 1 requires three key materials: cindercloth scraps, heavy leather, and cobalt ingots.
| Backpack Upgrade 1 requirement | Amount |
|---|---|
| Cindercloth Scraps | 40 |
| Heavy Leather | 24 |
| Cobalt Ingots | 8 |
Cindercloth Scraps are a cloth-type material obtained later in progression, usually tied to more advanced enemies or structures. Heavy Leather follows the same logic as earlier hides but comes from tougher creatures or higher-tier hunting targets. Cobalt ingots come from cobalt ore, a higher-tier metal found deeper or in more dangerous areas than iron.
Step 1: Progress into higher-level regions and enemy types to gather 40 Cindercloth Scraps and the hides needed to produce 24 Heavy Leather.
Step 2: Mine cobalt ore in late-game cave systems, then smelt it into at least 8 Cobalt Ingots.
Step 3: Interact with your Tier 3 Workbench, open the Tinkering tab, and craft Backpack Upgrade 1 with 40 cindercloth scraps, 24 heavy leather, and 8 cobalt ingots.
Backpack Upgrade 1 is treated as a character upgrade rather than a piece of gear you manually equip on the paper slot. In many builds it occupies the final slot on the right-hand side of the character sheet. Once applied, your backpack space increases again, giving you more breathing room for extended expeditions away from your base.
Unlocking Backpack Upgrade 2 with Memories
The final expansion is Backpack Upgrade 2. This upgrade ties directly into Hytale’s Memories system, so it demands exploration rather than just crafting resources.
Backpack Upgrade 2 sits on the Memories reward path, specifically in the fourth pack of rewards. Unlocking it requires restoring 100 Memories.
Memories are logged by discovering and recording creatures around the world. To participate in this system, you need to find the Memories Statue located in the Edge of the Echo region, which you reach through the Forgotten Temple Gateway. Interacting with that statue enables you to start restoring Memories and working along the reward path.
Step 1: Travel through the Forgotten Temple Gateway and locate the Memories Statue in the Edge of the Echo area.
Step 2: Explore the world and log different creatures until you have restored 100 Memories. This fills out the early segments of the Memories reward path.
Step 3: Claim the fourth pack along that reward path, which includes the recipe for Backpack Upgrade 2.
After the recipe is unlocked, you can return to the Workbench and craft the final backpack upgrade, using the specified materials shown in the recipe. This builds on the same Workbench-driven system as the previous upgrades and pushes your carrying capacity to its highest standard level.
Staying efficient with your expanded backpack
Even with every backpack tier unlocked, it is still possible to overload yourself with items. The upgrades are designed to reduce how often you have to return to base, not to remove inventory management entirely.
A practical way to use the system is to treat your inventories in layers. Keep combat and survival essentials on the hotbar, fast-access tools and crafting components in the main grid, and bulk materials or spares in the backpack panel. When you return to base, empty the backpack first into chests so it is always ready as overflow for your next expedition.
Used this way, the backpack path — from the first consumable unlock through the Memories-gated final upgrade — turns Hytale into a much less cramped experience, especially once larger builds and longer dungeon runs enter the picture.