
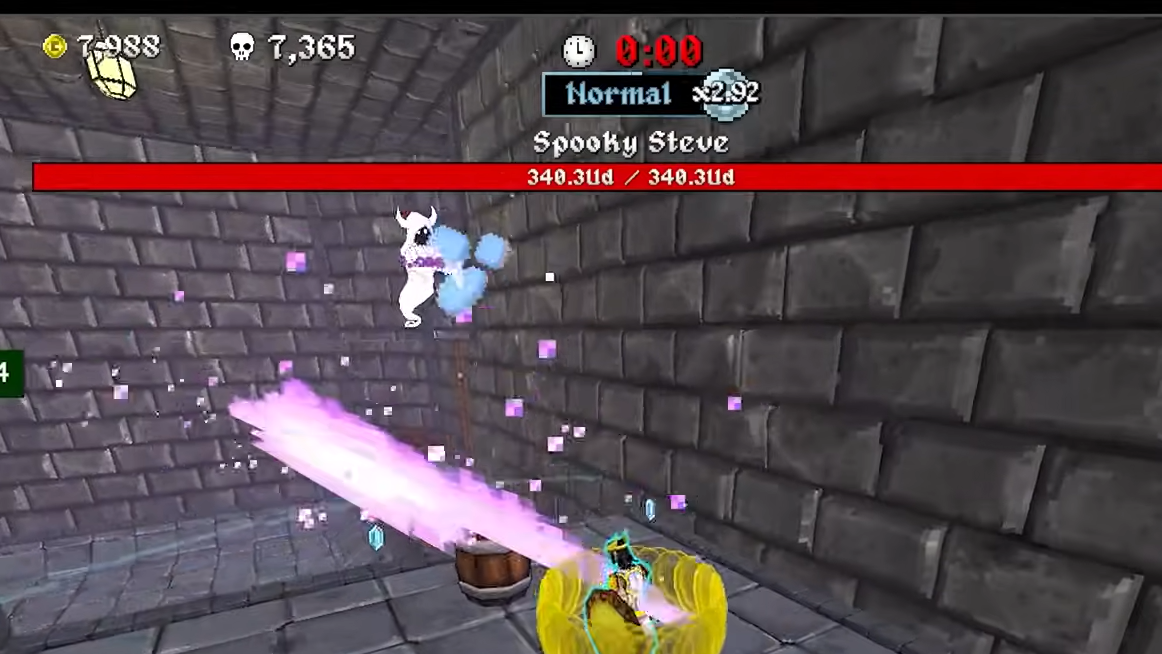
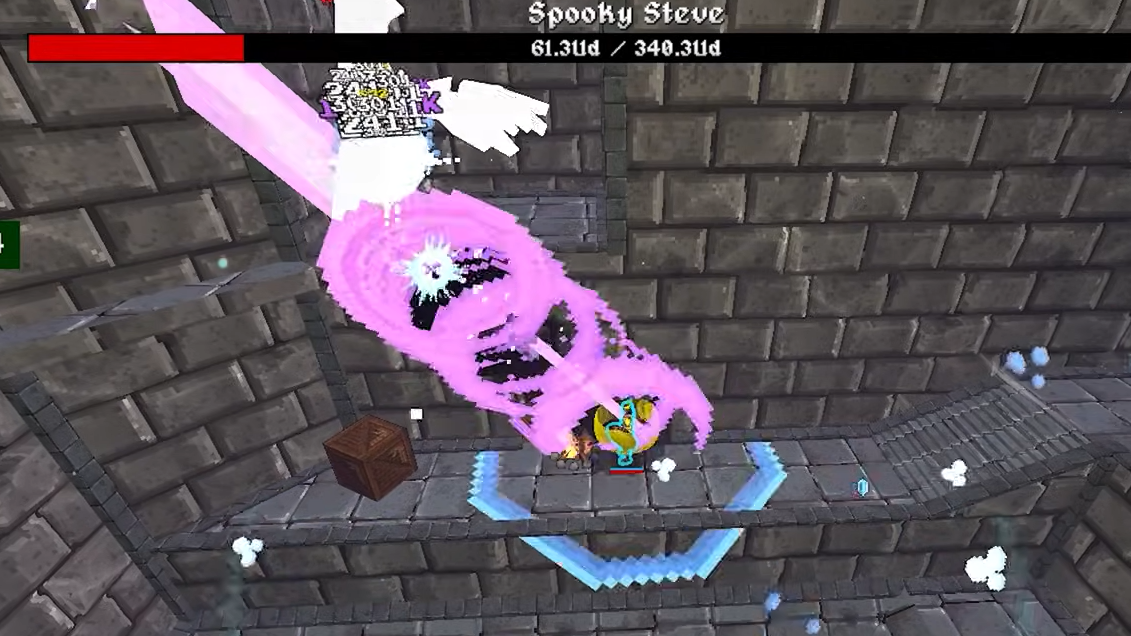
Spooky Steve in Megabonk is not a normal boss. His health sits in undecillions, his contact damage effectively one-shots most builds, and his speed ramps hard once he’s aggro. Raw damage does almost nothing; the only reliable way to kill him is to lock him in place and let execute effects chew through his health bar.
The good news: there is a consistent pattern that turns this fight from impossible to trivial. It leans on Athena’s Aegis, heavy crowd control, and a Dexecutioner-centric kit inside the second Crypt.
Where and when you actually fight Spooky Steve
Spooky Steve appears twice on the Graveyard map, but only one of those spawns is realistically killable.
- First Crypt “intro” Steve: He spawns if you linger too long in the starting Crypt and shoves you out into the Graveyard. With early-game stats and weapons, his health is effectively unkillable. Treat this encounter as a warning, not the real fight.
- Second Crypt “real” Steve: After you clear the Graveyard, collect four keys from coffin ghosts, and open the locked tomb, you enter a second Crypt just before Big Bob. This is where you fight the version of Spooky Steve you can actually kill.
Several high-level runs confirm the practical rule: killing Steve in the first Crypt is effectively impossible. Plan your entire build around the second Crypt appearance, after you’ve looted the map and scaled your tomes and weapons.
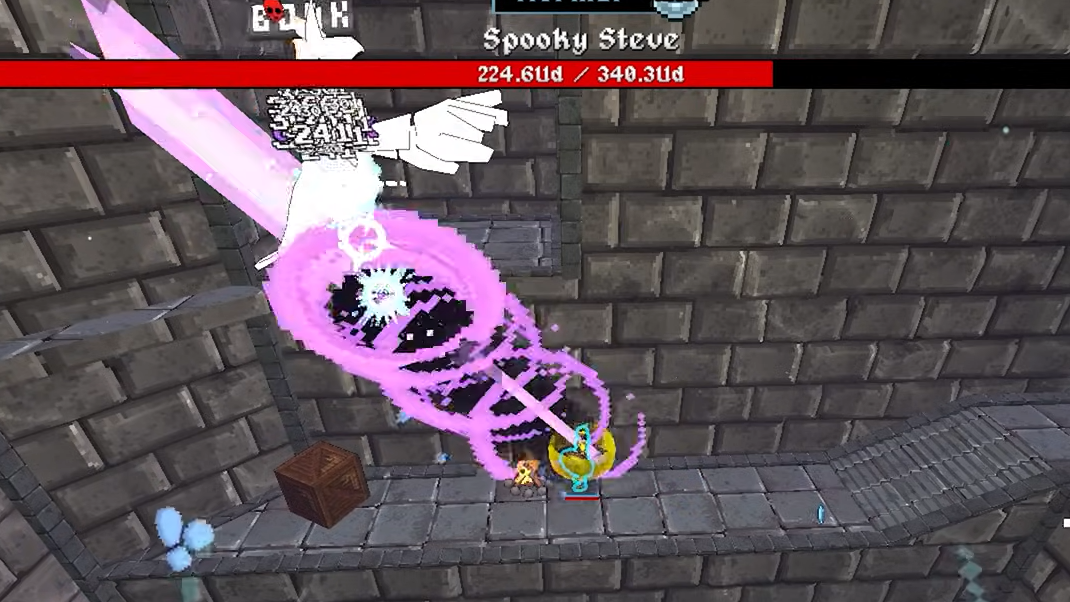
Core strategy: perma‑lock and execute Spooky Steve
Spooky Steve’s health is so high that normal damage numbers might as well be cosmetic. The kill condition is a steady stream of executes from Dexecutioner while crowd control keeps him from ever reaching you.
The strategy has three pillars:
- Execute-only damage: Dexecutioner’s execute chance is one of the few effects that meaningfully moves Steve’s health bar. Other execute sources like Joe’s Dagger do not seem to work on him, while Dexecutioner does.
- Continuous crowd control: Black Hole and Frostwalker lock Steve in place with overlapping pulls and freezes. Duration, quantity, and any stun/freeze items you find all exist to maintain that lock.
- Fail-safe defense: Athena’s Aegis fully blocks hits for her instead of partially, which gives you a safety net if Steve ever breaks free for a second. In strong runs, he never touches you; Aegis is there for the one time things go wrong.
If you do this correctly, Steve either never moves or only nudges you around the room while his health is shaved off by a storm of executes.
Recommended character and weapons for Spooky Steve
Athena is the most reliable choice for this fight. Her version of Aegis blocks entire hits instead of leaking damage through shields, which is critical when a single contact can delete your run. Other characters can technically do it, but they trade away that insurance.
Lock your weapon pool down to three:
- Dexecutioner – Your primary way to actually kill Steve. Every extra projectile, every attack speed bump, and every tome level is about rolling more execute checks.
- Black Hole – The main control tool. High projectile count and size let it sit on top of Steve and keep him stuck in overlapping pulls.
- Frostwalker – Constant slows and freezes along his path. With enough duration and size, the freeze zone becomes a permanent pad he never escapes.
Keeping only these three weapons toggled makes it much easier to max them and keep your level-up pool clean. You want Dexecutioner and Black Hole at high levels with large projectile counts long before you re-enter the Crypt.

Best tomes for the Spooky Steve build
The tomes you prioritize are what turn this into a stunlock machine. The core set:
- Quantity Tome – This is non-negotiable. You want as many Dexecutioner slashes and Black Holes on screen as the game will allow. High tome levels plus quantity-focused shrine choices can push Dexecutioner and Black Hole into absurd projectile counts.
- Duration Tome – This keeps Black Holes and freezes active long enough that they overlap. Runs that push Duration into the 150–300% range report Steve literally not moving. If Duration is too low, he can slip through between pulses and sprint at you.
- Cooldown / Attack Speed Tome – Different runs refer to it differently, but the goal is simple: attack as frequently as possible. More attacks mean more execute rolls, more crowd control triggers, and faster Aegis recharges.
- XP Tome – Early and mid-run, XP gain is what lets you reach extreme levels in your other tomes and weapons. Many successful runs hit level 100+ before stepping into the second Crypt.
A common priority order is XP early so you snowball, then Quantity and Duration, then Cooldown/Attack Speed once you’re leveling fast. By the time you’re farming the endless ghost wave, XP becomes less relevant; at that point, extra points usually go back into attack-related tomes or weapons.
Key items and shrine choices
Items are heavily RNG-gated on the Graveyard map, but certain pieces stand out for this fight.
Essential control and damage items
- Ice Cube / Ice Crystal: Multiple runs treat Ice Cube as practically mandatory. It freezes Steve often enough, especially when boosted by long Duration and high projectile counts, that he can’t build up speed. Ice Crystals help as a backup but do not replace Ice Cube.
- Lightning Orb / Thunder Mitts / Thunderclap effects: Any item that adds a frequent, hard stun is extremely valuable. Some players specifically call out Thunderclap-type effects as the only CC that still hits him consistently after long fights.
- Overpowered Lamp: OP Lamp lets on-hit effects like Ice Cube and Lightning Orb trigger more often. With Dexecutioner and Black Hole hitting constantly, doubling status procs turns CC from “good” into “permanent.”
- Boss Buster: A rare but effective route is stacking large numbers of Boss Buster, which adds bonus damage to bosses and elites. Some successful runs duplicated it in microwaves until they had more than twenty copies, making executes and regular hits hurt significantly more.
Defensive and utility items
- Mirror: Reduces the cooldown on Aegis refresh and gives you extra ways to nullify hits. Multiple Mirrors can make brief breaks in CC far less deadly.
- Golden Shield + Kevin combos: Powerful for general runs but risky here. Several high-difficulty attempts deliberately skipped or even banished Kevin because the extra risk didn’t outweigh the reward when a single mistake ends the fight.
- Movement speed and extra jumps: The Graveyard is huge and vertical. Movement speed bonuses and extra jump items help you traverse quickly, dodge boss lasers during setup, and reposition inside the Crypt if Steve slips the lock.
Using bald heads and gravestone “greed” shrines
The Graveyard introduces two scaling tools that matter a lot: bald heads and gravestones.
- Bald heads let you trade one stat for a huge boost in another. Strong rolls include 2x Duration, 2x Size, or 2x Attack Speed in exchange for something irrelevant for this fight, such as Armor, Fall Damage Multiplier, Lifesteal, or Thorns. Double XP from a head can also supercharge your leveling.
- Gravestones are a new kind of greed shrine marked with purple icons that increase difficulty but also grant XP gain. Stacking them pushes enemy scaling, yet the experience you get back more than pays for it when the goal is hitting very high levels before Steve.
Standard greed shrines that add difficulty without XP are less valuable here. When in doubt, favor XP gain, projectile count, size, knockback, and direct damage upgrades over small defensive bumps.

Graveyard routing: how to set up the run
The map is enormous and full of distractions. Treat it as a long setup for one minute of boss damage.
Step 1: Rush your tomes and weapon core online. Early on, prioritize unlocking XP, Quantity, Duration, and Cooldown/Attack Speed tomes, and pick Dexecutioner, Black Hole, and Frostwalker as soon as they appear. Avoid taking extra weapons so you don’t dilute your upgrades.
Step 2: Collect gravestones and boss shrines while avoiding early chest spam. Gravestones boost difficulty and XP, which you need; boss shrines feed you a stream of elite enemies and chests. Let keys pile up and avoid microwaving anything until your core kit is in place.
Step 3: Track and clear the four coffin arenas. Each red-lit graveyard patch hides a mini-boss that drops a key. You need four keys to open the locked tomb that leads to the second Crypt, where the real fight happens.
Step 4: Once your weapons and tomes are leveled, start popping boss shrines aggressively. The map bosses are relatively fragile compared to late-stage enemies, so they’re mostly walking loot piñatas feeding you more items and chests.
Step 5: Use microwaves strategically. Once you have high-value items like Boss Buster or key CC pieces, spend keys at microwaves to duplicate them. Some routes duplicate keys first, then use those extra keys to open more chests and further duplicate top-tier items.
Step 6: When the 16-minute timer winds down, use any remaining magnets to vacuum the map’s XP and rapidly finish off tome and weapon levels. Ideally, XP and Quantity will hit very high levels before you step into the second Crypt.
Farming the endless ghost wave before Steve
At the timer’s end, the map shifts into an endless ghost swarm. This phase is dangerous but incredibly valuable if you can survive it.
Step 1: Kite the swarm in wide loops and let Dexecutioner and Black Hole clear. Monitor how quickly enemies die; if they start to stack up and pin you, you’re near your farm limit for that run.
Step 2: Open remaining chests using your now-cheap or duplicated keys. With enough Boss Shrines and Luck, you can still uncover crucial items like Ice Cube, OP Lamp, or additional Boss Busters at the last moment.
Step 3: If you find extra magnets during the swarm, trigger them once enemies feel too thick to handle. The level spikes from a full-map XP pull often push Duration, Quantity, and Cooldown/Attack Speed well past the thresholds where Steve becomes trivial.
Step 4: The second you feel your damage falling behind the swarm’s health, stop chasing more levels and head to the Crypt entrance. Dying here ends everything, and you already have enough scaling if the screen is full of projectiles.
How to approach the Spooky Steve fight in the second Crypt
When you enter the second Crypt and clear the room, Steve spawns after a short delay. At this point, you should already have your projectiles saturating the arena.
Step 1: Before he appears, lower any particle density or transparency settings that make it hard to see him. You need to track his exact position to know if the lock is holding.
Step 2: Start circling the Crypt and let Dexecutioner and Black Hole fire continuously. You don’t need to charge into him; let him walk into your control zones instead.
Step 3: Once the Black Holes and Frostwalker trails settle on his position, stay just outside contact range and maintain constant fire. With high Duration and Quantity, new holes and freezes should refresh before old ones expire, effectively glueing him in place.
Step 4: Watch his health bar closely. You should see visible ticks or chunks of health disappearing from execute triggers. If the bar barely moves and you’re not hearing execute procs, you probably don’t have enough Dexecutioner presence; in that case, get closer to make sure every projectile is hitting.
Step 5: If he breaks free and sprints at you, you have a few seconds to recover. Use your movement speed and jumps to create space, drag him back through overlapping Black Holes and freezes, and let Aegis and any Mirrors absorb hits while your CC kicks back in.
Step 6: Maintain the lock until he dies. Efficient runs report kills in roughly a minute once the lock is stable. In some extreme attack speed setups, players have been able to let go of the controls and stand there while Steve dies in a stationary storm of executes.
Alternate character routes
Athena is the safest pick, but there are credible clears with other characters:
- Ninja with evasion stacking: Some players stack Dexecutioner, Aegis, Frostwalker, and near-max evasion using Slippery Rings and bald heads. At ~98% evasion plus Aegis and Mirrors, Spooky Steve’s hits are more likely to be dodged or blocked than to connect.
- Bandit and other Dex-start characters: Characters that start with Dexecutioner (Bandit, some others) offer a smoother early game and more consistent boss access, then pivot into the same CC-and-execute pattern later.
- Calcium and high-duration meme builds: There are niche clears with other heroes using enormous Duration stacks, Boss Busters, and stun items like Thunder Mitts or Thunderclap. These lean harder on sheer hit volume than on Aegis safety.
These approaches all circle back to the same core concept: massive Dexecutioner presence, extreme attack speed, and enough crowd control that Spooky Steve never gets to play the game.
Once Steve dies, he drops a chest and unlocks Roberto as a playable character. From there, you can either finish off Big Bob — who is much less demanding mechanically — or head back out into the Graveyard’s endless ghosts to see how far your busted execute machine can go.