
Weather is one of the strongest systems in Roblox Fish It. It affects how fast you reel, how often rare or shiny fish show up, and even whether special sharks spawn. Most of the time, weather rolls on its own, but the Weather Machine lets you take control and pay coins to trigger specific conditions on demand.
Where to find the Weather Machine in Fish It
The Weather Machine sits on a small, isolated island in the northwest part of the ocean map. It appears with a marker like other named islands, so you can spot it from a distance while sailing.
Look for it roughly between Coral Reef and Lost Isle. When you reach the island and step onto the shore, the machine itself is placed near a campfire.
How to use the Weather Machine on the island
Step 1: Sail to the Weather Machine island using your boat and walk up to the device near the campfire. Stand close enough for the interaction prompt to appear.
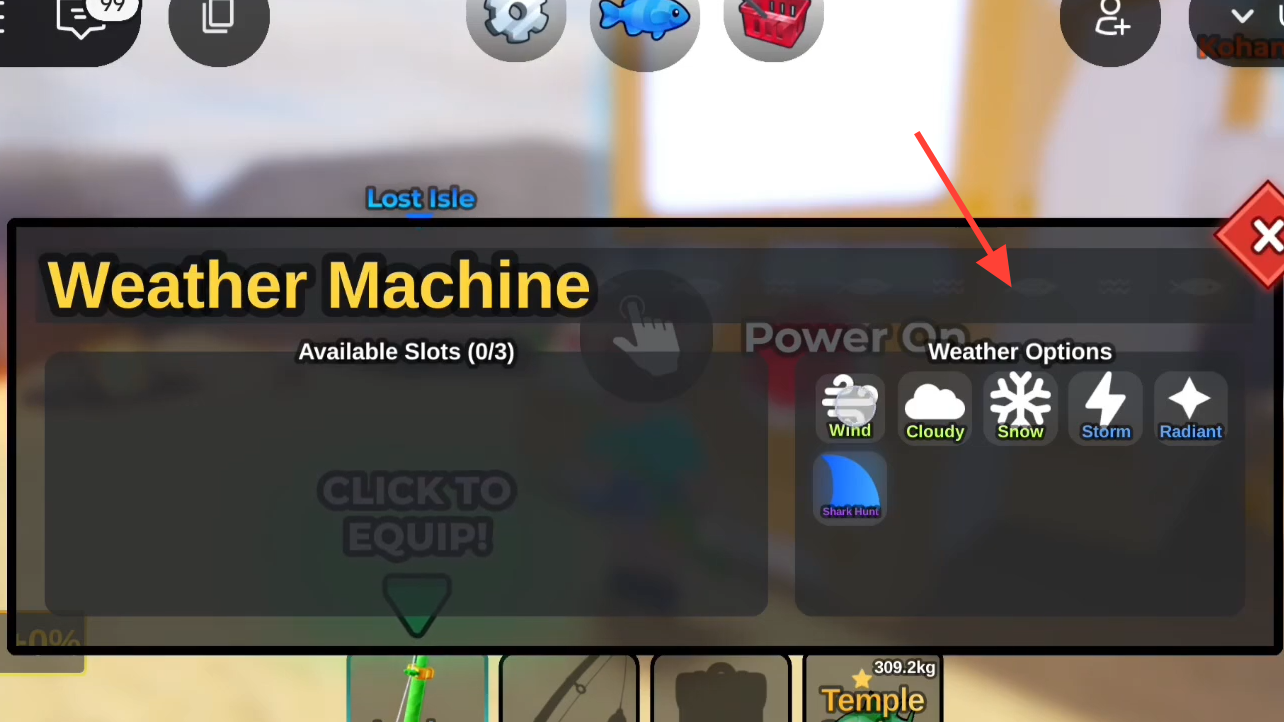
Step 2: Press the E key to power the machine on. This opens a menu showing the current weather slots and the list of weather types you can buy.

Step 3: Check how many weather slots are free. The machine can have multiple active effects at once, so make sure there is at least one available slot before purchasing.
Step 4: Select the weather you want from the list and confirm the coin cost. Once you accept, that weather starts on the entire server and runs for about 10–15 minutes in real time.
Using the physical machine is not the only option. You can also open the same interface directly through the on-screen weather icon, then add or change weather from there as long as you have the coins and a free slot.
How many weather effects can be active
The Weather Machine can run up to three different weather types at the same time. You choose the exact mix. For example, you can pair Wind and Cloudy for speed plus luck, or combine Radiant with Storm to stack shiny odds on top of general speed and luck boosts.
Every purchased weather effect is temporary. Each one lasts roughly 10–15 real-time minutes before expiring and freeing its slot again.
All Weather Machine options, costs, and effects
The machine offers six paid weather types, each with a fixed coin price and a clear gameplay effect.
| Weather | Cost (coins) | Main effect |
|---|---|---|
| Wind | 10,000 | Increases fishing rod speed so you reel in catches faster. |
| Cloudy | 20,000 | Grants a noticeable luck boost, improving chances for rare fish and secrets. |
| Snow | 15,000 | Adds a Frozen mutation to some of your catches, creating special frozen variants. |
| Storm | 35,000 | Combines speed and luck buffs for your fishing equipment, acting like Wind + Cloudy together. |
| Radiant | 50,000 | Raises the chance of reeling in shiny versions of fish. |
| Shark Hunt | 300,000 | Starts a Shark Hunt event on the server, causing large numbers of valuable sharks to spawn. |
Choosing the right weather for your goal
For faster money from volume fishing, Wind is the cheapest speed upgrade and works well for short farm sessions. Storm gives a stronger combined boost at a higher price and is better when you plan to fish constantly for the full duration.
For rare and secret fish, Cloudy is built around luck. It pairs well with high-luck rods and bait when you are targeting specific rare species. Storm is again an option if you want both speed and luck in the same window.
For mutated and collection-focused catches, Snow is the standout. It applies the Frozen mutation to part of your haul, giving you visually distinct fish that also tend to be more valuable.
For shiny hunting and high-value sales, Radiant focuses directly on shiny odds. It is expensive compared with Wind and Cloudy, but it pays off if you can consistently land and sell shiny fish during the active time.
For shark farming and high-risk sessions, Shark Hunt is the dedicated mode. Turning it on floods the ocean with sharks, including higher-tier variants, and is aimed at players who already have strong rods, solid gear, and enough coins to handle the 300,000 cost.

How to trigger weather from the HUD icon
Step 1: Join a Fish It server and wait until your character has loaded into the world. Check the HUD for the weather icon.
Step 2: Click the weather icon to open the Weather Machine interface without sailing to the island. The same slots and options that appear on the island are shown here.
Step 3: Review your available slots, choose a weather type, and confirm the coin cost. The weather starts immediately on the server and counts as if you had activated it on the island.

This shortcut is useful when you want to extend an existing effect or stack a second or third weather type while already out at sea.
Making the most of paid weather
Paid weather is strongest when it amplifies a setup that is already efficient. High-tier rods such as Ghostfinn Rod, Angler Rod, or Ares Rod, strong enchantments, and targeted bait and potions make each minute of boosted weather much more profitable.
It is also important to plan around the 10–15 minute window. Sail to your target location first, set up your bait and potions, and only then trigger the Weather Machine so you are fishing the entire time the effect is active.
Used this way, the Weather Machine becomes a controlled switch for speed, luck, mutations, shinies, or sharks, letting you decide exactly what kind of fishing run you want instead of waiting for random weather to roll in.