
Courier’s Rasher is a timed delivery run in Hollow Knight: Silksong that takes the package from Bellhart up to the gourmet in the Citadel’s Choral Chambers. The meat decays continuously and faster when you take damage, slam into walls, or suffer big drops, and fast travel is disabled during the job. Below are consistent setups and two practical routes players have completed with room to spare.
Prerequisites, access, and recommended setup
What unlocks the delivery. Finish the Bellhart wishes “My Missing Courier” and “My Missing Brother.” Then speak to the courier siblings above the shop in Bellhart to accept the Courier’s Rasher job that targets Loyal Mergwin in Choral Chambers.
Why consider waiting. The rasher alone does not advance the related meal until you bring all ingredients, and one of those requires double jump. Doing this run after acquiring movement upgrades and tools typically makes it far more forgiving.
Open the quick path in the Citadel. Make sure the Citadel Spa corridor is unlocked so you can cut through it during the climb. Explore the Citadel beneath the first large vertical section to find and open the Spa’s interior doors and hatches. Also, approach Mergwin’s dining room from above at least once to open its hatches for future runs.
Recommended tools and charms.
- Silkspeed Anklets for sustained sprint speed once fueled by Silk.
- Harpoon for fast horizontal pulls and to skip awkward enemy patterns and water sections.
- At least one Silk Heart to power Anklets and Harpoon without stopping to refill.
- One of: a safe ranged damage tool to clear specific blockers, or Flea Brew for a temporary speed boost.
Resetting attempts quickly. Sit at the Bellhart bench before you accept the delivery. If a run goes bad early, use Menu → Quit to Title to reload at the bench without repopulating the world via a new sit.
Safety notes.
- Bumping a wall at sprinting speed reduces freshness; round corners cleanly and avoid face-checking ledges.
- Some hazards hit twice (e.g., saws and specific burrowers in Blasted Steps), which can erase your remaining buffer quickly.
- With the route and gear below, players typically survive one to two mask hits and still finish, but treat early rooms as no-hit to keep late-time margin.
Route A (consistent): Shellwood → Blasted Steps → Grand Gate → Citadel Spa → Choral Chambers
This is a widely used line with manageable enemy density and clean landmarks. It keeps you in familiar runback terrain and leverages the Spa cut-through near the top.
Step 1: From Bellhart, head left through Shellwood toward the abandoned carts, hugging the lower path. Favor flat ground where Anklets keep speed, and use Harpoon to cross ponds between flying gnats and water bugs when their patterns look unfavorable.

Step 2: In the tall vertical Shellwood room with bellthrowers, either eliminate the throwers with a safe ranged tool or climb deliberately to avoid getting body-blocked against walls (impact drains freshness).

Step 3: Enter Blasted Steps and start ascending toward the Grand Gate. Use Harpoon liberally for horizontal pulls and to skip awkward ledges. Do not route around the center; jump off above doors to stay in the main upward spine.

Step 4: Watch for the ricochet flier that spawns near the start of the final Steps room. It likes to appear mid-air in your path; removing it on sight is faster than absorbing a hit and getting chased.
Step 5: At the Citadel’s Grand Gate, climb the scale rooms. You can slap the underside of platforms to bias scale direction; with double jump, you can shortcut several swings entirely.

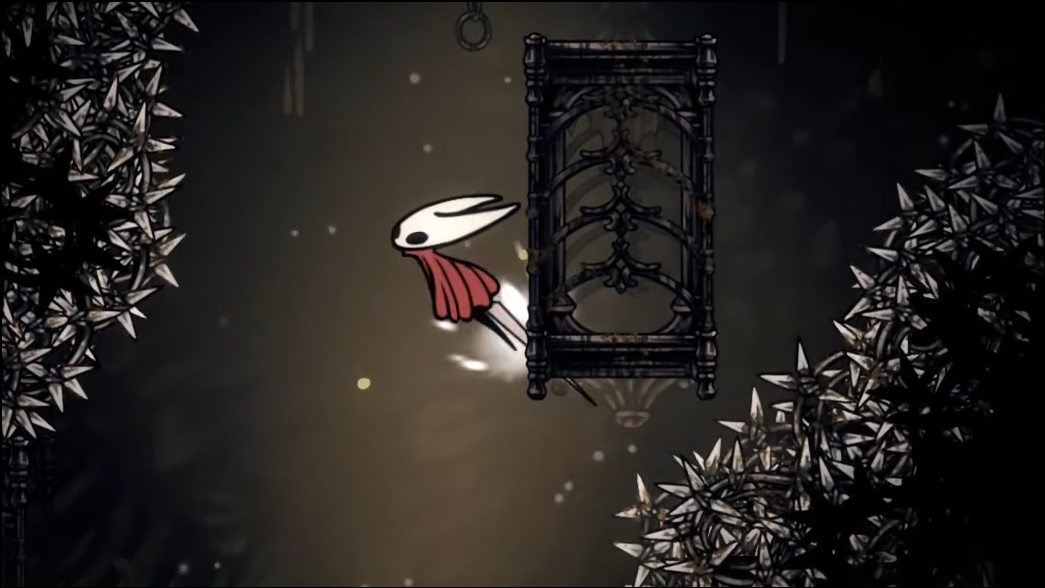
Step 6: Exit into the Spa and sprint through its interior to re-enter the upper Choral Chambers. This corridor is safer and straighter than the adjacent halls.

Step 7: Cross the final Choral Chambers segment and drop into Loyal Mergwin’s dining room. Avoid sliding face-first into the final door frame; the tiny impact can still tick the rasher’s freshness.

Route B (alternate): Greymoor → Sinner’s Road → Exhaust Organ → Grand Bellway → Choral Chambers
This path can feel shorter for some players and avoids parts of Blasted Steps, but it has denser rooms on the right approach to the Citadel. Use it if you’re comfortable with Sinner’s Road and the Organ pipework.
Step 1: From Bellhart, route into Greymoor and pick the line toward Sinner’s Road. Maintain sprint where possible; Harpoon across nuisances rather than weaving through them.
Step 2: Traverse Sinner’s Road, then transition into the Exhaust Organ. The pipe rooms have tight spacing; pre-clear troublesome clusters if you want a stress-free pass.
Step 3: Enter the Grand Bellway from the right side and push toward Choral Chambers. Expect more enemies on this approach versus the Route A climb; avoid stops and stay centered to minimize wall bumps.

Step 4: Finish through the same upper Choral Chambers segment into Loyal Mergwin’s room. Use the Spa door if your version of the route intersects it and it’s unlocked.
Area-specific tactics that save seconds
Ponds in Shellwood. Harpoon between airborne and water bugs to thread moving gaps. If a water bug fails to spawn under the dock with the sleeping flyer, swim under the dock to keep your line clean.
Vertical bellthrower room. Don’t let throwers pin you into a wall. Either pick them off before climbing or wait for safe windows; wall impacts are stealthy freshness loss.
Blasted Steps hazards. Burrowing worms can deal double-mask damage and chain you into more hits. If a mistake happens here, strongly consider resetting to keep late-time buffer.
Scales in the Citadel. With no double jump, slap scale undersides to tip them in your favor; with double jump, skip slow swings and move vertically in a straight line.
Saws and multi-hits. Treat moving saws and rapid-hit traps with respect—two quick procs can wipe the run’s remaining margin. Wait one beat for a safe gap if your line is dirty.
Optional pre-clearing and consistency boosters
Clear choke rooms before starting. Removing a few specific blockers (the ricochet flier in Steps, bellthrowers in the tall Shellwood room, and dense pilgrim clusters near the top) can be faster overall than dodging.
Use tools proactively. A modest ranged tool to delete one or two roadblocks is usually cheaper than eating a hit. If you prefer speed, Flea Brew gives a timed burst that can carry you through Citadel scales.
Mind Anklets fuel. Keep one Silk Heart active for Anklets and Harpoon. If you drain it early, your late climb slows and you lose the “two-hit” cushion.
Why the rasher matters in the meal wish (and when to do it)
The rasher is one of five ingredients for the Citadel meal that awards Pale Oil. The others include Mossberry Stew from a druid in Moss Grotto, Vintage Nectar purchased at Halfway Home in Greymoor after a cellar fight, a Crustnut in the Sands of Karak (Clawline required), and a Pickled Muckmaggot from an optional Sinner’s Road boss that needs double jump to access. Because at least one objective requires double jump, many players postpone the rasher until their kit and map unlocks make the run routine.
Fast failure diagnosis
“It rots even on clean runs.” You are likely tapping walls while sprinting or taking minor fall shocks; both quietly chip freshness. Soften angles and jump into walls at low speed if you must contact them.
“I arrive seconds late.” Keep Anklets fueled, Harpoon across long gaps, and avoid detours in Blasted Steps. Consider pre-clearing the last Citadel rooms and opening Spa hatches.
“I get hit exactly twice and still fail.” Those hits probably weren’t “clean.” Multi-hit hazards (saws, burrower pop-ups) and wall bumps add hidden decay; prioritize no-hit in the first half to protect your late buffer.
With the Spa doors open, Anklets fueled, and a disciplined climb, both routes above deliver with a small safety buffer; pick the terrain you read best and keep the package off the walls.