
Corporations sit at the center of progression in StarRupture. Every major structure, weapon, storage upgrade, and utility tool comes from raising your standing with one of five factions via Orbital Cargo Launchers or Data Points.
The difficulty is that these upgrades are spread across overlapping tech trees, and early mistakes can slow down your entire factory. The good news is that the early tiers are cheap, share resource requirements, and can be pushed in a deliberate order to unlock essentials quickly.
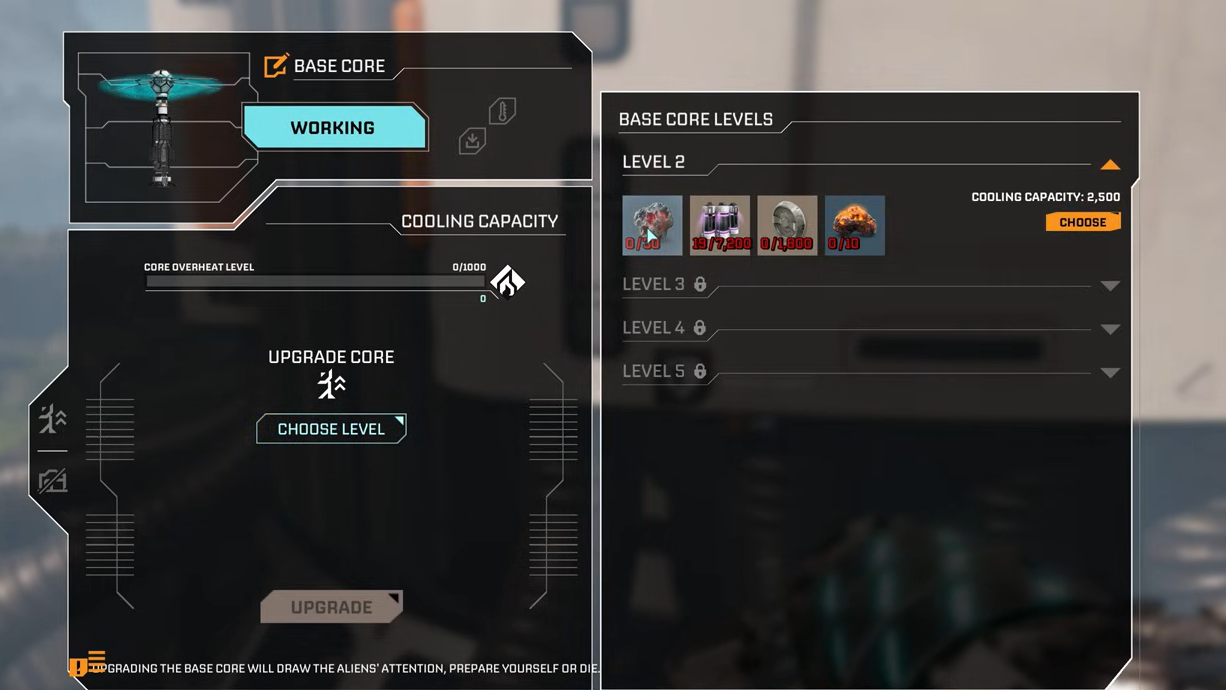
How corporation leveling works
Once you finish the tutorial and set up your first Habitat, the Corporate Terminal inside it splits into five corporations: Future Health Solutions, Selenian Corporation, Griffits Blue Corporation, Moon Energy Corporation, and Clever Robotics. Each has its own level track and reward list.
There are two ways to gain levels:
- Launch resources via Orbital Cargo Launchers (OCLs). Each recipe in the OCL is tagged with a corporation logo. Sending the requested resource or component increases that corporation’s trust and eventually unlocks the next tier reward.
- Spend Data Points at the Corporate Terminal. Data Points come from the Analyzing Station by scanning plants, meteor fragments, alien organs, and scrap. These can be used to buy levels directly, but they are also required to unlock crafting recipes at the Recipe Station.
Launching resources is slower but sustainable. Burning Data Points is fast but should be reserved for early, cheap levels or critical bottlenecks, because later tiers demand thousands of points for both recipes and status ranks.

What each corporation actually gives you
Before choosing a “best” corporation, it helps to understand what each one specializes in during Early Access.
| Corporation | Core role | Key early unlocks |
|---|---|---|
| Future Health Solutions | Player survivability and habitat upgrades | Regeneration Chamber, Medtool, LEM Station, Food Station, inventory upgrade, LEM bonuses |
| Selenian Corporation | Mining and production chain | Base Core, Ore Excavator, Smelter, Fabricator, Furnace, Helium-3 Extractor, Mega Press, Refinery |
| Griffits Blue Corporation | Combat and base defense | Platforms, UPP-7 Pistol, Grenade, Equipment Upgrade Station, Defense Turret, Defense Tower, War Bonds |
| Moon Energy Corporation | Power infrastructure and navigation | Solar Generator v1, Analyzing Station, Recipe Station, Map, Wind Turbines, Base Core Amplifiers, inventory upgrade |
| Clever Robotics | Logistics and storage | Corporate Terminal, OCL, basic rails, Personal Storage, Storage Depot tiers, Building Drone, advanced rails |
Most upgrades are simple to read: build the required machines, produce the listed recipe, launch it under the right corporation logo, and claim the reward in the Corporate Terminal once the level bar fills.
Universal early move: push every corporation to level 2
The cheapest and most efficient first step is to raise all five main corporations to level 2. The requirements at this stage are basic bars and early components you can produce from Titanium and Wolfram alone:
- Future Health Solutions level 2: Regeneration Chamber from a Wolfram Bar recipe.
- Selenian Corporation level 2: Fabricator from a Titanium Bar recipe.
- Griffits Blue Corporation level 2: UPP-7 Pistol from a Titanium Bar recipe (or equivalent early commission in some saves).
- Moon Energy Corporation level 2: Recipe Station from a Wolfram Bar recipe.
- Clever Robotics level 2: Personal Storage from a Wolfram Bar recipe.
These unlocks are inexpensive and immediately useful. After that shared baseline, you should stop spending Data Points on pure level-ups and start prioritizing specific trees with OCL exports.
First priority: unlock the Map with Moon Energy
Early exploration is disorienting without a map, and StarRupture’s Rupture cycles constantly reshuffle the surface. The fastest way to regain your bearings is to unlock the Map from Moon Energy Corporation.
Moon Energy’s early rewards look like this:
- Level 1 (tutorial): Solar Generator v1, Analyzing Station.
- Level 2: Recipe Station.
- Level 3: Map.
The catch is that the Map commission at level 3 asks for Calcium Ore, a resource that usually sits a bit farther from the starting crater. That means two parallel goals:
Step 1: Use Titanium and Wolfram to push Moon Energy to level 2 and build the Recipe Station inside your Habitat. This gives you visibility into which intermediate recipes you must unlock for other corporations.

Step 2: Make a focused expedition east from the starting area toward the crater, sulfur deposits, and then the small lake beyond. That region tends to offer better access to advanced ores, including Calcium, with relatively light enemy pressure.
Step 3: Once you can mine Calcium, pipe or haul it back to an OCL, complete the level 3 Moon Energy commission, and claim the Map. From that point on, your exploration, base relocation, and blueprint hunting become far more controlled.
Second priority: Selenian Corporation for Fabricator and inventory space
The entire mid-game production chain sits on top of Selenian Corporation. The early rewards worth rushing are:
- Level 2: Fabricator (unlocked by sending Titanium Bars).
- Level 3: +8 inventory slots (via Titanium Rod/Bar commissions).
- Level 4: Furnace, which opens higher-tier components.
Step 1: After the tutorial, array Ore Excavators on Titanium and Wolfram near your landing site and feed them into the Smelters. Use one OCL dedicated to Selenian commissions so you can quickly deliver Titanium Bars for level 2.
Step 2: Build the Fabricator and start producing Titanium Rods and Wolfram Wire. These feed both further Selenian levels and other corporations’ early tiers.
Step 3: Keep a small buffer of bars and rods for recipe unlocks at the Recipe Station, then assign the rest to OCL commissions to reach level 3 and gain your first inventory expansion.
The Fabricator is the most important early machine because it unlocks Calcite Sheets, Titanium Rods, Wolfram Wire, and, later, the components required for Helium-3 Extractor, Mega Press, and Refinery. Rushing Selenian to at least level 3 makes every other corporation cheaper to progress.

Third priority: Griffits Blue for basic weapons and defenses
Combat can be postponed briefly while you set up your factory, but not for long. Local fauna will contest resource nodes and later threaten remote bases. Griffits Blue Corporation delivers what you need to survive your first Ruptures away from home.
Early rewards:
- Level 1: Basic Platforms, Advanced Platforms, Platform Modules.
- Level 2: UPP-7 Pistol.
- Level 3: Grenade.
- Level 4: Equipment Upgrade Station.
- Level 6: Defense Turret.
Step 1: Once your Titanium production is steady, run a short Griffits Blue commission for Titanium Bars (or Wolfram/Titanium early recipe) to hit level 2. The pistol unlocks immediately and becomes your standard early weapon.
Step 2: Use the pistol to explore slightly farther from base, gather more diverse plants and scrap for Data Points, and locate blueprint towers for advanced components like Rotors and Stators.
Step 3: When you are ready to expand to more dangerous zones or forward mining outposts, push Griffits Blue toward level 4–6 for the Equipment Upgrade Station, War Bonds, and Defense Turret. These allow better firearms and automated base defense once waves become an issue.
Fourth priority: Clever Robotics for storage and logistics
As soon as you start running multiple excavators and OCLs, raw resources will flood your inventory and rails. Clever Robotics turns that chaos into something manageable through storage and smarter transport.
Early-to-mid rewards include:
- Level 1 (tutorial): Corporate Terminal, Orbital Cargo Launcher, Rail v1, Rail Support, Rail Connector.
- Level 2: Personal Storage.
- Level 3: Storage Depot v1.
- Level 4: Building Drone.
- Level 5: Multirail 3 and Rail Modulator 3.
- Level 11–13: Rail v3, Multistorage, Expandable Storage.
Step 1: Raise Clever Robotics to level 2 for Personal Storage. This gives you a secure, always-on chest in your Habitat to dump overflow while exploring nearby.
Step 2: Aim for level 3 to unlock Storage Depot v1. Storage Depots can act as both buffers and sophisticated junctions, redistributing materials evenly between multiple OCLs or processors when connected by rails.
Step 3: When you are ready to build large, layered factories, push to level 4 for the Building Drone. Being able to fly over your base while placing structures makes layout and expansion significantly easier.

Fifth priority: Future Health Solutions for respawns, healing, and food
Future Health Solutions lags slightly behind the others in early impact, especially if your spawn pod is close to your first base. Once you start venturing far afield or playing co-op, its upgrades become much more important.
Notable early rewards:
- Level 1: Habitat, Basic Habitat Modules, Advanced Habitat Modules (tutorial).
- Level 2: Regeneration Chamber.
- Level 3: Medtool.
- Level 4: LEM Station.
- Level 6: Food Station.
- Level 7: inventory upgrade.
Step 1: After you secure weapons, storage, and the Fabricator, push Future Health to level 2–3. The Regeneration Chamber lets you set a respawn point away from the original lander and also swap characters if you want a different voice or specialty.
Step 2: Use the Medtool as a backup when food and shields fail during prolonged fights. It regenerates slowly, so treat it as an emergency option rather than your primary sustain.
Step 3: In the medium term, work toward level 6 for the Food Station. This is where the plant samples you have been hoarding pay off, letting you cook meals that combine calories, hydration, healing, resistances, and stamina buffs.
Tip: Avoid feeding plants into the Analyzing Station for Data Points once you have a comfortable buffer. You will eventually need large quantities of each type to craft the better food recipes, and those are more valuable long-term than a small number of extra corporation levels.

Suggested early-game upgrade order
Taking all of the above together, a practical sequence after the tutorial looks like this:
- Phase 1 – Foundations (very early)
• Push all five corporations to level 2 using Titanium and Wolfram.
• Build Fabricator, Recipe Station, Personal Storage, Regeneration Chamber, and unlock the pistol. - Phase 2 – Navigation and throughput
• Focus Moon Energy to level 3 for the Map (find and ship Calcium Ore).
• Raise Selenian to level 3 for the inventory upgrade and start planning for the Furnace at level 4. - Phase 3 – Safety and storage
• Push Griffits Blue to level 2–3 for basic weapons and grenades; optionally to level 4 once you want the Equipment Upgrade Station.
• Raise Clever Robotics to level 3 for Storage Depot v1 and level 4 for the Building Drone when factory complexity demands it. - Phase 4 – Comfort and specialization
• Invest further in Future Health Solutions to reach the Food Station at level 6 and later the inventory upgrade at level 7.
• Continue alternating Selenian and Moon Energy upgrades as new extractors, turbines, and amplifiers become relevant to your current bottlenecks.
Beyond these early tiers, strict prioritization becomes less meaningful. Higher-level structures feed into one another; you will often need a Selenian machine to make the part that unlocks a Moon Energy amplifier that, in turn, powers a Clever Robotics rail system. At that stage, your best move is to identify your immediate bottleneck—power, storage, combat, or crafting—and nudge the corresponding corporation until that specific obstacle disappears.
If you route your first few commissions with this sequence in mind, you’ll have a map, a scalable factory backbone, basic weapons, real storage, and a path to food long before Arcadia-7 starts pushing back in earnest.