
OneDrive’s automatic syncing of folders like Documents, Desktop, and Pictures can lead to storage issues, unwanted cloud backups, or even confusion about where your files are stored. Disabling OneDrive sync for a folder on Windows 11 requires understanding how OneDrive manages folder backup and the limitations Microsoft imposes on selective sync, especially for system folders. The steps below explain how to stop OneDrive from syncing a folder, what to do if you want to keep files local, and how to avoid common pitfalls that can result in lost files or inaccessible folders.
Stop OneDrive Sync for Desktop, Documents, or Pictures Folders
OneDrive’s “Manage Backup” feature controls syncing for system folders. If you want to prevent OneDrive from syncing your Desktop, Documents, or Pictures folders, you must disable backup for the entire folder, not just a subfolder.
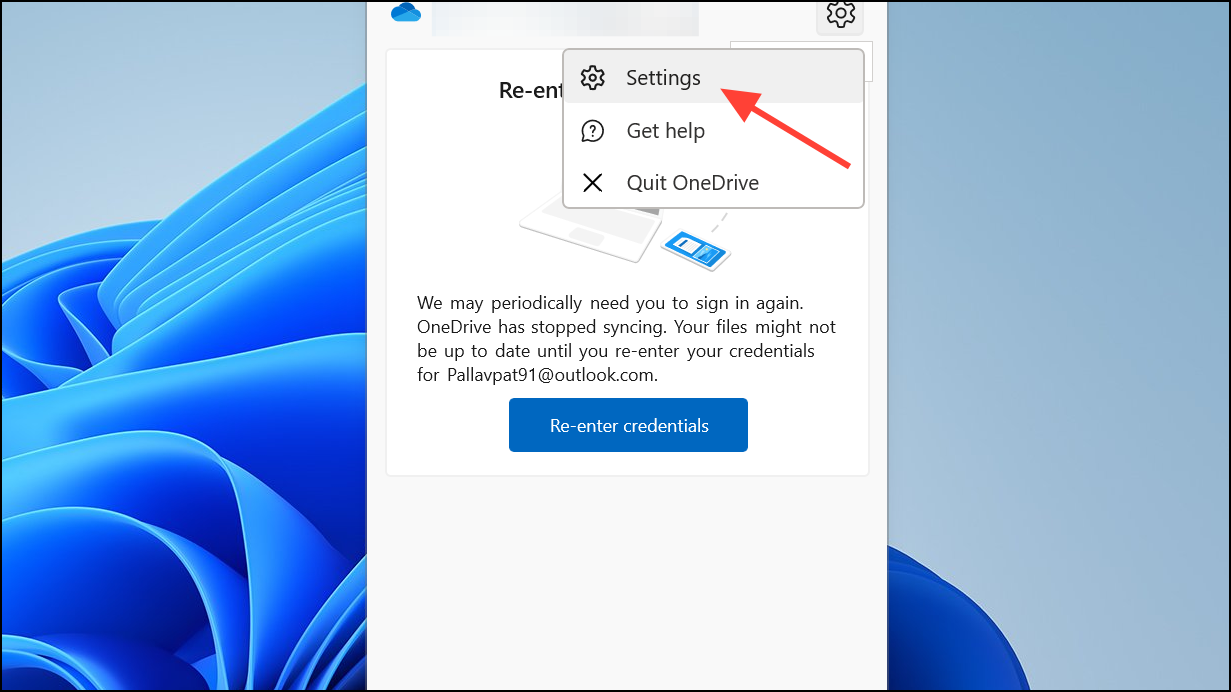
Step 1: Click the OneDrive cloud icon in your system tray (bottom right corner of the taskbar) to open the OneDrive menu. If you don’t see it, click the up-arrow to show hidden icons.

Step 2: Select the gear icon for Help & Settings, then choose Settings from the menu that appears.
Step 3: Go to the Sync and backup tab, then click Manage backup.
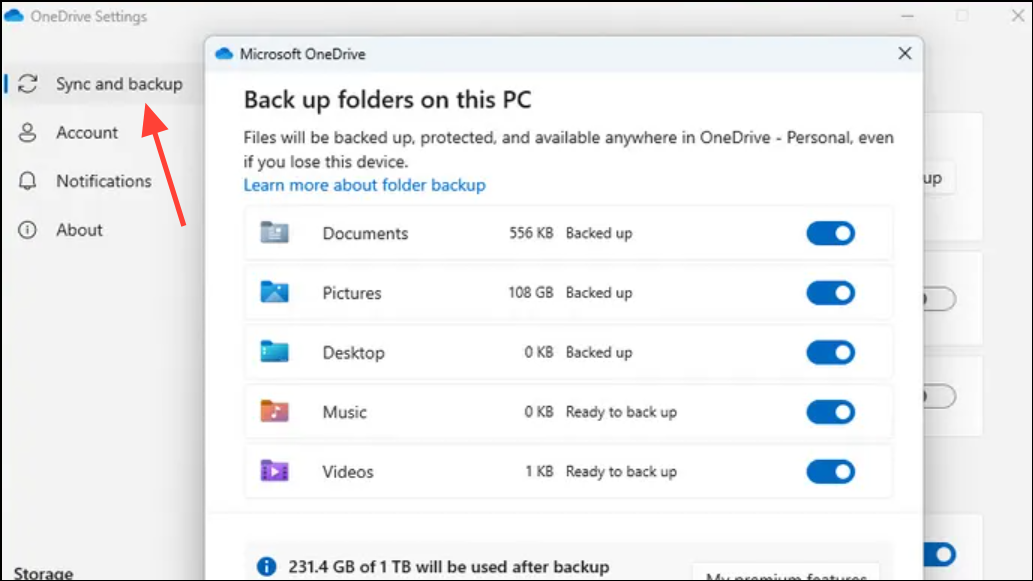
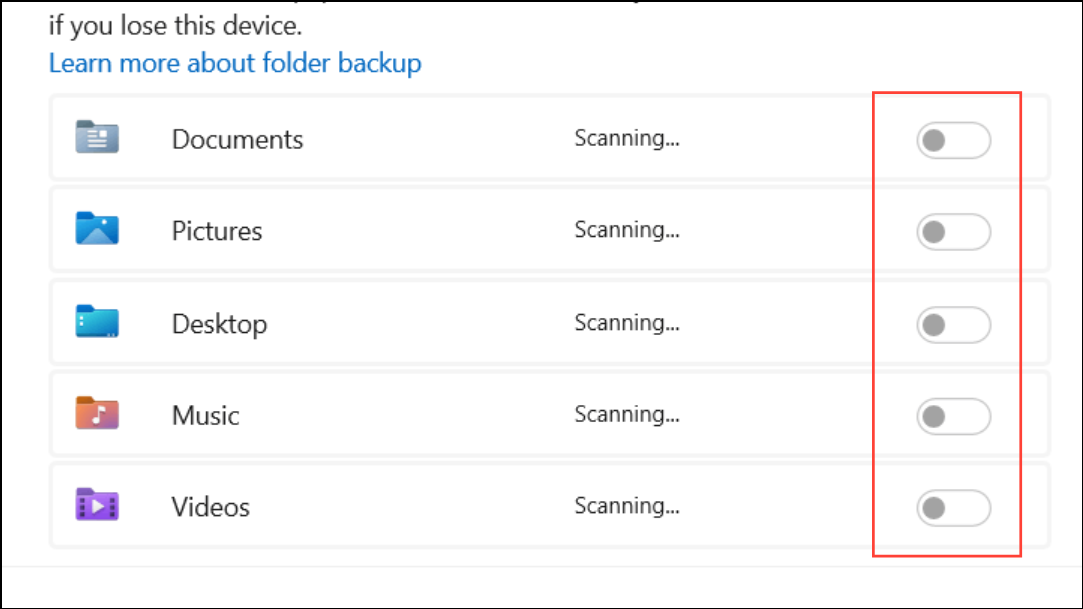
Step 4: Find the folder you want to stop syncing, such as Desktop, Documents, or Pictures. Toggle the switch to Off for that folder. OneDrive will prompt you to confirm; doing so will stop backup for the entire folder and move its contents back to your local user profile (e.g., C:\Users\YourName\Documents).
Step 5: Restart your computer to ensure the folder reverts to its local path and is no longer tied to OneDrive. Double-check that your files are present locally. If anything is missing, sign in to OneDrive.com to download files from the cloud before deleting or moving them.
Choose Which OneDrive Folders Sync to Your Computer
For folders stored in your OneDrive directory (not system folders like Desktop or Documents), you can control which ones sync to your PC. This method is useful if you want to keep some folders cloud-only while accessing others locally.
Step 1: Open the OneDrive menu from the system tray and click the Help & Settings gear, then select Settings.
Step 2: Go to the Account tab and click Choose folders.
Step 3: In the dialog that appears, uncheck any folders you do not want to sync to your device. This removes them from your PC, but they remain available on OneDrive.com. Click OK to confirm your choices.
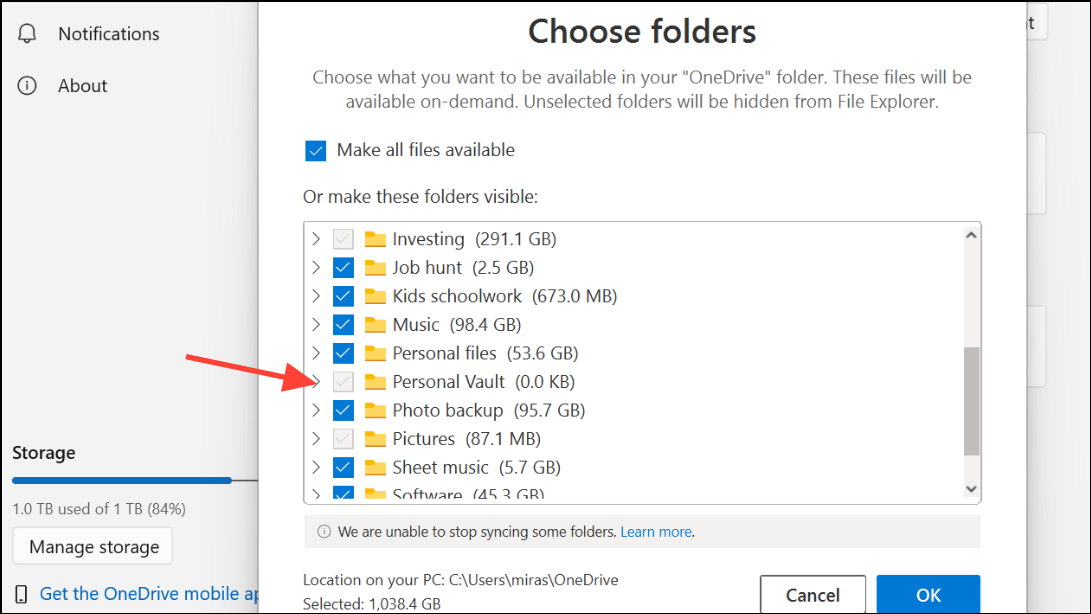
This approach is only for folders inside your OneDrive directory, not for system folders like Desktop, Documents, or Pictures redirected to OneDrive.
Pause or Quit OneDrive Sync Temporarily
If you want to stop syncing for a short period (for example, while making changes or troubleshooting), you can pause OneDrive sync without changing folder settings.
Step 1: Right-click the OneDrive cloud icon in the system tray and select Pause syncing.
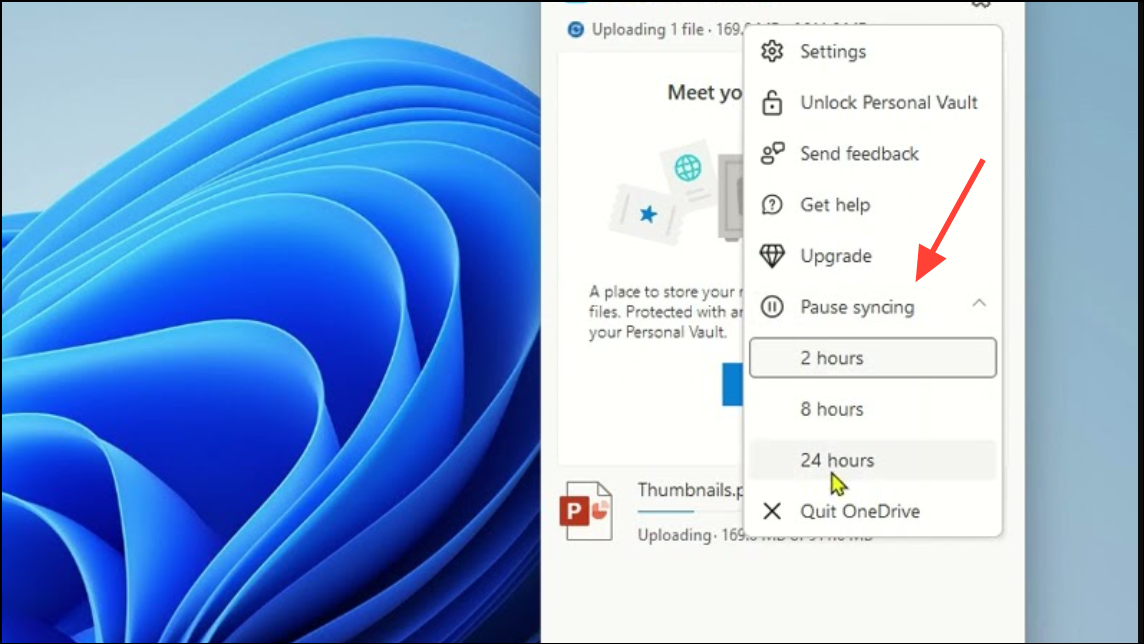
Step 2: Choose a pause duration—2, 8, or 24 hours. During this time, no files will sync between your PC and the cloud.
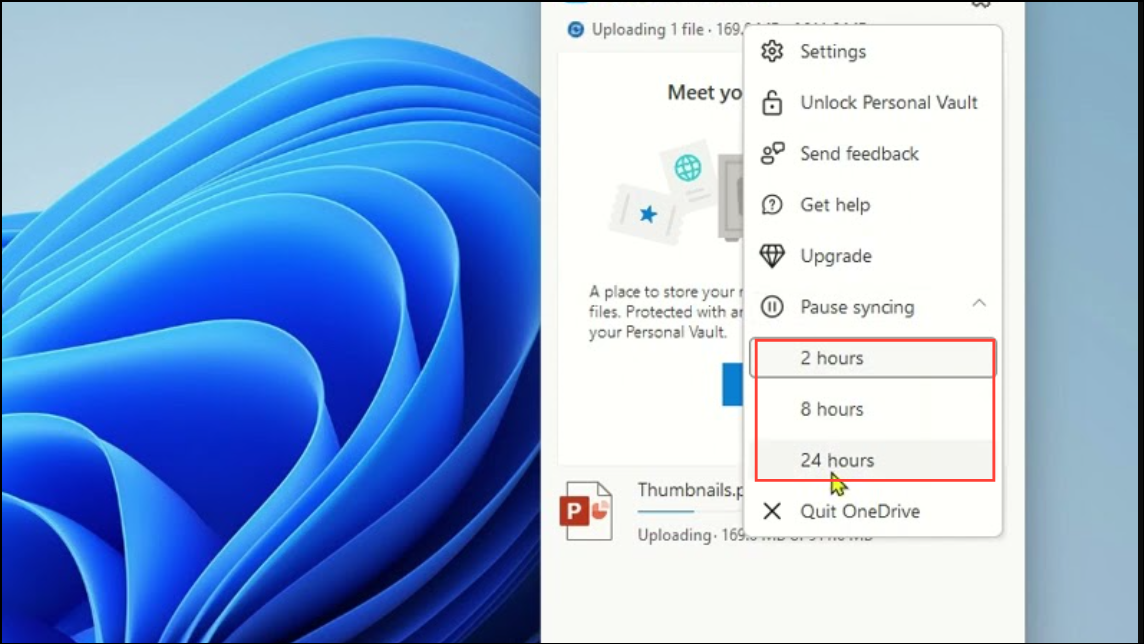
Step 3: To resume syncing, right-click the icon again and select Resume syncing, or wait for the pause period to expire.
Pausing is useful for short-term troubleshooting or to avoid bandwidth usage, but it does not permanently stop folder sync.
Unlink or Uninstall OneDrive
For those who want to completely disconnect OneDrive from their PC, unlinking or uninstalling the app will stop all syncing. This is a drastic step and should be done only if you no longer want to use OneDrive on your device.
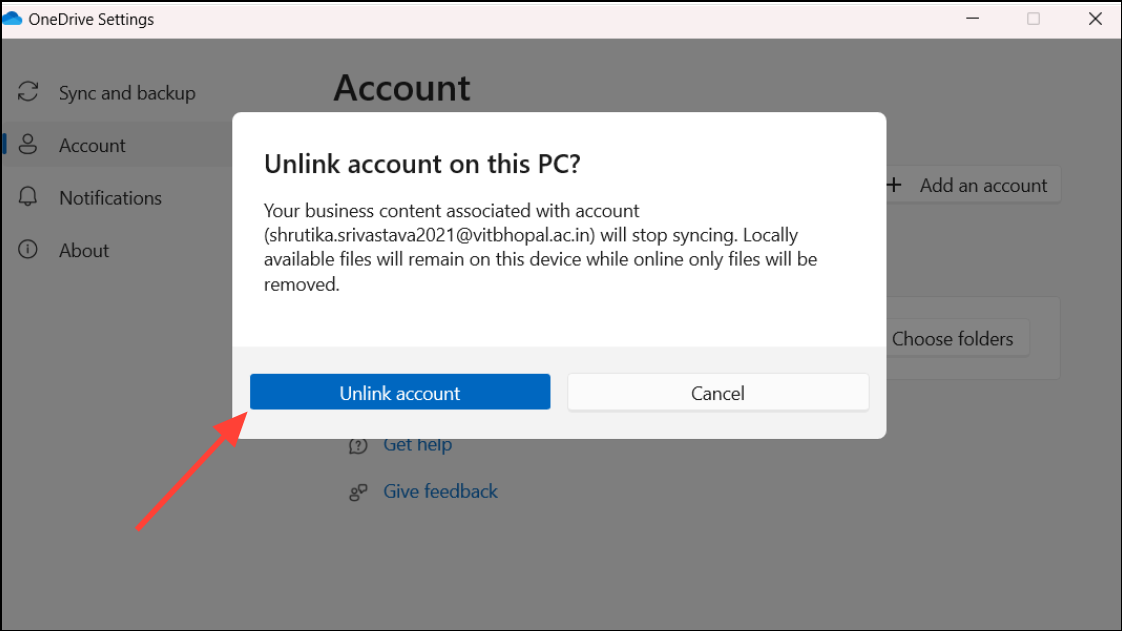
Step 1: Click the OneDrive cloud icon, open Help & Settings, and select Settings.
Step 2: Go to the Account tab and click Unlink this PC. Confirm when prompted. This disconnects your account and stops all syncing, but leaves files already downloaded on your device.
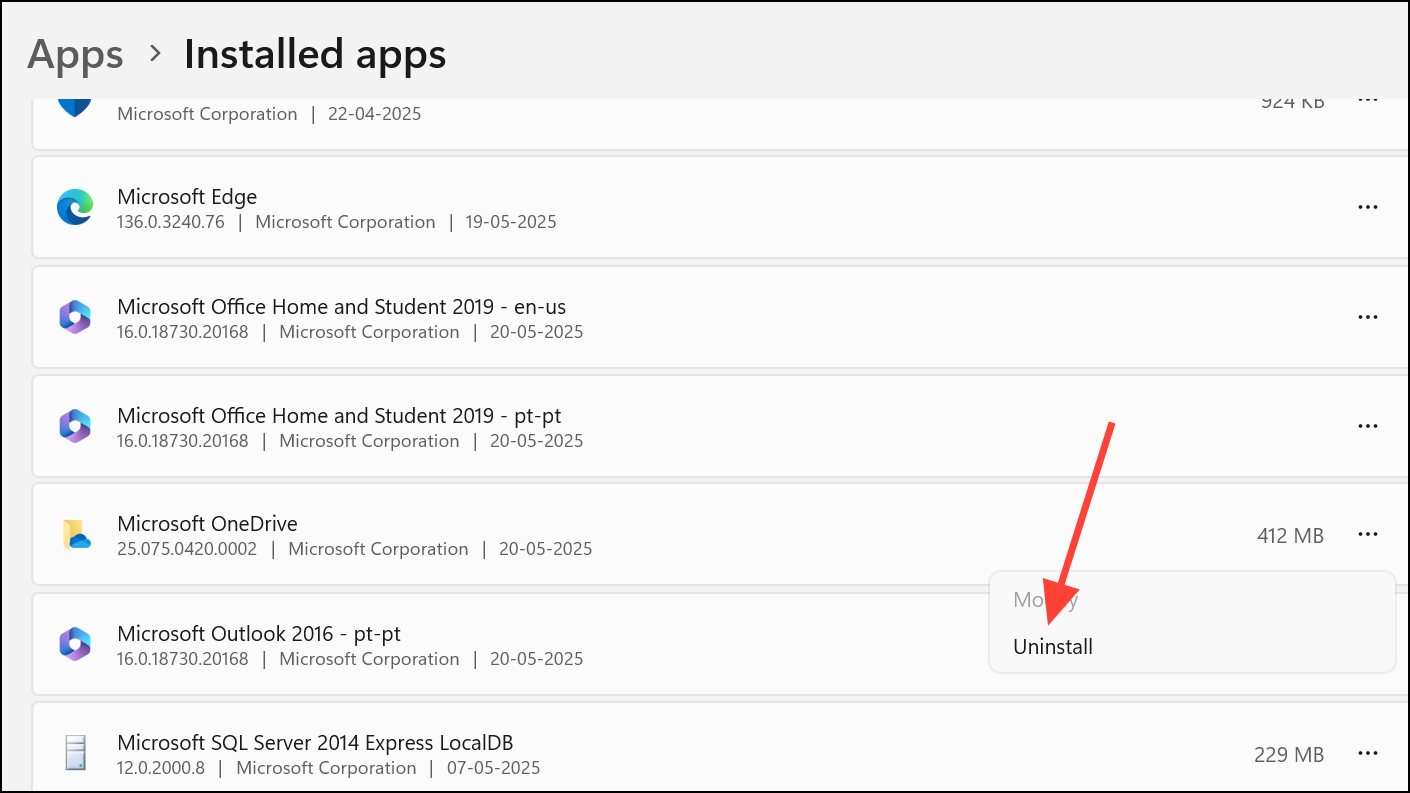
Step 3: To fully remove OneDrive, open Settings (Windows key + I), go to Apps > Installed apps, find Microsoft OneDrive, and select Uninstall. You can still access your files at onedrive.com.
Restoring Default Folder Locations After Disabling OneDrive Sync
OneDrive sometimes changes the default locations of system folders (e.g., Desktop, Documents) to reside under the OneDrive directory. After stopping sync, you may need to restore these folders to their original paths.
Step 1: Open File Explorer and right-click the folder (e.g., Documents) that is still under OneDrive.
Step 2: Select Properties, then go to the Location tab.
Step 3: Click Restore Default, then Apply. Windows will prompt you to move files from the OneDrive folder to the default local path. Confirm to complete the process.
This ensures new files are saved locally and not redirected to the OneDrive folder.
Important Tips and Cautions
- Always verify that important files are fully downloaded to your PC before disabling sync or uninstalling OneDrive. Use the Download all files button in OneDrive’s Advanced settings if needed.
- Stopping sync for a system folder disables cloud backup for the entire folder. Microsoft does not allow excluding only a subfolder within these protected folders.
- If you delete files from your OneDrive folder, they are also deleted from the cloud. Move files outside the OneDrive directory if you want to keep them local only.
- After unlinking or uninstalling OneDrive, check that your Desktop, Documents, and Pictures folders are no longer inside the OneDrive directory to avoid confusion or missing files.
Disabling OneDrive sync for specific folders on Windows 11 streamlines file management and prevents unwanted cloud backups. Take care to confirm your files are safe locally before making changes, and use OneDrive’s built-in settings for the most reliable results.